


splinters
-
Content Count
156 -
Joined
-
Last visited
Everything posted by splinters
-
My new bag
splinters replied to bikermutt07's topic in Purses, Wallets, Belts and Miscellaneous Pocket Items
Looks great bikermutt07. Thanks for sharing with us and giving us details. -
Top coat question: Fiebing's Leather Balm
splinters replied to splinters's topic in How Do I Do That?
Thanks cowhide for responding to my request. Much appreciated. -
Top coat question: Fiebing's Leather Balm
splinters replied to splinters's topic in How Do I Do That?
Would you explain the black and ginger part of your comment? I would like to know what that entails as I’m not familiar with it. Thanks. -
Top coat question: Fiebing's Leather Balm
splinters replied to splinters's topic in How Do I Do That?
Thanks very much gents. That was what I hoping and looking for. -
After doing some stitching and edge practice on natural veg-tan I decided to top coat it with Fiebing's Leather Balm. Found that I liked the way it applied, looks and feels but was wondering how it would work on carved and stamped work if not allowed to pool in low spots. If anyone has experience with that would you please let me know how it went? Thanks
-
Wild deerskin passport wallet
splinters replied to stormcrow's topic in Purses, Wallets, Belts and Miscellaneous Pocket Items
Thanks much for your reply. -
Wild deerskin passport wallet
splinters replied to stormcrow's topic in Purses, Wallets, Belts and Miscellaneous Pocket Items
Really like your design and the craftsmanship. Well done! Also, thanks for the details on the SPI, pricking irons and stitching material. Thanks for asking the questions MarkCdub. Was thinking the same. BTW stormcrow, was your deer skin supplier in the UK? Thanks -
Thanks very much for the info.
-
After some reading at the Wickett & Craig website I came away with the impression that all of the leather they produce is through vegetable tanning. I'll try a test piece of their English Bridle with the Fiebing Edge Kote and see what I think. Thanks for viewing.
-
Best Glue For Leather To Leather, And Leather To Fabric
splinters replied to CCPhotog's topic in How Do I Do That?
That's one I had not considered. -
Best Glue For Leather To Leather, And Leather To Fabric
splinters replied to CCPhotog's topic in How Do I Do That?
I was going to post a question about Elmer's white glue today and then saw your comment. Thanks Dwight. I've been thinking about using it to temporarily hold a gusset until I can align and stitch it. -
Wondering if any one knows whether Fiebing's Edge Kote is compatible with Wickett & Craig English Bridle leather. If not what would you all suggest? Thanks for any replys.
-
Great tip from a reliable source!
-
Alex, very, very nice work. Thanks for sharing with us and also sharing your wet form and explanation. Want to go there some day so always interested in wet form approaches. All the best.
-
Been looking for a small square to use in cutting my leather. Can't find mine so went to Taylor Tools this morning and found a small machinist flat square that fills the ticket. Am now a Taylor customer...… LOL Thanks again for pointing them out.
-
Bikermutt07, Thanks for sharing your list with us. Looks like quality items.
-
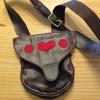
Outstanding. I have been working my way through the Vimeo channel tutorials as I progress with my Pouch Packet project and in some cases multiple times. Great to be able to pull them up on my iPad, which I take to my work area at the time so I can refresh as needed. I meant pricking irons. Finger check..... LOL I rented a few of the Vimeo tutorials at the start but two days later realize that they are all important and very worth while and being a subscriber is the way to go. A small expense for a great resource. Just in case anyone would like to know which pricking irons I decided on it's the Sinabroks. I purchased the 2 tooth and the 10 tooth both in 3.85 spacing. It was a tough choice as there are some good ones to chose from. The photo that follows is the first project I'm working on out of Nigel's Pouch Packet. I chose the 2oz tin pattern as a start as I think it may make a good iPhone carrier.
-
I hear you. I've been filling in with tools I know I will and am using. I have been practicing cold creasing with a C.S. Osborne & Co. maple wood creaser like Nigel uses in the cold crease demo I purchase after watching Nigel's Vimeo tutorial and even found I've had a tool for a very long time that I didn't know what it was used for and now realize it s a creaser that can be used for hot creasing. Been practicing with both as Nigel demonstrates. Just a small example of my progress. I was beginning to get wrapped around the axle trying to decide what make of picking irons I wanted. His U Tube reviews sorted that out for me. Love learning to use them and practicing with an awl as I relearn to saddle stitch. I use to use overstitch wheels which I may find a use for again. Anyway, I could go on and on about what I've learned from Nigel and looking forward to learning more. Having a ball! What an advantage digital tech knowledge has made for us in this discipline even when you're in the outback.
-
I've recently become a subscriber to Nigel's vimeo channel after ordering and starting on his Pouches Packet which I would highly recommend. His tutorials are a bargain and filled with his knowledge and craftsmanship. I am enjoying being back at leather work and finally feeling some real progress. We are privileged, IMO, to have this gent sharing a lifetime of learning and skill with us. Thank you very much Nigel Armitage.
-
Here is one application of Fiebing's Edge Kote Brown. Don't know how well you can see the edge in the photo but looks like I should have added multiple coats to smooth the edge more. Maybe one of the other mentioned products would fill in the roughness better. Anyway, thanks again for all the input.
-
I'll have to try my hand at feathering.
-
Thanks for all the good input. Love this forum. The following is what I have been using on veg tan edges and works very good for me. I am please with the control I have without creating slop over on the burnished edge or stitching. Not expensive and easy to find components with a close-pin, a remanent of felt and your in business. The width of the applicator will pass into the top of the bottle for a touch of solution. Not necessary to load the felt for application. A little seems to go a good distance. I haven't noticed an issue with fuzz , at least not yet. So, I'll give this a try on the chrome tan. Don't remember where I picked this up but from where ever "many thanks".
-
Alright gents. Thanks for your input. I’m thinking since I have some Edge Kote I’ll give that a shot and call it good.
-
Are the processes for chrome tan edges the same as used with veggie tan edges, such as edge beveling, preps and finishes? My first time to work with chrome tan. Thanks.
-
Thanks very much Jeff. A good piece of advice and experience.