

.jpg.19f28a93049d755a57be48cdfdd6dd35.jpg)
DoubleKCustomLeathercraft
-
Posts
194 -
Joined
-
Last visited
Content Type
Profiles
Forums
Events
Blogs
Gallery
Store
Everything posted by DoubleKCustomLeathercraft
-
.thumb.jpg.327685d8c1787fa894323fed9a6b2dac.jpg)
Happy Valentines day from me to me
DoubleKCustomLeathercraft replied to Thadrick's topic in Show Off!!
That's beautifully done! -
What Pattern software do you use?
DoubleKCustomLeathercraft replied to Chris777's topic in Patterns and Templates
This. And the back of a frozen pizza box 🍻 -
I love refurbishing and using antique tools. I don't have but a handful of for leathercraft. A few punches that I never use, and a wing divider that's always in my hand. It's smaller, but comfortable to use. The patina is prefect too. I have a cherry wood chest full of wood working planes from ca. 1850's, 32 planes, afew saws, some wooden measuring sticks, and a handle of other tools for timber framing, cabinetry, and finish work. All these, and the leather tools were from my great great great grandpa and his partner. Yes that's 3 greats in there lol.
-
leather cream or leather conditioner
DoubleKCustomLeathercraft replied to stampingdelight's topic in Leatherwork Conversation
I used to use nothing but neetsfoot oil, but have recently stumbled across something that is highly underrated. Montana leather company in Billings MT came out with their own blend of oil. It's called "montana pitch blend" leather conditioner. It will darken the leather, but so does neetsfoot oil. What i like about it is it seems to take very little oil to get great results. After applying, you let it set for a few them wipe off the excess. Give it a good big with a horse hair brush. It'll have a nice satin sheen at this time, but it's the feel of the leather afterwards that gets me. It'll have a nice velvety feel to it without any compromise of the leather's integrity. I highly recommend this blend for any veg tan project you may be working on. -
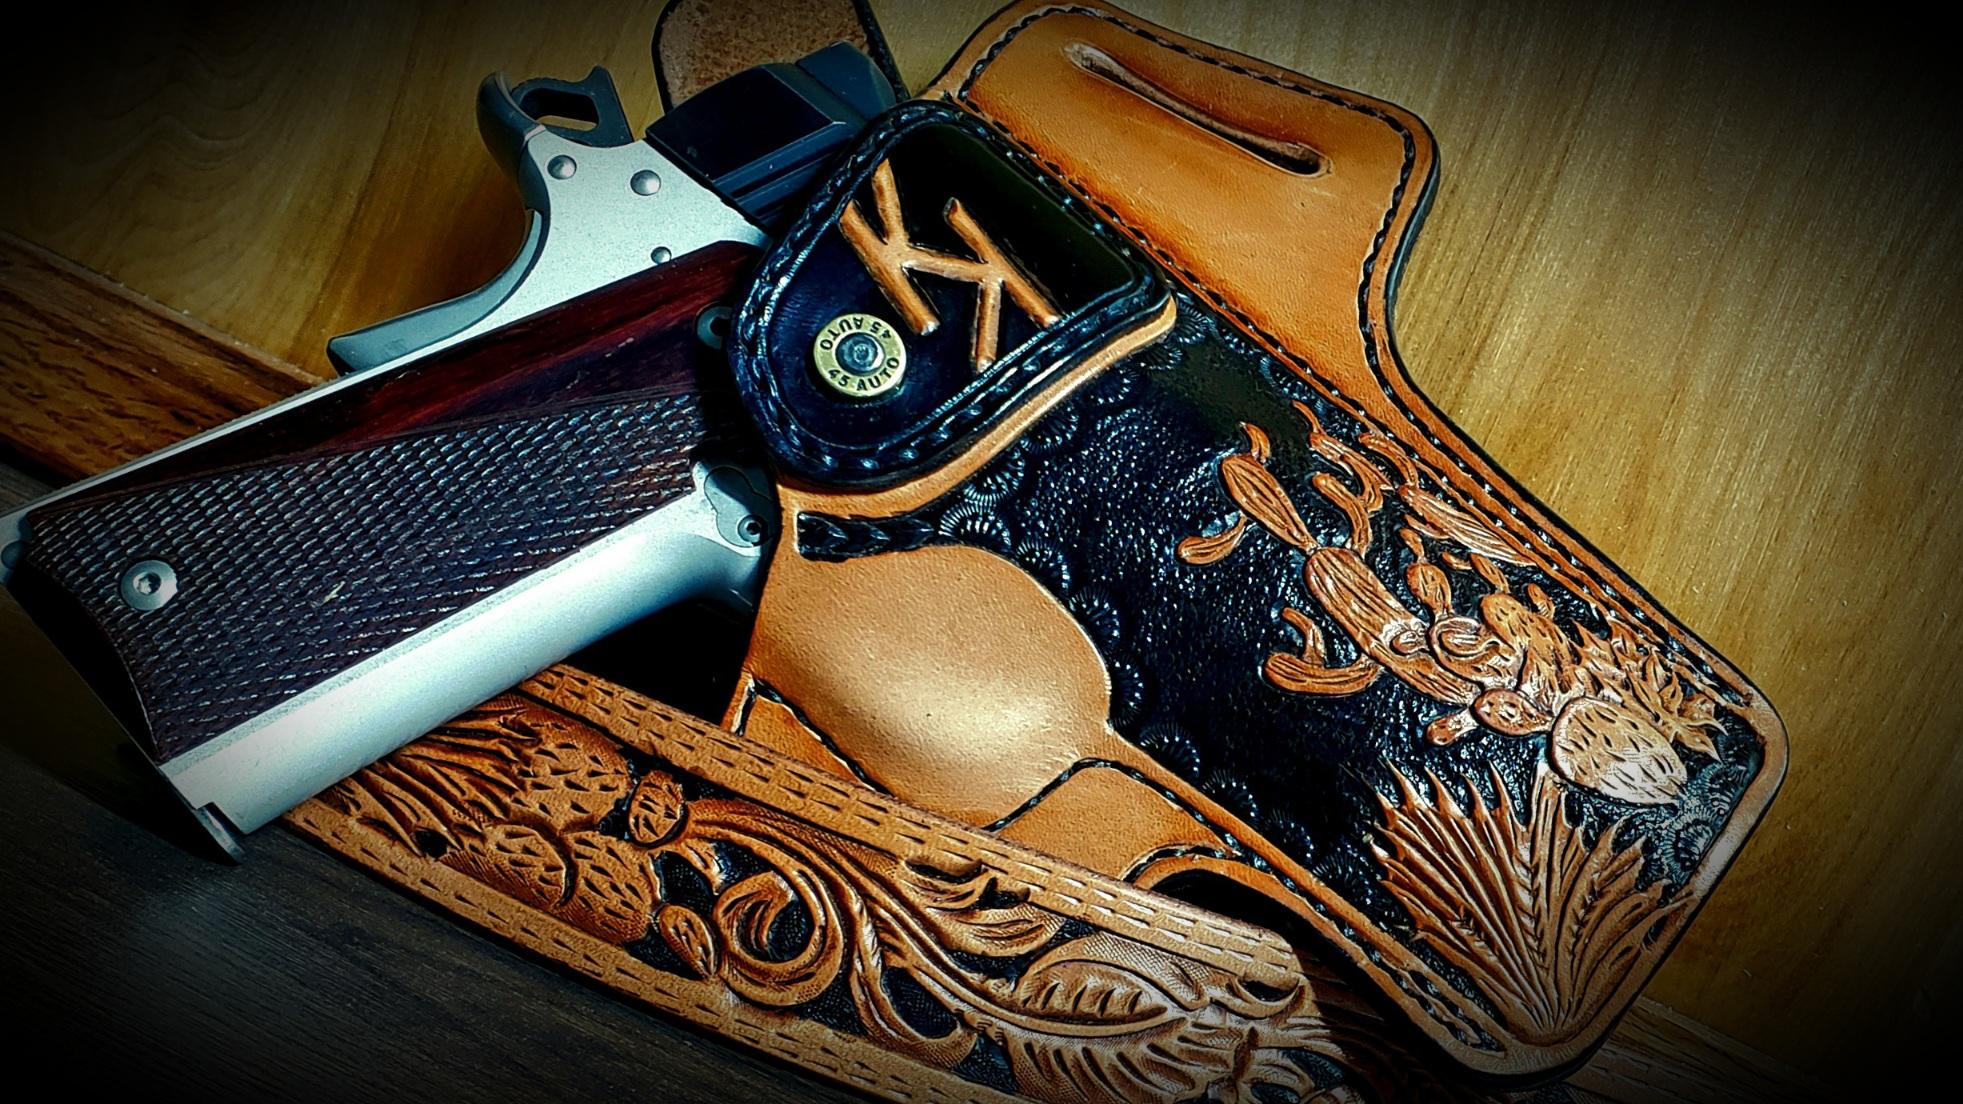
3 hour challenge
DoubleKCustomLeathercraft replied to DoubleKCustomLeathercraft's topic in Show Off!!
@wizard of tragacanth I didn't finish this in the 3 hours slot though. I had the perimeter stitched and I was about halfway through the gunslinger stitch at the 3 hour mark. I finished it the next morning. So if this was knife making and I was competing on forged in fire, I would've failed lol -
3 hour challenge
DoubleKCustomLeathercraft replied to DoubleKCustomLeathercraft's topic in Show Off!!
@YinTx That's pretty much what I use. 9/10 belt with a 4/5 liner. It will be heavy but anyone that's working or carrying will appreciate the extra heft. All belts will sag eventually. It's the natural curves of our body. Some markets make the belts with a curved strap to start with. I haven't done this, but it's supposed to make the belt fit more comfortably right away, and eliminate any stretch. I'm not convinced though -
3 hour challenge
DoubleKCustomLeathercraft replied to DoubleKCustomLeathercraft's topic in Show Off!!
Thank you. It's nowhere near perfect, as I can see all the mistakes I make. I wear or daily though, and it's a good belt none the less. This is one of my handful of short time challenges I put myself through. I only do it as a practice and to learn what I need improvement on. I don't have a sewing machine, so all my work is done with the saddle stitch. It only gets faster with practice, but stitching is still the slowest part of every project. I do what I can with no power to speak of. My shop is a cargo trailer I converted and off grid with solar. It keeps the lights bright and I can run a heater or fan. But the heater draw a lot of amperage so it's a hot or miss depending how sunny it is. And winters in Montana aren't always sunny lol -
3 hour challenge
DoubleKCustomLeathercraft replied to DoubleKCustomLeathercraft's topic in Show Off!!
I only reinforce from the buckle end, just before the bend (it's hard to bend the leather with the stiffener so i don't recommend going end to end) to just before the holes. I strip a piece of the bag stiffener about 1/4" smaller than the belt width, giving me 1/8" gap on both sides so the two layers of leather can adhere. I use barge contact cement. Glue the stiffener onto the main body, let it set a bit, then glue the liner over top. It'll take that contract cement well and become one with the leather. I don't go the full length because I find that having it around any holes makes it more difficult to put on or take off. When done, you'll be able to hold the belt out straight without any sag. Take a month or so of wearing before it really breaks in and becomes comfortable. While it doesn't completely prevent the belt from sagging with age it does keep it firm. Has that feel of durability for years to come. Hope I explained it well enough. I don't have any pictures of this prices or I'd post them so you could see the process also. -
Now that's interesting. You're doing great things
-
3 hour challenge
DoubleKCustomLeathercraft replied to DoubleKCustomLeathercraft's topic in Show Off!!
I use bag stiffener to reinforce my gun belts. You can get it from just about any leather supply company. It works well. Some makers use poster boards, which is fine but not nearly as durable overall. -
Paddle holster question
DoubleKCustomLeathercraft replied to DoubleKCustomLeathercraft's topic in Leatherwork Conversation
Believe it or not, he's a retired holstersmith that's tapped my shoulder a couple times. He worked for Bianchi as a designer/maker with s couple patents and is extremely well versed on holsters and designs. So when he decides what he wants, there's no changing his mind lol. I've never liked paddle holsters myself, I prefer pancake style. Everyone has their own taste and style, and with a paddle he doesn't need a belt. I'm pretty sure that's the main reason he wants one made. I'll be meeting up with him in about a week or so and we'll work together to come up with the prefect plan. He's got a used holster on order from out of state that's a paddle for a J frame smith that he wants to show me. He's been trying to convince me to go into a production style shop for awhile, and I keep telling him I want to continue my custom work rather than production. I enjoy working with people and coming up with something that is personal to them. Plus, I'm only one guy with a little 100sqft space to work in. -
Paddle holster question
DoubleKCustomLeathercraft replied to DoubleKCustomLeathercraft's topic in Leatherwork Conversation
Holstersmith is a go too for blue guns. I did look at the paddles there, but I'm thinking if using 24ga galv steel in between leather. The client is looking for a leather paddle, and using the plastic paddles would make it way too thick. There are a couple posts I found in the archives here that explain how to do so, and it sounded like a good place to start. They're old posts. Appreciate the response. I'm still interested if there are any other ideas out there, but the metal reinforcement for the holster and paddle make sense -
As someone who makes mistakes line this more than I'd admit. All I can say is bummer...I wouldn't know how to approach this without making it look like a scar from Frankenstein's monster.
-
Thank you Meelis.
-
I got a call today for a paddle holster. I'm familiar with these, the paddle rides inside the pants instead of using a loop or clip. Is there anyone here that has any experience making a leather paddle? Do I just stitch leather onto a kydex or plastic paddle? Or do I use just leather, maybe skirting, and hardening it? I'll do some research on my own, but this is my first stop. I'd rather hear from someone that's done it than just looking at pictures and trying to guess Thanks
-
Don't go expensive. Tandy craftool offers diamond chisels for dirt cheap. They are an excellent starting point. Or weaver's diamond chisels, they're not much more than tandy and gold up well. Buy cheap tools to learn. As you develop, replace said tools with higher quality. This will save you tons overall because you will find that you don't need everything you think you do. I have a bunch of expensive tools hanging up that I have never used. A great example: When I decided to start my own business, I just bought complete sets of everything. I've got punches from 0.5mm to 12mm, and another set from 1/8" to 3/4". Why? I dunno why. I saw a metric set and a standard set and bought both. I never use the standards, except the 3/4" and I only use the 2mm-6mm from the other set. I have 2mm to 5mm spaced stitching chisels in 2,4, and 6 prong. I use the 2 and 6 prong on the 2mm. I don't think I've ever sunk the 4 prong in anything yet because I rarely use 2mm. I've never used any of the 5mm and have only used the 4mm set once. The 3mm set has been the go to for 99% of everything I make. I hand stitch only, don't have nor want a machine as the sale stitch is the superior stitch. Again, a lot of wasted money there that could've bought me more stamps for tooling. That's where money really starts to add up fast! Of you take the advice of the old timers with the most experience they're always going to say use an awl. I use my awl very regularly because I'm working with leather up to 1/2". Chisels are good for a couple layers of holster leather. They're not long enough for a lot of my work, and they don't make them longer because they would either break or bend. I find the awl difficult as hell to use. If I was working with chrome or oil tan that might be different, but I'm working with 9/10 oz veg with 4/5 linings and sometimes up to 5 layers of 9/10 oz. Good luck with your journey. It can start off being very affordable, and end up breaking the bank lol
-
Digit First I gotta say, I primarily work with nothing but natural veg tan with an occasional order for bison. Sometimes exotic leathers like snapping turtle and ostrich which are irrelevant to my inquiry. That completely makes sense. I know some suppliers that I deal with definitely cut some of the hides themselves and piece it out as you mentioned. I just started working with ALD (american leather direct) which is the main source for Chahin leather here in the states, and they definitely do just that offering several sizes and shapes. I appreciate the response. It was something I didn't really consider. I still have a lot to learn lol
-
Are you dying veg tan or buying drum dyed leather? That green really catches my eye
-
Great job with the lacing!
-
Old school Weaver creaser (like a Randall)
DoubleKCustomLeathercraft replied to ChaChi's topic in Leatherwork Conversation
My god, now I know for a fact I'm getting old when 2008 is considered old school. 😂 Weaver doesn't know anything about the machine that weaver sold? That's not a good look for a company that big. That's sad actuality -
Well, I just finished reading the second page...Oops. looks like you've got the right decision already made. It'll look good Chuck.
-
I've seen leather sold in strips for these exact style of edge or tubing. If I can only recall where though. If you want to do it that way, use a 1-2oz veg tan cut to the right width to fold around. Burnish and stitch like normal at that point. Makes it simple and will add a little extra firmness to the edge. I think it would make the bag look more complete. You'll be able to manipulate the corners with veg tan a little easier by wetting it, but you may still be folding wrinkles as you glue. There's some good videos on the tube with techniques. A good binge folder is necessary to do the corners neatly.Use Feibings white glue, double stick doesn't always stick to chrome or oil tans. Skive and roll looks good when done right. But I prefer the method I mentioned above. It'll look good, and I'm my opinion is easier Or....... you could just use edge paint but that's kinda cheating imo 🤣 By the way, I typed a long answer for the skive and roll method, then saw your question. So I deleted five minutes of taking my phone's keyboard just to do it all over again with a different answer lol
-
Ya, I figured as much. As I mentioned, I googled the question only to get an answer from AI with the IQ of a 3rd grade student. I gess the extra cost is the cutting and consistency of the back vs the side. It's really a minimal difference in cost, but it got me thinking why? I always knew the bend was the premium cut. This is just the first time I've seen a bend and side of the same specs listed together as choices. I'm have only used Hermann oak strap or holster sides since starting my business. I have used other tanneries before but it's hard to beat how easy and smooth a swivel knife cuts and tooling HO is like butter. It's a dream to work with. I'm trying to find more affordable sources of high quality leather, especially since the last 4 or 5 sides I got from weaver were not the quality that HO is known for, and it's been very inconsistent since covid got is peak. I dunno if it's just Weaver because I also order HO from Montana leather when I need to get some bison or some of they're pitch blend oil (better than neatsfoot by ten fold) and had the same inconsistent results. I can't get enough capital at one time to order straight from HO because of their minimums. I'm a small time single person shop that's working on one or two orders at a time. Sometimes i dedicate my whole shop on one order that might take me two to the weeks to get finished. 100sq ft of madness when I'm pumping out 5 holsters a week during my busiest times. 50% or more of my work is one off custom. Maybe not the holsters but the artwork. The one off artwork patterns I come up with are either saved as a memory for me or handed over to the client if they want it. I'm trying out a double shoulder of chahin that ALD had on special for $90 in grade 1. If it's a good as the weaver select (which is also chahin) I think it'll work out. They hooked me up aug a decent size and clean looking piece. Just over 21ft and I only saw one small area of concern when i checked it in.
-
Not a huge concern if the out ends up bad because of the other shops inability. I've seen some of their work and I believe they're very capable. And if it does end up a horrible build, at least I came through from my end of it
-
Thanks again everyone for the awake words of encouragement. I've seen a handful of regular belts made by the other shop and they look to be in the same level. Fingers crossed i do get pictures of the final outcome to share.