


friquant
-
Posts
516 -
Joined
-
Last visited
Content Type
Profiles
Forums
Events
Blogs
Gallery
Store
Everything posted by friquant
-
How does one do the drop test with a vertical hook shaft? I tried it but the bobbin fell out of the bobbin case cap.
-
This happened to me a couple days ago on my Jianglong 341. The TEX 270 thread would be inside the tension disks at the beginning of the seam, but by the end of the seam the tension disks would be flat together with the thread only skirting their perimeter. That's when I decided to add some tension to the smaller/auxiliary tension disks right next to them, which I had never found a use for previously. But it seemed to keep the thread properly seated in the main tension disks.
-
I used to get longer (or shorter) stitches when turning tight circles on my pfaff 535. I was driving it like a racecar, meaning taking the corner at a constant, appropriate speed and rotating the fabric (cardboard, actually) at a smooth, constant rate. The center of pressure of the feed dog was not concentric with the needle, but rather more aft and off to one side. So when the needle was in the air, the fabric (cardboard, actually) would rotate around that offset center of pressure. It would make one length of stitches going straight. But longer stitches turning left, and shorter stitches turning right.
-
Is markdown or html or some other markup supported in these textarea boxes? I typically store my notes in markdown on my local machine, make edits there, and then copy/paste into the textarea to publish. Is there a way to have headers from my markdown file show up as Bold in the textarea, without needing to manually select with mouse? Any suggestions welcome.
-

Typical gc2605 conversion to non-binding machine
friquant replied to TakashiOkada's topic in Leather Sewing Machines
Jianglong makes a 246 also. (I have the Jianglong 341) You might see what it would cost: https://www.alibaba.com/product-detail/246-Maquina-De-Coser-Cuero-Cylinder_60469774160.html -
Typical gc2605 conversion to non-binding machine
friquant replied to TakashiOkada's topic in Leather Sewing Machines
Three interesting points from that video: The feed dog on the binding machine that he bought has no vertical movement. He wanted to convert it to being a standard machine. It appears that he bought a new feed dog and throat plate for it. In general it works as a standard machine, but the feed dog only goes forward and back. (No vertical movement) He made his own cover plate to replace the binding cover plate that it came with. (The long metal plate that's about 250mm x 30mm that he mentions about 6:55 into the video) He abosolutely loves his swing-down edge guide 😀 -
Welcome to the forum! How about some pictures of the Nakajima, and of the new motor?
-
That sounds good to me
-
I've confirmed the notifications get marked as read even if I click the bell icon, then refresh the page. Clicking on the individual notifications is not required.
-
Forgot that you have two hand wheels! Or one giant handwheel and two motor pulleys (one on the motor, one one the patcher). This is going to mess up my terminology notes for sure 🤷♂️ From your video, I'm not sure if that lateral motion is a problem, a feature, or neither. Is there anything along the main shaft that looks like it's intended to impede this lateral motion?
-
Are you saying the main shaft moves horizontally (and takes the handwheel with it)? Send a video maybe. You might try preventing the horizontal movement to see if the machine can still turn without binding up. If it binds up without the horizontal movement, then maybe the horizontal movement is by design. Also check to see if there are any screws loose near the main shaft whose job it might be to keep the shaft in place. On domestic machines I've seen C-clips used to prevent horizontal movement of the hook shaft. If a C-clip were missing, there would be a groove cut in the shaft but nothing in it.
-
You may be able to learn what is out of adjustment by slipping the belt off, and hand wheeling slowly. If there's enough force generated to break the thread, you'll likely feel that at the handwheel and you can see what is binding or yanking. It may be easier to feel if you are stitching somewhat thinner material. I'd also be interested to see what the hook to needle timing is. Beautiful old machine 😍
-
Juki 5550N experiencing problem in the bobbin area
friquant replied to thobgood's topic in Leather Sewing Machines
When I feel two pops it's when the thread has not cleared the latch by virtue of the latch opening but rather by the thread being yanked past it. Maybe you can find out what opens the latch. Removing the bobbin case may help you see additional mechanisms at work. -
Juki 5550N experiencing problem in the bobbin area
friquant replied to thobgood's topic in Leather Sewing Machines
The latch is the area between these two red arrows. It's also what keeps the bobbin case from spinning as the hook spins. The latch has to open at least once during the stitch cycle to let the thread pass.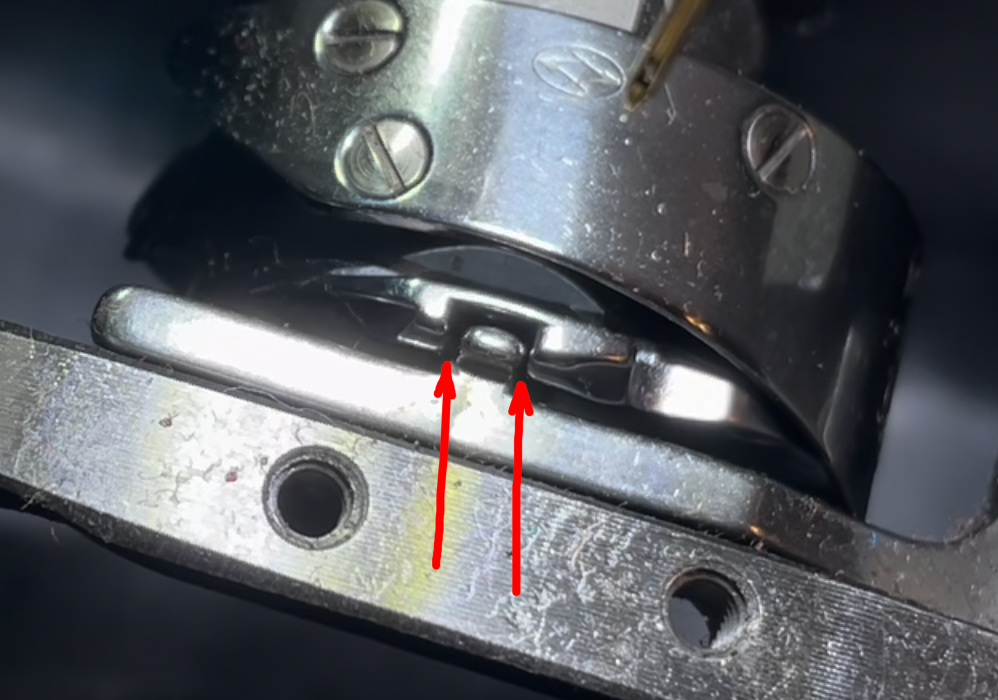
-
Juki 5550N experiencing problem in the bobbin area
friquant replied to thobgood's topic in Leather Sewing Machines
What jumps out at me is that the latch opens abruptly. Not sure if that's normal for this machine. I don't see the bobbin case opener..maybe it's internal? -
Juki 5550N experiencing problem in the bobbin area
friquant replied to thobgood's topic in Leather Sewing Machines
I'm enjoying learning hidden qualities of the thread check spring. Which of these screws do I loosen on my 341 to effect #1 and #2?
-
I can see that the timing is off, as it moves too far clockwise / not far enough counterclockise to drag the thread around the bobbin. (Even if it did manage to pick up the thread in the first place) I have not been able to find a service manual for this machine. As @Cumberland Highpower said: "Just look over the mechanisms, you should be able to "see" what the problem is with a little careful analysis." I would start by removing/opening covers. See if you can trace the movement of the hook all the way back to the main shaft. That is, figure out which shafts, rods, gears, cams, and/or arms are involved in making the hook turn. At least of of those members will be adjustable in a way that allows you to change the hook timing. Feel free to post additional videos as you make progress. Once you figure out what to adjust to effect a timing change, try setting the hook so that in its clockwise swing the point of the hook only goes about 5mm past the needle before the hook turns around to go counterclockwise. I expect that will put you in the ballpark where it will actually sew.
-
Juki 5550N experiencing problem in the bobbin area
friquant replied to thobgood's topic in Leather Sewing Machines
Wow it's hard to see down in there. I'm used to having a vertical-shafted hook where you can see the thread take a round trip. Can you take one more video with the feed dogs removed, as close as you can but still in focus, and move the handwheel very slowly. (About four seconds to do a full turn ought to do it.) Then maybe we can see what's clunking around. If we can't see it from above, you may be able to get a shot from below the left side. (This may require partially disconnecting the arm that the feed dogs ride on so we can get a better view) If using an iPhone, Uwe made a demonstration of how to lock the focus on an iPhone for taking close-up videos: https://www.youtube.com/watch?v=twl_V_vlq2Q -
Custom speed reducer pulley for Singer 51W56
friquant replied to FDC's topic in Leather Sewing Machines
Can you post links to the pieces one would need to buy in order to build this setup? I'm interested -
Custom speed reducer pulley for Singer 51W56
friquant replied to FDC's topic in Leather Sewing Machines
Yes I mean the pulley on the servo motor. They are typically 75mm. If it has a 15mm cylindrical shaft, that pulley can be replaced with a 45mm pulley for about ten dollars, which will slow down the machine. -
Yes, do post videos. Have you done timing on your RB5?
-
In practice, yes. What I really mean by this distinction is whether they have a minimum speed or not, and the ones with a digital display seem to have a minimum speed. They're either not moving at all, or they are moving at least at their minimum speed. And by analog, I mean you can ease into the gas pedal and start out at a crawl. What is the minimum speed of the servo motor on your consew? It's easy to find a "digital" servo motor with a minimum speed as low as 200 rpm, which with a 45mm motor pulley gave me 111 stitches per minute with an 80mm hand wheel pulley. Your setup may be slower if your handwheel is larger than 80mm. If you want slower than that, they you either need a speed reducer, or an "analog" servo, or both. I don't work with thick leather, so I will let others chime in regarding whether you will need a speed reducer in order to stitch the thick materials you are targeting.
-
Found a solution for the slack thread not jumping through the latch. That is, set the thread check spring to begin adding tension at that point in the stitch cycle. Still do not have a fix for the thread being off the shoulder.
-
What materials do you anticipate sewing, and how thick? With your other sewing machines, which would you rather have: A. Slow gentle startup, or B. The convenience of a needle positioner? It seems that there are two camps of servo motors. With an analog servo motor you supposedly get slow gentle startup, but not necessarily support for needle positioners. With a digital servo motor you get decent support for needle positioners but you get a jerky startup. Some have reported that their needle positioners did not work when they added a speed reducer. If your servo motor has a standard 15mm cylindrical shaft with a woodruff key in it, you can buy an aftermarket 45mm pulley (75mm is standard) for about $10 to get some speed reduction.
-
My digital servo motor has the same problem...the foot pedal is still hot for about ten seconds after turning off the power. I'm thinking on how to bring it to full off sooner. So far my best approach is: Turn off power Grab hand wheel with two hands so it can't move Press the gas pedal and let the motor pulley spin to scrub off the energy I imagine with a clutch pedal one could take a gentler approach...hold the hand wheel with one hand and press gently on the clutch to scrub off the energy.