
friquant
-
Posts
518 -
Joined
-
Last visited
Content Type
Profiles
Forums
Events
Blogs
Gallery
Store
Everything posted by friquant
-

Is backstitching with a leather point needle a problem?
friquant replied to Gymnast's topic in Leather Sewing Machines
Are you saying diamond point is less susceptible to cutting threads in a backstitch than a slant needle? -
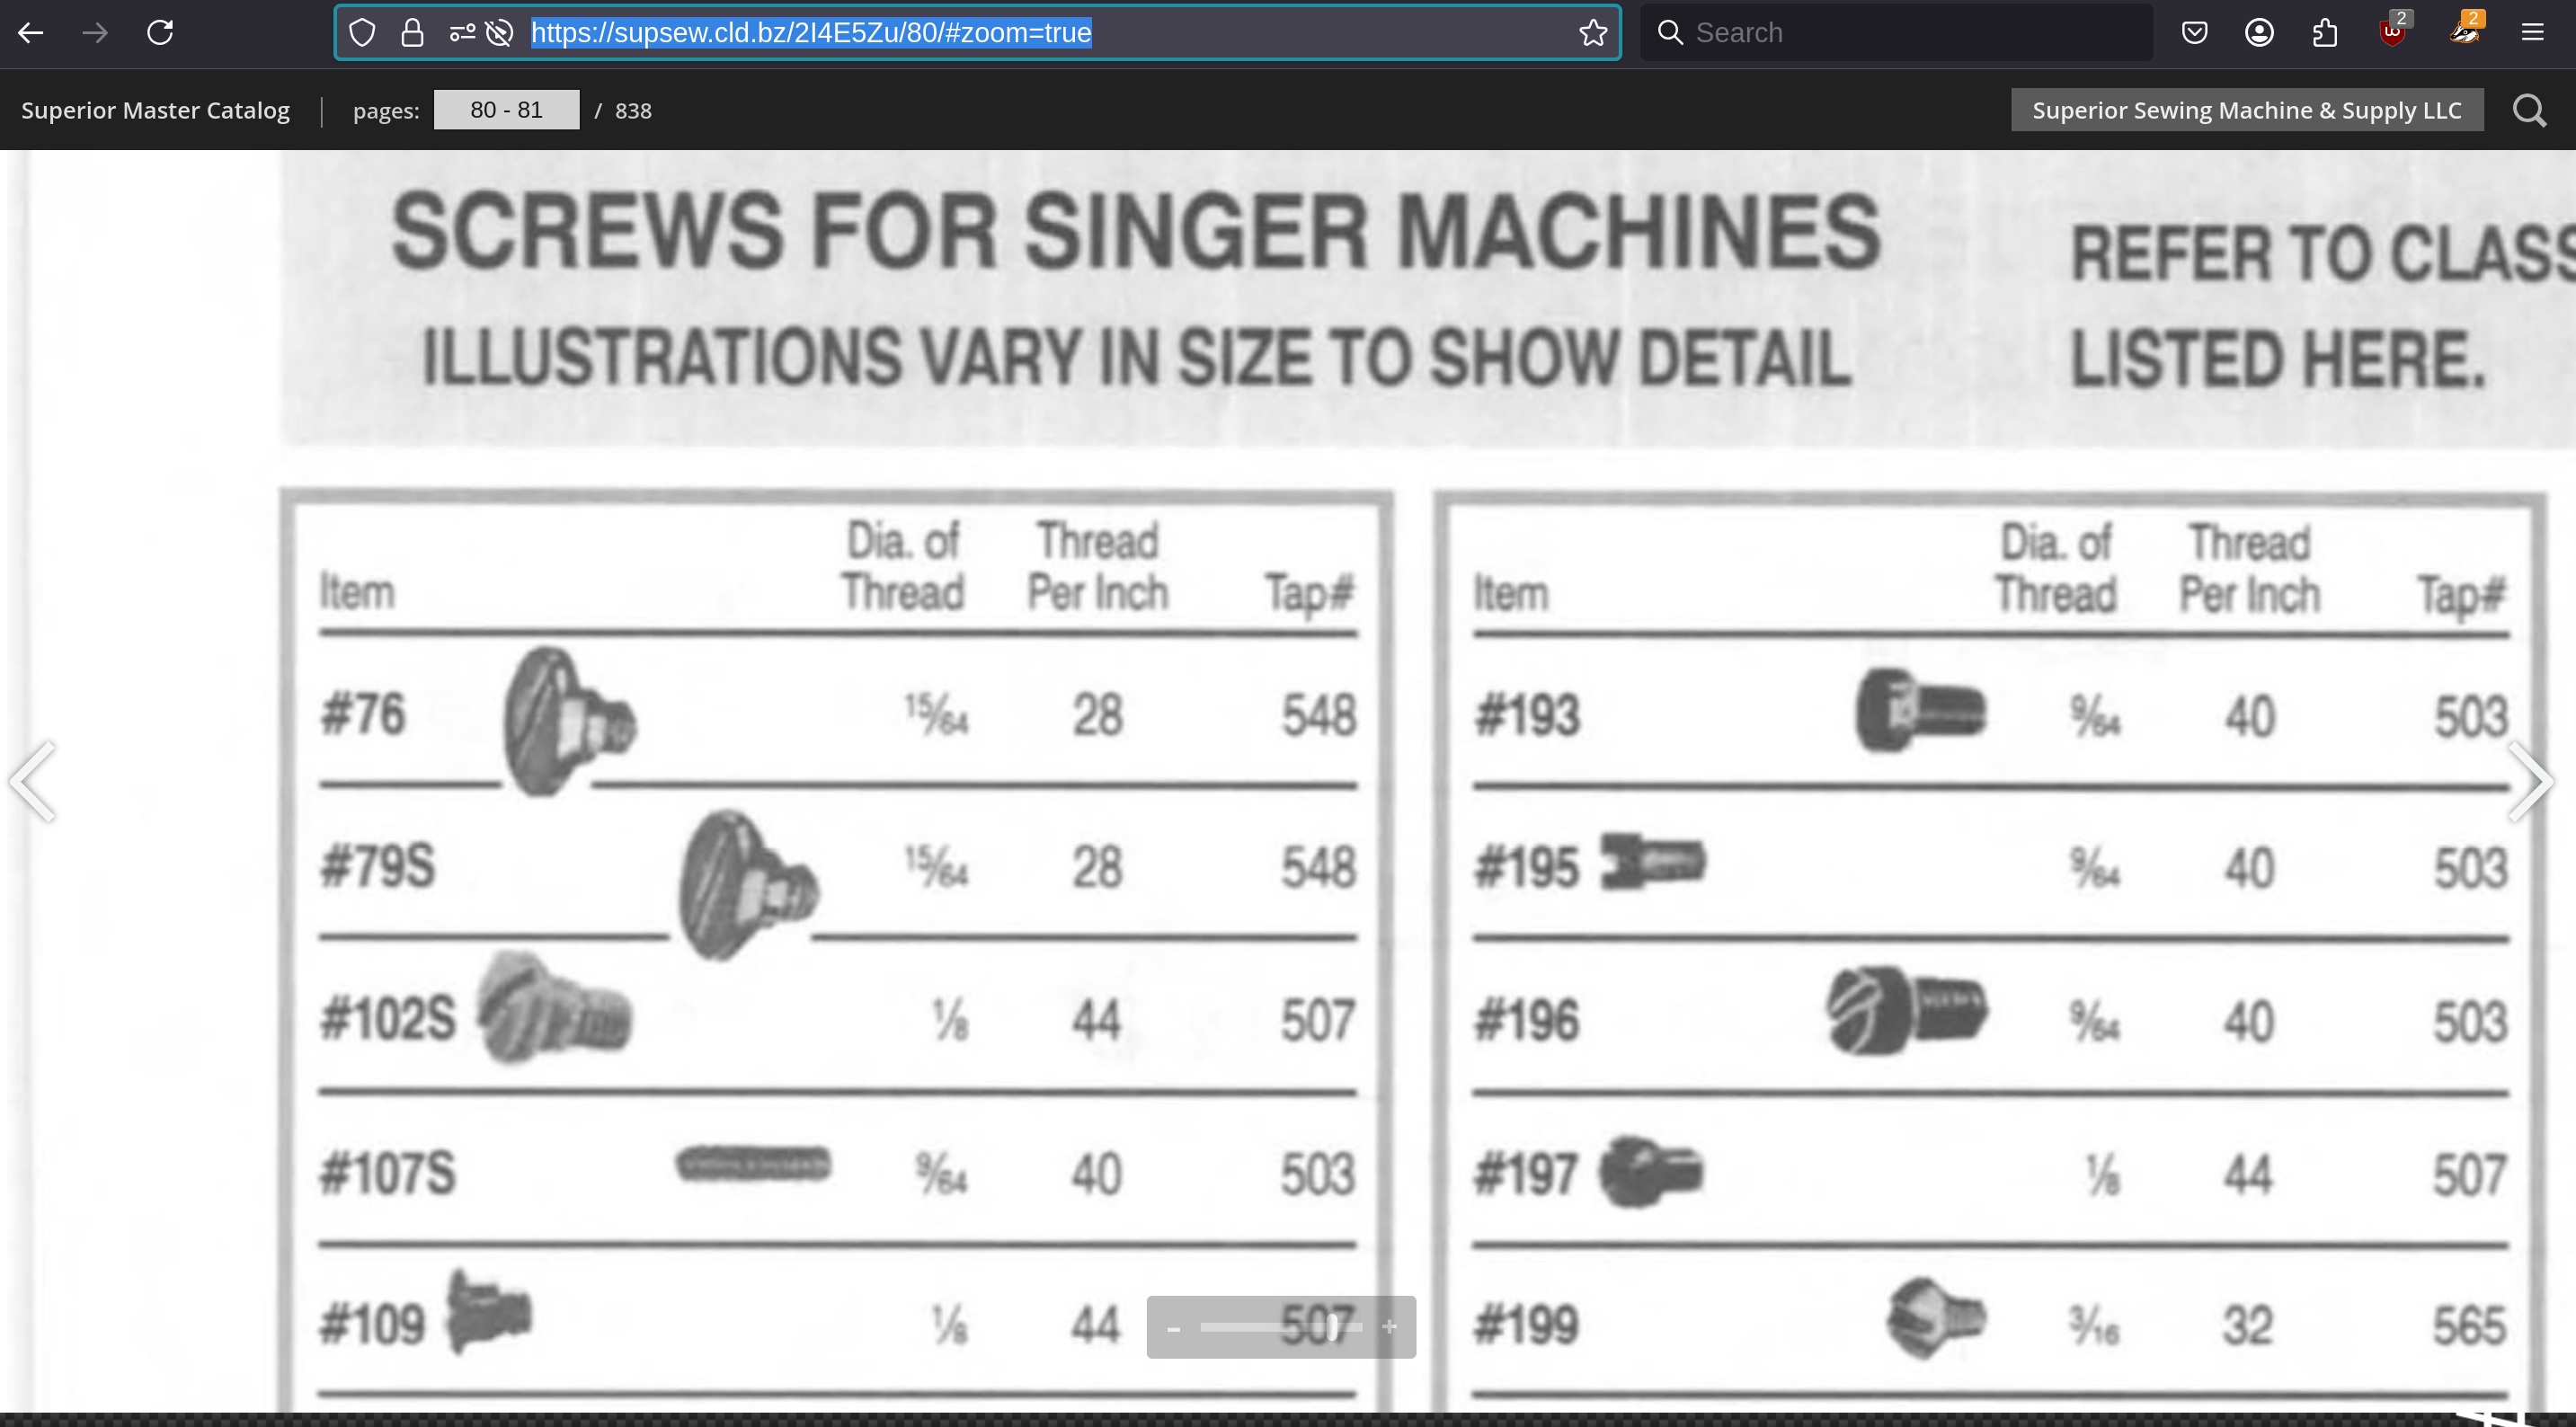
This looks promising! The section for screws starts on page 61. The sections for singer screws (page 80-) and union special screws (page 89-) are the most informative, as they tell you which tap is required.
-
Excellent reference, thank you. I suspected machinists would know things about this. Here is a link to a free copy of the book: https://www.tfgusa.com/wp-content/uploads/2023/11/Machinerys-Handbook.pdf Starting on page 1802 of the text, "Threads and Threading" introduces different thread systems. (There have been a few.) Page 1816 has a table of typical combinations in the american standard unified system. I think some slightly amended version of this system is still in common use today. It uses numbered sizes for anything smaller than 1/4". These numbered sizes mostly do NOT line up with 1/64" increments. Let's cross-referencing page 1816 with page 3 for details 1/16 is a little bigger than size 0 5/64 is in between sizes 1 and 2 3/32 is between size 2 and 3 7/65 is almost as big as size 4 1/8 matches size 5 exactly!! 9/64 is barely bigger than size 6 5/32 is in between sizes 6 and 8 11/64 is between sizes 8 and 10 3/16 is almost exactly size 10 13/64 is between sizes 10 and 12 7/32 is almost exactly size 12 15/64 is between size 12 and 1/4" Major Diameter of External Threads My main curiosity is how to interpret the measured major diameter and choose a nominal diameter from which to place an order. Let's look at an example from the book. Page 1818 The 1/4-28 UNF external (meaning screw thread, not nut thread) has a nominal diameter of 0.25" The least precision version (1A) has allowable major diameter 0.249" - 0.2392" This means the major diameter for the 1A series must be between 95.5% and 99.5% of the nominal diameter. From this I deduce that when I measure a major diameter to be X, I can look for a matching nominal diameter that is 1-4% bigger than X. I don't think I will always know which thread system the screws I'm searching for are from, either by my own ignorance or unavailability of data. But in general it makes sense that for a non-interference fit the screw major diameter has to be smaller than the accompanying nut major diameter. So I'll roll with the bolded deduction above until I find a more informed pathway.
-
What, no 9/64-40? 😉 I skimmed that list of singer screws and wrote down the thread sizes I saw on it. Here they are ordered by size: 1/8-40 1/8-44 3/16-28 3/16-32 3/32-48 3/32-56 9/64-40 11/64-40 13/64-32 15/64-28 1/4-24 9/32-28 5/16-18 3/8-28 7/16-28 1/2-20 9/16-14
-
Of course. For Singer machines that is a viable option, provided you can find the part number. I have a few screws I need to find the part numbers for so I can order them that way. But when I get off the beaten path: Manufacturer went out of business Manufacturer considers my machine obsolete Manufacturer has no dealers from which I can easily and affordable purchase parts Brand name on the machine is not the actual manufacturer Parts list for machine has no photos so you don't know which set screw it's referring to The ease of a midnight transaction on Ebay calls my name then I want to measure the screw and order it by its dimensions. Given that some of these sizes are uncommon outside of Sewing Machine Land, someday I aspire to look up which singer parts are the same thread pitch, major diameter, length, and head style and then order by part number through a singer parts dealer even though the screws are going into some other brand of machine. But that requires a lookup table and the only one I've seen is a good start but lacks screw length and head type: https://www.singersewinginfo.co.uk/screw_threads/ But for today I want to be able to accurately measure screws and at least know what size to ask for at the common internet retailers.
-
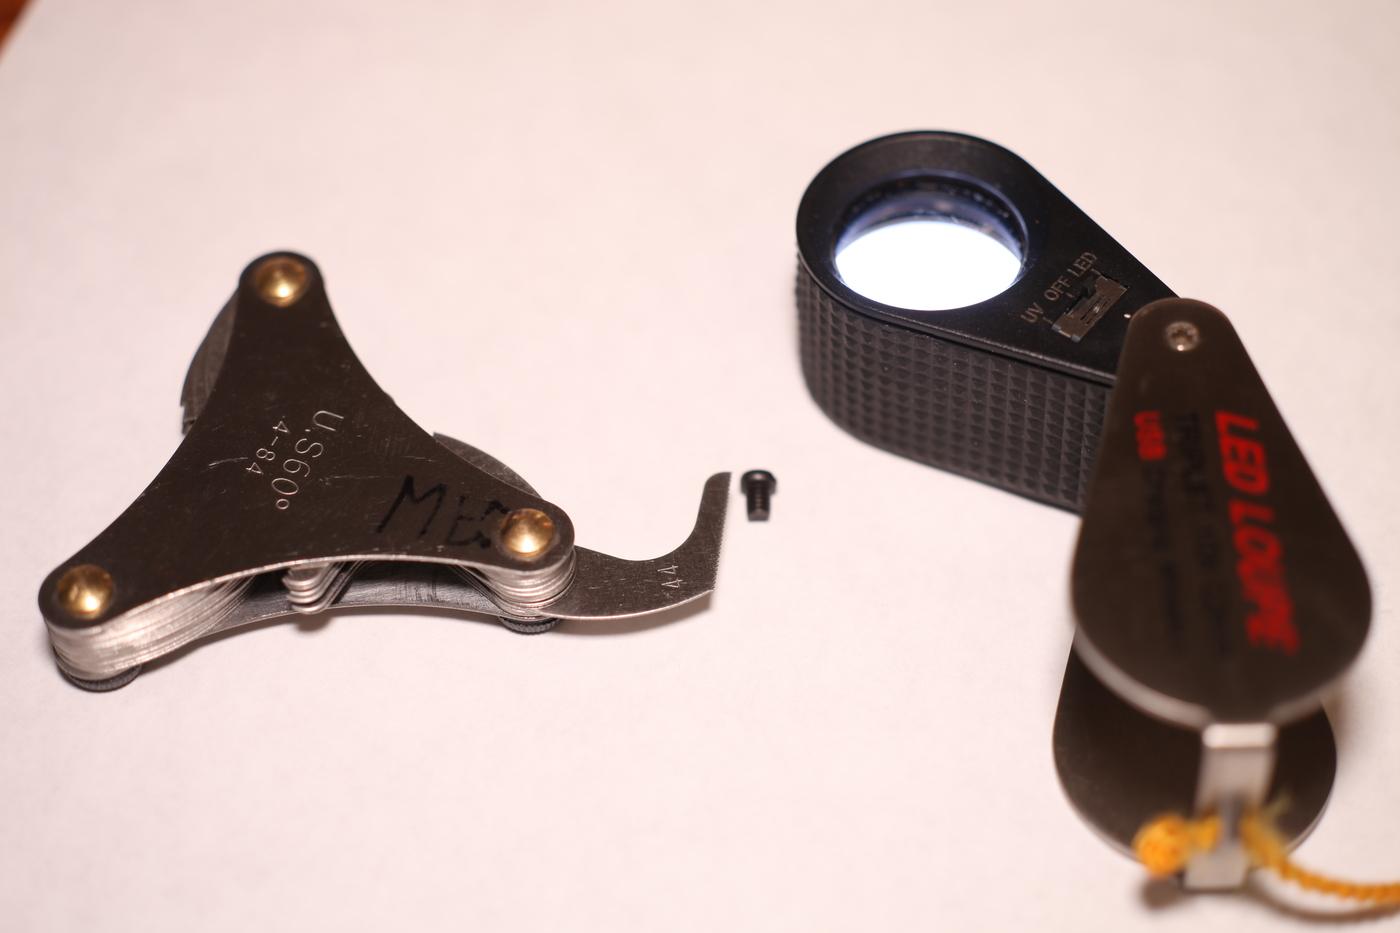
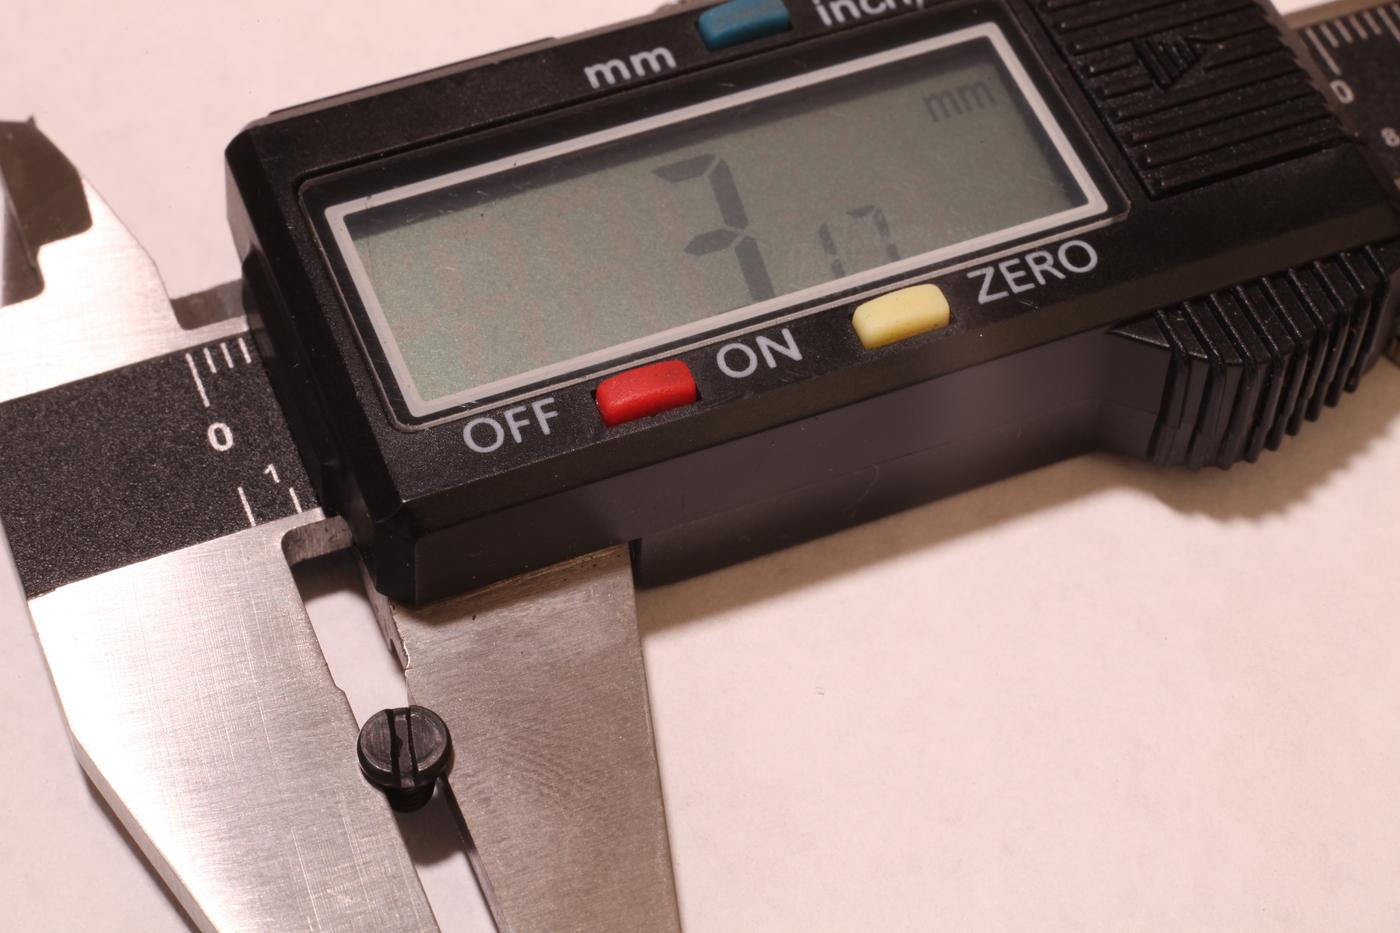
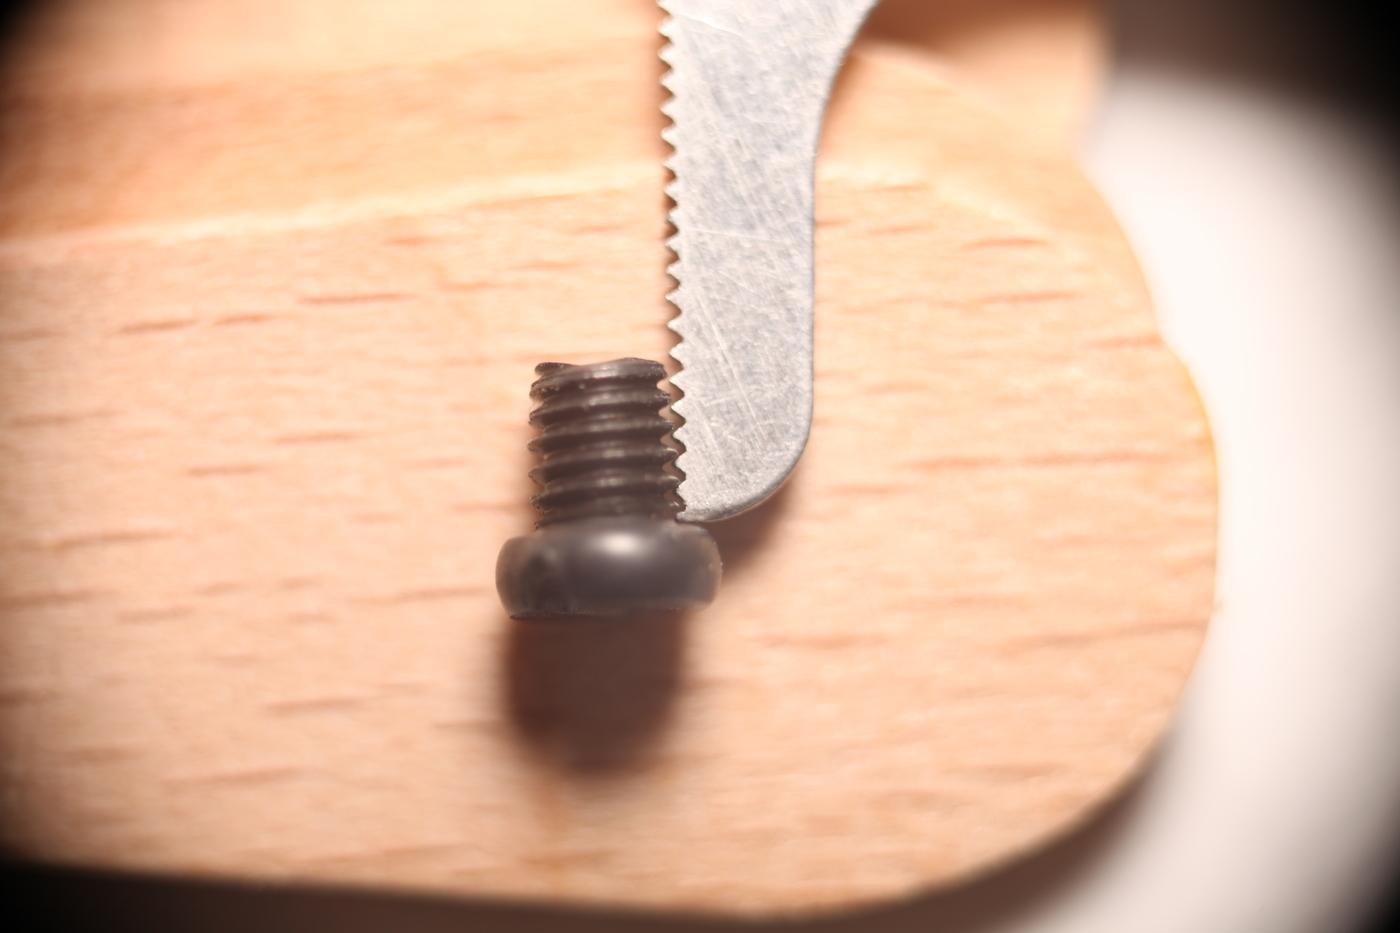
For machines where parts are not directly available, how does one measure the diameter of a screw to determine what size it is? To determine thread pitch I've been using this SAE pitch gauge: https://www.amazon.com/dp/B0BGRB96DP and viewing through a jeweler's loupe the pitch gauge snuggled up against the screw for comparison. To determine the major diameter (aka outer diameter, see https://en.wikipedia.org/wiki/Screw_thread#Major_diameter ) I've been measuring the threads with the fat part of the digital caliper jaws. Here's the hard part for me: For the nominal fractional sizes (1/16, 5/64, 3/32, 7/64, ..., 1/2) commonly sold as SAE screws and used on sewing machines, what is the actual major diameter for these screws that calipers or a micrometer would measure? If we were to assume that the nominal size matched exactly its actual major diameter (outer diameter), we could simply generate a table with a little math and multiple by 25.4 if we want millimeters. Here is such a table: NOMINAL | Theoretical | Theoretical 1/16 in | 0.0625 in | 1.587 mm 5/64 in | 0.078125 in | 1.984 mm 3/32 in | 0.09375 in | 2.381 mm 7/64 in | 0.109375 in | 2.778 mm 1/8 in | 0.125 in | 3.175 mm 9/64 in | 0.140625 in | 3.572 mm 5/32 in | 0.15625 in | 3.969 mm 11/64 in | 0.171875 in | 4.366 mm 3/16 in | 0.1875 in | 4.762 mm 13/64 in | 0.203125 in | 5.159 mm 7/32 in | 0.21875 in | 5.556 mm 15/64 in | 0.234375 in | 5.953 mm 1/4 in | 0.25 in | 6.35 mm 17/64 in | 0.265625 in | 6.747 mm 9/32 in | 0.28125 in | 7.144 mm 19/64 in | 0.296875 in | 7.541 mm 5/16 in | 0.3125 in | 7.938 mm 21/64 in | 0.328125 in | 8.334 mm 11/32 in | 0.34375 in | 8.731 mm 23/64 in | 0.359375 in | 9.128 mm 3/8 in | 0.375 in | 9.525 mm 25/64 in | 0.390625 in | 9.922 mm 13/32 in | 0.40625 in | 10.319 mm 27/64 in | 0.421875 in | 10.716 mm 7/16 in | 0.4375 in | 11.112 mm 29/64 in | 0.453125 in | 11.509 mm 15/32 in | 0.46875 in | 11.906 mm 31/64 in | 0.484375 in | 12.303 mm 1/2 in | 0.5 in | 12.7 mm But I don't have enough evidence yet to say whether this is the best course of action, or if there is a better table somewhere based on actual values instead of theoretical. Photos LED loupe, thread pitch guide, and machine screw Matching up threads under magnification Measuring the major diameter with digital caliper
-
A skipped stitch is a full miss. Guess what a half miss is......it's frayed thread. If the needle is too far away from the hook on that particular stitch, it will skip. If it's not quite that far away, the hook point will attempt to bisect the thread, resulting in a fray. Sometimes frays correct themselves (as is the case with UNbonded thread if the hook point gracefully catches one or two strands but not all three). Other times one or more strands break and you are left with a mess. Once you've tilted the head back and watched some skipped stitches (or frayed stitches) happen in slow motion, you will understand more of what's happening. And with thick material, the needle doesn't come down in the same place every time. The best defense against this phenomenon is to stuff the hook.
-
Or send the new user a DM after we reply to their new topic. (New users do get email notifications for direct messages.)
-
Option A: Digital Servo Motor
friquant commented on friquant's blog entry in State of the Servo Motor
This is a good thread for that: https://leatherworker.net/forum/topic/125148-replacement-pulley-for-tapered-shaft/ -
Can a worn case/hook prevent adjustment of case opener lever.
friquant replied to beefy's topic in Leather Sewing Machines
(At least some) Machines with a horizontal hook axis and a rotary hook (such as the Juki DDL-8700) don't have a latch opener. Yet the latch opens before the thread gets to it. I suspect maybe the thread dragging across/around the bobbin case is doing it, but I haven't studied it enough to be sure. Maybe that's why the hook moves the opposite way on those machines versus a lot of the machines I see with a horizontal hook axis + oscillating hook like the Singer 31-15. -
To enable email notifications when someone posts on your topics (like this one), you can visit https://leatherworker.net/forum/notifications/options/ then click "Mentions and My Content" and make sure the "Email" box is checked.
-
Can a worn case/hook prevent adjustment of case opener lever.
friquant replied to beefy's topic in Leather Sewing Machines
Wow, lots of travel! And seems to achieve it furthest reach earlier in the rotation of the hook than the OP machine -
I see tension issues. You mentioned an upholstery shop, so I'm not sure if you are new to sewing or an old pro. Have you experimented with different tension settings to get the looped threads under control? For photos, do you have some white thread you could use for the needle thread so we can easily see which is top vs bottom?
-
Can a worn case/hook prevent adjustment of case opener lever.
friquant replied to beefy's topic in Leather Sewing Machines
In my mind, the latch (or gate) (or gap) is the thing the thread attempts to cross. The latch is comprised of these two pieces together: the bottom of the throat plate which has a wide gap in it, and the piece of the bobbin case that exists in that wide gap, sometimes at the front of the gap and sometimes at the back of the gap. Okay. I'll bet you'd rather wait for the new one than try all the things we suggested 😉 -
What sewing machine should I purchase?
friquant replied to J Kellar's topic in Leather Sewing Machines
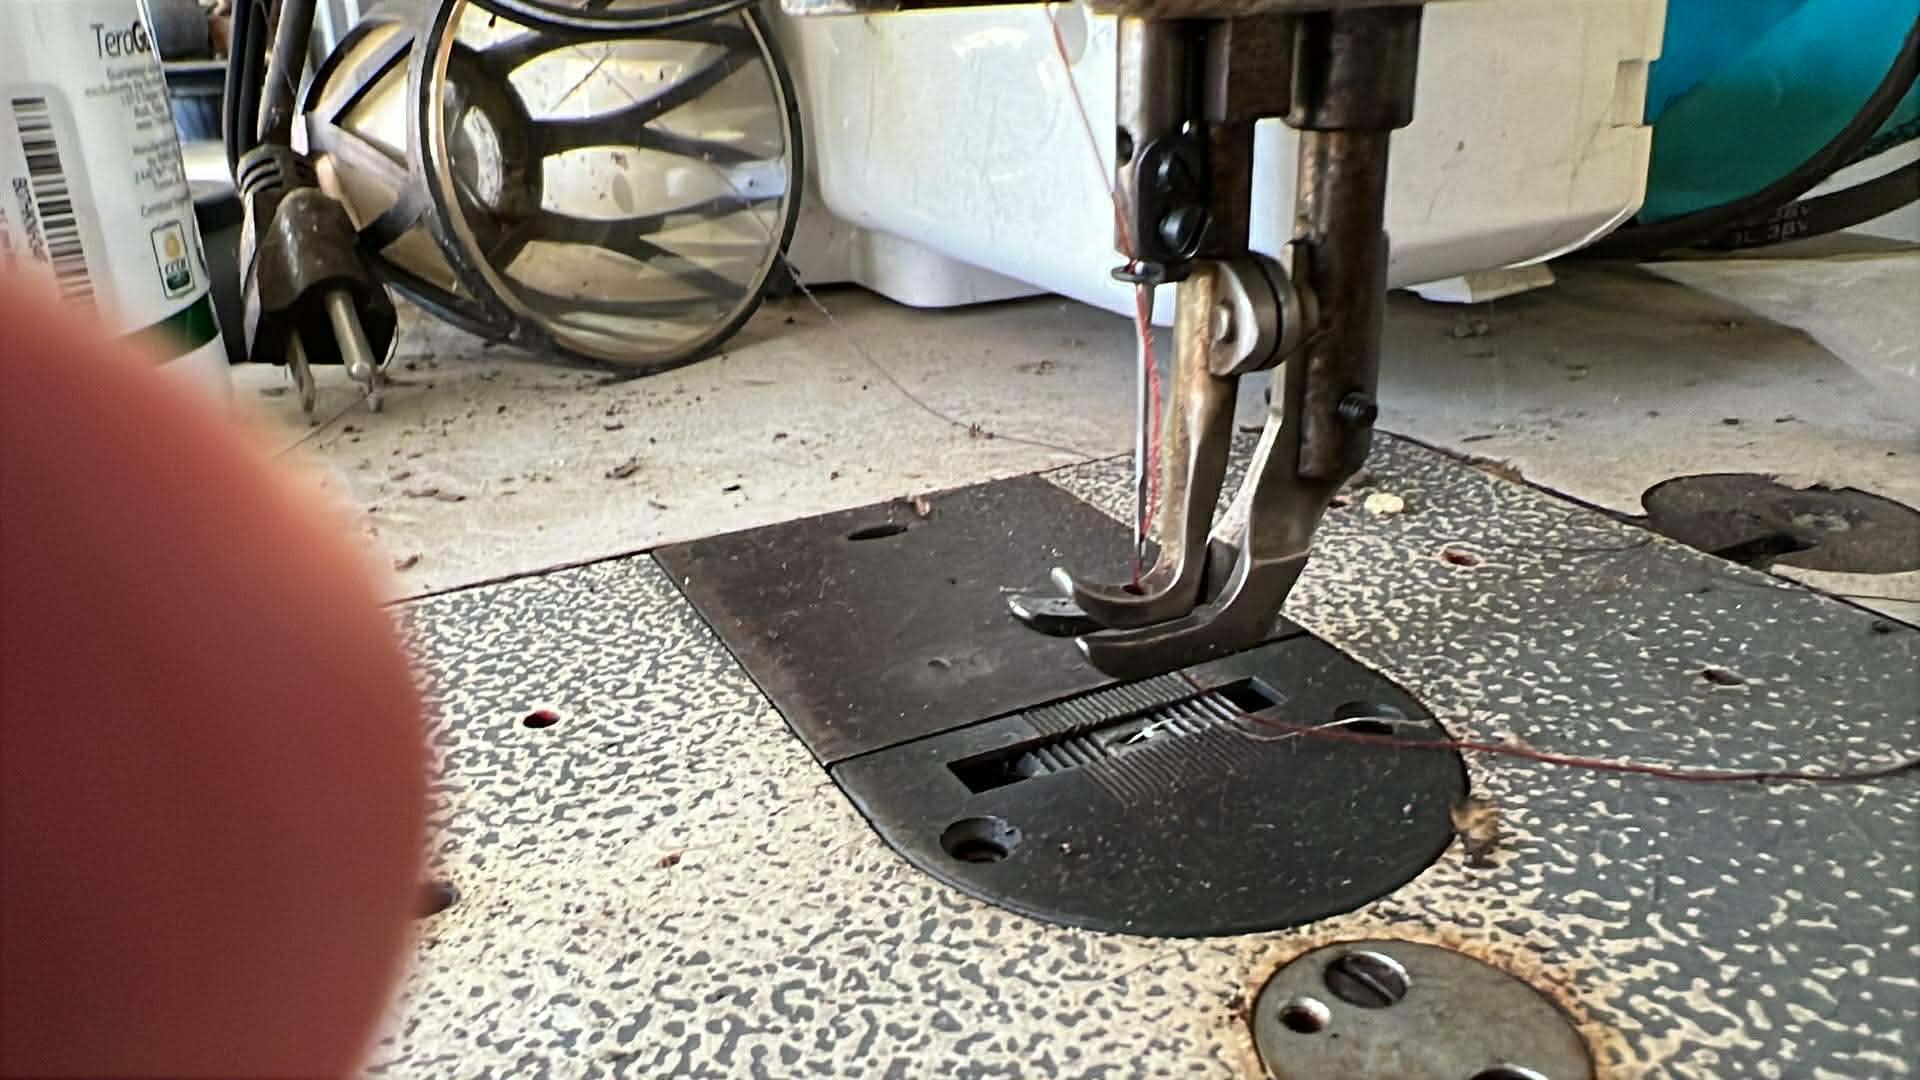
Here's a triple feed flatbed with "analog servo motor" for $500 https://www.facebook.com/marketplace/item/1184034927174464/ Seller provided these additional photos: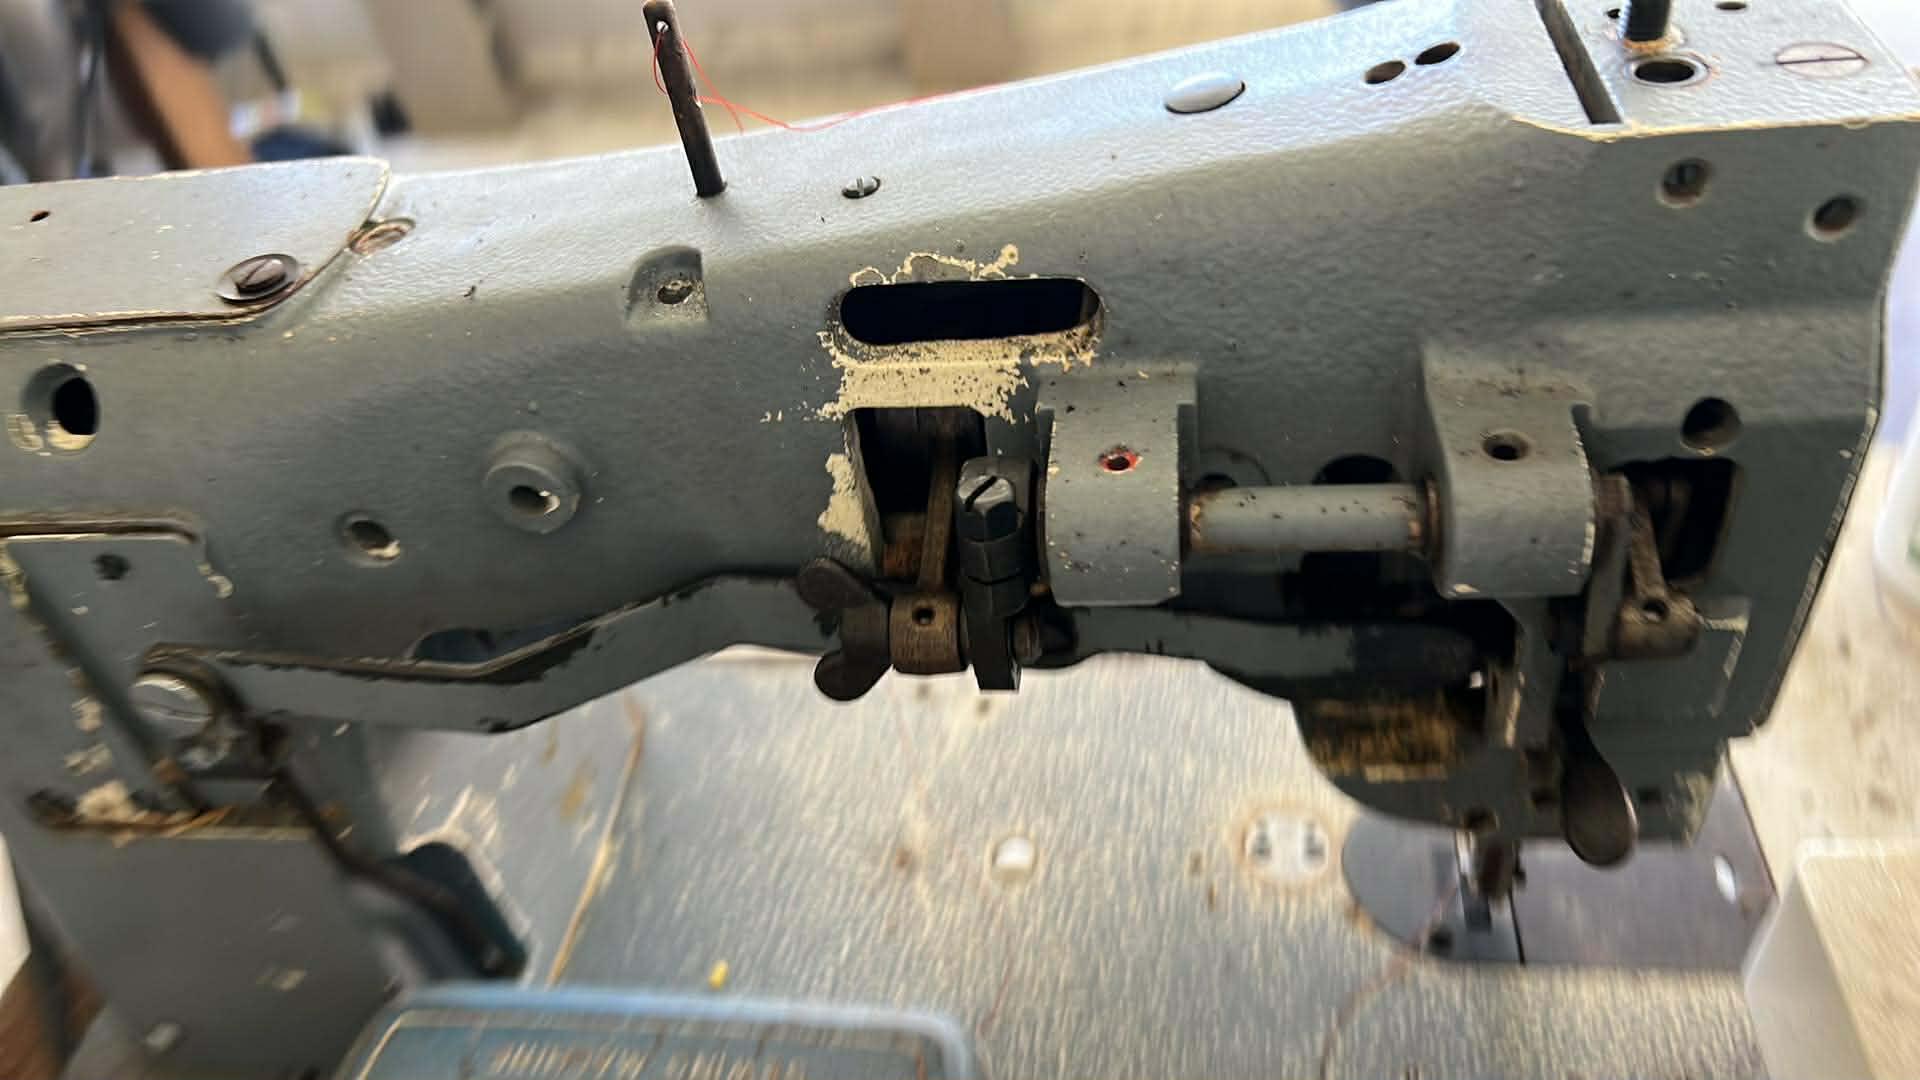
-
Can a worn case/hook prevent adjustment of case opener lever.
friquant replied to beefy's topic in Leather Sewing Machines
Is this the before or the after? What size thread? Looks to me like the latch is opening further than you need for this thread size. Adjust it to open a little less, and you'll get easier clearance on the second side. Also Wiz' comment: "Either the latch opener arm is bent down too far or the hook is sitting too high up." If the hook were down a bit lower it would be easier to clear the latch. Perhaps too many washers under the hook? Also looks to me like the timing is too advanced. If you retard the timing a little, maybe the hook will be out of the way when the thread is trying to go through the second half of the gate, giving the latch a little more time to close. -
What sewing machine should I purchase?
friquant replied to J Kellar's topic in Leather Sewing Machines
What zipcode are you searching? -
Now somebody replies to the topic
-
Can a worn case/hook prevent adjustment of case opener lever.
friquant replied to beefy's topic in Leather Sewing Machines
Looking forward to this! -
Can a worn case/hook prevent adjustment of case opener lever.
friquant replied to beefy's topic in Leather Sewing Machines
Can we make "notify by email when someone replies to a topic I created" the default for new users? -
By the way those excenter screws, assuming there is nothing pinning it in place you can see which side is the high vs low side by turning them in-place. Maybe the washer already fell out, either for you or for a previous owner?
-
I have heard folks on various machines say the tension is different in forward vs reverse. One option is to turn the material around instead of using the reverse feed.
-
What sewing machine should I purchase?
friquant replied to J Kellar's topic in Leather Sewing Machines
You could ease into the machine sewing world with something cheaper and more common like the pfaff 545. That would at least get your wallet party going. -
I can't always tell which parts on sewing machines can be bent. I've guessed wrong a couple times 💔
-
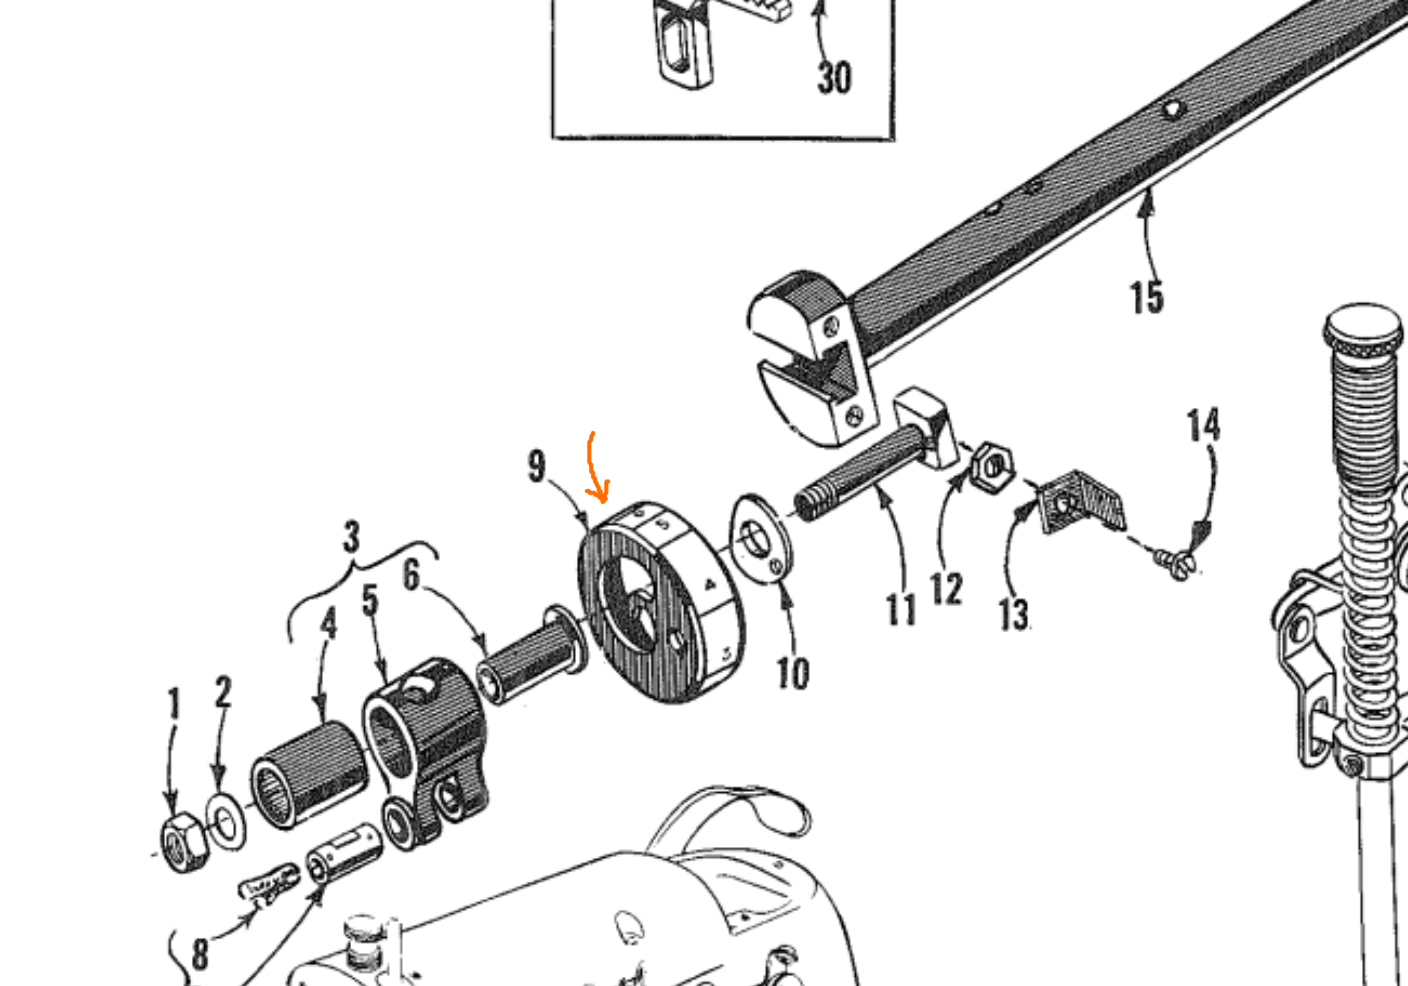
From this user/parts manual on page 17 I see part labeled #9 that has numbers on it like a stitch regulator dial. "Stitch regulator end cap", 51185D