

js5972
-
Content Count
127 -
Joined
-
Last visited
Everything posted by js5972
-
I thought I would make a few belts on spec. What are the more common sized that you make for resale? I have never made anything to sell before and am only looking to make a few things. I haven't been very active since I moved to OKC in 2013. it seems that I now have some free time.
-
Greetings! I have been a Leatherworker member since 2010, but haven't posted or even logged on for several months. We just moved from Tucson to Oklahoma City to concentrate on our primary interest of grandparenting. After we get unpacked, locate my tools, etc. and get the lay of the land, I hope to be more active on the forums and do a lot more leather work.
-
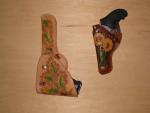
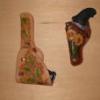
This project began innocently enough as warm-up project to put some 9 oz. remnants to use. This was my first effort after 4 months down time with tendonitis. One thing led to another and I ended up with some pretty cool gifts for my beer buddies. I used remnants so there are a few nicks and scratches-not noticeable after a couple of pints. Saddle Lac was used as a finish which seems to be pretty good for moisture. I guess Snow Seal would be better if I had any. Comments welcome.
-
Ostrich Leg Skin Holster Glock 26
js5972 replied to Garange's topic in Gun Holsters, Rifle Slings and Knife Sheathes
Beautiful work. Can I borrow it to wear with my tux? -
Nice color and design. You have a good basis here. I would take it apart and really work over the edges and belt slots then dye them for a good finished look. Clean them up first wth an edge beveler, then varying grades of sandpaper. Don't burnish until the edges are really smooth and even. For your next holster, the stitches should be farther from the edge-I think one thickness of the leather is the right margiin. This for both appearance and strength.
-
I thought I would try using sheeps wool for an applicator in certain circumstances, but I can't figure out how to prep it so I won't get little hairs all over my project. I have trimmed the nap down to 3/16 to 1/4 inch, washed, rinsed and air dried. Still sheds. Did I just get some crappy stuff? Some advice please, or should I just go back to sponges...?
-
Second Knife Sheath With Skirt
js5972 replied to PutnamLeather's topic in Gun Holsters, Rifle Slings and Knife Sheathes
Outstanding! Great colors-gorgeous lacing. -
On thinner leather, I burnish by rubbing a damp bar of saddle soap directly on the leather. Sounds a little goofy, but it works. The square edge of the soap works as a rub stick.
-
I thought I would try using sheeps wool for an applicator in certain circumstances, but I can't figure out how to prep it so I won't get little hairs all over my project. I have trimmed the nap down to 3/16 to 1/4 inch, washed, rinsed and air dried. Still sheds. Did I just get some crappy stuff? Some advice please, or should I just go back to sponges...?
-
Google "nautical knots."
-
Colored Floral On Clutch Purse
js5972 replied to js5972's topic in Purses, Wallets, Belts and Miscellaneous Pocket Items
Ferg, thanks for the input. Those petals crossing the stitch line are downright embarrassing. For some reason, I thought it would look OK when I layed it out. Very sloppy on my part, though. My only excuse is that I was originally going to lace the edges. The "customer" wanted stitching. Regarding the BW, are you saying the leather was too wet for stamping or for dyeing? Thanks again, JOHN -
Colored Floral On Clutch Purse
js5972 replied to js5972's topic in Purses, Wallets, Belts and Miscellaneous Pocket Items
Andrew, thanks for the input. I was looking at some older work that I did using spirit dyes and I see that the blending was much smoother. My observation is that the leather becomes saturated faster with Eco, so the subsequent layers tend to sit on the surface-thus the line between the colors. Maybe its that the first coat makes a slight resist? Anyway, "dry brushing" rather than multiple thinned out coats seems to work better. Does that make any sense? Those petals crossing the stitch line are downright embarrassing. For some reason, I thought it would look OK when I layed it out. Very sloppy on my part, though. My only excuse is that I was originally going to lace the edges. The "customer" wanted stitching. -
Be sure to finish the front side and the edges and dye the back before you try to smooth out the back. I usually just wet down the edge of my saddle soap bar and rub down the back a bit, finish with a rub stick. Let it dry and apply your finish.
-
Wow!! No offense meant, but you are asking where Da Vinci bought his brushes so you can paint like him. Start by going through the "Getting Started" forum here. Read everything you can get you hands on and practice every day. I have mostly Tandy Tools but I am upgrading the ones that I use the most as I can afford. Barry King has a nice line of tools and has recommendations on his website. I assume you mean ceramic blades. Expensive and brittle if you drop them, but no need to sharpen-ever. Only strop.
-
Swivel beveler...yes, a very handy tool. I've had one for at least 10 years; I think when I bought it they were called "speed bevelers." Anyway, I've found that you can't use them everywhere, but they are useful and FAST in many applications. True, they won't dig as deep as a tooling beveler, but good for long lines. like borders and big, sweeping curves.
-
How thin are your straps? Have you tried just burnishing them? It sounds like you are dyeing the edges a different color from the front and back. Not easy.
-
I have several leather templates of various widths and hole spacing. Once you have a template that is "perfect" you can clamp it to your new belt and punch it out.
-
Sheridan Belt
js5972 replied to js5972's topic in Purses, Wallets, Belts and Miscellaneous Pocket Items
Meticulous, painstaking...good descriptors. I usually use more colorful terms. -
The design is a modification of a Pete Gorrell pattern. Tandy “Gold Frost” was used to highlight. Comments are welcome.
-
The design is a modification of a Pete Gorrell pattern. Tandy "Gold Frost" was used to highlight. Comments are welcome.
-
I can never figure out where to post my work, so I am putting it in several forums. The floral patterns are modified from a Tony Laier Craftaid. All coloring is with Eco-Flo dyes, which I am still trying to perfect. The purse kit is a “Victorian Clutch Purse” which I think is discontinued-well at least it should be. After I took these pix, I discovered that the purse would not snap shut with the (inside) strap attached. I’ll have to move the snap. Pretty typical of Tandy kits, though. They never really fit together quite right. I always use backing, so I am pretty sure it is not caused by tooling stretch. I don’t particularly like to use kits but I have not the inclination, skills, tools, or equipment to make my own “guts” for purses, wallets, etc. Comments are welcomed.
-
I can never figure out where to post my work, so I am putting it in several forums. The floral patterns are modified from a Tony Laier Craftaid. All coloring is with Eco-Flo dyes, which I am still trying to perfect. The purse kit is a "Victorian Clutch Purse" which I think is discontinued-well at least it should be. After I took these pix, I discovered that the purse would not snap shut with the (inside) strap attached. I'll have to move the snap. Pretty typical of Tandy kits, though. They never really fit together quite right. I always use backing, so I am pretty sure it is not caused by tooling stretch. I don't particularly like to use kits but I have not the inclination, skills, tools, or equipment to make my own "guts" for purses, wallets, etc. Comments are welcomed.
-
New Purse For My Niece
js5972 replied to jayjay's topic in Purses, Wallets, Belts and Miscellaneous Pocket Items
Nice work! I wish I could get my BW that straight over a large area. What product/technique did you use for the pink color? -
Denatured alcohol is the thinner (reducer) to use for Fiebing's. It is a mild solvent. In the US, you can buy it anywhere paint is sold. Oxalic acid (wood bleach) and lemon juice are even milder. Acetone is also used as a De-glazer...VERY STRONG! Whatever you use, do a small test patch. Why don't you post a picture of your problem. Welcome to the forum!
-
What Kind Of Finish For Tooled Dog Collar?
js5972 replied to stingray4540's topic in How Do I Do That?
Eco Flo - no matter what you do, it will run if you get it wet. I've found Saddle-Lac to be the best sealer.