


Whit30
-
Content Count
79 -
Joined
-
Last visited
Posts posted by Whit30
-
-
Wow, I have the picture in my mind now! thanks so much for the instructions. Now I think I'm good on everything but had a question about "Ounce the gouge is cut, use a french edger to remove the shoulder on either side of the gouge" when you say either side of the gouge, are you saying remove the edge on both notebook sides but only one side of the gouge or both sides of the gouge it's self? Thanks a million!
Hi Ron,
I have to agree with azrider....I would use the pieces as stiffeners and not just try to wrap the notebook with leather. Depending on your budget, wmt sells plastic binders that are not vinyl covered and the leaves make good stiffeners. I am not a fan of using the cardboard found inside the vinyl covers. However, if that is not in the cards, then glue each leaf to the exterior leather of the binders and then line the inside with a lightweight leather. The spine needs to be stiffened also, so you can utilize all of the binder. Whether you elect to remove the vinyl covering or leave it in place, Barge will bond to either and hold it tightly in place. I think I would remove it. Remember to gouge the fold lines into the exterior piece before gluing in the lining. Ounce the gouge is cut, use a french edger to remove the shoulder on either side of the gouge. And you will definitely want to cut your stiffeners down so that you can bring the two leather edges together to sew. If you sew the outside perimeter, it shouldn't be necessary to sew down the fold line, Hope this helps...
Bobby
-
Thanks for the suggestions, did you take off all of the covering plastic down to the original stiffiner they used?
Thanks a million!
I have done a few of these. My suggestion would be to cut the note book into three pieces, and glue the leather to the pieces, and together between the pieces, along with glueing it together along the edges. This will make it easier to close the note book, otherwise it may be very stiff, and take quite a while to break in.
-
Hello, I made a post about needing suggestion on how to do some flowers in the Florial form and those are to go on the cover for a photo album for a great young couple at our church for there weeding. Please advise me if this will work.
I already have the leather from other things so I needed to keep my cost low. Instead of buying stiffiner, the three ring and all I picked up a good quality binder at wmt. with stiff sides and a smooth locking binder. I plan to drill
The two rivetd holding thee binder in place and covering the binder with an inside lining leather and a thicker leather on the outside. I plan on cutting any plastic pockets and the shinny covering and just covering the original white cover
of the notebook. Will barge cement glue the leather to the plastic? and I will take it out a little making an outter edge of just the two leathers to either sew or lace and they will be glued together as well. my other worry is the sides
of the notebook. Will it be ok after gluing the leathers to the notebook to sew down the seam of the hinge on each side or should I leave it alone and the barge cement will be enough to keep it from moving inside?
Or should I cut off the sides and use then just as seperate stiffiners glue and sew every up that way?
Any help would be greatly appreciated and if you havent, please read my post on tooling the flowers she likes for the cover, I've had alot to read but no responce. I am a novice at this and appologize if the questions are really basic.
Thank you for your time and advice!
-
Hello,
I don't know if this post should stay in here or go to Patterns and Templates? I am in need of some advice on tooling some flowers called Calla Lilly. I am not finding the tooling patern I need and the best I have came up with is the attached picts. one regular and I did a negative of the image. I know many of you draw your own patterns and I would greatly appreciate some tips you would have to share on how I can make these come out right. as well.
I can see the definate lines of the flower outline that shouldn't be that difficult. This is when I begin to get lost in the picture. How would I handle the shading coming down the flute of the flower outside and then how would I handle the inside of the flowers to make then look realistic? would I use a modeling spoon or possibly pear shaders in the inside pedals of the flowers?
Any tips and advice would be greatly appreciated even if there is a way to alter the image better than a negative option.
Thank you everyone!


-
Thanks for the info guys! I really appreciate it
-
Hello everyone,
Does anyone have a suggestion how they are doing the image on their products? I sure wouldn't guess hand tooling for the price, my guess would be heat embossed or something. And if so, how do you go about it? would you tool the original and how would you go from that point to get the end product and what would be required?
Thanks, looking forward to reading your thoughts http://www.oberondesign.com/
-
I want to thank each of you for taking the time and making the effort to reply. You all are a huge help. Also want to wish everyone a Happy New Year!
I doubt Tucker is applying antique to his holsters, as it's a pain to apply given the workflow for building a holster AND keeping white thread. If I were to take a stab at matching the color, I'd probably try something along the lines of Burgundy (maybe diluted so you can work up to the desired shade), followed by a single brushed on coat of Neatsfoot oil applied only to the outside of the holster (and only applied right before you apply the final finish coats to seal the leather).
-
Thank you for the replies and advice. Leatherimages, You said to use Leather oil and not neetsfoot oil. I have been using Neetsfoot oil before doing an antique tandy stain. Have not tried a color staing yet. Can you tell me the differance between the two oils and why I need to use Leather oil and not neetsfoot? I'm new to the hobby and would really appreciate the why and why not of using Leather oil over Neetsfoot.
When you say Leather oil, are you talking about Fiebing's Mink Oil Liquid or I did find a Obenauf's Leather Oil Preservative from Cabelas is this what you are refering to?
Bison, would love to see some picts of a project with the chocolate cherry
Do you guys feel tucker is dipping his products or spraying the stain? I have read that many are dipping their products when staining especially for holsters and many are spraying them. I have an airbrush I thought of tring or do you feel dipping is a better way to go? up until now, this is what I have been doing. Apply a coat or two of sometimes olive oil or neetsfoot oil to darken the leather a bit and soften it some on wallets and similair items. I have only used a damp spongue and do a couple of coats of antique usually followed by either satin or super shene also appiled buy damp spongue. When using the spongue, I have been having the antique lift a little and lighten when doing the protoctive coat, Thats why I was considerating using the airbruah this time. I just really like the Black Cherry look over the antique I have been doing.
Thank you so much for your time and advice!
I've had some luck with Eco-Flow's Chocolate Cherry.
-
Hello Everyone,
Can someone tell me if Black Cherry stain is produced anywhere or is it a custom mixed color? A picture of the color is on Tuckers home page http://rlcompanyusa.....net/index.html. If it is a custom color does anyone have a formula for it?
Thanks
-
Thank you for your suggestion and advice. This is our family "Crest" or coat of arms. Artwork may not have been the correct term but was just a way of describing the "image" of the coat of arms. Thank you for taking the time to reply
Hi,
I'm not sure if I would call this art, it is a coat of arms, a family crest. These crest belongs to some family (?) All symbols and colors means something special in the world of crests and are specifically made to a certain family and it should not be changed. Just make sure who has the right to this symbol before using it if it is not your family.
Now carving, inverted sounds like a really great idea and usually looks very clean and nice when colored.
Good Luck//Tina
-
Hello everyone, I hopw this isw the right place to place this question. Im kind of mixed on ideas how to tool this artwork. This will go on a portfolio for my twin and I messed around using differant images. If you were going yo do this, how would you do it? inverted carving? I thought the decorative lines inside the design would work for swivwel knife lines, Would you invert or tool down the helmet itself or leave it raised and tool down?
My first thought and the more I think about it I start to question myself was this.
Just carve the outline of the feathers on top of the helmet, tool down the dark areas inside the helmet, (if looking at the artwork with the white border) cut the decorative lines inside the dark grey area and tooling down the light grey areas of the artwork.
Any suggestions or thought of how you would aproach this would be greatly appreciated Also would you consider changing the checkered cross to a solid cross while tooling down the shield leaving the cross lifted up or vise versa by tooling down the cross leaving the shield lifted up.
Thank you for the help and advice!


-
Hello everyone,
had just ran across a picture of a book by F. O. Baird and thought it looked a little familiar. Went to the book sheld and discovered why. I had a differant book that I had seen mine being "Design Artistry" copyright in 77. Just wondering if any of you use or have used any of the patterns in it and would love to see some picts of the finished product. Found it somewhere of 5 or 10 bucks a couple of years ago when I bought a starter tool set tring to learn the craft.
Thanks!
-
Looks great! did you make your own initial plate or have it made for you?
-
Hello,
I am wanting to make a few christmas gifts and already have leather but I just need the patterns. Would someone be willing to send me a copy of any of these three holster patterns and instructions?
I am in need of:
I would truly appreciate any help you can offer. If you are willing and would have to mail them I will cover the cost of everything. I just can't buy the three kits when I already have the leather to make them and just needing the patterns.
Thank you
-
I posted on here before about,can,t remember what area,I,ve made 3 R.Ross has 1. I like useing odd stuff to make things. made these from a sulkey hay rake tooth,good steel. short section ,chuck it up in the drill press and filed down a stem. to make it like a tandy knife. went to the vise ang draw filed 8 sides, I despise knurling.ended up with a taper ,from top to bottem.for the yoke I used a section of auto brake line,yoke was a cross section from motorcycle handle bar,then cut that in half.why do you need ball bearings? a fellers fingers can,t work that fast.just a finger and thumb going back and forth.after I finished I cut 3 rings around the top spaced apart,and hammered in some silver wire,cleaned it up and blued it with cold blue.I like the taper and the 8 sides give you a good grip.and it kooks kinda neat too,I think, Edward
Thanks for the reply Edward. I'd love to see the ones you made. Can you post a pict or two? Thanks
-
I'm just wondering if any of you make your own swivel knifes? if so, would love to see some picts! Do you fab all of the parts or are parts like the ballbearing and the yoke available from a supplier? I'm also looking for pictures or a diagram that shows the working parts of a ballbearing knife. . Any help would be appreciated.
Thank you
-
This is a slightly modified Vergez Blanchard professional leather stitching clamp, used for holding one's work steady so both hands can be free for stitching (a common shoemaker's or saddler's technique). It can be used as it was originally designed, by applying knee pressure to the outside of the two jaws; or (for younger learners or smaller craftspeople, especially), there is a wooden screw that can tighten the jaws to hold your workpiece.
I am a shoemaker, and this one has been in training apprentices, so it has been cut down to about 28" tall. It is also flat on the bottom, so it can be used straight up and down whilst sitting on a stool. If you are getting into leatherworking, you will find this to be an essential tool,...and at the right price. Thanks for helping me find this a new home. $45 or best offer, plus shipping and it is yours.
Is this still for sale?
-
Lots o' folks asking me about the lazy man's clutch wallet. I have a sick little boy today, so I'm gonna split this in chapters of sorts to let 'im sleep, hope that's okay… Call this the preamble…
NEEDED: 3 oz cow 'er calf back (same as "Phoenix" clutch kit, I just don't like their "innards"), mask or stencil of your flower, a piece of paper (steel one from your printer, it'll be fine for one use), The Fiebing's dye was...
"background" -- dark brown (full strength) and
the rose -- red (not dark red) thinned "about" 6:1 with solvent and
the stems/leaves -- mixed "about" 3 parts green, 1 part dark brown, 6 parts solvent.
NOTES ON DYES:
I say "about" because the stuff is alcohol, and some will no doubt evaporate when the jar is open. Color (sediment/pigment) stays, solvent evaporates, so the more it's open the darker it gets. Couple of hours isn't gonna show alot of change. Maybe if you use the mix a dozen times... and, the browns will come out slower than the lighter colors, and WAY slower than the solvent, so when it changes, it'll be DARKER (and maybe just a little THICKER).
I sprayed this, so if you're using a brush, might wanna thin it a bit further.
Fiebing's dark brown shows a distinctively reddish tint; more obvious the more it's thinned. I really like this type of effect done in chocolate – which is more brown – but I used the dark brown because I was going to paint red stuff, and I hoped it would "flow" a little better with the overall look. Just a "whatif"… like "whatif" I was gonna do the rose yellow, I mighta used the chocolate …
Not all leather is tanned the same, even two hides you ordered from the same place at the same time. Word to the wise, no excuse for not testing your color on a piece of scrap FROM THE HIDE your project is cut from -- might match, might not. In this case, it's a FLOWER and and EFFECT, neither of which was a critical shade.
For all these reasons and some others, I only mix about an ounce at a time.
Some folks have been asking me if this was done "freehand". Yes and no. I "freehanded" inside the rose, but only after masking the rose and painting the background effect. For some reason, folks get the idea that "good" painters "freehand". Here's the truth … you will NOT get that hard edge by "freehand". Period. For more information on colors/hard edges, I'm gonna refer you to Kate, who is clearly better 'n' me, and who I may have a shot at appeasing with a relatively inexpensive consolation prize
Kate …? Kate …?
More when Junior is awake and Mom is back, so I kin turn on the compressor. One disclaimer … a quick proofread of this has got me thinkin' the fella what wrote this sounds a bit sensitive, and if'n I met 'im, I ain't sure I'd hang out with 'im …
Thanks for taking the time and sharing your methods! Were all greatful
-
The best thing to do might be just take the head off the stand & take it in they'd be tack welding on the top,sure it all comes apart but you'll probably have less trouble in the log run.
I'll do just that Bob, Thanks for all of your help! One last question. Can you tell me what size screw/thumb screw is needed to lock the feeding foot in place? Thanks again.
-
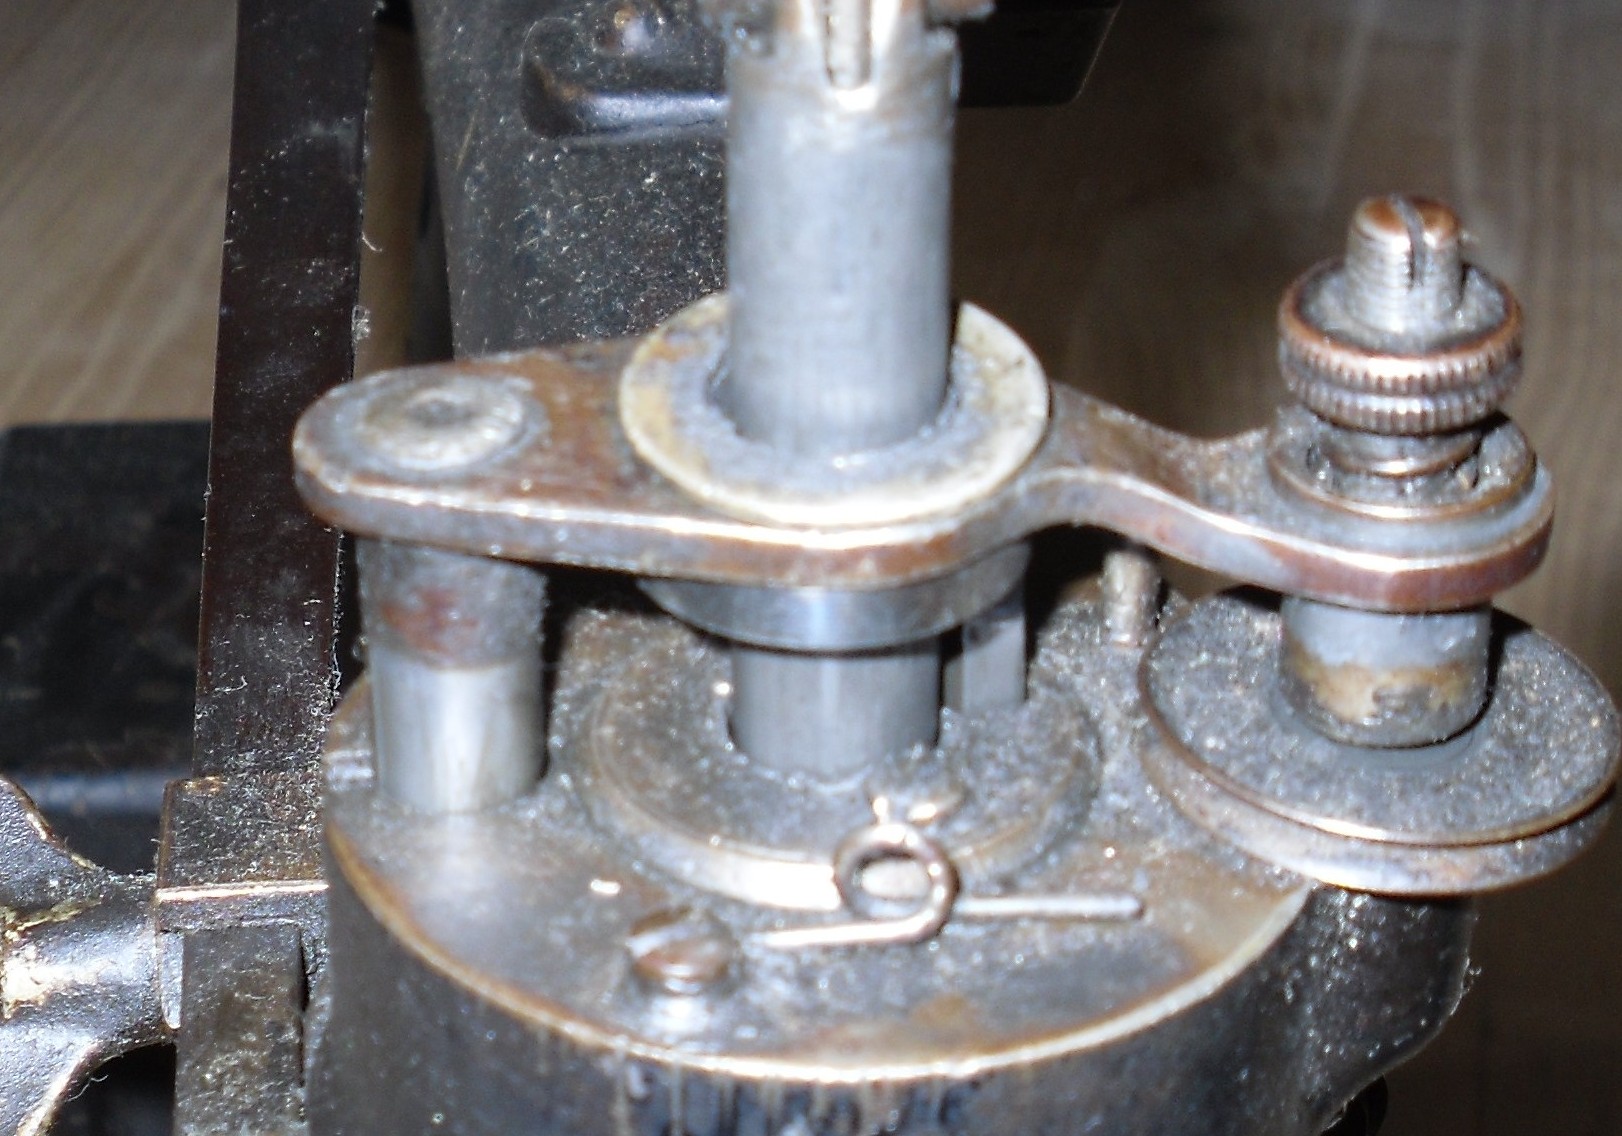
It's hard to tell from the pic because when I click on them they are to big to get any detail,but it looks like the washer has come undone from the collar underneath,originally they were just peened over & maybe somebody worked on the machine in the past & didn't repeen good enough,I would push the lower part back into the upper part so it doesn't have any play but still turns around & just tack weld it in 4 spots.
They call these machine shoe patchers for a reason,that's what they were made for,BUT I know alot of people have done some fantastic sewing on them & as already mentioned,some tape,rubber or grind off the teeh will stop the marking but will also stop the feeding of the leather making you have to push it through.
A big thank you to everyone who responded! You all were a huge help. I appologize for the picts. I know what not to do next time. Bob, that is exactly what has happened. The washer has seperated from the collar. Do you or anyone happen to have a service or repair manual I could beg for or know where I can download one? I looked but didn't find what I was wanting. I need to see how to remove that section from the machine for repair. I can have that tack welded like you said i'm shure if I could have the cross bar off and cleaned up well. Bob, do you also feel this is the reason the walking foot isn't feeding the leather?
You mentioned pushing the leather if you removed the walking foot teeth. I have seen some machines that have a roller or wheel that holds the leather. I wonder if something like that would work? I guess you would have to use a stiching wheel or something to know where to stop and place each stich or you would have a real mess on your hands.
Thanks a million!
-
Another problem that Bob has had with obtaining this material was the company changed policy as to min order. Bob used to buy it by the 5 gal bucket now they want him to buy a tanker truck load of it in order to get a price that would make every one happy. I used to live about 40 miles from Bob and his shop is not set up for that kind of bulk. I own a 20 oz and wish I could get other sizes as well. I see Bob a few times a year and I always ask when the next run will be ready.
I've seen these in his picts as well. What material are they made from?
-
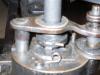
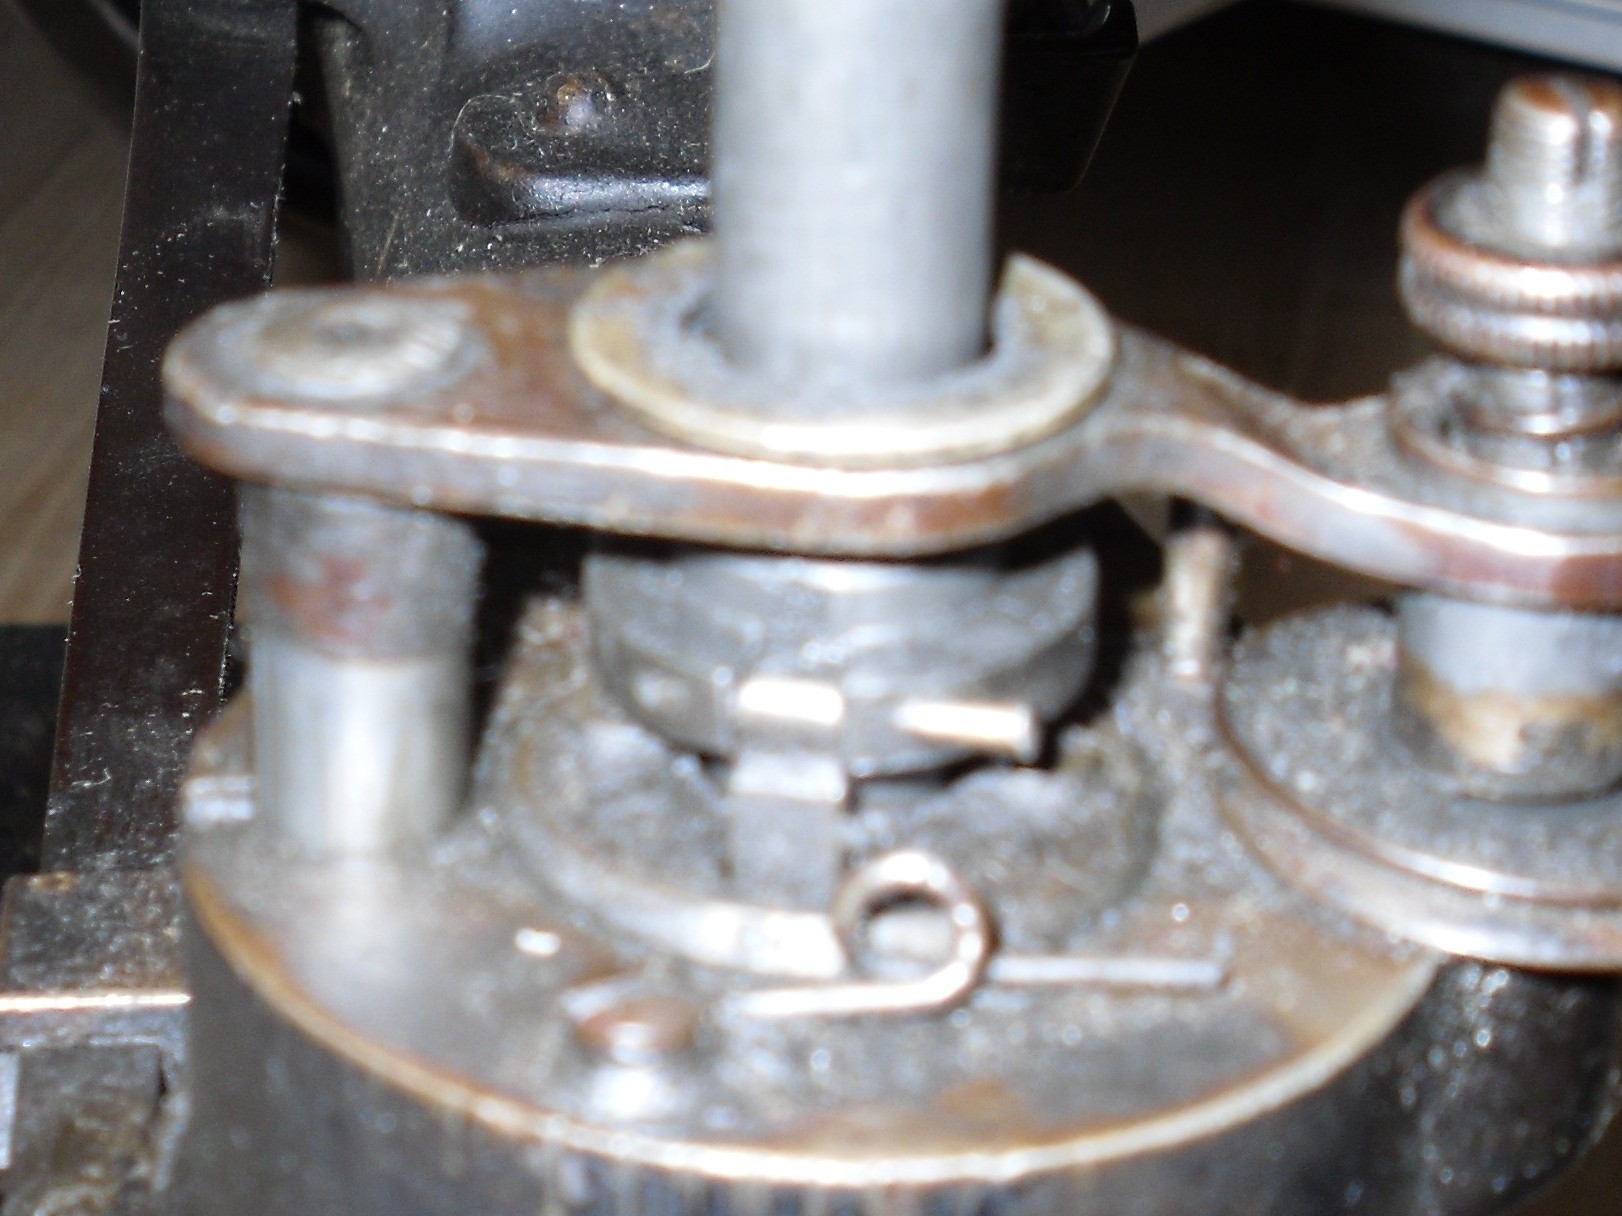
Hello All, I need some advice from you Singer 29 series experts. I am having a few issues with a 29-3 machine. First, When you lift the pressure foot lever the pressure foot does not rise because of a broken collar that mounts on the cross bar that connects to the pressure foot lever on the left side and to the adjustment screws on the right side. The first pict shows how it should look. Pict 2 shows what is happening. The brass like washer should be attached to the collar but it is broken. If I haven't described this well enough, please let me know.
The second issue, the pressure foot does not feed the leather. It goes through all of the right moves but it just will not feed the leather. I have a good idea it may be part of the first issue.
Last, has anyone ever figured out a way to avoid or minimize the marks the pressure foot makes on the leather? can a differant foot be used or anything?
If any of you know how I can fix this or know of someone that may have some of these machines that they are parting out that I may buy the collar please let me know. I'm shure this was discontinued long ago.
Thank you and I hope I was able to describe this well enough.
Thanks
I'm sorry, After posting this I should have put it in the Machine area. If anyone can tell me how to move it, i'd be glad to do so. Also I tried to reduce the size of the picts but It didn't work. I'll try and see what I did wrong.
Thanks


Covering A Hard Plastic Notebook
in How Do I Do That?
Posted · Report reply
A tremendous help guys!! Thank you so very much!