bullwhips
-
Posts
55 -
Joined
-
Last visited
Content Type
Profiles
Forums
Events
Blogs
Gallery
Store
Everything posted by bullwhips
-
I think there are a couple secrets in the book that come out here and there...not much, but to the novice rawhide braider (like me) there was some good information. Also I love biography's so for me it was a good read...and the pictures are amazing!
-
8thsinner, I replied with my thoughts in bold. You asked for feedback and I'm not trying to say I know more than anyone...In the realm of things I don't know much. However what's below are my opinions on whip making and they are that...opinions based on my experiences. Remember opinions are like *ssholes...everyone has one. The paragraphs I had no comment on I didn't copy, so they aren't below, just things I had thought on. I hope you take it for what I intended it to be constructive opinions...I did my best to put my reasoning for my opinions. One more note the forum dosen't like my comments in bold, and convereted a lot of the entire text to bold and won't let me change it, so where I couldn't use plain text I put a ** before and after my comments. sorry if this is difficult to read. Some things are impossible to balance, or nearly so, eg a 3 kilo 30 footer which will crack with 1lb of force behind it in the space of one second. The extreme mass simply cannot be controlled to allow for such an energy transfer. You can balance a 30 foot whip, you just need a big ol' heavy handle. Think bulluck whip. Flow The flow of energy is controlled by the density of the material used and how it is manipulated into a pattern. A four plait belly, with bolster and 16 strand overlay in a regular whip plait, eg, under four over four. has a limited number of connections between each strand, the flexibility of each individual strand is not very well controlled because the number of friction alternations is low. However, that same 16 strands if plaited in an under one, over one, under one, over one, under one, over one, under one, over one pattern will have more alternating friction points, which means the amount of movement being allowed is severely reduced. Resulting in a higher density plait. Higher density means better energy transfer.By this theory a whip that's entirely checkerboard will crack better than one that's 4 or 6 seam in the lash. There's a reason why you don't see a lot of all checkerboard whips (besides being a pain to make) they don't crack as well as a 4 seam whip. Bevels Beveling the strands can be done in many ways, You take the vertical edge of the lace and change it's angle to perhaps 30 degrees instead of 90. If this is done on the fall end of the whip in each lace, and the opposite ( handle ) side beveled at thirty degrees in the opposite direction these strands will sit in more closely to each other, the angles help the lace fall into a perfect position. This results in more a smaller gap size between laces lying side by side. This greatly effects the work. If you think about it like this. If you could see the energy as a line being passed down a solid bar of material, what happens when the energy hits a dip in the road? The shock wave must follow the line of the dip which disturbs the flow of energy. It then flows out from this following reflection and refraction. This effects the efficiency of the energy transfer and therefore throw of the whip. Personally I think that beveling the strands for a competent whip maker ends up being more of a cosmetic thing that a function that. For example Chris Barr who made that 72 strand stock whip doesn't bevel his lace. If you thing about it beveling actually weakens the leather at the point, the whip will be stronger with more square corners. There's an old sideshow stunt where you tear a phone book in half, and you do that by beveling the edge and tearing a nick in a couple of pages and ride that tear into the next couple and so on and before you know it you've torn the phone book in half. Same thing with a pared strand, you get a little nick in the point (which is the plait part that takes the most abuse) and by flexing and rubbing on the ground that little nick an grow into a broken strand. Taper The amount of taper which I categorize as a ratio from core width at the handle to the core width in the fall area over a limited distance greatly effects the speed of the crack at the end of it's energy transference. A whip with a one inch handle and half inch fall area over six feet, ( 1/2 x 6 ) will move more slowly than a core of a one inch at the handle and 1/4 of an inch at the fall area. ( 1/4 x 6 ) This is because the energy is traveling much more quickly due to the reduced mass inside the whip over the same distance. **This is dependent on how the whip is actually tapered. a whip that sharply tapers immediately off the handle and then evenly tapers the rest will handle different from a whip with the same start and end dimensions that evenly taper its entire length or one that is thick for most of it's length then sharply drops off at the point. So in my eyes it's more how the whip tapers than the actual dimensions.** Taper is controlled in one of three ways inside a whip, more noticeable on the overlay. Tapering strands A 16plait whip which starts with strands a 1/4" wide may be cut in a tapered fashion perhaps down to 3/16" Because the strand is taperd itself the energy transfer is much smoother. Reducing strands Strands are kept the same width during the entire length of the whip, The strands are usually tapered inside the whip lait itself using various methods but at some point that strand ends, inside the main body. This causes two direct effects. 1) The strand lying inside the whip sits up deforming the outer layer. 2) The strand ends. The first example creates an alternate route for the energy to travel along, and the latter causes the energy to jump from the end of the strand to the next point of contact. Tapering and reducing strands. Strands are tapered to a degree causing a more efficient transfer but the strands are also reduced, the loss in reducing the strand is coutner acted by the more efficient tapering shape. **FYI the above is very difficult to understand, I"m not quite sure what you are trying to say, so I don't have an opinion as to whether I agree or disagree with it. ** Mass The mass of the entire whip is important but everything begins at the handle. A very heavy handle will be harder to control with ease but will begin a larger transfer of energy down the body of the whip. This higher energy level causes two main effects. The fall and crack of the whip will be traveling much more quickly and result is a louder crack with more force behind it. Also the larger amount of energy also has to come to a sudden stop, creating more, heat, noise and friction against the air itself. All these factors destroy the fibres of the crack. In all cases the crack needs to be replaced more often for the same amount of use. **The cracker is designed to be replaced, so this really isn't a issue...except in the case of a with a braided in cracker. Usually a whip with a braided cracker is shorter and doesn't take the abuse that a 10 foot bullwhip will. ** Balance Balance is extremely important for the user as it's directly responsible for the ease at which multiple cracks can be made. A whip with the handle weight being equal to the entirety of the weight of the body of the whip will result in a whip which is easy to move from one crack to another without wasting physical energy by moving your arms and hand more. A lighter handle will be more cumbersome, this is all quite similar to lever principles. A heavy handle will take more energy to move around and create a slower whip action . **This is very much debatable, for example Adam Winrich who's had the Guiness World Record holder for volleys with a bullwhip prefers a nose heavy bullwhip. However one thing I've learned as a whip maker balance comes down to personal preference. Different balances crack differently, but one isn't necessarily better than another. ** Accuracy Many things effect the accuracy of a whip. The skills of the user are not as vital though obviously they do count. **What! The skills of the user are more important than the whip...but more importantly it's the skill of the user that's familiar that specific whip. I'd trust a whip cracker to knock a cigarette out of my mouth that's an expert using a poor whip much more than poor whip cracker using a expertly made whip. ** But for the sake of argument we shall say that the whip user is 100% accurate every time. This comes down the following aspects: Bias (alignment) Roll Circle Seams Control Bias The bias of a whip is the way the whip falls naturally when the handle is held out horizontally, if the bias is allowed to drop the fall to the ground and you try and twist the handle, it will feel heavier. This is the bias pulling the whip a certain direction. As you continue the rotation you will see the curve of the whip body move more and more outwards, until it eventually pops back into it's natural bias flips around and drops suddenly. The bias is much more noticeable on a new whip. Now if you turn a whip 180 degrees against it's bias with the fall towards your shoulder, it will sit in an upward rising curve. but it also comes back on itself forming a near circle. On a new whip this self holding circle can be nearly 3 feet wide. **You can train a whip to change it's bias. The natural curve is put there by the whip maker and the whip making process. However if you take a whip and use is 90 degrees off it's natural curve and coil it 90 degress off, over time the bias will change. ** Roll and circle. Following on from above, the roll is the distance apart that the body of the whip and the tip end of the whip are apart from each other during the energy transfer. If the BIAS is perfect on every layer, the whip should be touching itself here. If the whip is sitting perfectly vertically during this circle construction but not touching itself then the energy is trying to escape the line of energy which will send the tip of the whip outwards. Not on target. By dropping your hand slowly the circle should move smoothly down the length of the whip getting smaller and smaller as it does so. If it wobbles to the side the energy will shoot outwards. If it flops and appears looser in one area (like a kink) the circle will snap because of the energy transfer. this bounces of the internal layers of the whip and causes the area to loosen and breakdown over time.** I'm not sure how I feel about this...obviously this would be hard to test one whip longer than a few feet because if you are rolling out the whip, as soon as it hits the ground initial slow down and continuing friction will drastically alter the results of this. sure you could dangle the whip off a bridge and put a loop in it...but if you already have the whip in you hand you might as well just crack it and see how it tracks in the air...does it throw straight or wobble. ** Seams Seams are the number of friction points around the whip, A 16 strand under four over four sequence of plait continues to the back in an under four over four for example makes a four seam plait. An under two over two, under two over two 16 strand sequence plait will have 8 seams. As noted with the balance and flow elements of construction this increases the density. Takes longer to break in, slows down the roll and increases the circle dimensions, This can be handy for a dramatically slow whip crack for stage work. **Once again I'm not sure how I feel about this...a skilled whip user will know cracking techniques to dramatically slow down the whip (think Anthony Delongis's style which was designed for film work), that way you can do a mix of slow and fast cracks with the same whip. ** Control When I say control here, I mean the user control coming from the handle. If the user can move the tip of the handle completely in line with the target and the whip is a good one, then the whip will crack on target. Creating this line is easier to do when the handle is quite long. You have more time to correct the angle during the movement if a mistake in alignment is detected. A shorter handle will not have as much control. A standard sort of length for a target bullwhip is around twelve to fourteen inches, A performance bullwhip may have a handle eight inches long as standard. Stock whips often have handle twice this length in the extreme. **The length of the handle doesn't really give you more time to correct a bad throw...but it gives you more leverage to really tell a whip where to go initially. If you try to move the whip halfway through the crack the whip will get mad at you because you are giving it mixed signals and not go where you want it. ** All of the above elements and physics principles can be combined in one word. THROW How the whip throws, is the direct result of all of the above factors, describing a whip as "it throws like a noodle" probably means it's not plaited tightly and flops in use**Flopping also usually means it's light internally**. "throws like a needle" may mean it's deadly accurate indoors but it's far too light to stay accurate if the wind catches it. There are probably a million words that can and have been used to describe the throw, but it's common sense to work out why any particular word is used. Throws like a bull probably would be a common term if you kept getting face slapped with the fall. Here are a few terms to look at. Bellies Bellies can be single or double or more like Bernie at EM whips, leather (Naturally falling) or weighted (loaded) Naturally falling is when only leather is used to begin the whip, twisted thicker leathers Bull pizzle (traditional), white hide and kip are the usual methods found. Low plait bellies are standard with the number being most common sitting at four strand. If a second belly is used there are often more strands usually 8, however this can also be a simple four strand to increase the speed with which the whip can be made, density and flow all improve on the introduction of a second belly. I personally think that the number of belly strands is irrelevant because of all the layers above compressing down on it. The plaited belly adds density weight, and a bit of stiffness...and I bet the most knowledgeable whip cracker couldn't tell which whip had 4 or 8 strands in the belly if you had two whips by the same maker. Tapering method. Regardless of which tapering method is used, it should specify. If someone is using tapering strands for example, the maker probably spent up to a year getting this preparation process perfect enough to be used in a whip. They will be proud of the fact and should advertise it. The reduction method is somewhat quicker and easier to do but can also reduce the over all costs. **most whip makers don't specify that they taper strands. This is a basic whip making skill. Look at guys like chris barr, joe strain, vic tella, or paul nolan's websites, none of them dramatically advertise that. It might be mentioned in a FAQ, but it's something all whip maker should be able to do if they are selling a whip.** Bolsters Bolsters are often used to somewhat pad the plaited layer beneath, and help to smooth out the shape of the taper. They can be thin and even a little flimsy or even quite firm. They can be twisted around the thong, or have a straight seam through the length of it's use. A common construction may be, twisted leather core, bolster, plaited belly, bolster then possibly another belly, bolster and finally an overlay. **A well made whip's bolster shouldn't twist around the thong. It will slow the energy going seam to seam, and the energy will want to travel around the whip instead of in a straight line giving you a turning action. This however will be a very minor effect because the bolster is held tight by the layers above.** Type of material Kangaroo is one of the strongest leathers, Red hide skins being the best ** should be the red species...Red Hide typically refers to a specific type of latigo**, Females improving the quality again and using a drum stuffed tanning process on top will dramatically increase the strength of the laces used. Using this type of leather allows for very fine strands of even 1mm to be used and still pulled very tightly. It certainly is not necessary for 16 plait whips but the 16 plait with this leather will be extremely tight and take a little longer to break in. Cow hides Come in many forms being more common in every day use and careful research should be done on this. Simply stating cowhide doesn't mean much, Chrome tanned (the commercially most common form of tanning) results in a much weaker hide with the fibres being broken down all too much.If I recall correctly Terry Jacka uses chrome tanned cowhide in his whips. Vegetable tanned is much stronger, holds it's natural oils better and longer and breaks down the internal fibres much much less. Cowhides will rarely be split to very low thickness ratings because it is a little weaker, but you can still get very strong plaits from cowhide, especially if the laces are beveled. Beveling decreases the strength...think of that thinner edge One thing I've learned about whips and whip making is that an article like this is very difficult to do because every whip maker does things differently and whip crackers look for different characteristics in their whips. So much of whip making comes from experience and learning what works for you as the maker and what you as the maker like to crack. Someone could make a whip with all the positive characteristics you mentioned above and still turn out a very bad whip. At the end of the day I'll take the worst whip that Joe Strain made all year over the best whip that a whip maker with a couple years of experience made this year. Louie
-
Hollywood, I've got several sources for roo that I use that I get good skins and a good price. I've gotten from Taubman before as well. I was surprised that Tandy was selling again and tried out one of their skins...and while they aren't bad skins, the dry and price are deal breakers for me... I"m going to stick with my current suppliers. Louie
-
On Thursday I stopped by my local Tandy to pick up some kip and the manager told me that Tandy is now selling whole kangaroo skins. The skins they sell are dry, and expensive, if you can get over that they aren't bad skins. I bought one try out and here's what I made with it: It's alway nice to have a local source of skins...however due to the "pain in the butt-ness" of having to grease them myself I'd rather get drum stuffed skins. Because of that (and price) I see Tandy as an alternative source for roo skins, not my primary. However it's always nice to be able to go in and actually see the skins before you buy them! Has anyone else tried the skins that Tandy sells? Louie
-
I wasn't a big fan of the "italian white" from hardtke, if I remember right it was a chrome tanned roo with a white glaze over the top. The problem I had with it was that I had you had to be very careful when you stretched it or it the glaze would crack. A little while ago I got some white from Paul Nolan at www.midwestwhips.com and while I haven't used it, it looks great! Louie
-
Chris Barr is well known in whip circles, he's currently the president of the APWA (http://www.apwa.org.au/). Louie
-
There is a small cosmetic flaw in it (I wouldn't call it a mistake), but to be fair and completely honest that whip is a million times better than what I and just about every other whip maker could do and it's an AMAZING WHIP! Someone told me that making whip isn't how well you make them, it's how well you hide your flaws/mistakes. I'm not going to point out what I see, but it's there and if you don't see it then it's not something you should worry about. Also I didn't notice this until someone else pointed it out to me.
-
And by using a less lard I've noticed that my plaiting soap at then end of a month started getting really dried out and sometimes I need to rehydrate it by cooking it up again with some water.
-
There are soo many correct ways to prepare the lace to make a whip (some are more correct than others). There are a lot of ways to think about it, for example I remember David Morgan sternly lectured me against paring both flesh sides because over time the strands will push up against each other like tectonic plates...however until that happens it will give you a smooth look to the whip. If you pare opposite corners you will get a bit more texture to the look of the whip. If you dont' pare it will have a lot of texture...but if the strand is thin enough you won't really notice it. A fun experiment is to alternate paring top left/ bottom right and top right and bottom left across your set. You'll get a whip that is very smooth one way you look at it and have a lot of texture another way. When you have thinner strands and you pare them you are risking losing some of the strength of the strand. Think of the old sideshow stunt of ripping a phone book in half, you have to bevel the phone book and get a small tear and ride that tear through all the pages...however if you hold the end flush you won't be able to rip it in half. So with thinner strands you'll get a more durable product without paring. If I recall Chris Barr doesn't pare his strands, and if you've ever seen his 72 plait stockwhip you won't doubt how smooth a whip can look without pared strands. Another memory I have is asking Joe Strain which is the best way to pare lace, his answer was priceless, "it'll still braid no matter how to you pare it" and that's the best answer! Paring will mostly change the look of the whip, not the function. A well made whip with unpared strands will perform better than a horribly made one with pared strands and vice versa. In my opinion a competent plaiter can make a good product with any way of paring or not paring, and in my opinion main result of how your pare or don't pare is cosmetic. I've had a lot of fun trying out different ways of paring lace to see the results...I think any aspiring whip maker would find it interesting as well,and I highly recommend experimenting.
-
You can get the dubbin from these places: http://www.pappysdub...om/dealers.html I used to be a dealer, but I personally used more than I sold, so now I just buy it by the gallon for me. Also with plaiting soap, personally I back off a bit on the lard (I used Morgan's recipe as a starting point). You'll notice if you plait tight when you get to the 2nd half of the whip it will end up darker than the first half. Ever since I started using hardly any lard I get a more even color. I've got a theory why the last half will get darker, and part of it is too much lard. My plaiting soap is mostly soap and water. Another thing when I cook my plaiting soap I hit it with my cheap-o mixer a couple of times. Then I mix it while it's cooling off. The reason you mix it is to keep it from seperating while it's cooling off. It doesn't always do that, but when it does you have to recook the whole batch. I find that if I spend a minute mixing it saves me doing it over. Louie
-
For what it's worth, I use the word grease for a lot of things: Plaiting soap, dressing, or anything that's remotely grease-like. If I have a dry hide I give it a coat of dubbin (http://www.pappysdubbin.com/) and let it soak in, then buff it out. Repeat if necessary.
-
You want to pull harder than you'd plait. The object is to stretch, and occasionally discover a weak spot before braiding. Also if you have a dry roo skin and are planning on greasing it, I grease it before I stretch. You'll notice that a drum stuffed skin or greased skin will stretch differently than one that is bone dry.
-
As a whipmaker stretching kangaroo is essential! It will help you get a more uniform width and firmer strand. That firmer strand will help you (in a whip) get a nice dense internal layers because each pull you will be compressing the layer under what you are plaiting instead of stretching the strand AND compressing. And as a bonus a good stretch will help you find any weak spots in a strand before you are 5 feet into a plaiting project and have to deal with splicing. A few weeks ago a wrote on my blog a post about how much stretching goes into the strands I use in my whips: http://bullwhips.org/?p=3640 Also personally I stretch all roo that will be plaited no matter what the project is. It may be "unnecessary" work for simple projects that don't take a lot of stress like a bracelet, but it will give you a better end result. Louie
-
One thing about the site is that there is no easy way to order. For example if I wanted to order the Morning Glory Belt, I'd have to email you, wait for a reply, then reply back and figure out how to pay you. You don't clearly state what you take for payment. That makes it a lot of work for the person shopping. Most people shop online because it's easier than getting in the car, fighting traffic, getting lost, wasting gas and time just to buy a belt or whatever. I bet if you added a paypal "buy now" button to things like belts where there isn't too much customization you'd get a few more orders because for the consumer, they'd be able to pick what they want and pay now and they know what form of payment you take. Also personally I'd probably not buy from you because from your website I'd guess that you don't take credit cards or paypal. It looks like I'd have to send you a check or money order which is the least secure way to buy online...I know when I shop online if I pay with a CC or paypal and the order never gets shipped and can dispute it with the my CC or paypal and get my money back. However with a check or money order I'd be stuck with the loss if you weren't on the up and up. I'm not saying that you aren't honest, I'm sure you are a fine business person, so please don't take that the wrong way.
-
The problem with machine cut lace is that you can't control weak spots, stetchy spots or splices. By cutting your own lace you can avoid all of that. When shopping for machine cut lace you should try to get hand cut lace, it's a bit more expensive, but usually the person that cut it will try to avoid weaker spots. David Morgan's shop offers hand cut lace www.davidmorgan.com. Also I'd do my best to not use the spliced part of the lace in the work, I know that's not always a option, which is why cutting your own is better than machine cut lace.
-
What I like about getting kangaroo from another whipmaker or braider is that they will pick you out a great skin...however the price is a little higher. For someone starting out I'd highly recommend getting roo from someone that knows what a good skin for your project and will pick you out a good skin to work with, even if it costs you a couple more dollars. When learning to cut out a skin you don't need to be worried about a heavily scarred skin. You just want something clear that you can learn to cut on, or is strong enough to braid with. However once you have a bit of skill with cutting and plaiting then a less than perfect skin is much more workable.
-
I used to get roo from Mike Murphy, but personally I prefer roo from Packer. For the price you can't complain about the stuff from Murphy, it's good...just not as good as Packer. When I'm only getting a skin or two I get them from Paul Nolan http://www.midwestwhips.com, and I get them from Hardtke http://www.charleshardtke.com/ when I need more than a couple of skins. The Packer skins are a bit cheaper at Hardtke than from Paul Nolan, but if it's just a skin or two I make that back in cheaper shipping and faster delivery time by order from Paul Nolan (I'm not too far from Nolan). I've never been impressed with the AmazingOz people in Australia. I've gotten a few hides from them and in my experience and opinion they don't know what a Grade A hide is. Also I'd ordered drum stuffed and didn't get drum stuffed. You'll get the best hides from David Morgan http://www.davidmorgan.com , they are a bit more expensive, but they sort theirs by thickness and pretty much only get the best skins from packer. Personally for me being able to visit David Morgan's shop and pick out my roo skins can definately offset the cost when I'm working on a special project. However lately those have few and far between. Also unless it's changed recently you still have to pay the $60 export permit fee on top of the roo price and shipping to get kangaroo skins legally out of australia, so you need to factor that into pricing when getting directly from Australia. That was the deal breaker for me and what got me to use suppliers in the USA.
-
One of Ron Edwards booklets has a method for making Braided snakes from roo. I saw one that david morgan made about 30 years ago when John Leonetti and I were doing a whip cracking workshop with David's son Will in January. You can see David Morgan's snake at http://web.me.com/jo.../122709.html#60. Here's a SNAKE signal whip that I made a few weeks after seeing the braided snake that David Morgan made: My braided snake has a checkerboard plait on the back and sides and an over two under two type pattern on the bottom to look more like a snake. Here's a close up of the snakes belly: This signal whip cracked very well and it was a fun project. Louie
-
Very cool looking!
-
There are a lot of ways to do it: You can find the middle of the strands and do a 4 plait flat braid for a few pulls then switch to a round braid. Or you could have a bit of a yoke in the middle with two strands coming off each end. Then just start the 4 plait braid. Or you just just put the middle of two strands through the key ring and start braiding. Each way will give you a slightly different look where the key ring goes through the braid. I agree that David Morgan's book Braiding Fine Leather is a great resource...and it's not too much money, something like $14 at amazon. Louie
-
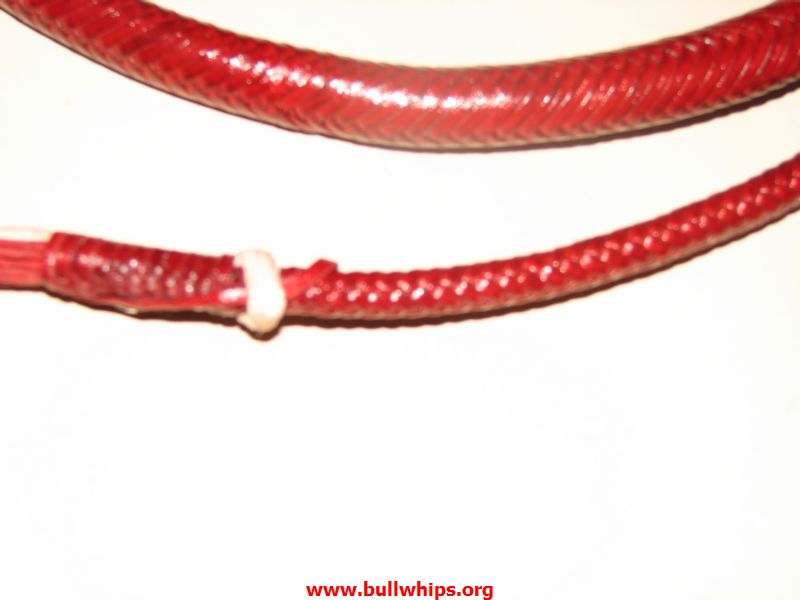
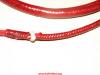
8thsinner, The lace I use is hand cut by me, I cut it with a box cutter. I don't use precut store bought lace because you don't know where from the hide it was cut from and I don't want any shrinkage when I plait them. The lace in this bullwhip started at 3mm and tapered down to 2mm at just shy of the 4 foot mark where I started my strand drops. Louie
-
Personally I try to only use drum stuffed roo, and if I"m forced a dry hide I grease it a day or two before I cut it up. Also Veg / bark tanned is better than chrome tanned for plaiting. I pare my strands by hand with a box cutter, and I don't really have a chattering issue. Here's a video of me from a while ago working on my top left paring (normally I do top right) on an 8 plait set of kangaroo: I can cut an 8 plait set on both sides with one blade (usually), when cutting 12 or more I usually use one blade for the flesh side, then change it and use another for the grain. Shelly you have it it backwards, the smaller gray kangaroos are what is easily available and the larger red kangaroo skins are harder to get right now. You can what kind of kangaroo you have if it's from Packer. Look at the stamp that says the skin's size, if the stamp is silver/gray it's from a gray and if it's a red stamp it's from a red. Louie
-
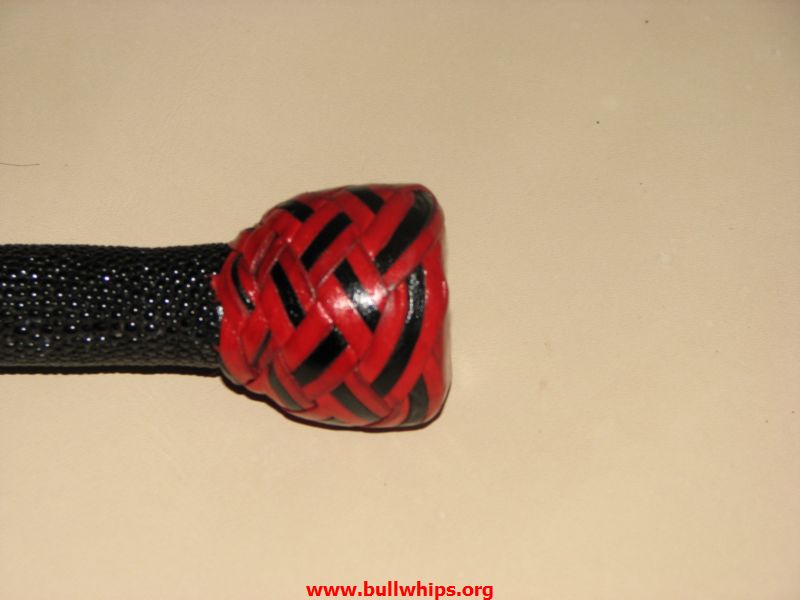
Did they have bullwhips or signal whips that I made? Just curious. The sting ray bullwhip is a bit to "flashy" for my personal taste in what I'd use...but I still think it looks cool! I could pictures some sort of circus ringmaster in a movie using it. Louie
-
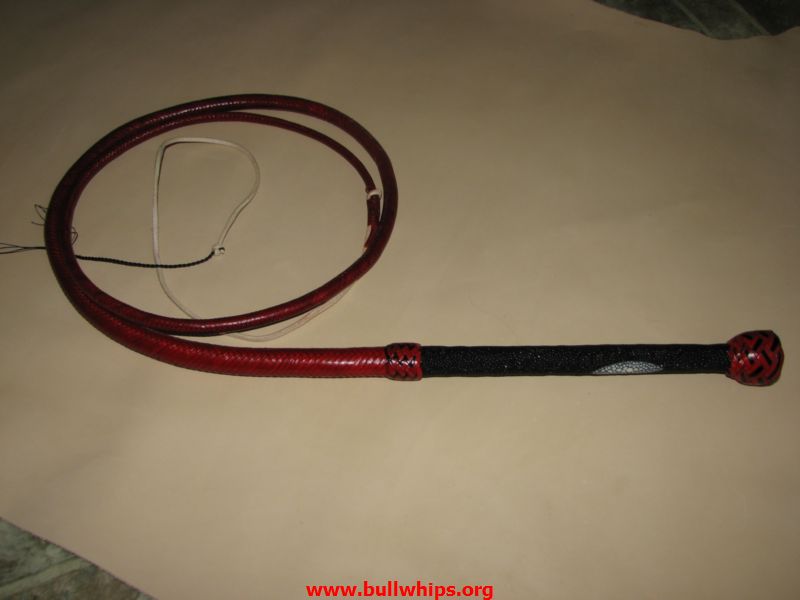
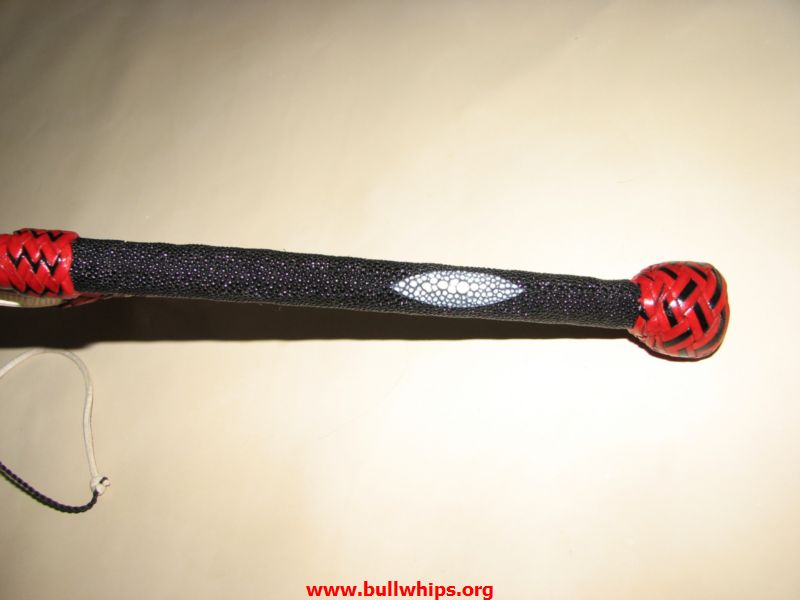
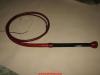
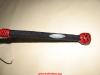
Here's a bullwhip that I finished yesterday. The handle is stingray. It's got a 20 plait lash that ends in a 10 plait point. It was a fun project to do! Louie
-
Braiding And General Q Re: Petroleum Products
bullwhips replied to DSJackson's topic in How Do I Do That?
Try cooking up a batch of plaiting soap to use to lube the roo lace. The formula that they use at David Morgan's shop can be found at http://www.davidmorgan.biz/?p=536. That's basically how I make my plaiting soap, but I use more soap and less lard. I've found that for how tight I plait having too much lard will discolor the points of my whips. One thing about using Pecards to lube while plaiting on drum stuffed kangaroo is that is can discolor the strands quite a bit if you are using thin lace and pulling tight. I went through a short lived phase of using Pecards to plait with and the result was the 2nd half of my whips were much darker than the first half and definately had a greasy feel. Louie