Rod and Denise Nikkel
-
Posts
423 -
Joined
-
Last visited
Content Type
Profiles
Forums
Events
Blogs
Gallery
Store
Everything posted by Rod and Denise Nikkel
-
Here is something (slightly reworked) that we posted a while back, and the more we talk about it, the more I think this is the philosophy we work from. Saddle fitting is not rocket science. There are two basic rules: 1.) Don’t get in his way. Make sure that the edges – the front, back, top and bottom of the bar don’t dig in anywhere, and the cantle and fork gullets don’t contact the horse. 2.) Within those margins, keep as much contact with the horse as you can over as much area as possible without breaking rule #1. In other words, shape it the way they are shaped as much as possible. If you do those two things, you will have a good fit. We are not trying to fit camels, elephants and donkeys here. A horse is built like a horse, with some variations. Problems arise quickly when rule number one is broken. You can have a fair amount of leeway with rule number two and still “get away with it” (ie. not hurt the horse) because of the movement of the horse under the saddle. This is why if you have a tree that is correct in the basics, it will fit a wide range of horses well enough to be used comfortably.
-
Anyone got a source for SS hand shoe tacks? We use SS ring shank nails for the trees as well (you're right - they don't come out easy), but haven't found a supplier for the tacks we use when holding the rawhide in place prior to stitching. The steel ones we currently use sometimes discolor the rawhide. We wouldn't need a lot since they are reused a number of times.
-
Old Frazier Saddle
Rod and Denise Nikkel replied to Randy Cornelius's topic in Saddle Identification, Restoration & Repair
Steve responded while I was typing, but here goes what I found anyway. Information from “They Saddled the West” on the R.T. Frazier Company: Started in 1890 by Robert T. Frazier. He worked with S.C. Gallup under the name of Gallup and Frazier before that for ten years before they split. Frazier was a believer in strong advertising and put out large catalogues of his saddles. The sales peaked in 1919 due to “the dearth of saddles throughout the cow country due to war restrictions on materials.” Orders increased after the war ended, and he had “a force of 50 saddle- and harnessmakers in his shop”. He died in 1931, but his wife continued the business on. It doesn’t say anything about the materials he used in his saddles though, so it doesn’t help you there. I have found it interesting in reading through this history book on saddles that most of the names we still know are because they created larger companies. They generally had quite a few makers working for them and it was their company name that got stamped on the saddle. So while we think of Walker or Frazier as great saddle makers (and they probably were in their own right), most of the saddles that have their stamp on them were probably never touched by their hands. I would suspect there were still individual makers out there turning out great saddles but because they didn’t make a factory with lots of workers, their names have been lost in history. And if one of their saddles is found now, it wouldn’t be worth as much because the name on it is unknown, whereas a Frazier saddle – though probably made by another maker – is worth more. I guess then, as now, the name sells. -
We have had a couple of these sent to us and they work fine. The biggest thing is to get one that is long enough for Western saddles. At least one company charges extra for that compared to the ones they sell for English saddles. Also, we had one (not equimeasure but similar idea) sent to us along with the directions which they had followed fully. The directions had you starting the mold ahead of the wither, but it ended about mid-back so gave no information about the back bar pad area. Other disadvantages are that it only checks one horse at one point in time, so if you have multiple horses, which one will you do or will you purchase a few of them? Then there is the cost of the form and the extra shippping costs to consider. And it isn't a system you can use to compare between horses in any manner. So for a single tree here and there, it works fine. But as it wouldn't work well for categorizing horses or quantifying shapes.
-
As we may have said before, “Every tree maker does things differently”. So you can’t expect to order the same numbers from us as from anywhere else and get the same fit. It just doesn’t happen. With that as a base, then you know from the start that you are going to have to spend some time talking with us, just as we know from that start that taking an order from a new customer means a fair amount of time on the phone as Rod talks you though it. To help reduce that time, it is good to know as much as you can about what we do and how we see trees. This is why we originally sent out our information articles and then started our website. It was meant to be a resource for our customers. (The principles there can be applied to other trees, but the specific numbers can’t.) So if you are familiar with the contents of that, at least we have similar terminology and you know, for example, what we mean when we say we measure by hand hole width and not gullet width in case you have never done that before. So when you first call, whether you have read our stuff or not, we will ask you what type of horses you are trying to fit. This is the hard part – getting what is in your head into our heads. This is where Dennis Lane’s system will be a huge help if people use it. MUCH easier to communicate shape that way than our current descriptive words. If you have something a bit unusual or are concerned about us not being clear on what you are trying to fit, then you can send back drawings to us, done as we describe in our “Fitting the Horse” information article. Also, we may or may not know how the two other makers' trees you have used fit but if we do we often have some idea how similar or not their trees are to ours, so that may help us as well. Next, Rod will explain what the different options are, in all their permutation and combinations, discuss how we like things to fit and give you his opinion on what might work for you this time round. Then there’s discussion until you are comfortable with your order. Unfortunately it does come down to: You don’t know for sure how our trees fit until you have one and although we listen to you and ask for your input and opinions, ultimately you have to trust us to make what will fit that type of horse best. The problem has always been communicating what “that type of horse” is. Question number two is easier. Once you have a tree or two and have thrown it on a few horses, you will have a pretty good idea how they fit, especially if you have ordered different sizes. Deciding what to change to fit a different shaped horse is much easier when you already have something to start with. The best thing is to take one of our trees you have on hand (since you are a regular customer) and put it on the different shaped horse. It may surprise you by not needing to be much, or any, different than what you have already. If it does, you can look to see what needs to be changed. If you aren’t sure, expect a longer phone call again as we ask specific questions when you order. Pictures work well too, especially now with e-mail. Take pictures of one of our trees (tell us which one) on the horse you need to fit, especially of areas that concern you. We know the shape of that one (we keep piles of specs on every tree we make) so if we can see what you see, we will have a good idea what to change. And as we discuss this with you, you will know too for the next time. I guess in both cases there are three – no four – steps that need to happen. 1.) Communicate the shape you want us to fit. This is the hard one. You can’t tell us the size and shape you want us to make the tree, because you don’t know what our sizes and shapes are till you get a tree. So you have to tell us about the type of horse you are trying to fit. 2.) We will discuss with you the specs we feel we should use to fit your type of horse and why. 3.) You have to trust that we know how we build trees to fit that shape. There is your “4 month and cost of the tree” question, but that is honestly the way it is. Your customers trust you too. 4.) Give feedback when you get the tree. If it doesn’t fit the way you expect, we want to be the ones to know. Maybe it is because we have different expectations on how a tree should fit. If that is the case, another long phone call can clear up the discrepancy, though hopefully most of that was taken care of in the first long phone call. Maybe it is because we didn’t communicate clearly enough about the shape, so we have to figure that out better. In any case, we will do what we can to help get it right. And if it does work, tell us that too. We really like that kind of phone call.
-
Anatomically, the thoracic vertebrae which make up the withers lean backwards. The lumbar vertebrae and the thoracic vertebrae just ahead of them lean forwards. At some point, there has to be one that goes straight up. This is called the anticlinal vertebrae, and in the horse is it the 14th vertebrae, plus or minus one because there is always some anatomical variation. This vertebra must be shorter than the ones on either side or else they would hit and cause pain. Thus, the anticlinal vertebra is the lowest point of the horse’s back. If a horse is built severely downhill, the anatomy doesn’t change but it is possible that the lowest point might appear to be a bit forward because the whole vertebral column is tilted forward, but this can be easily taken into account. This low point is also consistently above the horse’s center of gravity when it is standing still. It was also used by some old time saddle makers as a reference point when they were designing saddles. Using this as a “datum measurement”, in Dennis’s terms, the other measurements are taken relative to it. This makes it very useful in comparing between horses. If you take a measurement 4”, 6”, 8”, and 10” behind that spot, the shapes will all be different. Horses’ backs are vary in length but the same bar length might be put on them all. By using a consistent point to measure, you are fitting the same point of the bar to the same place on the horse’s back relative to the 14th vertebra. The same idea goes for the other measurements. David, you have a system that works well for how you design trees, and that is great. This system was designed to be as easy to use as possible and as consistent as possible in comparing different horses. Thus it can accurately convey information regarding the shape of the horse’s back from saddle maker to tree maker in a very simple format. Nothing is perfect, but out of all the “shape communicator” ideas, this one seems to be the easiest and the best, so we are trying it out.
-
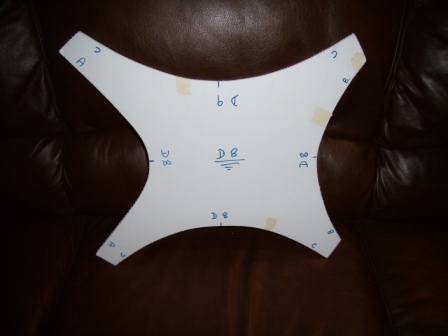
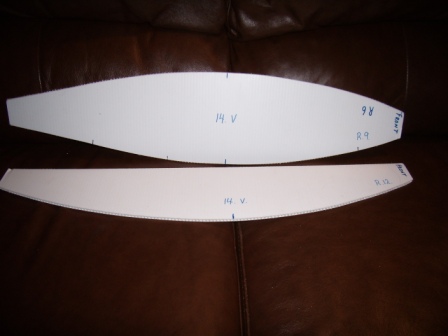
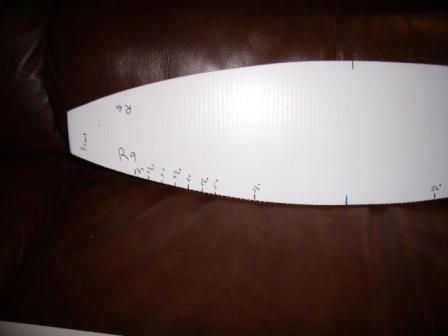
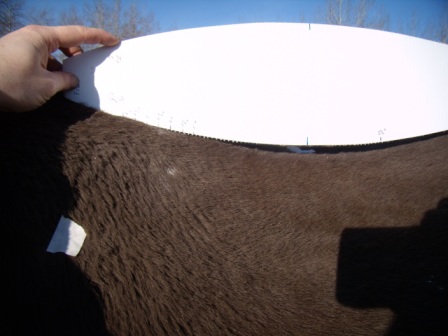
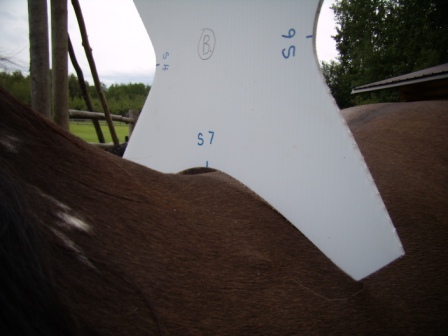
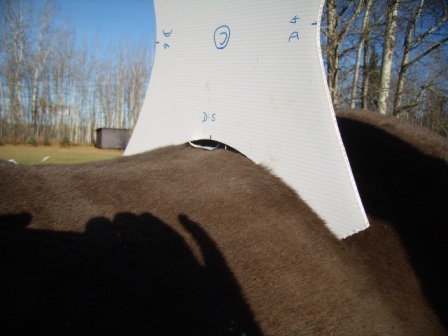
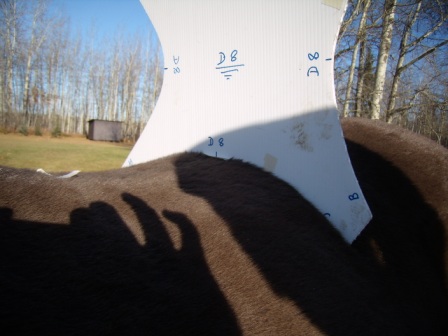
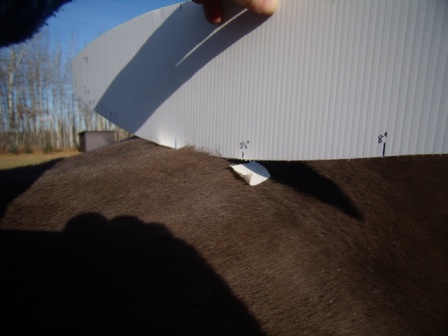
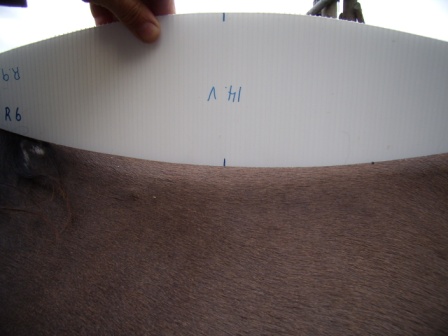
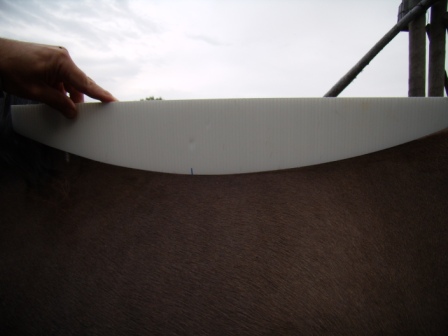
Here is a pictorial tutorial of how Dennis Lane's Equine Profiling Cards work. This system is designed to enable anyone to easily determine the shape of the card that fits correctly at four different places on a horse's back. The numbers can then be communicated to anyone else who has the card system – saddle makers, tree makers, etc. Dennis has used the system well in Australia with his trees, and has now made it available to us in North America. Here's how it works 1.) Become familiar with the cards. There are four different shapes (S4, S5, S6, S7) on the S cards and four (D4, D5, D6, D7) on the D cards for each of the A, B and C positions. There is one extra card that has the A, B, and C position for shape D8, and a D9 shape for the C position. There are three shapes to determine rock – R9 is the middle, R6 is flatter and R12 has the most curve. There is a "ruler" on a rock card to help you measure more conveniently. 2.) Stand your horse as squarely as possible on flat ground. Find the lowest spot on your horse's back. This is the B position. Note: this spot corresponds to the 14th vertebrae and is situated above the horse's center of gravity when standing still. This is a consistent point on all horses from which all the other measurements are taken, making the system a consistent way to compare horses. 3.) Using a ruler, mark a spot 8" behind this spot. This is the C position. 4.) Feel for the back of the horse's shoulder blade (scapula). Mark this spot. This is the A position. 5.) Measure and record how far forward this spot is compared to the low point of the horse's back. (This horse measures 8".) 6.) Take one of the cards for the B position and place it on the horse's back at the B position you have marked. You are trying to find the shape that most closely matches the shape of your horse. Record this. This one obviously doesn't fit. But this one does. 7.) Do the same for the C position. In all cases you are looking for fit all along the card, but especially where the bars fit on the horse's back. This one still has some clearance, and the ends stick in a bit. This one fits. 8.) And the A position. This one seems to fit well down below, but the shape is wrong up top. This one fits. 9.) Next, measure 3 ½" down from the centerline of the horse at position B. 10.) And C. 11.) Place the rock patterns perpendicular to the horse (not vertical compared to the ground) along this line 3 ½" off the centerline. Make sure the center mark on the pattern (marked 14 V) is at the B position. Keep the horse as square as possible with his head in its normal "working" position. You are trying to find the card that most closely matches the shape of your horse. Record this. If the card has too much rock compared to the horse, it lifts off the back. Too little and the center doesn't meet, as in this case. This one fits all along. 12.) Fill out the form sent to you, including the horse's name, age, sex (and number of foals if a mare), breed, what they are used for and any other comments about the horse, along with your results. This form can be sent to the saddle maker and then to the tree maker. Dennis also asks that you send him a copy, via e-mail or snail mail, so that he can continue to build his data base and improve his system to fit the North American horses as well. Dennis Lane is a member of this board under his own name. If you want more information about receiving a set of cards, please PM him. A number of people on this forum are currently trying Dennis's system. He has worked with us on this post and would like feedback and free discussion on this forum about how his system is working for the rest of us.


-
Ashley, A number of years ago we put together a small package of material we send out to people who ask about learning how to build trees. We would love to teach people who are serious about becoming tree makers, but we have yet to have anyone take us up on our offer. Included in that package is the following: Equipment needed for Tree Building 1.) Large equipment - minimum 28" band saw (ours is 32") - pneumatic drum sander with stand idlers, converted to belt sander - 12" jointer and planer or combination jointer/planer - dust collecting system (we have a Clear Vue cyclone) 2.) Small power tools - 5" side grinder x 2 - electric drill - router - circular saw 3.) Other tools - clamping and gluing equipment - numerous hand woodworking tools Other requirements you will need: 1.) A shop of some kind to work in. This makes too much dust and noise for tree making to be a basement project. 2.) A dependable supply of kiln dried (7-10% moisture) hardwood and softwood where ideally you can choose the boards you want. Lumber yard wood is not acceptable. 3.) A source for horns and other good quality hardware needed in making trees. (Bork Saddlery Hardware or Boise Foundry) 4.) A dependable supply of bull hides that are carefully skinned out. 5.) Someplace to make rawhide, and a place to get rid of the garbage from making rawhide. 6.) OR, in place of 4 and 5, a dependable place to buy good quality rawhide which hasn't been dried. (A lot of guys use Hereford Byproducts in Texas.) We don't have a table saw, radial arm saw, lathe or moulder. Could one or two trees be made otherwise? Probably, but that bandsaw is pretty critical in getting the cuts on the bars to fit the fork and cantle correctly. And if you are going to make many trees, especially if you will have hardwood in them, the other equipment is pretty vital too. As for a manual on building trees, maybe someone could put out a short "how to" cookie cutter type book. But you need to understand the "whys" and not just the "hows", and I probably don't have enough time left in my life to write that. Part of what we would give people who learn from us is full written instructions, but that is along with good teaching. Without the seeing and doing, the instructions wouldn't be completely understood, or worse, they could be misinterpreted and misused.
-
Saddle treemakers-sub topic
Rod and Denise Nikkel replied to Hidemechanic's topic in Saddle Supplies, Tools & Trees
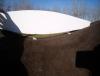
This has been a very interesting topic to re-read. Here are a couple of thoughts that maybe haven’t been put out or maybe just stated in a different way. Is anything “better” than good quality wood and rawhide needed for a saddle tree? Good, knot free wood is very difficult to break, yet can be carved to any shape desired. Rawhide, as a natural material, has a strength and resiliency that would be very difficult to duplicate with synthetics. We have driven over one of our trees with our rawhide to see what would happen. A half ton did nothing. It didn’t break. The front end of a five ton loaded moving truck flattened the bars to the ground. We heard it crack. We saw it flatten. We picked it up afterward and the bottom edge of the bars had been scuffed on the concrete all the way along. But the bars were their normal shape again and we could not tell it had been broken. No give, no squeaks, no nothing. Only a couple of popped stitches on the rawhide under the gullet. We soaked the rawhide off (which took over a week to get it soft enough to pry away a little around the edges, and this was unvarnished rawhide) to see what had happened underneath it. Both bars had split longitudinally – three times on one bar, twice on the other – through the screw holes where they attached to the fork where the wood is the thinnest. The cracks didn’t extend all the way down the bar. This is why we use the wood - yellow poplar in the bars - that we do. It splits lengthwise, not across the grain. I can’t see this type of result from using other materials. A fair percentage of our trees go to working cowboys who use them day in and day out. Some of them now have up to 12 years on them, which is hopefully only a small percentage of their lifespan. And we have a collection of “wreck” stories as well, yet only one where the owner figured he had “cracked a sidebar”. (Not comfortable roping in it, he sold the saddle to someone who didn’t rope…) So are good quality wood and rawhide all you need to withstand the use, abuse, and occasional adventure that a saddle tree endures? Our answer would be yes. Then why do people constantly look for something else? A couple of thoughts: 1.) Decreased cost and time in production. Carving a wood tree is a longer process than using a mold to shape a synthetic substance. It takes a few hours to rawhide a tree, then a couple of weeks babysitting them, pounding seams and resetting nails a couple times a day till they are dry. Then a couple coats of varnish. That means time and labour costs. All the alternatives that have ever been used, to our knowledge, are faster and less expensive. That is a consideration in business, and a less expensive tree has a place in the market. 2.) Poor quality workmanship and materials in some wood and rawhide trees currently being produced. A good wood and fiberglass tree will be stronger than a knotty pine and chicken skin rawhide job any day, and if that is the quality of tree you are experienced with, it makes sense to go for something different. In the same way that the newer synthetics can’t be judged by the quality of older, poorly made ones, neither can wood and rawhide as a whole be judged on the quality of large factory production run trees. Ultimately it comes down to the saddle maker’s decision on what he wants to put his name on. And that is why we not only use the types of materials we use, but use the quality of materials we use. We are comfortable putting our name on these trees, and wouldn’t be on other types of trees. Other people with different markets or different ideas may choose something different. Is one “right” and one “wrong”? No. But it is always good to know why we are doing what we are doing, and honestly recognize the drawbacks as well as the strengths of our choice. As an aside, it is really good to read the differing ideas from so many saddle makers coming from different viewpoints, and yet being discussed in reasonable tones. There has always been a lot of competition in the saddle market, which leads to “strong people with strong opinions” at times. It is great to have a forum like this that is designed for people to share ideas, learn and discuss differences in a friendly atmosphere. It benefits us all and hurts no one. Can’t get better than that. -
There is microfitting for a particular horse at a particular moment in time which, from previous posts, nobody is really thrilled with doing whether they decide to do it or not. And then there is recognizing that there are varying sizes and shapes of horses and one size doesn’t fit all. Dennis’s system is nothing more than what we have all been doing for years in getting back drawings sent to us – trying to communicate the basic shape of the horse’s back from one person to another. The advantage of his system over the back drawings are consistency and reproducibility. Dennis uses his system as we hope to use it once we have had it on enough horses to be comfortable with it – to tell us what style of horse this tree is being built for. How we build that to fit as we see best is up to us. We aren’t planning on changing how we do things. We just need to correlate how what we are currently doing matches some of the shapes. Sounds like you are of the same mindset. There have always (?) been different widths and angles to trees which the saddle maker can order from. But there has never been a way to discuss rock, and horses do vary in the amount of rock in their backs. We don’t make wild variations, but if we know the saddle is going to someone who trains 2 and 3 year olds, we will make the rock a tiche less. There are some breeds or styles of horses that have quite a rise up to the loin. Would we prefer they weren’t built that way? Sure, but they are and they are being ridden, so you have to be careful not to bridge on them and add a tiche extra rock. Are these variations enough to negate the fit on most other horses? We don’t think so, or we wouldn’t do them. The same goes for the profile of the bottom of the bar. How round do you make it, and do you think you need to or are you willing to make a few variations to fit different shapes? That is the question every tree maker has to answer as he puts his name on a tree. The truth is that there just isn’t one, and I doubt there ever will be. There are just so many variables and that pesky third dimension (which seems to be six some days) that you would need a whole slew of numbers just to get one point defined. And then there is shaping after that. That is why the best solution we can see is labeling the horse shape rather than the tree shape. Then all the tree makers can build a tree to fit an X shaped horse or a Y shaped horse, and use whatever measurements or angles they need to in order to get the final product to fit. Then the fit of trees could really be compared. If two trees are shipped out to fit an X shaped horse, then put them on an X shaped horse and see how they both fit. That is the only way we see that you would be comparing apples to apples. Now, what is the best way they should sit to fit? I doubt there will ever be total agreement there either. Hidemechanic, We disagree a bit that the rider’s position has nothing to do with soring a horse. We think that a rider who habitually leans back, leans forward or leans to one side will concentrate pressure in those areas and can lead to soreness even with a good fitting tree. But it has to be a major and habitual weight shift to do this and we still don’t think that would happen in the center of the tree. It would certainly affect performance long before it causes soreness. Great summary statements of a bunch of topics… David, Dennis's system is built on anatomical points. I will try to repost the explanation this evening if I can.
-
JW and Bruce, Thanks for the information on cutting trees. Always good to hear the why of things. And help others think about the why of things too...
-
David, Unless the bar if flexible (really bad idea, and I believe you agree) then putting the weight in the stirrups rather than on the seat will shift the proportion of weight more forward than backward, but the bar will still distribute the weight over the whole bar surface. It won't be concentrated under the stirrup leather as it goes under the bar. So we don't see it causing the problems you are describing. In the same way, the edge of the stirrup slot shouldn't cause any more problems with weight in the stirrups versus the seat either as we see it. Agreed here. Overtighening the cinch will increase the PSI under the bars and can definitely cause problems. The cinch may need to be tightened to rope or for a fast arena run, but should be loosened off again for basic riding. If it needs to be that tight to hold the saddle in place, it doesn't fit.
-
Thoughts on fiberglass trees.
Rod and Denise Nikkel replied to Hidemechanic's topic in Saddle Supplies, Tools & Trees
Jon, You've obviously done your research. A question just from curiosity: How long does it take you to fiberglass a tree, and how long does it need to sit before you can ship it out? -
A question and a comment: We are not cutters, so are curious enough to ask why are they full to 7/8th? Is it from the (mistaken) idea that the rigging will affects the position of the saddle and will somehow hold it back on the horse, or something else? Interesting what you are saying, Bruce, about positioning the back rigging by using the front points of the cantle as a reference point. I know that if we wanted to, we could change where those front points end up by and inch or more without changing anything else in the whole tree (except the measured thigh length). The bars and how they fit on the horse would be the same. Denise asking the question here, but is this a common way to set back riggings? Because depending on your tree maker and how they do things, it would cause a lot of variation in where you position your rigging based on a very movable point. (Maybe this should be another topic?)
-
Honestly – there is none. We know of makers who won’t fit a bare tree to a horse at all feeling that it doesn’t represent what the final fit is anyway. Our opinion is that putting the bare tree on the back is the best way to see if the curves of the bars match the curves in the horse’s back. Trying to check with a blanket in between you severely limit what you can tell about the shapes fitting. So we use bare trees to check fit. Our opinion is that if the shapes match well, padding won’t make a lot of difference unless it is excessive. Let me explain. Yes, a tree that is too narrow plus extra padding makes the problem worse. So it would seem that a tree that fits well without padding would be too tight with the padding. BUT – you are not only checking the width between the bars, but the angle of the bars compared to the flatness of the horse’s back. If you get the angles matched, then adding padding will only cause the tree to sit a bit higher on the back, but the shapes will still fit. Widening it out a little wouldn’t hurt, but you don’t want to change the angle that works – and unless you are ordering a completely custom tree, you don’t get the option of separating bar angle and bar width in your order. (You do with most hand makers.) And unless the rider is a “super padder”, which negates the fit of the tree anyway, the amount the tree sits higher on the back is minimal. Bad news again – there is no set way. The tree maker will know what he does to make the rock he has. Once you have had one of his trees, you can ask for more rock or less rock in the next one and they can make them that way if they are willing and able to it. Sending back drawings taken specifically under where the bar goes can show the tree maker what you are looking at for horses, but you have to be careful to get them correct and with the horse standing with his head in his normal “working” position or it will change the picture considerably. This is where Dennis Lane’s system shines. (I may need to repost those pictures if the old posts take much longer to rise from the rubble.) It has a way of communicating the shape of the horse’s back under the bar from saddle maker to tree maker. But it still doesn’t give the tree maker “a certain amount of rock from to back”. That would also vary with bar length and a few other factors, so communicating the shape of the horses, or how one of that maker’s trees needs to change, in general terms<to fit these horses is the best way to go. David, I am not clear how a tree that fits the shape of the horse’s back correctly would have problems in the center of the bar caused by rider error. At the back bar tips – yes, as the horse improperly hollows out his back due to the way he is being ridden, resulting in bridging. Or over the entire back bar pad area if the rider’s weight is thrown back, especially if it is one sided due to them leaning to the side as well. But I don’t believe a horse can “over round” his back enough under load to create enough increased pressure under the center of the bar to cause problems. So I am not quite sure what you are getting at here. Could you please explain more?
-
Selecting a saddle tree
Rod and Denise Nikkel replied to Hidemechanic's topic in Saddle Supplies, Tools & Trees
Don, I can't really speak for other makers, but it is always worth asking your tree maker if they can and do make the style you are interested in. You can only put so many pictures in a catalogue and I would suspect that there are many more styles available from some companies than you would know about without asking. As for the hand made guys - that is the fun part of being a custom maker. We make what you want. Old, new, wide, narrow, tall, short, flat seats, bar risers, unique shapes - whatever. We have made individually designed forks and cantles for experimentally minded saddle makers. (I have a section in our photo album entitled "Whatever They Want".) Everything is negotiable. But we will work with you to get what you need in strength, etc. as well as what you want in looks. And if we really think what you are asking is not really a good idea, we will try to explain why. (And we do reserve the right to say no, but I don't know that we have used that right yet, except for Arizona bars...) Our order forms have 18 areas of specifications for you to give. We put those in blue ink. Beyond that the special requests go in red ink. Some orders have as much red as blue on them. I expect most hand makers are the same. All it takes is a phone call (or e-mail if you live in Germany!!). The most important thing is to be able to communicate with your tree maker. Do they listen to your ideas? If they are asking you to do something different than what you want, do they have good explanations as to why? Are you willing to listen to them when they try to explain why your idea may need some modification? We have built some pretty wild looking trees at times, but so long as they are structurally sound and so long as the customer knows what they are getting, we will try our best to make them the way they want them. -
Selecting a saddle tree
Rod and Denise Nikkel replied to Hidemechanic's topic in Saddle Supplies, Tools & Trees
Our answer to that is unfortunately that, no, there really isn't. You can do the research and decide what material you want them built from (wood and rawhide is best – no bias in that statement ). And you talk to other guys to see what their opinions of different tree makers are. But to really make a decision, you need to get them in your hands and put them on some horses, or you really can't tell how they are made or, more importantly, how well they will fit. There are no numbers or terms that can tell you how a tree will fit. It is like women's clothing – doesn't matter what the size says, you have to try it on to see if it fits. Every tree maker shapes them differently and uses different angles on varying parts of the tree, so even 90 or 93 degrees really means diddly-squat when comparing between makers. And fit is the #1 thing we feel you should look for in a tree. That said, then you have to learn how to order the different things to get trees to fit different horses, which is a whole other 18 or so topics… For us, it has to have the basic design to fit a horse well. Beyond that, you should be able to work with the tree maker to understand how and why they change things to fit different horses so you get what you want and need. It needs to have solid construction – good quality wood without knots and a decent thickness of rawhide rather than "chicken skin" if you go with that type of tree. You can see through a lot of rawhide to get a bit of an idea of the wood. What type of wood is it? Hardwood adds a lot of strength to a tree compared to pines. Is it laminated at all? How many layers? This will be more important if the tree will be roped off or put to hard use compared to basic pleasure riding, but you never know where a saddle with your name on it will end up, so that also needs to be considered. It should be square with itself – fork and cantle are put on the bars evenly front to back and side to side. The horn should be square and centered on the fork. These are just givens. Things put on crooked are simply bad workmanship. We will accept a small amount of rock on a dead flat surface. Rawhide and wood are natural materials and they will move. That is also a given. A little amount actually feels like a lot. We measure by kneeling down and measuring from the stone to the bottom of the high bar. But even 1/8" (absolute maximum for us) will only give you 1/16" difference from one side of the horse to the other, and I don't know of any horses that are that symmetrical themselves. It should have a shape to its seat that makes it easy for you to put in a groundseat. We have had a number of people tell us that the difference in cost on the tree is more than made up in time saved putting in their groundseat. The rawhide should be tight to the wood, held in place with good nails. Rawhide lacing is definitely the way to go. Nylon is only ever used for cost purposes. The seams should not be all lumpy and bumpy but have been pounded flat. There should be minimal gapping of the seams, but honestly, sometimes they just gap. It is very frustrating, but it really does have to do a lot with the weather – heat and humidity levels. We are not overly concerned about it other than from an aesthetic viewpoint since we know that once that hide is dry, even if you cut the strings that rawhide is not going anywhere except under severe duress. But we don't like it either. Those are the basics. Of course if you choose different materials there may be other factors. But the tree should #1 – fit horses, #2 – be constructed strongly enough to withstand normal use and abuse and #3 – be easy to build on. At least, that is our opinion… -
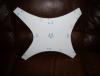
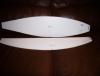
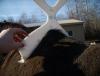
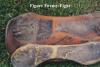
Doug, Other terms we have heard for the curve front to back on the bar are rock, rocker and bow. We use rock because that what we are used to, but bow might be more descriptive. Whatever you call it, there is not a consistent amount that will fit all horses. It is very unusual to get white marks in the middle of the bar. Usually if there is too much rock, the tree will be pulled down harder at the front and you will see problems from the front of the bar back to the center of the bar. But if the back cinch is done up snug as well (which is what we like, by the way) then if there is way too much rock the center can cause problems. I guess if we had this question come to us I would first of all say to put the saddle on the bare back of the horse with the white marks and then feel on the bottom of the saddle just over those white marks to see what you feel there. Are the white spots under the bar or under the skirts, rigging rings etc.? What part of the bar exactly is over the white spots? Are there any lumps or bumps for any reason? And don’t forget to check the padding. Some people use shims and all sorts of things in their pads and then blame the saddle for the problem. And don’t forget the horse. If they are young, or mules, or just “odd” horses, they may have a very flat back which requires a flatter than normal bar, and the normal bar would fit the majority of horses. And I am assuming the white marks were on both sides. Just one side brings in a pile more options. Lots of things to check out… If it is too much rock in the bars, it is not because it is a “Wade” bar. A Wade bar, in general, has greater surface area because the bars are a bit deeper and the front bar tip a bit longer to accommodate the extra stock thickness in the Wade fork. It has nothing to do with the amount of rock in the bar. And every tree maker makes them differently. I don’t know what type of trees you are using, but talk to the tree maker and tell them what trees had too much rock. Ask for less rock in your next bars and see what they can do. But in our opinion, if you had to go one way or the other, you are better with a bit too much rock rather than too little. A bridging tree – hitting front and back only – will sore your horse more easily than the extra rock tree. As for taking out the back stirrup groove – yes, in this case you removed some rock from the tree, but it is not a good long term solution for every tree. This is the distinguishing mark of an Arizona bar – the lack of a back stirrup groove. This was discussed a bunch on the posts that are temporarily out of order, but here is a few of the comments we made back then: We have asked a number of people who know nothing about trees if they see a problem with putting a piece of leather under a bar, making a groove for it at the front but not the back, and then sitting on the tree when it is on a horse’s back. Their response is generally, “Won’t that make a lump at the back of that leather that will hurt him?" Even if the bar is made to give relief for the back of the stirrup leather, you end up with an area behind it that has no contact with the horse, reducing surface area. We have good pictures of the upper side of a set of skirts and the under side of a bar that had an Arizona bar tree in it, which I have attached below. You can see the area of pressure under the stirrup leather, and how it gets deeper towards the back. Then you see the area of total lack of pressure behind the stirrup groove for a bit, and the pressure gradually building back up again. You don't want an area without contact anywhere along the bar, except for the relief built into the bar edges. That lowers surface area and increases the pressure everywhere else, especially along the back of the stirrup leather. It is much better to have even pressure the whole way through. This is why we never have made, and never will make Arizona bar, because of the compromise in the fit this gives, and a lot of other hand made tree makers feel the same. As to your question – how much rock is right? The answer is – it depends on the horse. Not that you want to micro fit for one horse, but young horses have flatter backs than older horses - as a rule. Mules are much flatter than horses – as a rule. Depending on the work they are used for and how they are ridden, the rock in their back will change. Most tree makers build for what they consider “the average” and change when requested for specific reasons. The only way to know is to try the trees on a bunch of horses and see how they fit. But to re-iterate, your experience is the opposite of what is most common. Generally more severe problems occur from bridging saddle than ones with too much rock. Since our own experience is what generally drives what we do, I would caution you to make sure you don’t order bars that may be too flat for most horses. And no – there is no number or term that describes the amount of rock. One of the drawbacks of the current system of terminology. PS. The original reason for an Arizona bar was because of breakage at the back of the stirrup groove – the weakest place on the tree. Taking away the back groove left more thickness to the bar and so increased the strength. But there are other ways to make it strong – better wood, better rawhide, greater bar width. This saddle was brought into a friend's shop because it had a broken tree - through both bars right where the back stirrup groove would have been...
-
Saddle treemakers-sub topic
Rod and Denise Nikkel replied to Hidemechanic's topic in Saddle Supplies, Tools & Trees
Curious to see what others say about fiberglass. It has been around for years, but is it a “standard acceptable covering”? Using both fiberglass and rawhide, in our opinion, falls into Bruce’s paranoia category unless you are unsure of the quality of the a fiberglass, b rawhide c wood or d construction that you are using. -
Strength testing trees
Rod and Denise Nikkel replied to Rod and Denise Nikkel's topic in Saddle Supplies, Tools & Trees
We have seen the youtube video of a test being done on a fiberglassed tree where they lashed the tree down to a stand front and back then pulled with slowly increasing pressure forward on the horn (as if you were holding an animal) to see when it broke. But maybe a more realistic test would be a “jerk test” as happens when the animal hits the end of the rope when first caught. I would think some of these “tie hard and fast” ropers who doctor cows out on pasture give their saddles a real workout in that way. I wonder how something like fiberglass stands up to that use. In talking with some experienced saddle makers lately, it came up that bridging trees would have a lot to do with broken bars. The rider’s weight being hung totally on an unsupported bar would put a lot of strain on it that wouldn’t occur it the tree contacted the horse’s back full length. If only one bar is broken, has anyone noticed if it is more often the left or the right? As for wrecks, they will happen, and you can’t guarantee against them. We don’t say you can’t break one of our trees, but we do want to hear the story, because it will be entertaining. -
Rod learned from a guy in another province. He had about 1 1/2 weeks of hands on instruction. The rest was phone calls before and after. But he came into it with a background of riding and horses. He had repaired enough saddles to have a very basic idea of saddle construction. He had been in Julian's tree shop a few years before so had a general idea of how a tree went together. By the time he went for teaching he had decided he wanted to be a tree maker and had done the research to know the costs of equipment, etc. that he would need to get set up. He started in a 10' x 14' shop in the backyard of our rented house in town. (Good thing he is skinny.) It is not rocket science, but it is also not something that can be done as a hobby or on a whim. To get good, you have to build some trees. If you decide this is what you want to do, go for it. Make sure you learn from someone whose trees are the quality you strive to attain to. And make sure you get the why and not just the how. Good instruction makes a world of difference, as we well know.
-
Saddle treemakers-sub topic
Rod and Denise Nikkel replied to Hidemechanic's topic in Saddle Supplies, Tools & Trees
Art, When rawhide is dry you can often see right through it, especially after it is varnished, even on thick hides. So the colour you are seeing is the dark Line-X. And since it dried in such a short time, it must be a pretty thin hide. If he ordered a tree, rawhided it, and will sell it for less than $100.00, where is he getting these trees from and what is under the Line-X? -
Grade of trees
Rod and Denise Nikkel replied to Hidemechanic's topic in Saddle Supplies, Tools & Trees
Our views, for whatever they are worth: When nylon is cut or wears out, as it does under stirrup leathers for example, it unravels down the whole stitch line. When rawhide is dry, you can cut the stitches and they won’t go anywhere. Rawhide loses a lot of thickness as it dries and nails need to be reset, not because they weren’t put in right to start with, but because the hide gets that much thinner (unless you are using “chicken skin”). So if the nails are sticking out when you get a tree, the tree maker didn’t take the time to reset them often or well enough. If the heads pop off, they are cheap, poor quality nails. If they actually pull out as the hide dries, both the nails and the wood are poor quality. This might happen more commonly with staples. And how do you reset staples? You can’t. This explains why the rawhide is so often pulled away in concave areas of the tree. We have always used 5/8” ring nails for tacking down the hide, 7/8” in the cantle thong. A few years back we got a supplier for stainless steel ring nails and have used them ever since. They are very difficult to remove (the stainless steel ones are softer and bend occasionally going in :angry: ), and it is interesting that it is harder to pull them out of the rawhide than out of the wood. We have ripped apart a few trees when making duplicates, and have yet to find a factory tree that has been screwed together. Some of the older ones were nailed, but the newer ones we have seen have all had staples holding them together. Most hand made makers use screws, and not the cheap ones. We also glue everything together – something we have not found in factory trees either, but is often done by hand makers. If you get a chance to rip apart some old or not so old trees, it is a learning experience. You learn a lot about quality of rawhide, ease of removing staples versus smooth nails versus ring nails, and how well or poorly the pieces are put together. You also get to see the quality of wood underneath whatever the coating is. As for us, we only have one grade of tree. If they don't make it, we don't want it out there with our name on it. -
So, can anyone tell me why people aren't lining up to become tree makers? The demand far outstrips the supply. If you make a good tree, your advertising budget is nil after you get a few out there. The saddle makers do your advertising for you by word of mouth. The start up costs are not insignificant, but way less than most other businesses. The business was able to support us within three years of start up, and that was when the demand wasn't as high. You get to talk to people from all over North America, with the occasional contact from overseas. It is a specialized thing, but not rocket science when you get good instruction. OK, the fact that most handmade tree makers can only turn out 80-150 trees a year (one turns out an amazing 200!) working full time, means that you won't be a millionaire. But other than that minor detail, I really don't know why there aren't more people interested in making trees for a living. By the way, no problem getting good rawhide. We make our own - it's easy (unless you live in town. But we made it there too - we had good neighbours!). And there are suppliers in both Canada and the States where you can buy premade rawhide sold frozen. You just can't buy it un-split, which is where making your own has its advantages.
-
Restoring a McClellan saddle
Rod and Denise Nikkel replied to karl's topic in Saddle Identification, Restoration & Repair
Karl, We were asked to build a McClellan tree a while back. The customer sent us a few pages from a book called The American Military Saddle 1775-1945 which had very detailed information. I am sure if you got a copy of that book (library maybe?) you could use the information to date your tree more. Our customer got his hardware from Weavers. If you check out the 1858 McClellan Saddle thread, there is a website listed there by someone else as well who said it is good for information on McClellans. All the best with your search. Let us know what you find out.