The Grizzly
-
Posts
138 -
Joined
-
Last visited
Content Type
Profiles
Forums
Events
Blogs
Gallery
Store
Everything posted by The Grizzly
-
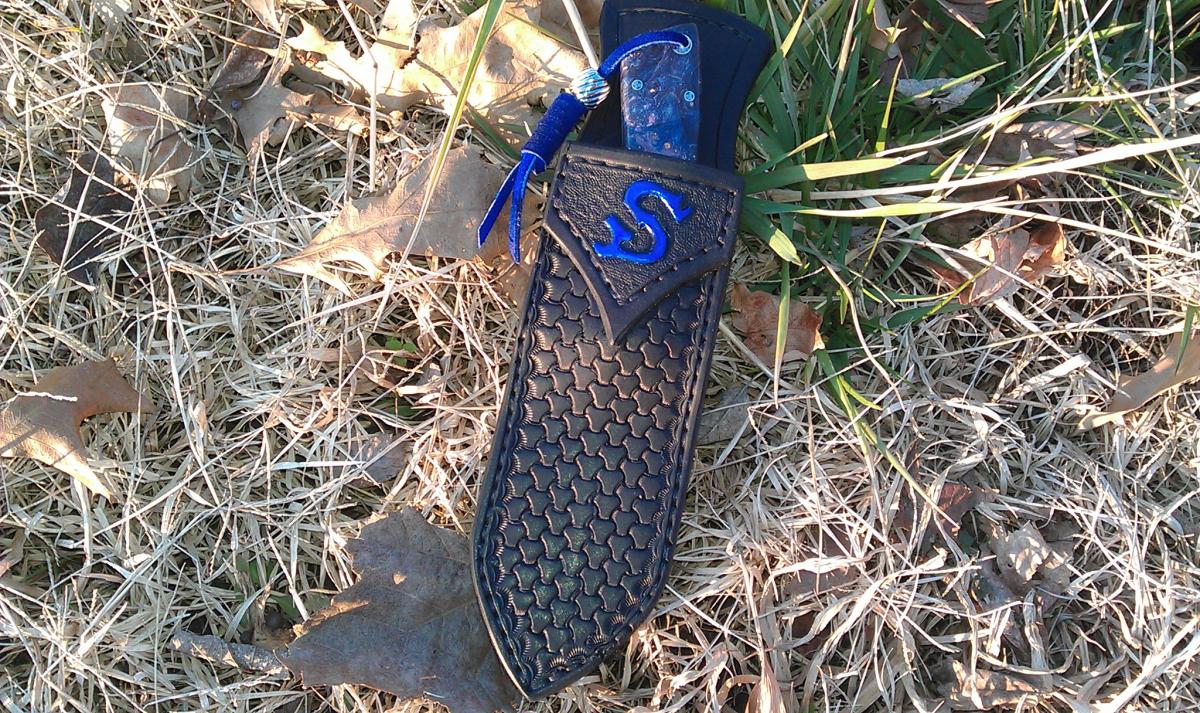
 Hey folks. Just thought I would share a piece I just finished. This knife and sheath was donated as a fundraiser item for the 2013 Relay For Life event in Metropolis, IL. This is, by far, one of my best knives yet. Here is the rundown: Blade: Jantz Pattern #31 in D2 with their satin finish. These Jantz Pattern blades are top notch. They are ground in house at their facility in Oklahoma, not imported. This is the 4th blade I have used from their in-house line up and I was not disappointed. I do believe they sent me a peened finish blade mistakenly though, as the finish is unlike the last satin finish blade I ordered. Size: 7 5/8" long, 3" blade, 5/32" thick. Beautiful light grey textured finish and razor sharp from the package. Handle Scales: California Buckeye Burl. This was a set of scales that I received from Mark @ BurlSource as part of his free knifemaker's pack he gave out a while back. There was some choice sets of scales in that pack, but none of the burls were stabilized. So, I had to do my own stabilizing, so to speak. Multiple coats of thin CA glue make up the finish on these scales. Sanded and hand polished. I added a few coats of Formby's Low Gloss tung oil to bring the shine down just a shade. The scales are tapered back to front from 3/8" at the butt to about 3/16" at the front. Pins: Brass and Stainless Steel Gatling pins in 1/4" diameter with a 1/4" brass thong tube, chamfered ends. Sheath: 8/9oz veg tan shoulder from Springfield Leather. Dyed black borders with natural center that has been tooled and antiqued. Hand sewn. Resolene and neutral shoe polish finish. This knife was a joy to build and I sincerely hope it brings a good bit of money to donate to this event. Hope you enjoy the photos...
 -
Hey folks. Just thought I would share a piece I just finished. This knife and sheath was donated as a fundraiser item for the 2013 Relay For Life event in Metropolis, IL. This is, by far, one of my best knives yet. Here is the rundown: Blade: Jantz Pattern #31 in D2 with their satin finish. These Jantz Pattern blades are top notch. They are ground in house at their facility in Oklahoma, not imported. This is the 4th blade I have used from their in-house line up and I was not disappointed. I do believe they sent me a peened finish blade mistakenly though, as the finish is unlike the last satin finish blade I ordered. Size: 7 5/8" long, 3" blade, 5/32" thick. Beautiful light grey textured finish and razor sharp from the package. Handle Scales: California Buckeye Burl. This was a set of scales that I received from Mark @ BurlSource as part of his free knifemaker's pack he gave out a while back. There was some choice sets of scales in that pack, but none of the burls were stabilized. So, I had to do my own stabilizing, so to speak. Multiple coats of thin CA glue make up the finish on these scales. Sanded and hand polished. I added a few coats of Formby's Low Gloss tung oil to bring the shine down just a shade. The scales are tapered back to front from 3/8" at the butt to about 3/16" at the front. Pins: Brass and Stainless Steel Gatling pins in 1/4" diameter with a 1/4" brass thong tube, chamfered ends. Sheath: 8/9oz veg tan shoulder from Springfield Leather. Dyed black borders with natural center that has been tooled and antiqued. Hand sewn. Resolene and neutral shoe polish finish. This knife was a joy to build and I sincerely hope it brings a good bit of money to donate to this event. Hope you enjoy the photos...
-
How To Glue Up Without Getting It Where I Don't Want
The Grizzly replied to Iron Pounder's topic in How Do I Do That?
Can you thin contact cement with Xylene? -
how do you get the tape to stick to cased leather? Do you put it on before you case? If using rubber cement, how do you get it off the leather when removing the backing piece?
-
I have found that you can tool it to some degree, but it doesn't perform as well as cow.
-
I picked up my green and white bars from Sears. I work there and get a discount so it was easy to pick them up to try before I spent money on higher quality compound. You can get some good green and white from www.jantzsupply.com
-
Ideally, how much of the snap post do you want above the inside of the snap before you set? Sometimes I seem to have too much, other times I grind down and don't have enough and the snap pulls apart.
-
I'm getting ready to make a strop bat. A 2x2 piece of lumber from Lowe's, probably 16" long. Spun on the lathe to turn the first 6" into a contoured handle, then the last 10" gives me 4 sides to adhere leather to. 2 sides will be rough side out, the other 2 will be smooth side. Each pair of sides will get compound, green on 2, white on the other.
-
How To Glue Up Without Getting It Where I Don't Want
The Grizzly replied to Iron Pounder's topic in How Do I Do That?
Those of you who use DAP WeldWood, what do you thin it with? -
I assume total thickness? For a knife sheath made out of 8/9 with an 8/9 welt, that would be pretty far from the edge I would think.
-
I had an issue with some predyed horse butt strips I bought. The black seemed to always produce a white filmy coating on the leather. Took many applications of oil/wax to get it to stop.
-
Yes it is my final finish. Although, if I want a bit more shine I will apply a coat of Neutral Kiwi polish.
-
I seriously considered trying to do the "bow" effect on the leather to open up the mouth of the sheath....just had no idea how to do it lol. On my normal veg tan cow hide sheaths, I've been using 8/9oz for a pouch, and an 8/9oz strip for the welt. In my brain I just cant figure the leather will stretch that much when it's wet. But, I guess it does.
-
Sanding Edges
The Grizzly replied to mncarpenter's topic in Gun Holsters, Rifle Slings and Knife Sheathes
Thanks so far. I, too, have been using a heavy grit to square it all up then 120 for finer sanding. Is there any point in going above 220? What about hand sanding above 220? -
Hey guys. I'm having some issues when making pancake style pouch knife sheaths. Pancake may not be the right word...basically a pouch that has been split and sewn on both sides instead of 1. My issues start rearing their ugly heads when I test fit my knife. Is it normal with these types of sheaths to have to put in 1 or 2 extra welt spacers at the top of the sheath to allow the knife to slip into it properly? Take this last sheath I just made from one of those 2.99 black horse butt strips from Springfield. I laid out my back pieces, 2, since I didn't want a curved belt loop, sheath style is similar to a Bark River Gunny sheath. I added my welt around the entire perimeter. I cut, tooled and laid down my top piece (no glue) and held it with clamps to test fitment. The knife did not seem like it was going to fit at all. So I added a welt spacer at the top. Still didn't seem like it was going to fit. So I added another. At this point, we're at 6 pieces of leather thick. The knife goes in well, but the retention is soft. This horse hide never stiffened up, so the sheath is fairly supple. My handle isn't overly thick either. I think the scales were 5/16 and the blade about 1/8". Should I have just added one spacer, sewn it all up and soaked the crap out of it in hot water and forced the knife in? I've ran into a similar issue with my pouch sheaths. Ill get my pattern cut, per instructions I learned from Chuck Burrows' DVD, but when I wrap it around the knife it seems like it's going to be too tight of a fit...so I have a mini freak out and add a wedge to open the mouth of the sheath up. I guess I should just bite the bullet, sew it up, soak it and stretch it.
-
Sanding Edges
The Grizzly replied to mncarpenter's topic in Gun Holsters, Rifle Slings and Knife Sheathes
Sorry to resurrect an old thread, but I have a question. What sanding grits are you guys using for the best finish with belt grinders? -
Never thought of that, adding extra thread, Ill have to try that and see if it helps. The leather was predyed horsehide in black and was dry when I started stitching.
-
Hey folks. I just finished up a leather sheath for a guy that was drum dyed black. I thought I would use some waxed white thread instead of black for a nice contrast. I got halfway through my stitching and ripped it all out, it was dingy from picking up black pigment inside the stitch holes. I've seen plenty of items done in black or dark brown that uses a light or white thread and the thread is immaculate. Any suggestions?
-
Randy- This mixture is used to treat sheaths/holsters and other leather goods to be extremely water resistant. You can apply it any number of ways, I apply mine hot (not hot enough to burn you) to an already warmed sheath. It will drink up a bunch of the mixture and harden some as it does.
-
I remember seeing a Cerama coat paint with the Folk Art acrylics. I wondered if it was similar to the paint used in painting ceramics that has to be fired to get the full, true color. Do you have any photos of your work using that paint? And here's another question, are there preferred paints used on items that will see flexing vs flat artwork? I plan on making wristbands fairly soon and those will see flexing. Thanks for all the help!
-
Hi folks. I was at hobby lobby today and decided to browse around for all the different acrylic paints they carry and I made a small list to ask you all about. First off in the model paints section, airbrush area, there are the Createx and Createx Wicked Colors paints. Can these be thinned and used with a brush or are these airbrush only? Next in the same aisle beside the Testor's stuff, was Model Master acrylics. And another shelf that held Vallejo Model Color acrylic paints. Any thoughts on these? Over in the art painting section there were some really high dollar paints and then there was a large section of Liquitex paints. In fact, there was a really nice Liquitex Basics set of quite a few tubes and I think it included a color blending chart. Little pricey at $43 but a 40% off coupon knocks that down. Are the Liquitex artists acrylics good for leather? Then further down in the actual craft paints section, you have several brands with the better (most expensive) being the Folk Art acrylics. What's your opinion on these vs the others listed...there's quite a bit of $$ difference between the Folk Art at $1.25 per bottle and the others that run $3-5. Thanks for the help!
-
I guess I was thinking that the oil would leave some (minimal) residue that would cause the finish to not adhere well. Like I said, I know it works...just didn't know how . Man, I remember getting a show truck I was working on ready for a coat of paint...had it prepped, tack clothed, wiped, and ready....then I look up and across the garage is a buddy soaking down some rusted parts with WD40. I could have killed him. For those of you who don't know what I'm talking about....you spray WD 40 or any other silicone lubricant in the air in the vicinity of something about to be painted, if ANY microscopic bit floats over and gets on the thing before you paint, it will fisheye like crazy.
-
Hi guys. I haven't started getting into sprayed finishes like resolene, neatlac and the like so I haven't experienced this for myself yet. I see so many posts suggesting the use of Neat's foot oil before the finish coat is sprayed. You guys gotta help me come to terms with this...I come from a minor automotive painting background and anytime I see the words oil and finish in the same sentence my brain goes into overload with horror stories of finish flaking, peeling, fisheyes, etc. How do the sprayed finishes stick to the leather that has had oil applied during the finishing process? I just can't wrap my head around it lol. I know they must (or folks wouldn't keep suggesting it) but dang it I just dont understand. LOL
-
No, block paraffin wax found at the grocery store in the food canning section. Usually under the brand "Gulf Wax".
-
I use a 3 part mixture that contains beeswax, paraffin and neatsfoot oil. The paraffin keeps it from hardening up too much without requiring the use of a lot of oil. I melt mine up in an old pot and pour it into jelly jars.