-
Posts
2,397 -
Joined
-
Last visited
Content Type
Profiles
Forums
Events
Blogs
Gallery
Store
Everything posted by Cyberthrasher
-
It's still worth the 6 bucks I haven't even had a chance to read through it, just skim, and she was kind enough to put quite a bit of information in there. It's not just "here's the shapes and designs - have at it".
-
Thanks for all the compliments guys!! Yeah Bro, I'd been wanting to do that flare out off the border for quite some time. This one just seemed like the perfect candidate for it!! I'm just getting so bored with "decal" work. Hopefully this one will show people what kind of things we can do to really utilize the leather and bring it all together.
- 18 replies
-
- hellhound kustoms
- hk leather
-
(and 1 more)
Tagged with:
-
Resolene REEKS, but only in large amounts. If your leather stinks because of it, there's a good chance you're using too much.
-
They're wax conditioners. MPB is a mixture of Mink Oil, Beeswax, and Pine Pitch. It's great stuff. conditions the leather and adds a protective wax finish on it. I use it on everything before I wrap it up and send it out, and also instruct my customers to do the same a couple times a year as needed. If you're applying over Resolene, you'll want to let it sit for several hours (over night) to allow the oils to penetrate the finish, and then buff off according to the instructions in the morning.
-
yeah, that's why it was a serious "DUH" moment for me. From my first day of mixing colors as a kid I learned that the quickest way to make a pooh brown was throwing EVERY color together. Even came up with my wife the other day when she asked if I could add black to darken something and I told her that would probably just make it brown. Don't know why it never occurred to me that they would be doing the same thing with the dyes.
-
Oh yeah, and don't drag and drop them - who knows if something there might be causing an issue. Just hit "attach file" and browse to it.
-
Wet it with a sponge and slick it up with my nine folder. I have a glass slicker on the way. After that,dye then finish with Resolene to keep the black off the clothes. If the piece is too fleshy I'll shave and sand it first. You will NEVER see me use Gum Trag to simply glue the fibers down. Aside from the fact that it can wear off and let your fibers pop back up, its also abrasive and shouldn't be used anywhere that might slide. Its also just a cheap way out of doing a few more minutes of work to get it done right. I'm on my phone and it decided bone folder should read "nine" folder. Sorry about that.
- 18 replies
-
- hellhound kustoms
- hk leather
-
(and 1 more)
Tagged with:
-
No need for pictures if you can't get it figured out. This pretty much says exactly what you're looking for. There's confusion because we also worry about rounding the edge of our leather too. Most of these replies are accidentally explaining that. I was trying to find a good write up I found on it once, but can't seem to find it yet. I think it may be in a paid book actually. That's something I'm not comfortable copying to post here. But, if I have to I can try to take pictures of the process for you. It's such an important technique and I really wish more people would do it - so I'll do whatever it takes to make that happen!!
-
I'm just south of you. So, Scott, which end of the state are you in?
-
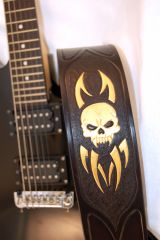
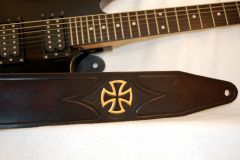
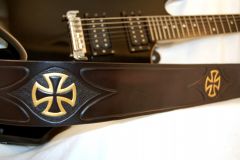
Figured I should put something up down here for once instead of just leaving it to my gallery This one is fixed length with holes punched for Schaller/Fender strap locks. The gold is acrylic. Black is Fiebing's Pro Oil, and the whole thing is covered with Resolene and finished off with Montana Pitch Blend. I had been wanting to get some more backgrounding worked into my designs and got the chance here. The customer originally came to me with a tribal cross, then changed his mind to this skull (kind of). While waiting for his turn on the list, I started thinking and decided I'd combine the two and put this frame job in there. We struggled with the back design a little bit until we decided to go back to a cross and came down to the ones you see here. Also, you may notice that the tribal design on front somewhat resembles a snake with it's mouth open. The customer's been on a rampage lately killing snakes around their Southern California ranch, so I used that for some inspiration - including the diamonds down the back.
- 18 replies
-
- hellhound kustoms
- hk leather
-
(and 1 more)
Tagged with:
-
From the album: Guitar Straps
© Hellhound Kustoms Leatherwork
-
- guitar strap
- tribal
-
(and 7 more)
Tagged with:
-
From the album: Guitar Straps
Fixed length with holes punched for Schaller/Fender strap locks© Hellhound Kustoms Leatherwork
-
- guitar strap
- tribal
-
(and 7 more)
Tagged with:
-
From the album: Guitar Straps
© Hellhound Kustoms Leatherwork
-
- guitar strap
- tribal
-
(and 7 more)
Tagged with:
-
From the album: Guitar Straps
© Hellhound Kustoms Leatherwork
-
- guitar strap
- tribal
-
(and 7 more)
Tagged with:
-
light light. It's always going to go on darker where you first put it down, so you have to make sure there's not that much there to begin with. I use either a sheeps wool scrap or a blue shop paper towel. Either one, I put over my bottle and do a quick splash up onto it. Then, the important part, wipe it off on the rim and follow it up by blotting it off on paper or something. Then you can use light pressure to try to evenly move it around on the leather. If you're doing dark colors, don't worry too much about discoloring the front. In fact, as mentioned, sometimes you WANT it on the front to aid in your coloring (the oil before dye will also help pull color in better). I oil the flesh if I'm going natural or I have a lot of color variation and I don't want to move color around (if it needs some oil after dying). This is where experience and trial and error are your best method. But, it sounds like you're not afraid of doing that
-
I don't know about Aussie, but for MPB, the directions on the jar tell you what to do Just put small glob of it in your palm and rub it into the leather with your fingers - a little goes a LONG way. The heat from your hand melts it, followed by the heat from rubbing it into the leather with your fingers.
-
What's you pink color? If it's paint, then you can go over the black. If it's dye, you may have to paint it anyway. Other than that, you're correct. The key to block dying is to make sure it's light dye on your block and use VERY LIGHT pressure. If you're getting it on too light, you can go back over, but as you can see, too much and there's no going back.
-
Hey, it's Saturday morning - I'll give you a pass
-
Well, that would give him 6" of adjustment if my math is right. So, now lay that out on some poster board and try it out remember to add some extra length to that buckle strap though, to account for the fold over on the buckle.
- 15 replies
-
- chancey77 custom leather
- chancey77
- (and 4 more)
-
Ah, black is a whole different game!! You'll find that within the same bottle and the same piece of leather you'll get different results every time. For black, if I get that faded look, I find that rubbing the dye with a light touch of oil will liven it back up. Don't expect a leather dog collar to last through lots of swimming - regardless of how you finish it.
-
He Hey Mike, I think he was referring to the edges of our tooling. If you just cut a line and bevel it, you're often left with a 90 deg edge on your artwork. There are a couple of ways to take care of that. One is to make a second pass and tilt the beveler back and hope it does what you need - I'm not a fan of that one. My preferred method is to use a modeling spoon. I go over my line once at a 45deg angle to knock off the corner, and then run it over the top real quick to knock back that ridge that was just made, and then sometimes I'll need to go one more along the side (near the cut) to get a nice rounded profile. Once you figure out how to hold the modeler it's just a couple quick swipes.
-

Best/cheapest Place To Get Vegetable Tanned Leather
Cyberthrasher replied to captain's topic in Suppliers
2 of the best tanneries out there are Hermann Oak and Wickett & Craig. I get most of my HO from Springfield leather company. Are you tooling at all? If you're not tooling, they have some Craftsman grade stuff from HO that may suit your needs. Just tell them what you're going to use it on and see if they can get you a good piece. Wickett & Craig is available direct. The only thing you have to remember is that "Cheap" and "good" rarely go together when buying leather. I do have some import I get from Springfield too that's not what I would call high-quality, but it's pretty white and tools nicely. -
Resolene is both water and UV resistant. It's among the BEST choices for outdoor use like that. Just remember the difference between resistant and proof . After that, it all comes down to aftercare and how much the customer cherishes the item.
-
I FOUND IT!!! So, the fact that I spray my resolene more often than not is probably why I had never seen this. I wasn't aware that there were all those other colors in the browns (makes sense though considering how you make brown.....DUH). I want to say it's a few minutes in where Rusty mentions it here.
-

How To Get Rid Of The Fuzzys No Back Of A Hide
Cyberthrasher replied to walletman's topic in How Do I Do That?
If it's fuzzy, sand it, apply water with sponge, burnish with slicker (bone folder or glass) and then apply finish coat if you desire (especially if you're dying the back of something to be worn)


