


Mike Craw
-
Content Count
578 -
Joined
-
Last visited
Posts posted by Mike Craw
-
-
Thanks Steve!
I can see why John enjoys the reputation he has.
Mike
-
Hey Jon!
Do you happen to have a link to John's site? Google keeps trying to tell me I spelled it wrong. Thanks.
Mike
-
Hey Peterk!
Within the last month or so, an individual named "Snakebyte" posted some holster questions and mentioned he was a security products dealer in Michigan. He specifically mentioned that he stocked "Blue Guns" and said that he would do right by members of this site. You might want to send him a PM and see what he can do.
Mike
-
Hey Shorts!
In my own case, that's how I got started in leather work. I started as a street cop with Metro-Dade in Miami and then became a Special Agent with the U.S. Treasury Department. As I have said in other posts, there are few things more personal than your preferences for how you carry a concealed weapon for a living. I had spent years trying to find a holster that I really liked everything about. In 1981, I walked onto a Tandy Leather store in Cherry Hill, NJ and asked the man how many lessons I'd have to take to learn how to build a holster. He said, "There's a book over there by a guy named Al Stohlman for $5 that has just about everything you need to know." In the last 27 years I've wasted some cowhide during the learning process, but some of my holsters have been worn on the street by officers and Agents from many different agencies. It's a real honor when somebody thinks enough of something you've made to be willing to use it when the stakes are so high. It has also opened up other areas of leatherwork and allowed me to meet some fantastic people.
Mike
-
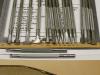
Hey azrider!
This photo was posted under a different section a while ago for a discussion about tool suppliers. The third tool from the left is a thumbprint. If you have one or more, they may be smooth, lined horizontally, or lined vertically. Unlike the standard pear shader, they are generally rocked up on one tip before you strike it.
Hope this helps.
Mike
-
Hey Denise!
Thanks so much for the help. I have no recollection of seeing that original post...maybe because then I never heard of putting elastic next to the zippers, so I paid no attention to it. Anyway, I have made contact with the lady and we are discussing a purchase of some of her stock. Thanks also to Bev for being kind enouth to share this source!!
Mike
-
Hey Guys!
We've had a couple of ladies come to the shop lately wanting to have their chaps modified. They want elastic sewn along the zipper seam to allow freedom of motion like some of the show chaps offered in many of the western wear catalogs. Carlos found some rolls of elastic, but naturally this stuff only stretched LENGTHWISE and we need something that stretches crosswise.
Does anyone have any information on suppliers of rolls of elastic strips/tape about 1" - 2" wide in black?
Thanks!
Mike
-
Thanks for the replies. Since I've never made a holster I don't know the lingo either. The gun is not a revolver and he wants to carry it locked and cocked. he also wants it to be a cross draw so does the thumb break get made the same way and stays on the back side of the holster?Hey Murse!
Yes, a thumb break on a cross draw is made the same way as for a strong-side holster because the snap needs to be on the "Inside" so that when his hand grasps the weapon in shooting position to draw, his thumb will move down the left, or inside, of the weapon if he's a right-handed shooter. What will change is the position of the belt loop or slots to position the muzzle the opposite way for cross-draw.
Mike
-
Hey Scott!
That call should be made by your customer. If he is a law enforcement officer and carries a 1911A1 or clone, he probably carries it "cocked and locked" or hammer back, safety on. The holster should have a thumb break and the strap should go over the rear of the slide and under the hammer. If your customer is not used to carrying a .45 and just wants something to carry it on the pistol range, he may want to leave the chamber empty and hammer down until he's ready to fire.
Tom,
Your blue gun will come with the hammer molded in the "down" position, so if your customer wants to carry "cocked and locked" then you will have to allow for that when you make the thumb break.
Mike
-
A. I don't know, and
B. I don't forsee you gettin' a straight answer here...

Mike
-
The "tinyest" bit, Marlon? No, a whole butt-kickin' lot!!
Mike
-
Hey Pella!
If I understand your post correctly, the term "trip" in common usage means to stumble or miss your step. As with many other words in the English language, there may be no obvious reason why Americans from different parts of the US use a word in a particular way. To make matters worse, many of us use the same word differently from folks in other regions of our same country!
I can't imagine what folks on this board from other countries, who didn't grow up speaking our brand of English, must be thinking

Mike
-
Hey Hilly!
That's called a "latigo carrier" and it's purpose is to carry...nah, that would be too stupid even for me!! Seriously, the shiny ring shaped object right in front of (and partially covered by) the fender is the rigging ring, and when the saddle is rigged to ride, there is a long strip of latigo leather laced through it. That latigo then goes down through the cinch that goes under the horse, and comes back up to tie on the rigging plate. This is how you adjust the tension on the cinch. Because the latigo is so long, there is generally a fair amount left over once the horse is saddled and the chinch tightened up, so rather than having it trail along on the ground where the horse can step on it, the end is passed through the slot in the carrier, and it keeps it up out of the way.
Oh, and it's not an ignorant question. If you don't ride or deal with saddles, there's no reason you would know that.
Mike
-
I was re-covering aonther one of the twenty or so of those Billy Cook braided rawhide horn covers that had worn through. I had convinced the customer that it should be covered in leather this time, but she was really insistant that we had to save and re-use the engraved concho that was on the horncap. I got it off (along with the top layer of rawhide and a lightweight leather backer) and found it was clinched on with three copper wire posts. When I tried to straighten the first one, it snapped off, so I decided to cut the leather away from the other two and use them as they were. I was holding the concho (about the size of a 50 cent coin) in my left hand and cutting the leather away from the posts with a razor knife.
I looked right at the set-up and muttered, "If that knife slips, it's going to be ugly!" OK, I didn't get "ugly" competely out of my mouth when, all together now...
It went under my left thumb nail and half way down to the first knuckle. I don't know which was worse, the pain of the cut or the pain of knowing I could/should have stopped!!
Mike
-
Link to it?It's a post by Stelmackr under "Announcements and Administrivia."
-
I just read the November issue of the Rawhide Gazette posted by Bob Stelmack in "Announcements and Administrivia." The lead article was a very nice interview with Johanna about Leatherworker.net. I thought Bob wrote a great article and gave Johann some much deserved credit for everything she has done for us. Also, if any of the Gazette readers didn't know about our little corner of the web, they sure do now! Congratulations Johanna, and thanks, Bob!
Mike
-
Hey Steve!
That's a beautiful job, and I'm sure your customer will be rightly impressed.
Mike
Traveller,
As one who's shop sometimes looks a little like that, we prefer to think of it as "lived-in"...

-
Hey John!
Not that you don't have enough to do running a business, but a DVD of Bobcat working, a discussion of his philosophy, or of his clinic if he does one, would be of great interest to many of us on this board!
Mike
-
Wow, it seems like anybody who ordered a full carved Troy West saddle would have some idea of what it was going to end up looking like!
 I don't guess you had any trouble selling it.
Thanks for the info on antiquing a working saddle. I wondered why many of the custom saddles appeared to have been antiqued, and now I know. I appreciate you sharing your experience.
Mike
-
Hey Ed!
As usual, the bag looks fantastic. In this case, the leather looks almost broken-in already. Is that the latigo you mentioned in another post? I'm sure your customer will be delighted.
Mike
-
One more question Troy,
This saddle looks to have been antiqued. If it was, didn't it require a resist of some kind (Neat Lac, Sheridan Resist...)? Would that be done only on a saddle for display, or is that not a problem on a working saddle?
Mike
-
Hey Tim!
What I'm trying to describe (and not very well - I wish I could draw the explanation) is called a "thumb break." As it shows in your photo, the strap from the back goes over the tip of the hammer with the snap pointing up. The strap from the front of the holster has the other half of the snap facing down, and it snaps on top of the hammer. The user must find his shooting grip, and then bring his thumb back up and brush the flap of the front strap up and out, to unsnap the strap. He must then, as he draws the weapon, move his thumb back down the left side of the frame to his shooting grip position.
With a thumb-break, the snaps are in the opposite relative position (as though the back strap was on top in the arrangement you have now) only the rear strap is shorter and the front longer. This moves the secured strap around the left side of the hammer, between the hammer and the wearer's body. I usually double the leather on the rear strap to stiffen it.
When the officer draws the weapon, as his hand moves to his shooting grip, his thumb goes between the two straps as it starts down the left side of the frame and unsnaps the straps. As his four fingers tighten around the grip and pull the weapon up out of the holster, his thumb is on the left side of the frame, where it should be.
I hope this helps.
Mike
Tim, if you search in this thread for a post "New Holster for my Makarov" by ArtS, he has some great close-up shots of a thumb-break. Thanks Art!!!
-
Hey Tim!
The holster looks good. The shaping looks good and the stitching is excellent.
The thing that jumps out at me is the safety strap. Carrying a concealed firearm, especially for a peace officer, is an intensely personal thing and your customer may have specified that configuration. If he did, then disregard my next statement.
The holster configuration requires that the drawing motion move from obtaining a shooting grip to sweeping the thumb up and over the top of the hammer to unsnap the strap. A "thumb-break" style would have the leather behind the hammer go straight up with the snap half facing the hammer. The strap in the front would have the other snap half facing "out" or the fastening shaft coming from inside the holster. That way, the strap from the front goes over the tip of the hammer and down between the hammer and the rear strap. When it is snapped in that configuration, obtaining the shooting grip would allow the officer's thumb to go down between the two straps, unsnapping the snap and continuing down into the proper grip position. The weapon can then be drawn in one motion.
I hope the explanation is clear. If not, then maybe one of the other holster makers can explain my explantaion

Mike
-
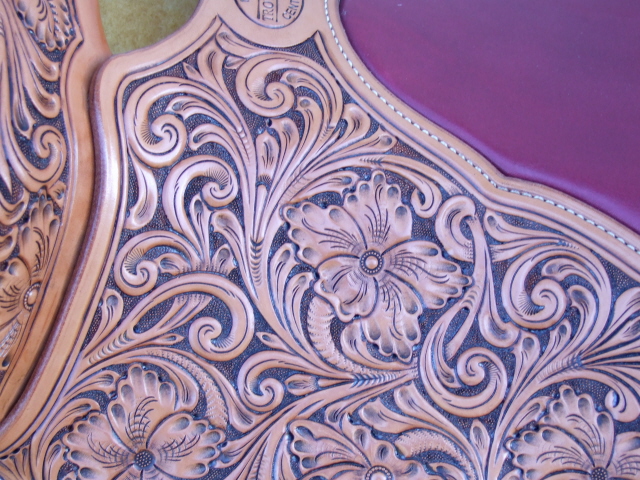
Thank you Mike. Sorry, but these are Ellis Barnes bar grounders. Maybe this picture wll show up better. If not, I may need the help of a kid.
I can't tell even from this photo, but they are bar grounders.
Troy,
Thanks for the quick answer, and I know what you mean about needing a kid to help. Groucho Marx had a line about being so simple a five year old child could do it...
I can see from a couple of areas in the photo you included that it was done with a bar grounder. I got a bar grounder in a set of tools from Ellis Barnes, and it's the first bar grounder I've ever actually been able to make work, so they may not be as hatefull as I always thought they were. Thanks again for posting your saddle, and for being so willing to share your process.
Mike

The Artisan TORO 3000 Video Is Now Available !
in Leather Sewing Machines
Posted · Report reply
Hey Dave!
After using the 3000 in Carlos Lopez' saddle shop in Kingsland, GA for months, I have several comments to make. First, GREAT idea having a video. The computer line drawings that came in the manual with our machine were not clear, and Carlos and I had trouble with matching parts in the drawings to the machine (keep in mind, you're dealing with with two, border-line senile 60-somethings). Actually seeing someone doing something is much better than one of us reading it and the other trying to do it!
Second, I would suggest that the video have many more close-ups. When Steve referred to a part on the machine, there should have been a close-up. During the threading demo, Steve's hands were in the way some of the time, and some of the parts he was refering to were too small to see.
Close ups would have helped with the sewing demo, too. Steve says to Carl, "As you can see..." when talking about sewing back into the same stitch hole, but WE can't see!
After watching about the first half (through the demo with the flatbed machine) the only other suggestion I would make would be to have the "Trouble-Shooting" section from the manual on the video with CLOSE-UPS of incorrect stitches or problems (like pulling the bobbin thread out the top of the hole) with the fix discussed using close-ups of the parts tightened/loosened or whatever the countermeasure for the problem might be.
All that said, I don't do video production, so I HOPE you can edit in close-up shots without having to re-do the whole thing.
Hope this helps.
Mike