


wizard of tragacanth
-
Posts
555 -
Joined
-
Last visited
Content Type
Profiles
Forums
Events
Blogs
Gallery
Everything posted by wizard of tragacanth
-

New Rig
wizard of tragacanth replied to katsass's topic in Gun Holsters, Rifle Slings and Knife Sheathes
Wow! Nice looking rig. Your customer should be very happy with that. -
First Projects And Post
wizard of tragacanth replied to bogie12's topic in Gun Holsters, Rifle Slings and Knife Sheathes
Welcome to the forum! That's a good looking design... I think you're off to a good start. If you want to learn about sheath making... look around here for Chuck Burrows! He sells some DVD's on sheath making and other stuff too. Nick -
Basket Weaved Belt Rig
wizard of tragacanth replied to Eaglestroker's topic in Gun Holsters, Rifle Slings and Knife Sheathes
A nice classic look for that wheel-gun... I like it. Nick -
1911 Pancake Holster
wizard of tragacanth replied to rgepting's topic in Gun Holsters, Rifle Slings and Knife Sheathes
Mr. Epting... FANTASTIC knives! Nick -
Fantastic tutorial... thanks so much! Nick
-
Nice stuff. Thanks for sharing. Nick
-
My First Belt
wizard of tragacanth replied to Eaglestroker's topic in Gun Holsters, Rifle Slings and Knife Sheathes
I especially like the revolver holster. Nick -
New Here
wizard of tragacanth replied to mr09's topic in Gun Holsters, Rifle Slings and Knife Sheathes
Welcome to the forum! Nick -
1 3/4" Belt - Hole Sizes
wizard of tragacanth replied to particle's topic in Gun Holsters, Rifle Slings and Knife Sheathes
I have used the 2" Stohlman buckle and a Tandy oval punch (6mm x 9mm) and 3/4" spacing. It looks like this... Nick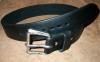
-
Finally, a gift someone will appreciate! Merry Christmas! Nick
-
Lion Holsters
wizard of tragacanth replied to silkfatblues's topic in Gun Holsters, Rifle Slings and Knife Sheathes
That holster looks absolutely top-notch. The brown sheath looks great but I think that I would want a little more of the handle of the knife to be exposed (personally). I stared at that nylon sheath for a long time... wondering how the heck to make something like that. Quality workmanship on all of those pieces, for sure. Nick -
Very nice indeed.
-
Shoulder Holster Tips
wizard of tragacanth replied to BobH's topic in Gun Holsters, Rifle Slings and Knife Sheathes
A little tip... when you go to cut out the leather for your first holster, cut it at least 1/16 - 1/8" larger than the finished size because you will probably be trimming it down later. The bottom line is... you can always trim off excess but you cannot, very easily, add any. Nick -
Wow, man, that has tons of style... very classy looking! Nick
-
New Owb For My J-Frame
wizard of tragacanth replied to markush's topic in Gun Holsters, Rifle Slings and Knife Sheathes
Markush, I said Maker's Mark, I should have said Maker's Stamp... you know... the one's that have your name and say "maker" on them. One of these would work until you come up with a logo. I have a plastic one... it works fine and was very inexpensive. http://tuffcase.com/shop/index.php?main_page=product_info&products_id=46&zenid=0auj18qra46agkrpi65lvhv8c7 If you want one that is smaller or larger, look here http://greyghostgraphics.com/Stamp%20Brochure.pdf If you want a steel stamp, look here http://www.steelstampsinc.com/ Nick -
New Owb For My J-Frame
wizard of tragacanth replied to markush's topic in Gun Holsters, Rifle Slings and Knife Sheathes
Nice work. The only thing missing is your Maker's Mark! I can't understand why the finish is coming off those snaps? Weird. I guess you could drill them out and use some new ones. Nick -
Some Recent Work
wizard of tragacanth replied to dickf's topic in Gun Holsters, Rifle Slings and Knife Sheathes
Top notch stuff! -
I used that blue-green DAP product many years ago, putting Formica on some speaker boxes. IIRC it worked fine but I would recommend experimenting on scrap before using it on a project. Nick
-
Pics are definitely needed for us to be of any more help at this point.
-
Very nice.
-
Sig P238 Bb&wb New Design
wizard of tragacanth replied to Denster's topic in Gun Holsters, Rifle Slings and Knife Sheathes
That's a gem! I like everything about it. Looks like the perfect design for that size of handgun. Nick -
Are you going to cut belt slots for attachment? If so, it's hard to tell from the pic but it looks like the slots will be rather small, maybe not. My recommendations are to wet mold the holster, cut the belt slots, sew as closely to the gun as possible and hopefully, round off the square corners at the bottom of the holster a little bit. For sewing, I use a drill press with a 1/16" bit to drill the holes. Tandy sells waxed linen thread (or waxed nylon) and stitching needles (10 pack). The 25 yard spool of thread will do at least half a dozen holsters. After sewing, sand the edges, dye the holster if you want, slick the edges and finish with a top-coat. Nick
-
Tuckable Iwb
wizard of tragacanth replied to BBAYS's topic in Gun Holsters, Rifle Slings and Knife Sheathes
Bingo! http://tuckergunleather.com/beclforiwbho.html -
Tuckable Iwb
wizard of tragacanth replied to BBAYS's topic in Gun Holsters, Rifle Slings and Knife Sheathes
Yes... but I can't remember where I saw them. May come to mind eventually. Nick -
Beautiful work. The pictures of the log pile and barbwire fence brought back so many memories of my Grandfather's farm that I got a litlle tearful.
