wizard of tragacanth
-
Posts
569 -
Joined
-
Last visited
Content Type
Profiles
Forums
Events
Blogs
Gallery
Store
Everything posted by wizard of tragacanth
-
 Thanks chiefjason. I really like the streaky blue myself. Well, I was going for a blue jeans look, so I thought that worked pretty well. I don't blame you for not reading the whole post, but the two piece loop and reinforcement was not planned. I did the loop and later decided to add the reinforcement. That was my first ever Avenger. I cut the trailing loop high in order to allow the best possible access to a back pocket but I definitely understand what you are saying. Next time, I will give more consideration to that. Don't know that I will make it round, but less acute. Nick
 -
Hey bikermutt, thanks for your comment. I have always related to you because I said to myself... "I'm not paying $60 for a holster..." and you know the rest! I'm retired now, so I will be making more than I used to. Nick
-
Whoa! 147 views and not one comment. I think I'm getting the message. Bye!
-
Love it! So unique and awesome. Put a tail on it!
-
machine - belt or bench sander edges?
wizard of tragacanth replied to christine1ca's topic in How Do I Do That?
Dwight... you are right. I totally agree. It was an uniformed opinion. Based on the original post, mentioning holsters, I thought that we were talking about holsters. No mention was made of long, straight edges. I was recommending a spindle sander for a holster. I also agree that an oscillating spindle is not ideal. A non-oscillating spindle would be the better choice but the OP was asking if a specific machine was adequate. The OP was thinking about a belt sander, which I considered to be a mistake because a belt sander is of little value in making holsters. It would be very common to ask "What are you sanding" but I thought that to be implicit in the original post. For straight edges, use a belt sander. For curves, use a spindle sander. Nick -
Doh... Thanks Tom!
-
I started to re-think my comment about Snow Seal. Technically, it is not a top-coat, it is absorbed into the leather. I did another test, using 3 or 4 applications of Snow Seal, warming the leather in a 120° oven before each application. I put some drops of water on the area and let it dry completely. The result with hard tap water, and RO water was the most minimal of marking. I had to hold the leather in good light at a certain angle to see it. BTW, Snow Seal is made of bees wax.
-
Doesn't reducing dye also allow to make lighter shades? IDK, I have never tried it.
-
Hmmm... if you cannot find it, you might try some Tokonole (from Japan). It comes in a jar, looks and smells something like Elmer's Glue All. I just tried it for the first time, on my last project. I applied it with a Q-tip but would like to find a better method, but even if I don't, I will be using it exclusively. I much prefer it to Gum Tragacanth. Better results. I used it for burnishing the edges and flesh side on a holster. It darkens the leather. That may be a plus or a minus depending. For this project, it darkened the blue edge to nearly black, which was great for me. Maybe Elmer's would work too! If I had some on hand, I would try it. I applied the Tokonole, let it soak in and then burnished as usual. Really great stuff. I may need to change my screen name to wizard of tokonole.
-
You will have to use regular Fiebing's Leather Dye, I guess. One advantage over the Pro dye is a wider selection of colors. Try searching for UV clear coat. There might be something out there.
-
I'm thinking that you are not planning to tool nor to wet form this project because you did not ask when to do that. So, if you are not wet forming nor tooling, perhaps you should be using chrome tanned leather. I know nothing about chrome tanned leather other than it is used for garments that are flexible and resistant to moisture. AFAIK, there is NO waterproof top-coat. Some finishes are mildly splash resistant but the water must be wiped off as quickly as possible or it will leave a dark stain. Snow Seal isn't even able to stop that. Watch the many comparisons on YT. I have done my own tests. Yes, including Snow Seal. I was very hopeful for that one. However, water eventually marks the leather, it's just a matter of time, and not much time at that. As you will eventually discover, there is no answer as to when a project should be dyed. Sorry for the bad news...
-
Bowie sheath
wizard of tragacanth replied to Bigfoote's topic in Gun Holsters, Rifle Slings and Knife Sheathes
Really nice. I love the contrasting stitching. -
Makers stamps, who’s the best?
wizard of tragacanth replied to paulamoose's topic in Leatherwork Conversation
I have one of those "plastic" stamps. I had the same problem when using a mallet. Do you have an arbor press? I use an arbor press and it works great. First, make sure that your leather is properly cased, to get a good crisp impression. Set up the lever on the press so that it is horizontal when it contacts the stamp. I put all of my weight on it (since I don't have much strength any more) for about 10-15 seconds. I haven't really experimented with the time factor. Five seconds may work, I don't know. Impressions come out deep and crisp. -
How did you get into leather work?
wizard of tragacanth replied to Rolandranch's topic in Leatherwork Conversation
I am one of those who said to himself... "I am not going to pay $60 for a holster, when it is only a few dollars worth of leather and so easy to make!" Now, eight years later, having invested hundreds of dollars and many hours of studying and making, I can make a holster that is worth $60 (maybe). Well, it has been fun and interesting all along the way. The most amazing surprise to me, was when I discovered how willingly people gave up their secrets of the craft, helping others reach their level. I don't think that I have ever seen that in any other arena. Many thanks to all of these giving artisans on LW and YT. -
Here is the first one that I did...
-
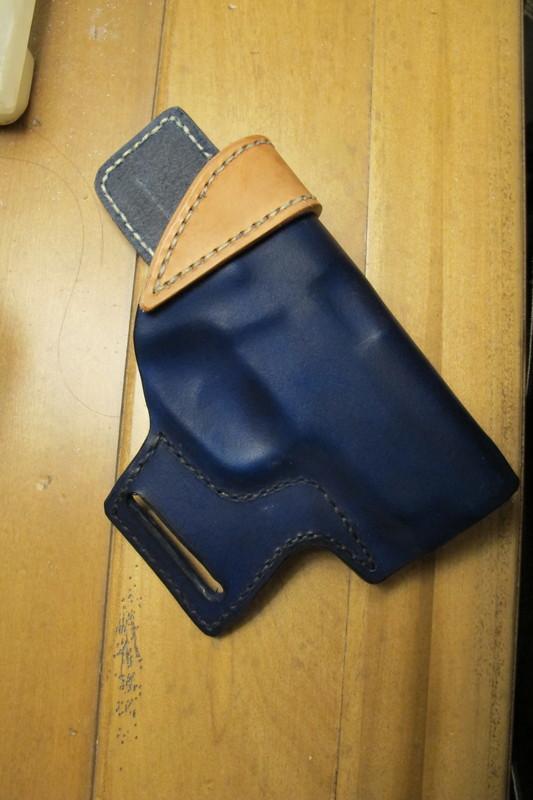
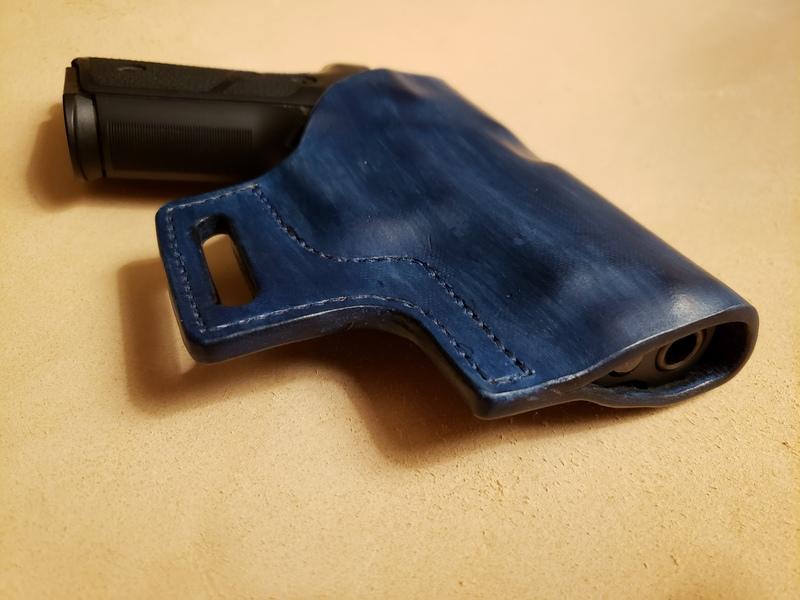
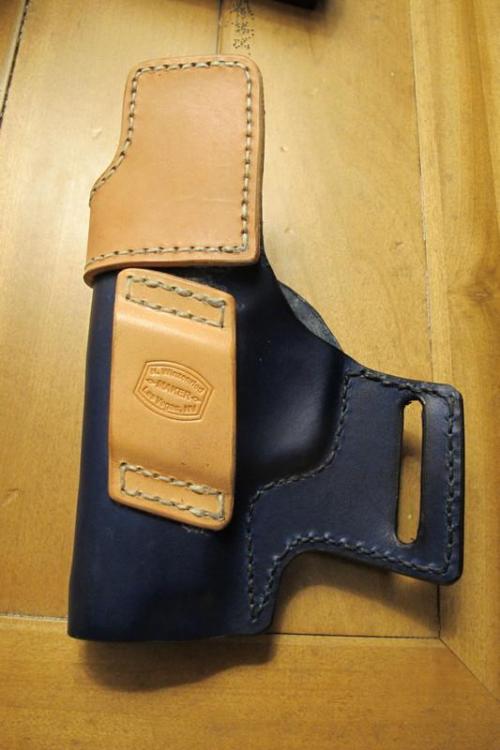
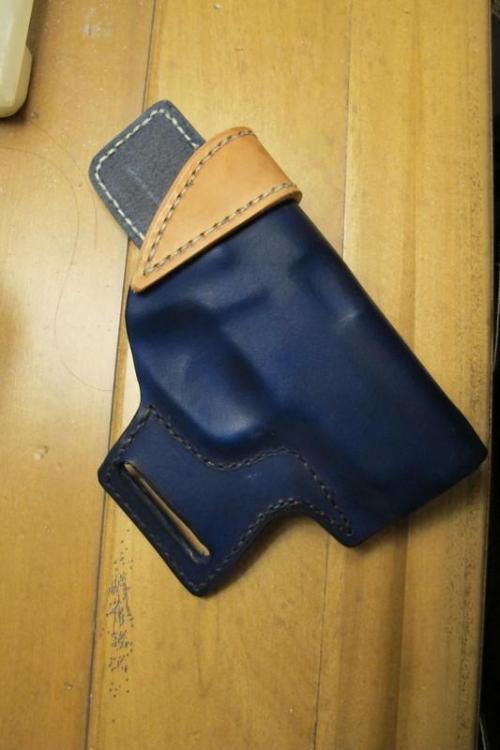
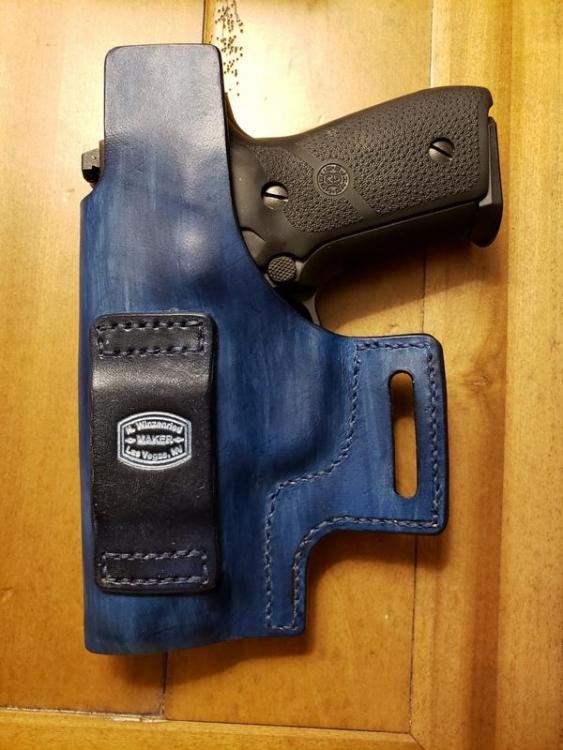
Been doing leather work on and off, for eight years, at the rate of about 2.5 (finished) projects per year, though I haven’t made anything for the last two years, so I am still a novice. I have only made holsters, a few belts, and one multi-tool sheath. All of the holster were simple, black, concealment holsters. I make them simple because that is the extent of my skills. I make concealment holsters because CCW is very popular here in Las Vegas and because no one would want to show off my work. Got tired of making only black things and got this idea to make a Blue Jeans holster. I had this vision of a dark blue holster with a tan patch on it somewhere, with yellow or orange thread to mimic the stitching on Western style jeans and some copper rivets for the same reason. I have made two iterations of it (that is, not quite what I was imagining… still trying to do it right), now planning to make a third. First one was a solid Navy Blue Avenger (my first ever Avenger) with a natural tan mouth reinforcement. Truth be told, I had not planned a reinforcement but the leather that I had on hand was too thin, so the holster was flimsy. I added the reinforcement after the fact. I had used tan for the belt loop, then added the reinforcement. That is why it is not one piece of tan but two. A beginner mistake is to use whatever supplies one has on hand, when one knows full-well that it is not what is called for in the project! Cheap people also make this mistake… and people who are in too big a hurry to complete a project. That’s what I did. Don’t do it! So, I wound up with an Avenger that was too thin, was sewn with black thread on the body and white thread on the reinforcement. I had forgotten to buff the excess blue dye before stitching the tan pieces, so the dye came off on the waxed linen thread and now it looks dirty. Or, I don’t know, maybe one should not use waxed linen in this case? On the second iteration, I embossed the leather in my shop press, using canvas, to make the surface of the leather look like denim. Then I did an intentionally streaky dye job to make it look like worn denim. I had done some experiments using 600 grit sandpaper, hitting the high spots of the embossing, to remove some of the top color without going through to the leather color. It worked. Really looked like worn denim. Loved it but feared ruining this holster, which I was already happy with so I did not follow through with sanding. Promised myself that I will do it on the third one. Well, I started stitching with yellow thread (dyed linen) but it made my poor stitching stand out so badly that I took it out and used Navy instead. No one should experiment on their project but I did. I filled my maker’s mark with Silver Cova Color, which I had never used on anything. When I wiped it off, silver particles spread around the mark and all over the belt loop, which was dark Navy. It may not show up in the picture. It doesn’t look bad but it is not what I had aimed for. Kind of looks like a star filled night sky. At least, that’s the way I like to think of it. Others might say it looks like a mess. Oh, and I had planned to use a couple of copper rivets, as decoration, on the un-stitched side of the belt slot, to further add to the jeans illusion. Maybe next time. Though I could still do it. So, the next one will be a belt slide style with canvas embossing, some kind of distressed finish and yellow thread (after I practice my stitching for a while). By the way, the first holster (tan reinforcement) is a 15° cant, the second one (streaky blue) is a straight-drop, zero cant design. That was the first zero cant model that I have made. It rides very well at my preferred 3:00 position. I am surprised at how good it is. It’s my new EDC… until I make my belt slide with copper rivets! Streaky Blue Jeans Avenger Info Leather: 3.25 mm Thread: 0.8 Ritza 25 Navy Stitching: 6 spi saddle stitch (sloppy)(not intentionally) Dye: Fiebings Navy Blue Applicator: semi-dry dauber Edges & Flesh: Tokonole Top Coat: Fiebings Satin Sheen (may go for a matte finish next time) Gun: Sig M11 (P229 variant)


-
That is an excellent first project. Did you burnish the edges of the holster? I can't tell. On the slots... first, edge the long side of the slots on both the front and back. Use a paint stir stick or something similar, wrap 150 or higher grit sandpaper around it and sand the inside of the slots. Then use just about anything round to burnish the inside of the slots. I have used the shaft of a screwdriver, anything round... wood, metal or plastic.
-
Alex, that is mind blowing production! I especially like the Celtic design. HAND STITCHED?! Wow!
-
machine - belt or bench sander edges?
wizard of tragacanth replied to christine1ca's topic in How Do I Do That?
Christine, A belt sander is not the solution. You need a spindle sander as they have spindles as small as 1/2" diameter, which will get into the tight curves of a holster. Can't do that with a belt sander. This Rigid is both belt and spindle, but you will likely use the spindle more often than the belt. It won't hurt to have the belt though. You could just get a plain old oscillating spindle sander for less than what the Rigid sells for, like this Harbor Freight model for $145. https://www.harborfreight.com/search?q=spindle sander If you have a shop vac, both the Harbor Freight and the Rigid have dust collection ports, so they will work with it. You may need an adapter to make it fit. Adapters are common and easy to find. Here's one: https://www.homedepot.com/p/Think-Crucial-Replacement-2-1-2-in-to-1-1-2-in-Conversion-Unit-Fits-Shop-Vac-Compatible-with-Part-9064900-9064900/305847086 Get some 150 grit and 240 grit sanding sleeves for it. Finish sanding by hand with 400 grit or higher if you want. This is a good tool to have if you ever do anything with wood too. -
Stamping a leather holster
wizard of tragacanth replied to grimdaddy's topic in Gun Holsters, Rifle Slings and Knife Sheathes
Ah, yes, when I said 100 degrees, I did mean Fahrenheit. Sorry, I often forget that we are a global forum. I recommended warm water and dish soap to soak the old holster because soap is a wetting agent and warm water is a more effective cleaner than cold water. It makes sense to me, but if it doesn't make sense to you... okay. If the OP is going to disassemble the holster, I think this would work better than room temperature water and no soap. That's my suggestion and I think it is a valid one. However, I am not the expert that many are on this forum. -
Stamping a leather holster
wizard of tragacanth replied to grimdaddy's topic in Gun Holsters, Rifle Slings and Knife Sheathes
Soak it in warm water. Somewhere around 100 to 110 degrees. Add a few drops of liquid dish soap. -
New Holster For My Sr9
wizard of tragacanth replied to Redd's topic in Gun Holsters, Rifle Slings and Knife Sheathes
I like the basic design and execution but you need to trim out the leather that you can see on the back piece where the grip and the trigger guard meet. This area must be open in order to get a proper firing grip on the handle. Otherwise... nice! -
Great, thanks guys!
-
Hi Guys, I've haven't been around here for several months because we have been looking for a new house. It has absorbed most of my free time. Still haven't found one, but a co-worker has asked me to make a holster so I have to squeeze it in. He has a G19... I have a G17 mold. IIRC, these are identical except for the barrel length. Can I successfully use my G17 mold and simply shorten it? Thanks, Nick
-
Hairdryer Holster
wizard of tragacanth replied to benlilly1's topic in Gun Holsters, Rifle Slings and Knife Sheathes
Cute... but its made for Southpaws! I will just have to do without one, I guess.