wizard of tragacanth
-
Posts
582 -
Joined
-
Last visited
Content Type
Profiles
Forums
Events
Blogs
Gallery
Store
Everything posted by wizard of tragacanth
-

My First Avenger Holster
wizard of tragacanth replied to mlapaglia's topic in Gun Holsters, Rifle Slings and Knife Sheathes
I would suggesting curving the stitching around the trigger guard, following the natural line, rather than making it square. I think that doing the inside black and the outside tan is kind of different and interesting. That could be your signature design element. Did you use a stitch groover? Nick -
Iwb For A Small Bersa
wizard of tragacanth replied to Sanch's topic in Gun Holsters, Rifle Slings and Knife Sheathes
Okay, so he hit a softball at 100' but was it a fatal wound or did the softball survive? -
How long should the neutralising soda bath be? I did it for approx. 30 seconds.
-
I used a baking soda dip when I did the initial vinegaroon treatment. Do you think that another dose of baking soda would help... after the Sno Seal? I guess it is worth a try because I will otherwise throw this belt out. Perhaps another error of mine was that I didn't leave it in the baking soda bath long enough. Nick
-
Well, I am actually talking about the smell ON the belt. Perhaps I used the 'roon too soon? The belt was done around three weeks ago and still smells. Perhaps I should have let the brew age a little longer or expose it to open air for a while. I really soaked the belt in it and probably used at least three times as much as was needed. Then, the next day, I finished it with Sno Seal... probably sealing in the smell, so to speak. So, I can see several ways to reduce the odor possibly... airing out the batch before use, using only as much as needed on the project and no more, and then perhaps airing the project before finishing. Nick
-
I am new to leather work and new to vinegaroon. I made a batch of vinegaroon and used it on a belt project. Color wise... fantastic... I couldn't ask for anything better. However, the belt continues to smell like a bait box. Did I do something wrong or is this normal? If there is no way to eliminate the smell, I will have to abandon the thought of ever using vinegaroon again. In my mind, one of the nice things about leather is that it smells good. Nick
-
1911 Cover Trigger Or No ?
wizard of tragacanth replied to MADMAX22's topic in Gun Holsters, Rifle Slings and Knife Sheathes
Madmax, I don't think you are talking about leaving the entire trigger exposed are you? I think that you are referring to many designs that I have seen where one can see the base of the trigger where it attaches to the gun but the "face" of the trigger is NOT exposed. Personally, I would always cover the "face" of the trigger, for several reasons... 1. I can't think of a reason NOT to cover the trigger 2. I will take all of the passive safties that I can get 3. Not covering the trigger could foster early engagement of the trigger finger with the trigger... not a good thing (IMHO). Could lead to shooting oneself when drawing the gun. OTOH, I do not see a problem with exposing the base of the trigger. I think the designs in which the base of the trigger is exposed, are done that way to keep the leather away from the grip so that one can get a full firing grip on the gun before it leaves the holster. The bottom line for me would be to cover at least the face of the trigger and the more that I can cover, the better it is, in my mind. Nick -
Looks to me like the rear strap on the hybrid is too close to the grip to get a good purchase on it, but other than that, it looks good to me. The shark grips are a very interesting concept, for sure. Also, shark for a pocket holster seems like a good idea in every respect.... nice looking design too.
-
Strap End Punch
wizard of tragacanth replied to Guy W's topic in Gun Holsters, Rifle Slings and Knife Sheathes
I wouldn't recommend running out and buying a strap end punch. I got a 1.5" English point and I am not crazy about it at all. I'm sure my technique is probably at fault but when I use this punch, it ploughs ahead of the starting point and results in a sloped edge, not a 90 degree cut. It was also not as easy to center on the strap as I thought it would be. The tip would be off center and result in a lop-sided cut. The results were worse when trying to use it on straps smaller than 1.5" so I don't recommend that at all. I actually had a better result using wing dividers to scribe the cut-line and hand-cutting with my utility knife. Since I paid nearly $50 for the punch and I would like the conveniece if I could use it correctly, I will be trying it again. I guess my message is that you should get the punch in every size that you need, don't try to adapt it to different sizes and two, don't be in a hurry, it may not be the perfect solution anyway. Nick -
Here is a link to basic tools that might be helpful. http://unblinkingeye.com/Guns/LTools/ltools.html Be careful when you buy your first piece of leather. You don't want to buy something of such poor quality that there is no possible way to get a good looking project out of it and you don't want to buy a flawless, premium piece of leather that you cannot do justice to. Be sure to get the right weight of leather too. Just a rough guide but something in the 8 - 10 oz. range should be good but it really depends on what you are doing with it. If you are doing 2-ply stuff, then 4-5 oz back-to-back would be the way to go, again depending on which project and design you are using. Nick
-
If you want to sew a belt, especially with double row or ornamental stitching, you will need a sewing machine. A good sewing machine for leather is $2000 - $2500. You might want to start with single-ply, non-stitched belts in the beginning. As Doc said above, search YouTube for leathercraft tools and you can see some videos. For comparison, a hand tool such as an edge beveler from Tandy is around $15; a premium edge beveler is around $70 - $90. You will need at least three hand tools: a stitch groover, an over-stitch wheel and an edge beveler. Among the other things that you will need are... a strap cutter, wing dividers, cutting boards, anvil, punches, snap setters, etc. Nick
-
Thanks guys... I appreciate the help. Nick
-
I really like the styling... it's a perfect complement to the Glock... elegant simplicity. Nick
-
That looks really nice markush... nice clean work, and I really like the contrasting materials. Nick
-
My First Western Rig.
wizard of tragacanth replied to evandailey's topic in Gun Holsters, Rifle Slings and Knife Sheathes
Well, I don't know much about Western rigs and I cannot say anything about the workmanship because the photo is not close enough. However, I can say that I like the style and the rich color. That Ruger looks real handsome in there. Nick -
My First Holster - 1911 Iwb
wizard of tragacanth replied to Guy W's topic in Gun Holsters, Rifle Slings and Knife Sheathes
I'm impressed... for your first project... I would say you are a natural! Nick -
So, do you use linen or nylon thread for hand-stitching your holsters and belts? Why do you choose that one over the other? Thanks, Nick
-
I seriously hope that is not your gun belt because that is just not sufficient. That looks like a rather soft, 1" belt from here. I would highly recommend a 1.5" belt of sufficient thickness that you cannot bend it vertically by pinching the top edge and the bottom edge together... (I don't know how else to describe it). That would make another good project for you! A holster needs the good foundation of a proper gun belt to be any good. A good belt makes a huge difference. Once you experience it, you will never have anything else. I would also recommend that if you make a belt, you should consider making it the same color as your holster. It looks much better that way. I would also recommend that you look at what other "veterans" around here are making. I learn so much just by looking at their creations. Nick
-
A Very Unusual Result
wizard of tragacanth replied to Lobo's topic in Gun Holsters, Rifle Slings and Knife Sheathes
Very interesting and quite attractive. I had no idea that horsehide had such attributes. Nick -
When I bought my first piece of leather, I had no idea what to look for. At that time, to me, leather was leather. I bought it in person at Tandy and did not even consider what the flesh side looked like. So I wound up with a side that is far from what I would like to have. I found that I could use 120 grit sand-paper on a sanding block and with not too much effort, remove much of the offending stuff. Sanding sometimes works better in one direction than another so, if you do this, try it in more than one direction. I haven't tried gum tragacanth for smoothing the flesh side... I have used Satin Shene though. I put Satin Shene on a dauber and rub it all over. It lays the nap down nicely. I will have to do an experiment with gum tragacanth to see if there is any difference. I started using Satin Shene because I was finishing the inside of a holster where there was one side of flesh and the other of grain. I didn't want to put gum tragacanth on the grain side so I just used a dauber with Satin Shene to do both surfaces simultaneously. Here is a pic of the back done with Satin Shene.
-
Thanks markush, I will definitely try to use only a single dip next time and give the 'roon time to color up the leather.
-
Some day, I will get a bench mounted punch press but until I do, I will probably use a ruler and an awl to mark the two ends of the ovals on the center-line of the belt. OTOH, I may take the easy way out and just make round holes!
-
Hey Guy, Those are Chicago screws. They are two piece screws that you can get in different sizes. On the back side of the belt you would see a slotted head for the screw. You can get them in lengths such as 1/4", 3/8" and 1/2" depending on the thickness of your belt or other project. I got mine at Tandy. You could use snaps or rivets but I think most people on this forum use Chicago screws because they are a better solution, overall. Nick
-
Thanks for the info!
-
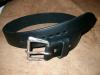
Finished my first gun belt. It was also my first project using vinegaroon (vinegar black). The gun belt was made for a friend. It is 32", 2" wide, single ply (I don't have a machine), 12 oz. cow hide. Since the leather is thick and the Tandy buckle is rather massive, I used oval holes. They are spaced 3/4" apart. This was the first time that I had used an oval punch. I should have sought advice on this forum about how to keep the oval holes parallel to the edges of the belt but I recklessly forged ahead with a silly idea. I put blue painters tape across the belt, such that the top edge of the tape was at the center-line of the belt. Then I tried to follow that line by eye-balling the oval punch head. Well, it didn't work well. A couple of holes were skewed, tilted from the center line. When I removed the tape, it took a little hide with it. I was not happy about that. Later, in an attempt to correct the tilted holes, I cased the leather, inserted an oval punch and twisted it to straighten it out. It actually worked pretty well but I don't know if they will stay that way or later relax back to their tilted state. The vinegaroon was my first batch, brewed for two weeks. It worked great. I had no problem with that. However, I did three dips with the belt, which pretty much soaked it. Now the smell is pretty strong. Next time, I will dip it and wait 30 seconds or so to see if the leather gets dark enough with a single dip. Then, if need be, I will dip it again. Hopefully, I can get the deep black with less saturation and less remaining smell. Also, I only let it air out for a day before I put the top-coat on, so I would imagine that that only sealed in the smell and now will take even longer for the smell to dissipate... if ever. I may be making it sound a little worse than it is. You can really only smell it if it is an inch from your nose, it's not like it stinks up the room. Questions, comments or advice are all welcome. Nick