


Sanch
-
Posts
699 -
Joined
-
Last visited
2 Followers


Recent Profile Visitors
16,304 profile views


Sanch's Achievements
Leatherworker (3/4)
-
 Lol I like that "simple weapons of opportunity" I can see it now "no your honor I never intended to bludgeon him so severely but the tin of cream corn was all I had to protect myself with"
 -
Nice job!, guess Canadians have no legality worries lol! Mines a zippered coin purse $3.75 in US coins with a line 24 snap to fold in half and snap together to slide your belt through.
-
Checkering files are the best way to go. SS bolts work great but if you have access to SS steel rod try that, 304 is your friend just remember it does work harden. Making your own tools and using them to make your own projects adds soul to what ever you make it adds more of "you"! I make all of my knifes, swivel knives too, including the blades, alot of my tooling stamps (mostly bevelers) all of my mauls, to include the"thumper" it is addictive so be ready but it looks as if you are! Your 2x72 belt grinder looks similar to the one I made except I use a multi speed frequency drive/converter... Secondary habit/hobby knife Smith (haven't done it in years) new job eats life.. ugh.. keep up the AWESOME work!!!
-
When I first started leatherwork I tried EVOO worst thing I ever did...I don't care what anyone says it does "sour" and mice like it... Only use 100% neatsfoot oil 0 silicone.... Top coat then MPB (Montana pitch blend) good luck!
-
Excellent.
-
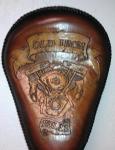
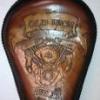
Nice work on the skulls, should've given the bird a red eye out would've popped killer. Thanks for sharing!
-
Go over the seat with a few paper towels that have denatured alcohol on them, it will look like it's bleeding green and black don't freak out KEEP THE BLACK OFF THE GREEN. Re dye the green and black two or three coats. Apply a light coat of neatsfoot oil (real 100% neatsfoot no silicone) on it the green and black will get real dark don't freak out. Let it sit over night the leather will soak up the oil. Buff the seat with some fresh paper towels. Get some MOP & GLO cut it 60/40 with distilled water and airbrush it on the seat. If you don't have an air brush use a hairy stick. After all this put your leather balm with atom wax in the cabinet and save that sh.... tuff for wallets and watch bands. Get some Montana pitch blend that's all... Put it on like like shoe polish, let it sit.. Warm it with yet ol ladies hair dryer but the whole seat again, done..
-
How's the sporty seat coming??
-
@chuck123wapatibevelling much faster no need to re- check where stamp is in reference to maul head. Simple tap tap tap, easy enough to go back if there's any skipping which is very seldom. K.I.S.S. wins the day again!
-
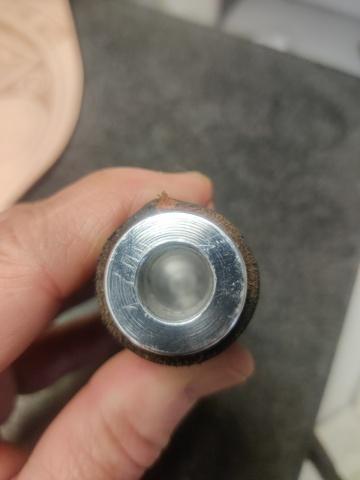
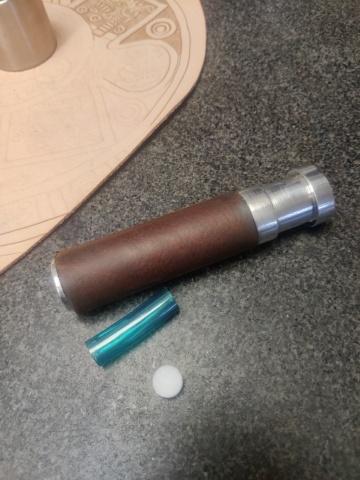
Ok, gonna try to keep this going as I'm still pretty stoked with my results. I made some more improvements to the "Thumper" I found while using it with my bevelers that there was a little too much slop, the shaft diameter of the beveler and the orifice diameter were allowing for "rattle" and not as much control as I would like. Seen here So I added a sleeve. Seen here. Also I didn't like the noise of aluminum pinging on the beveler so I added a wafer of delrin (same material as my maul heads) in the bottom of the "slide hole" seen in previous pic. You can also see the added weight (sacrificial maul top nut) I felt I'd make it look better as well as upping the weight to a little over 200g plus if I need it heavier I can change the top nut out for my brass one from another maul I made. and last pic shows the air line (sleeve) installed Also to answer anyone who'd ask. No this "Thumper" doesn't replace my mauls I will still use them. Even though I can now use the thumper proficiently with my back grounders as well.


-
Liquefy, Buckethead, Mastodon, Megadeth.... Dió. ... Puro pinche metálicos!!
-
@Dwightthis one is far from done sir! It's my personal seat for my Shovelhead. Soon as I get it all done I'll show it. The more I use the thumper the more it's growing on me!
-
@Rahere thank you for the idea. I would call it successful for my part. And I'm sorry for having hijacked your post. My findings are these. 1. It's doable. 2. Measuring the depth of the thumper in reference to how you hold the stamping tool is critical or as @Dwight so aptly put it the "dumb thing" will hit your fingers and thumb. 3. The weight of the thumper needs to be no less than 186-200g to be effective. 4. Stamping Tool articulation around curves and corners not affected. (in my case B2042 and self made micro beveler) 5. If thumper were in the 500g range it might lend itself to being useful for background work. 6. I hold my maul at the head and handle 60/40 (the 40 is the head) when I work, so anyone who holds "all handle" may or may not be able to control the thumper. Sorry for the long post I do have other findings but this is plenty "It does work and work well in my humble opinion" here are some results. Good, bad, wrong, right or indifferent I like it! If you like your mallet or maul or tree branch or old boot heel use it! It's yours!

-
Seen it no thanks. Again K.I.S.S. is the best if I wanted that I've got 2 air gravers I could molest into that monster.