


wizard of tragacanth
-
Posts
569 -
Joined
-
Last visited
Content Type
Profiles
Forums
Events
Blogs
Gallery
Store
Everything posted by wizard of tragacanth
-

Nambu Holster
wizard of tragacanth replied to JayB's topic in Gun Holsters, Rifle Slings and Knife Sheathes
Well, IDK if it is worth your time and gas to go there. The 25 yard spool of thread is only $5.50. Maybe it would be better to just order it online. Also, if you go there, it could end up costing you hundreds or thousands of dollars. No kidding. You might start buying tools and supplies for years to come. If you do go there, get some bee's wax and some stitching needles. I can't remember which ones I use. I thought it was the #2 Glover's Needles but I don't see that on the website. It's either those or the harness needles. Do not buy the "Stitching Needles" with the BIG eye. nick -
Nambu Holster
wizard of tragacanth replied to JayB's topic in Gun Holsters, Rifle Slings and Knife Sheathes
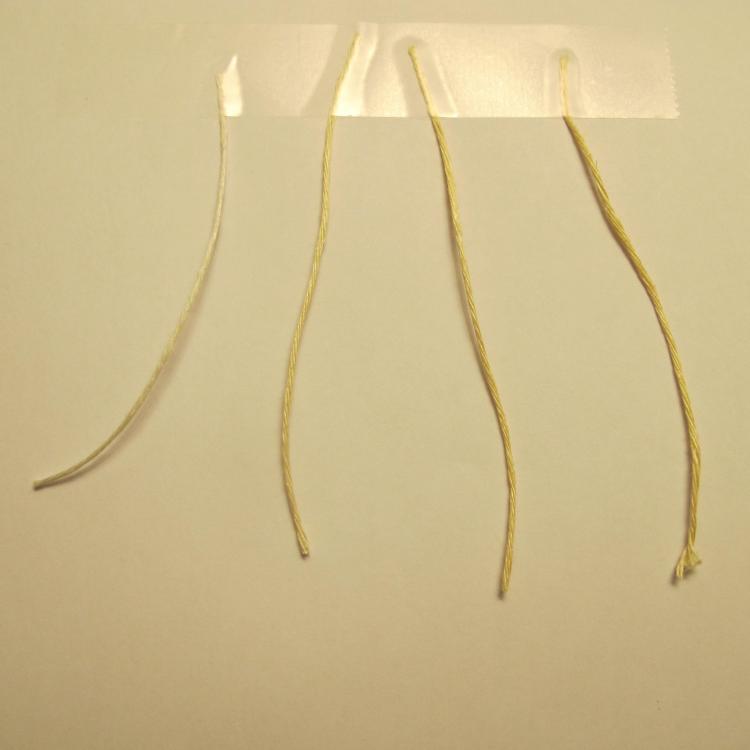
Okay, I was shootin’ from the hip, with that recommendation, so I tried it myself. I used Black Coffee. Here are the results. Four samples are shown, on a background of – HP Ultra White, Multi-Purpose Paper. Left to Right: Natural, 3 second dip, 30 second dip, 5-10 minutes. The bluish pic was taken outdoors in the shade, the yellowish pic was taken indoors under a Warm White LED bulb. nick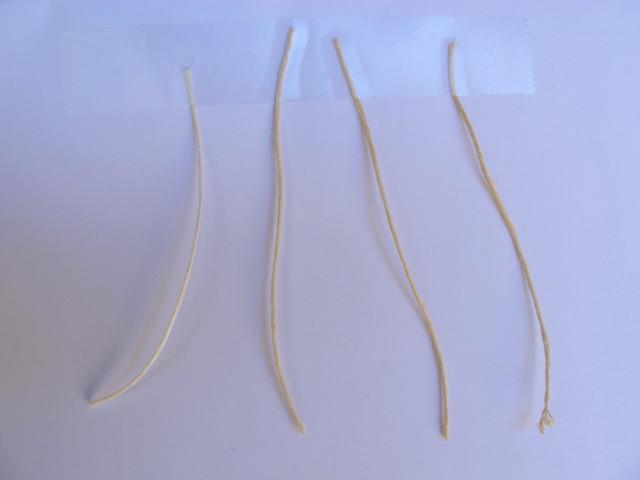
-
Nambu Holster
wizard of tragacanth replied to JayB's topic in Gun Holsters, Rifle Slings and Knife Sheathes
Hopefully someone will come along here and give you the REAL answer to this, but this would be my approach. I have not yet tried what I am recommending but this is what I would do. I would start with an un-waxed natural linen thread, such as this Tandy product. https://www.tandyleather.com/en/product/unwaxed-linen-thread-natural If the color of the thread is too white, I would make a cup of black tea or maybe coffee and start experimenting. The tea or coffee will be used to dye the thread. Dip short 6" pieces of thread in the tea, let it dry completely and then wipe the thread by drawing it through a paper towel. That may remove some color. Experiment with length of time for the dipping until you get the desired color. After you get the timing right, dye the thread that you need for the project. Then, lightly wax the thread by placing it on a chunk of wax, putting your thumb on top of it and drawing the thread over the wax a time or two. If I have time this afternoon, I will try this and let you know what happens. nick -
Well, you go to the Springfield Leather Company website and you search for Single Shoulder (Craftsman) and you find out it is $25. Here's the direct link. https://www.springfieldleather.com/Import-Single-Shoulder-Craftsman Now that is not premium leather but it should be good enough for a beginner. The label of "Craftsman" grades is a common term for the lower grades that are offered, but the cost is low and they are perfect for practice. The "extra" leather that you get with the single shoulder will probably come in handy. Everyone makes mistakes and must re-cut pieces. Then, you may also want to use some of it to practice making holes, dying, edging, etc. before you make your project. Choose the weight of the leather that is appropriate for your project. A small holster may be okay in 6 oz. a medium holster in 8 oz and a larger one in 10. As JLS said, if you use 2 layers, then they would total that amount, like 2x5 oz = 10 oz. This is just a general guideline. I have made a couple of holsters in 6 oz., just because I had it on hand, and I was not happy with them. BTW, Those were for me. I am a hobbyist and rarely sell my stuff. However, I do give some to relatives as gifts. If you get a single shoulder, you will have enough to make a gift or two, as well! BTW, if you have a Tandy Leather Store near you, I highly recommend that you go there and look at the leather in person. The first time I went, I didn't even know what veg tan was. It was a bewildering experience. Didn't have any idea what to look for. I told the woman who worked there that I wanted to make holsters. She was not much help, I wound up with 12 Saddle Skirting. Would have been great if I was making shoe soles! I am not suggesting that poor customer service is the norm there. You may find what you want there. Since leather is not a uniform thickness, it is usually listed with two weights, such as 8/9 or 9/10. Look for a shoulder with as few blemishes as possible. Look for as little fuzz on the back as possible. A shaggy back is not good. You want it to be as uniform as possible, front and back. They won't be perfect but that is the goal. nick
-
I finally got around to looking at that link for the leather. SLC is a good company but you are looking at the wrong item. When you buy these pre-cut project pieces, they are good, flawless leather but the cost is high. These are more appropriate for making journals, notebooks or such... that is, square projects that will use all or most of the leather. You would waste a lot of that leather making an irregular shape like a holster. What you should probably be looking at is a single-shoulder. Cost per square foot is lower. The shape is irregular but this should be enough leather to make a couple of holsters out of. Personally, I started with single-shoulders, and I think many of us do. Then I graduated to double-shoulders, then half a cow, I mean Sides. Later, I started buying Bends. Really nice stuff. BTW, the "hair side" is also known as the "Grain", so you don't get confused if you hear this down the road. nick
-
Dwight, I am very impressed with how concisely you described the building process, in so few words. Amazing. Wow! nick
-
You only want to make one or two holsters? Yeah, sure... this is how the madness starts. You can't see it, but we can! Watch this YouTube video with Sam Andrews, to learn how to do it. https://www.youtube.com/watch?v=5PdKDmcmu8k Can't tell you if the eBay leather is appropriate unless you provide a link. nick
-
I can't help you with your current problem but I can offer some advice to avoid such problems in the future. Use Fiebing's Pro Dye. It's much better. Unfortunately, it does not come in Purple. nick
-
No worries SaddleBags. Just the difference between Western 6-Irons and City Slicker Concealed Carry. We only know what we are familiar with... or something like that. nick
-
N - I - C - E !!!
-
You are so kind, Sir Frodo! I never looked better!
-
Inlay on this knife sheath
wizard of tragacanth replied to Rossr's topic in Gun Holsters, Rifle Slings and Knife Sheathes
Right after posting this, I thought that a two-snap configuration may work slightly better if the snaps were offset 15 - 30 degrees, so that the top snap opens first, then the bottom snap. That might be easier than trying to un-snap both at the same time. nick -
I don't know how much money you want to invest in this but I think that a Mini Desktop Laser may be perfect for this type of thing. However, I don't have one or really know anything about them. I frequently shoot off my mouth, then I miss and shoot myself in the foot. Saw one on Amazon for $118 but I think it only does 8cm x 8cm or something like that. nick
-
Inlay on this knife sheath
wizard of tragacanth replied to Rossr's topic in Gun Holsters, Rifle Slings and Knife Sheathes
Okay... here's my current thinking on Ross's fine project. I personally prefer the direction that the snaps are installed now, because it is natural and easy for the thumb to release the snap. I know the argument about snagging on something but I give little weight to that, unless it is used for bush crafting and I really do not see this knife in that role. Thinking about the position and number of straps, I think it would be interesting to double the width of the strap and keep the bottom of it where it is now. Oh, and use two snaps, one above the other. Make the strap as tight as possible but not so tight that it is difficult to snap closed, of course. nick -
Man, you are the creative one, aren't you? Brilliant idea, my friend! I'm no help here though... nick
-
I totally agree with your clothing choice, Matt. I was actually making fun of the younger guys that wear this Capri style recently. It looks very effeminate to me after seeing it for years as a ladies pant. Guess I should've used a Smiley Face on that comment. Now you have to educate me and tell me what a G3 is. Around here it is a new model of pistol nick
-
I actually forget how many people still holster a pair of 6 irons these days! I have never been involved in Cowboy Action Shooting, nor have I ever been to such an event. All of my firearm's experience is from a Concealed Weapons, Self Defense perspective. The belts that I was referring to are made for Concealed Weapons, so they kinda look like a normal 1.5" belt but they are thick, sometimes as much as 1/4". They are usually only holding up one gun, and maybe one or two, loaded magazines. My 9mm handgun, loaded with a 15 round magazine, weighs somewhere around 2.5 lbs.
-
Thank you for your understanding. Now, I will be able to sleep tonight. Okay, now I get it, the tan will coordinate better with a lighter green tank. nick
-
In the U.S. Capri's are tight fitting ladies pants that stop just below the knee. However, I have seen some men wearing them lately... https://en.wikipedia.org/wiki/Capri_pants
-
You know, I just put my pic up after many years on this forum and now I may have to hide my face in shame after that last post. If it's gone tonight, you will know why! nick
-
Well, it looks like you did a really good job for a first project. You would laugh at mine. I know I am going to be sorry later but I am going to be brutally honest and say that I think it would be better in Black or a done in a dark brown or burgundy/wine, etc. which would blend nicely with the Green tank and look more masculine. Set it off with the gleam of a sliver buckle to match all of the other metal on the bike. Sorry, sorry, so sorry... Gorgeous bike! And yes, you should be very proud of your work on this! nick
-
Ah-ha! Mystery solved! Looks Medieval. It projects the personality that I get from your profile pic. Reminds me that I really need to put some kind of pic up there. nick
-
Yeah, I don't know why people do not reveal their location. It is often helpful to know, in order to give them good advice. Anyway, I understand if they are in Witness Protection or On-the-Run from the law! I only make gun belts and they are all 1.5" but if someone wanted a dress belt, I may think about 1.25" if they are not over-weight. I would consider 3/4" if they were wearing Capri's! nick
-
Hahaha... got it! It is not a requirement but people usually show both the front and the back of their project for full appreciation. Looks good from the front! nick
-
Belt Repair
wizard of tragacanth replied to TBigLug's topic in Purses, Wallets, Belts and Miscellaneous Pocket Items
I can't say for sure how most commercial belts are constructed here in the U.S. I never really look at them because I make my own now. I think most are sewn or riveted and sometimes they have snaps. However, many of us leather workers use Chicago Screws, which are easily removed with a screwdriver. You can see them in his last pic, next to the buckle. nick
