wizard of tragacanth
-
Posts
573 -
Joined
-
Last visited
Content Type
Profiles
Forums
Events
Blogs
Gallery
Store
Everything posted by wizard of tragacanth
-

Who is your favorite hardware supplier at the moment?
wizard of tragacanth replied to fighttobreathe's topic in Suppliers
I don't really have an answer for you. I mostly use Tandy. However, I am curious as to what you are looking for and I think that it would help others, help you, if you were more specific. Are you looking for more variety, better quality... what? nick -
Well, it would help to see a pic of this in order to make a proper recommendation but off-hand, I would say -- stitch a line around the flashlight. That's how we would do it on a gun holster. nick
-
Third holster
wizard of tragacanth replied to GnewVFL's topic in Gun Holsters, Rifle Slings and Knife Sheathes
I am not normally a fan of floral but dang, that is very good looking. I like the red too! nick -
Latest Holster
wizard of tragacanth replied to Hildebrand's topic in Gun Holsters, Rifle Slings and Knife Sheathes
Thanks for sharing this info. This is sad news. I wondered how they would work out. They sure look nice. Do you think pull-the-dot snaps are the solution? Are you going to try them? To the best of my memory, it seems that when snaps are used, they always loop over, and around, then snap on the front. I really liked the looks of the design, sorry it didn't work out. Let us know what you do with this. nick -
Edge Kote rubbing off....solution?
wizard of tragacanth replied to HondoMan's topic in How Do I Do That?
I never use any products designed for edges, only Gum Trag and Tokonole on belts and holsters, but I have always been on the lookout for a good one, just in case I needed it in the future. I always thought of Edge Kote as the rubbery, semi-gloss paint, that I would see on cheap belts, at cheap stores. It looked like it would eventually wear, or peel off. That was just as guess, as I had never used it. The only two products available at my local Tandy are Edge Kote and Dura Edge. On the Fiebing's website, it has these descriptions... Edge Kote: Dries water resistant with a flexible, deep semi- gloss. Dura Edge: Fiebing's Dura Edge is a flexible and highly durable finish that will result in a professional edge every time. No need for burnishing, buffing or other labor intensive processes to get the edge you always desired. Fiebing's Dura Edge dries bright, hard and will not rub off. The convenient wool dauber attached to the cap allows for easy application with minimal mess. A few days ago, I ran across a Fiebing's product called Burnishing Ink Wax. That one sounded very interesting to me, as I could dye and burnish at the same time. It appeared to be available only in 32oz jugs. I asked my local Tandy and they had no experience or knowledge of this stuff. I searched this forum and found a post saying that it was not a good product. So, I went to the Fiebing's website, and for the first time, discovered their Shoe Care products. Under the Shoe Care products, they have Cobbler Classics. There are a couple of interesting products. However, I could not find any descriptions. I am wondering if any of our Cobblers on this forum could be of assistance here. Perhaps there is a product for sole edges that would work great for us? https://www.fiebing.com/shop/?c=34411/COBBLERCLASSICS nick -
Very nice work... and quite interesting. I had no idea that "eating knives" were a thing... other than a table knife, as we know it. nick
-
I am absolutely NOT the person to answer this question because I have ZERO experience here. However, since no one else will answer, I will try. Honestly, I am not sure that you should even continue on this one but if you must, think of a flashing on a roof. Use a long strip of leather, folded down the middle, length-wise. Place it in the inside corner, sew to the side and the strap. Good luck! Hopefully, some one with real knowledge can be of more assistance. You might give it a week. I am here every day but many are not. nick
-
I use Tandy Harness Needles, Size 0 (zero). Mine measure an average of 1.09 https://www.tandyleather.com/en/product/harness-needles-10-pk nick
-
Confession time: I always sew one-needle-at-a-time. I guess that is kinda amateurish and I may be the only one doing it but it works for me and I doubt that I will change. However, I am open to constructive criticism. nick
-
Sweeeet!
-
Second holster
wizard of tragacanth replied to GnewVFL's topic in Gun Holsters, Rifle Slings and Knife Sheathes
It's always nice to have a "little helper" around, right? I'm sure that your friend will treasure his gift. nick -
Material For Making Reusable Templates?
wizard of tragacanth replied to AusSimon's topic in Patterns and Templates
Matt, what do you use to cut the Masonite,. a jig saw? nick -
Latest Holster
wizard of tragacanth replied to Hildebrand's topic in Gun Holsters, Rifle Slings and Knife Sheathes
Very nice work. Those layers do look nice and clean. What brand of contact cement did you use? nick -
Oh yeah... just re-read this thread (haha, there's a joke there) and realized that I did not address your thread thickness. 1.2 mm is just too thick. For me, 0.6 mm is a little thin. I use 0.8 mm Sorry Nigel... I just like a chunkier look on holster. nick
-
Second holster
wizard of tragacanth replied to GnewVFL's topic in Gun Holsters, Rifle Slings and Knife Sheathes
Well, you have definitely cleaned up the edges and have given it a nice contour. The dye and finish are good... and that firearm is awesome! I am a huge Sig fan. Things to consider: I am wondering if there is enough room to get a full firing-grip on the pistol. It looks like the leather comes up a little too high but that could be due to the slight angle of the picture. I am seeing some finger nail marks and the goal is not to have any. I had a huge problem with this on my first few projects. At first you will need to have great awareness every time you touch the leather. Later, it will become totally natural and you will not even have to think about it. The stitching that goes around the trigger guard and under the barrel, needs to be much closer in… as close as you can get it. If your sewing machine cannot get in there, you may have to hand-stitch that line. I only hand-sew so I can’t be of any help there. You could still fix this on this project. Here is an example. On one of my earlier projects, I did not stitch close enough. I went back and stitched closer in. It worked out. nick -
Second holster
wizard of tragacanth replied to GnewVFL's topic in Gun Holsters, Rifle Slings and Knife Sheathes
I had some kind of problem making this post. The text for this pic is in the next post.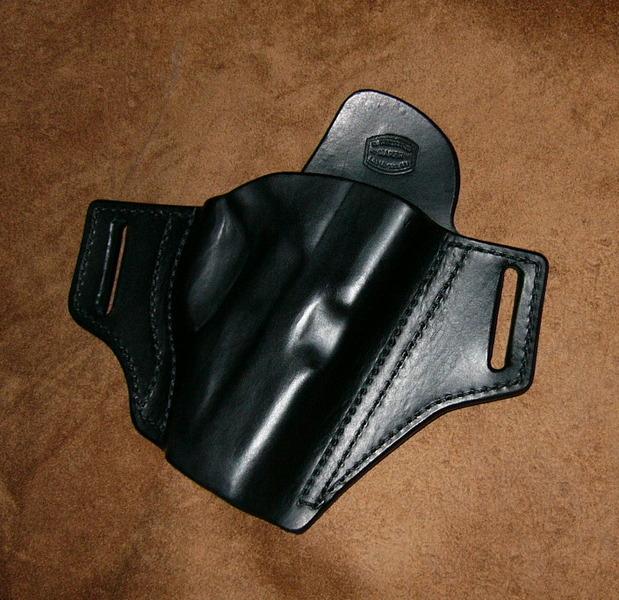
-
I don't know if I am really helping here but fraying is an unavoidable part of the process. I have used twisted linen thread more than synthetics and I don't know if this applies to braided thread. Anyway, I find it is best when it is moderately to heavily waxed. This keeps the fibers together better and makes it slide through the leather with less damage. Additionally, it is highly advisable to stretch the thread before sewing. Again, this is for twisted linen. My favored way to do this is to hold the waxed thread, one end in each hand, loop the thread over a door knob, keep firm tension on the thread and "saw" back and forth from one end to the other. Does that make sense? Optionally, you can hold one end and run it through your finger tips of the other hand, squeezing and pulling but this can make a twisted thread, bunch up. I sometimes have to use jeweler's pliers to pull the needle through the leather. nick
-
Sig P365 pocket holster
wizard of tragacanth replied to chiefjason's topic in Gun Holsters, Rifle Slings and Knife Sheathes
Jason, thanks for posting that. Looks good. I think rough-out is especially good for a pocket holster, for obvious reasons. I also like the full coverage. That button-tab that you put on it is a cool design element that makes your holster stand out from others. When I made my pocket holster, due to habit, I cut the leather for grain side out. Since it was a slightly asymmetrical pattern, I had to leave it that way. Jeez! Oh well, next time... maybe. nick . -
Beautious! Well executed. Must have been a challenge to get through all of those layers. How did you make the holes?
-
Sig P365 pocket holster
wizard of tragacanth replied to chiefjason's topic in Gun Holsters, Rifle Slings and Knife Sheathes
Jason... please do post a pic of the etsy holster. Would love to see it. -
Alligator Shoes
wizard of tragacanth replied to JazzBass's topic in Shoes, Boots, Sandals and Moccassins
Hilarious... and kinda creepy! nick -
Looks good Yin. I love the tooling, though I know nothing about tooling... never done it. There is something glaringly missing though... your maker's mark! Try to get that on V3, okay? nick
-
Sig P365 pocket holster
wizard of tragacanth replied to chiefjason's topic in Gun Holsters, Rifle Slings and Knife Sheathes
Jason, that is a real nice looking holster. Hope I'm not repeating myself but the P365 is not too big nor too heavy to pocket carry. However, I guess that depends on the person's build and type of pants that they wear. I made a pocket holster for my P365. The gun and holster fit nicely in the pocket of my Lee jeans (regular fit). I am 5'10" and 180 lbs. It rode comfortably, even when sitting and driving, and it was nearly invisible. I didn't need to worry about printing though because I always wear long, un-tucked shirts. The only problem was... I could not draw from it. The opening of the pocket was too small and made it into a monkey trap. If I had a full firing grip on the pistol, I couldn't pull the gun out. It doesn't work too well drawing with just a thumb and index finger! Carried for 5 years IWB, now 10 years OWB. Thought that I would try pocket carry but looks like I am staying with OWB... unless I buy a different style of jeans. nick -
Is the stamp plastic or metal? If it was metal, did you heat it up first? nick
-
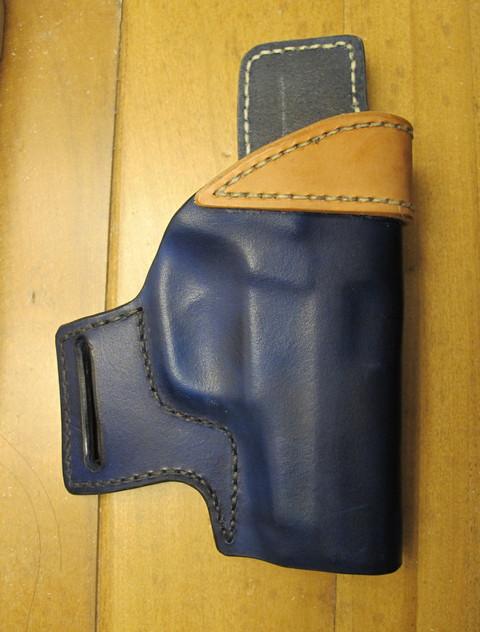
First holster
wizard of tragacanth replied to GnewVFL's topic in Gun Holsters, Rifle Slings and Knife Sheathes
Here is an example of burnishing both before and after assembly. The tan reinforcement had to be burnished on the bottom edge before assembly and had to be sanded and burnished on the top edge after assembly.