TABcustomleather
Members-
Posts
43 -
Joined
-
Last visited
Content Type
Profiles
Forums
Events
Blogs
Gallery
Store
Everything posted by TABcustomleather
-
Vinegaroon Shine?
TABcustomleather replied to Lizard's topic in Gun Holsters, Rifle Slings and Knife Sheathes
Hello Steve, I've been using Vinroon for quite a while now. First, when making a batch I let it sit until the steel wool stops dissolving in it. If the steel wool completely dissolves...add more. Mine usually sits for approx 4 weeks. I also know its finished when the smell has changed. It doesn't really smell like vinegar when its ready for use. Any ways after applying the vin-roon, I let it sit for a day. (Also I have applied it by dipping and wool daiber.....both work.) After sitting for a day I oil very liberally then it sits a second day. Last step I rub in a coat of Clear Lac and let dry then buff. I'll attach a picture of the most recent holster I used this technique on. If your looking for less shene...you could reduce the clear lac. The Lac on this holster is full strength. Hope this helps, Tom -
Ruger Mark Holsters
TABcustomleather posted a topic in Gun Holsters, Rifle Slings and Knife Sheathes
Hello Folks, Had a lady ask for a Ruger Mark lll holster and decided to make one for myself as well. Thought I'd share a picture of the holster I made her. She wanted her better halfs initials and I lined it with pig. Tom -
Thanks Shooter!! Dill, to answer you questions( or at least try), I made that bordering strip lighter by adding an additional two coats of clear-lac as a resist. That way I could block additional antique from penetrating that part of the leather. The rest of the holster only has one light coat of Clear-lac, just to ensure an even application of the antique. I tooled that strip with a shader to give extra dimension and to make the edge like sharper. Hope that answers you questions. If you have anymore...fire away!!!! Thanks for the appreciation. Tom
-
Sylvia, Your more than welcome. Its nice for the newer members of our beloved craft to have such a nice forum to wick info from. And it would seem that the backbone to such a communal gathering would be individuals such as yourself. I wish I would have found this place years ago when I had all of these questions that needed filled. It would have saved many a pieces of hide over the years!! Tom
-
Hi Rosi, Thank you very much for the compliments. I really appreciate that!! I'm a weird one in a way. I have been working on leather as my "secret" little hobby for quite some time now. I would just make things for myself and those I was close to. Now as I venture out to show things for other people to see, I'm so dang shy I get embarrassed by all of you folks compliments. I appreciate everyones kind words. I;m glad you like the carving. Thanks again, Tom
-
Hi Pete, I've stopped by and looked at this a couple of times and left so I could come back and get a fresh look. Everytime I looked at it the same couple small things popped out at me so here's my cents worth. That loop you have to the left of your center flower just doesn't fit in quite the way I would personally make it flow. It sort of looks like it comes out of nowhere to fill a space...you dont want that. The next thing that keeps catching the eye is the difference in the density in the design comparing the right side of center flower to the left side. On the left side you have a single smooth flow (minus the loop that swings down to center and out the other side of center you have double the concentration of flowing matter). If it were mine I would try and find a happy medium on both side. Eliminate the loop to the left as well as the double to the right. If you want more filler I would use something similar in size that kept the balance. Is the center flower supposed to be center of attention or part of a continued pattern? If part of a continued pattern I would keep the middle, top, middle flow you have on the left and do the opposite on the other, middle bottom, middle. If the center flower is the center of focus, I would some what mirror both sides so the matching sides would pull your eyes to center. I'm going to post a picture of something I put together that was supposed to focus on the center. You should notice that my center was no where near the center of the carving yet the flow makes your eye perceive it as the center anyways. I hope you understand all, if any of this jibberish. I flat out stink at typing and can't put it down as fast as I think it!! Hope this was what you were looking for!!! Take care, Tom
-
Hello Dan, In that picture I was not trying to catch too much shine off the snake. I know what you mean. She wanted a dark rich leather snake like purse, she doesn't know about the carving. Working with the colors that I had to work with, I clear lac'ed the hell out of the snake and left a couple of the extra coats off of the bag for a satin finish. In the light the damn snake will almost blind ya!!!! I'll post a bright photo so you can see what I mean. Thanks for looking and the compliments!!! Take care, Tom
-
Sylvia, Hello and thank you for the kind words!!! I worry about having to go through that same ordeal you did, jumping over snakes, everytime I go in my folks house!!! The room that used to belong to us kids is now cages!!!! LOL!!! What in the world!!! Anyways, yeah that snake was pretty fun to carve. Just keep an eye on the picture and try to make shadows fall where they should. sometimes a little challenge is good for us though you know? Its nice having a chance to say hello to ya, I've been reading your posts around here. Your always out there trying to help someone. Thanks for being here. Take care, Tom
-
Hey Blues, glad I could give you an idea, if and when you get around to it post it up!!!! Any questions give me a holler. Tom
-
I bit on the 1.99/ft pigskin at Tandy
TABcustomleather replied to JoelR's topic in All About Leather
I use pig all of the time but always as a lining. It does great lining holsters, belts, cell phone cases, small pouches. The stuff I use comes in at 1-1 1/2oz thu, like stated above. With the pig I have I also use it for my wallet inners. 3oz would be too thich for that. Sounds like it time to experiment with some new project ideas, if you still have the pig. I know this post has been on here for a while. Hope it helps, Tom -
I second Springfield Leather, as well as the idea of you getting the bundle. I have also ordering their bundles before and I've gotten a nice variety every time. You'll have your material for your watch bands and after the leather bug has you by the throat:spoton: You'll already have leather for other tooling projects!!! Tom
-
Thanks for the kind words guys!!! I like to keep my work as traditional as possible myself Mike, its just the style I prefer. Of course I'll try anything that someone is SURE that they want, but given a free rein, I'll lean on traditional every time. I've been seeing your work around the forum and I DEFINITELY like your work as well!!!! Sharp, do you have any pictures on here of your knives you created? I would love to see some. I have a real appreciation for the kind of work you do. If you get the point of doing a skinning knife kit, PM me..I'll be ordering one. Thanks again guys, Tom Here is another one, same pattern, tooled for my mother for her to wear on our range days when she'll be in and out of the holster alot. She carries concealed everyday except our monthly Mother/Son range day. Nothing like quality time together!!!
-
Thanks guys!! Appreciate the kind words. I'll post another picture of the other side for you Blues. The only difficult part was finding the patience to drill all of the holes, while trying to keep them all evenly spaced and at the same angle. I used a draw knife to rough the wood into shape on the tool side. A little sanding and three coats of polyurethane. Thanks again guys, Tom
-
Pneumatic Finish nailer would work too. If it were a larger critter you could step up to a framing nailer. Naa...I love dogs too much for that. I wouldn't waste the air or the nail on the cat. There are other methods............. Back to the collar..In the past I have used the quick release and they worked out really well. Also you might try and use the buckle you have and make the collar a little longer so you can put the tip thru two keepers that fit pretty snug. I've done that before for some dogs my friend hunts with. It kept him from losing the collars in the briars and brambles. Tom
-
Todd, I don't know of any other of those stamps available. With in the next couple days hopefully someone else can chime in. What about the possibility of making the guitar on your strap a little larger so you can carve it? Have any pictures of what your working on? Sorry I couldn't be of more help. Noticed that you had a bunch of views but no responses. Just my two pennies worth!!! Tom
-
Welcome from Spring Grove, PA. This place is awesome!! Tom
-
I've been layed up lately. Finished all of my projects people have been asking for, So I thought I would make something for myself. I had an interesting piece of a peach tree limb that I cured and wanted to do something creative with. So I made a new tool/stamp holder for my most commonly used stamps, then wrapped the back with leather. What do you think? My tools seem happier, both for the recent increased use and their new home Feedback more than welcome....Semper Fi!! Tom
-
Thanks for the welcome Folks!!! I've been keeping myself rather busy. To any members who live in the South central part of PA, I have a connection thru a company who works with granite counter tops. Their name is Frankys and they are out of Red Lion, PA. If your looking for a piece of granite for a work surface they have a large selection of kitchen sink cutouts that are free for the taking. Semper Fi Tom
-
Bob, Just wanted to take a moment to say hello and let you know that your floral carvings are absolutely beautiful. You set one hell of an example and provide unending inspiration.
Thank you for you willingness to share your knowledge. When I'm reading through the posts I'm always looking for Hidepounders input!!!
God Bless
Tom
-
Iwb Holster Problems
TABcustomleather replied to glockanator's topic in Gun Holsters, Rifle Slings and Knife Sheathes
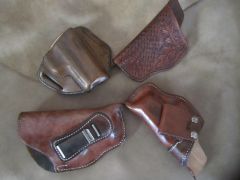
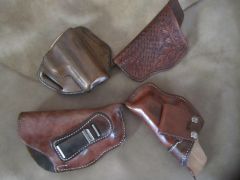
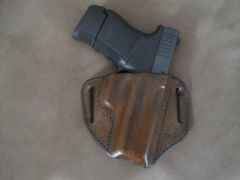
There is one more detail I havent seen mentioned yet. If you extended the side that goes next to you body just a little bit it would do a couple of things for you. One it will let you feel the difference between the two sides when you are trying to reholster and second it will protect you from hard edges such as the hammer spur while wearing it. Now like mentioned before IWB carry is not the most comfortable method in the world thats for sure. Add to that fact that your making an IWB holster for a good sized revolver with a nice thick cylinder on it, comfort is a luxury that combo wont provide. I've made IWB revolver holsters for folks before, my sister carries a S&W J frame in one I made her. What I do is keep the side of the holster thats next to the body as flat as possible, extending the inside leathers mouth a little and add a band of leather around the back of the cylinder for support. Just my two cents. I know I have a picture of an IWB I've made to show you what I mean. Don't know if I still have a revovler IWB picture, I'll look. Nope, don't have any revolver IWB pictures in the computer. Anywhos, see the holster on the bottom right? Thats the concept about adding another layer of leather at the throat for reinforcement, also the extended inside leather. That just happens to be for a glock 36. I'll get some pictures of my IWB revolver holsters on here if you would like. Like it was said before I would cut some belt loops on that holster and have a really nice open carry piece. take care, Tom -
Tom's creations
Images added to a gallery album owned by TABcustomleather in Our Leatherwork Galleries
-
From the album: Tom's creations
-
From the album: Tom's creations


