


rktaylor
-
Posts
486 -
Joined
-
Last visited
Content Type
Profiles
Forums
Events
Blogs
Gallery
Posts posted by rktaylor
-
-
Ron,
You know I do not have the trained eye that others do, but the 'flow' looks great (rear jockeys onto the skirts and the seat jockey). It all 'fits' together. I can see the issue you point out with the rear rigging but it certainly doesn't look bad. I see CW's point on the screw also. If either of those are your worst mistake, pat yourself on the back.
I really like the tooling on the rear jockey. The way that you blended the border and basket weave with the floral design. Very nice indeed.
Take some time to ride it before you start your second.
Randy
-
I would like to echo Bob's comment. Ron L. was not the only one learning from the posts. Thanks to all who are willing to share.
Randy
-
Ron,
It's looking good. I can't wait to see the gallery photos when you're done.
Hand sewing the skirts (and everything else) is time consuming. However, I think am getting better and faster with all of the sewing that I do. Nonetheless, if I ever sell a saddle, I am buying a machine.
Randy
-
Thanks for all the feedback. Billy, you are correct, that I thought these were really smooth. However when they dried, they were not so smooth. I stopped rubbing initially because I though they were starting to get rough and I was concerned with over-burnishing them. Either that or I was getting tired of rubbing. I'll give them a little more TLC like Bob says. These are my fenders, so I will get a lot more chances to burnish them before they are installed.
Randy
-
I have started my second saddle and want to do a really good job on the edges. I have been following Bob Park's guide for the most part. I sanded the edges and edged with a #4 western edger. Then I wet the edges, applied Fiebings glycerin bar soap (liberally) and rubbed it with a piece of canvas coated with saddle soap. The edges seem pretty good, but I could probably burnish them some more. You can see in the two photos (the leather is damp in the first photo) that I am getting some soap on the surface and not just the edges. Is this a problem? Am I being too sloppy? I am not planning to dye the edges, but I think the surface needs to be cleaned before I oil it.
Any advice is appreciated.
Randy


-
Big Sioux,
I think I will pass on those swells. That is well outside my amateur status.
Keith,
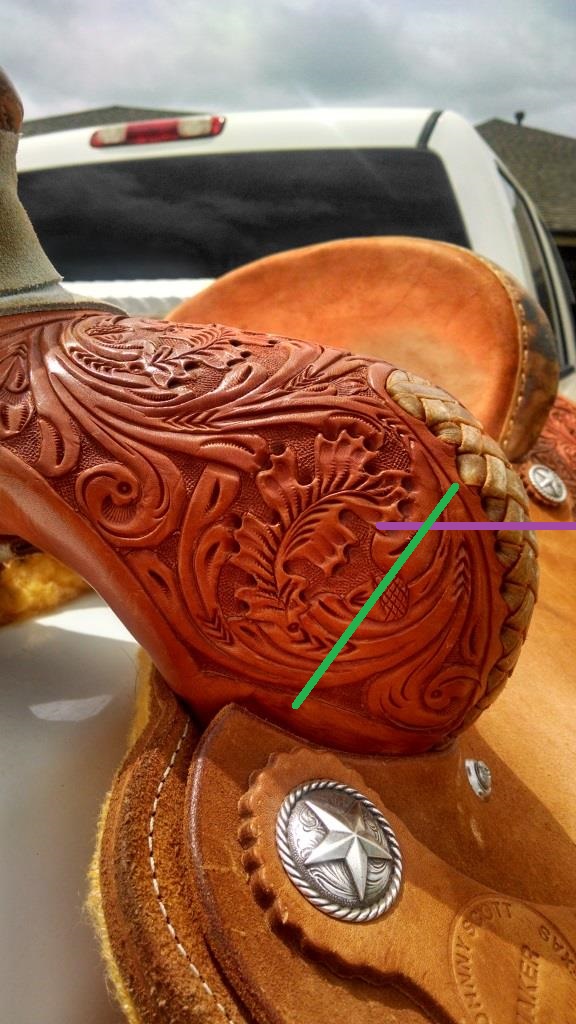
I am leaning against lacing now, but I wanted to get clarification on your advice. Are you saying that the lacing should not get too far above the purple line in this photo? What about if I laced it down the green line. I think I should be able to stretch it around the top corner and lace the slack below it. I was planning to lace them with latigo to match my saddle strings. I seem to get this 'good' ideas that someone else has already found that they are not that good. I am going to practice sewing some welts this weekend. Thanks for all the advice.
Randy

-
I am going to be faced with this issue in the near future. I will be building on a Will James tree with 13.5 inch swells. Maybe I could cover them without welts, but I figured it was something I should learn anyway. I am planning to lace them, but this last post has me somewhat concerned. I sure see a lot of saddles with laces down the side of the swells, but I know that doesn't mean its a good idea.
I figure after six years some of the opinions may have changed or maybe someone new wants to chime in.
Thanks,
Randy
-
Oltoot,
Thanks for the detailed comments. I thought the primary purpose of plugs was to make a smooth transition where the skirts were blocked. JW talks about keeping tension on the plugs to prevent the skirts from curling. I was going to order three sides to start my second saddle and talked myself into two. I haven't ordered them yet, but now I am second guessing myself again. That's becoming a habit.
Ron,
That's good advice from Bob, but I am anxious to see your saddle.
Randy
-
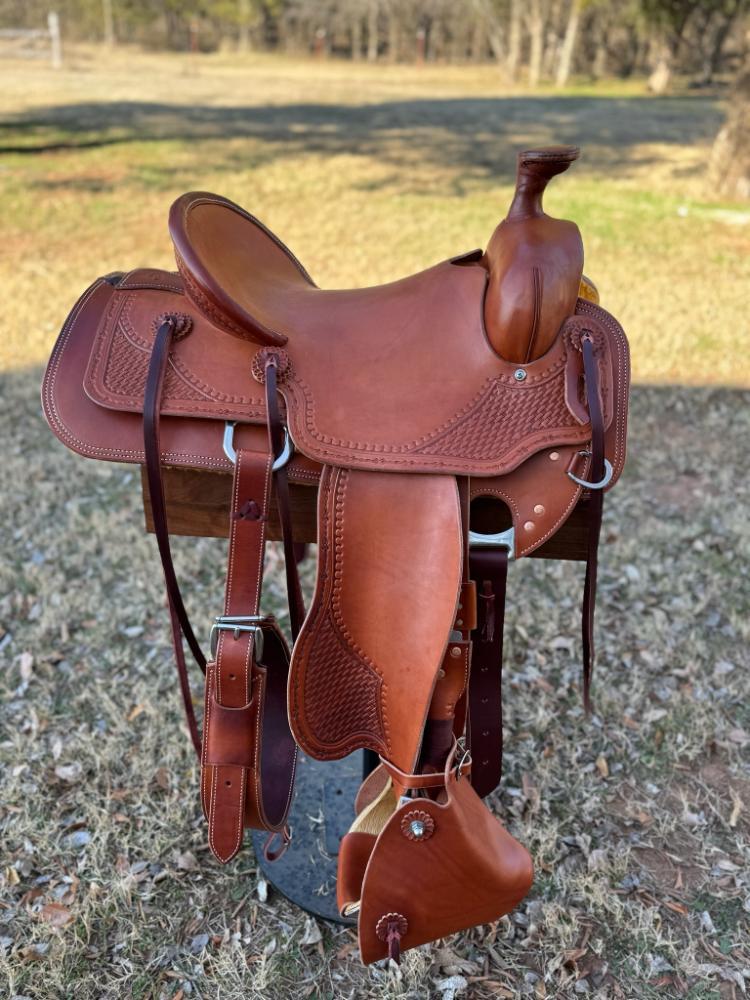
I have a friend looking at some used Johnny Scott ranch roping saddles. I can't find anything on the internet about them. Can anyone provide some information? Thanks,
Randy
-
Looks nice. Can you post some close ups of the cantel and horn? How long did it take to braid that?
Randy
-
Oltoot is correct about the cross sectional area, shape and orientation affecting the strength of a member. I won't bore you with the terminology. Think about 2x4 and 2x6 boards laying flat. There is a difference in strength but not that much. Turn the two on edge and the difference becomes greater. Notch one of these boards when it's laying flay and then see what it can support. I think that's what he is talking about when he mentions scoring the rawhide at the stirrup slots.
Randy
-
Bob,
I think Denise answered the question better than I can. My statement that it will flex is because everything flexes. I remember as a young engineering student the first time I learned (not sure I believed it at first) that steel flexes. We build stuff out of drill stem in Oklahoma, because we can't get anything heavier. I would offer a couple of examples of flexible items that we see all the time in pre-stressed aluminum semi trailers and prestressed concrete beams. Ever see one of the trailers empty and then loaded.
Now, I have only built one saddle. I don't build trees. And if I ever find myself attached to bull some very poor decisions have been made to get me to that point. So I am far from an expert on the matter, but I do have an opinion and an internet connection. Since you started this thread, I have tried to visualize what happens within the saddle while it is on the horse. I agree with Denise in that I can't see any value in the tree flexing (at least easily). Maybe when we talk about flex, we are talking about absorbing the shock when something large hits the end of your rope. Its better to give a little than be completely rigid. At least I think it is. I think this leads us back to some of the initial points made on fatigue. Fatigue of any material is related to stress cycles. Typically, I would like to base my conclusions on some scientific data, but I don't know if I can find any on rawhide. My gut feeling is that rawhide would handle more stress cycles than fiberglass. Thus having a longer 'service life.' That's just my opinion, but two weeks ago when Sonny gave me the choice between rawhide and fiberglass, I chose rawhide.
As far as computer models or even measuring what happens dynamically on a horse, you bet it can be done. I have a colleague who raises bucking bulls and we discussed methods for measuring the tension in a bull rope and the pressure points it puts on the bull while bucking. We didn't do it, but I thought we had a pretty good plan. In the end it just seemed like an academic exercise that would not lead to useful knowledge. This leads me to me one of the statements in my first post. Is it a question worth answering? Even though the wood in each individual tree is unique and then the covering adds another level of uniqueness, we could determine whether the coverings make them different. Now the question becomes, How many trees would we need to determine this? Having spent a lot of my career doing research on things that are hard to control, I would guess somewhere in the neighborhood of 25 with each covering. That's assuming we could all agree on a standard methodology that is repeatable. My experience is that getting this agreement takes significantly longer than the tests. As fun as it might be for me, I don't think I could generate any new knowledge that would improve saddle tree construction.
So it leaves us with anecdotal discussion and the collection of extreme observations. Which, in the end is more fun than an academic discussion. Trust me, I have had a lot of both.
Cheers,
Randy
-
Bob,
I am not sure I understand your question and don't want to write a three paragraph response and miss the target. Are you asking:
How did I arrive at the comments in my post like: "a tree would flex regardless of the covering"?
or
What methodology would I use to measure the flex in a tree?
Randy
-
CW,
It will have to be hand stitched, because I don't own a machine. That is exactly what I was thinking about doing, but was concerned I might damage the thread in the overstitched holes. My smallest needle is a double 0 and the holes are pretty small, The needle goes through fine, but I am not sure with extra thread in the hole. One way to find out.
Thanks for the advice,
Randy
-
As an engineer, I find this discussion extremely interesting. I would bet a large steak dinner that the tree will flex regardless of the covering. The real question is how much and is it enough (assuming it needs to flex). As Ron pointed out, fatigue failure is a function of cycles. If it goes through too many stress cycles, you could see your swells bouncing through the pasture attached to a smaller bull. I have spent most of my career conducting research and testing equipment or components. I guarantee we could answer the question of how much a tree flexes, but I wonder if it is one that is worth answering. I would like to tour a tree manufacturer though. I think that would be very interesting.
Randy
-
Joel
The holes are still intact. The stitches just broke loose.
Randy
-
Ron,
Thanks for the update. I was getting curious about your progress. I can't offer tips on sewing a Cheyenne roll, but am interested in hearing any.
Looking forward to seeing the final product.
Randy
-
A friend asked me to repair this stitching. Sorry for the image focus (or lack of). At first, I was thinking about stitching over it. But I am concerned I might damage more stitches. Then I thought about just pulling this thread back through the holes and tying it on the back side. Or maybe someone knows the correct way to fix it.
This is on the seat jockey and is only cosmetic.
Thanks,
Randy

-
Really nice. I need to build a new one and like your design. What's the clearance on your jaws? It looks like enough to sew saddle skirts.
-
Ron,
You are correct. The pulling collar does not lay flat on the chest. I will modify my pattern with more taper.
Randy
-
I am far from an expert and further from an artist, but I am also attempting some floral design. I have Bob Park's book and compared your design to some of those he displays. The first thing I see is some large blank areas between the flowers. Maybe the flowers are too far apart. Bob talks about spacing and balance between elements. I also think you need more 'non flower' elements. Maybe some stumps. The two smaller flowers seem disconnected.
That's a lot of information from someone with no experience, so take it for what it's worth. I don't get a commission, but Bob's book was a value buy for me.
Randy
-
WyomingSlick,
I picked the Tech-Tips book today. Thanks for the tip. I believe it will be well worth the money spent. I noticed that my backgrounding looks a lot like the "Wrong." I am going to practice this weekend.
Randy
-
Bob,
Thanks for the insight. Attention to detail. I was afraid someone would say that. I always look for the complex solutions first, but I suppose if you do all the little things right the rest takes care of itself. I have looked at Keith's saddles and also Troy West's. They are certainly worth striving to replicate.
I noticed most of your points were on the rear of the saddle. I did not get the jockeys tight enough on my first saddle, so I need to improve. I really like the way Jeremiah Watt spikes the rear jockeys to get them tight. Actually his entire approach of using a center line on everthing made sense to me. I think my ear cuts were ok, but this is a really visible area so I need to pay attention.
I figured somone would point out edge finishing as it really does make a difference in appearance. I am still practicing that on some other projects. Since it will all be hand sewn, I am still trying to build those skills.
Again, thanks for the repsonse.
Randy
-
Saddle Experts:
I guess I am doing this a little backwards, but I am trying to improve my saddle building skills after I already built one. But, as I plan for the second, I am trying to be more systematic. I would like to end up with a saddle that no one would ever guess it was only the second one I ever built. Thus, my questions are:
- What are the first things you look at when critiquing a saddle to assess quality, first class construction?
- What do you feel are the most common mistakes made or overlooked by novice saddle makers?
I want to make sure that I don't get to some point in saddle construction (that the experts feel is critical) just to think 'that's good enough.' I have books and DVDs to help me in the process and plan to build on my library, but I want to know what your eye is drawn to when you first look at a saddle.
Thanks in advance for the tips.
Randy


Saddle Making Workshops/courses In In North America?
in Saddle Construction
Posted
Do you want to do this as a hobby or a profession?
I looked at a lot of saddle schools before I built my first saddle, but the bottom line is I did not have the time to attend one. I have a full time job already and was not looking for a new profession. If you are considering it as a hobby, I can offer my experience. However, I am a long ways from being a saddle maker and further from being a brain surgeon.
Randy