Evo160K
Contributing Member-
Posts
497 -
Joined
-
Last visited
Content Type
Profiles
Forums
Events
Blogs
Gallery
Store
Everything posted by Evo160K
-
You're welcome Uwe. ( I had looked at it before and forgotten all about it ) Yes, I notice that happening to me more often as I season.
-
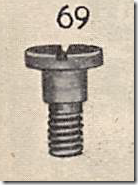
Uwe, The screw is used on a Singer 45K69 to hold the spirit box cover on to the sprit box while allowing the cover to rotate.. "There's no cross-reference that correlates Singer screw part numbers to thread size that I know of. " This website, singersewinginfo.co.uk, has them and more, but not the 69. : http://www.singersewinginfo.co.uk/screw_threads/ Thanks Uwe
-
brmax, Both.....a replacement and a repair of the area. I snapped the screw in two while trying to remove it, so I need to drill out and tap the hole, plus I need a replacement screw. I can/will make a repair, but I would like to keep it original Simanco if I can. Thank you for your interest.
-
While searching the internet for the thread size on a Singer No. 69 screw, I stumbled upon the link below that seems to contain some extremely important information (for me at least) on thread sizes, including Singer, and how they're determined. Experienced members most likely know this. One of the people responding to the post seems to have some good tips. https://groups.io/g/Wheeler_and_Wilson-Sewing-Machines/topic/493006?p=,,,20,0,0,0::,,,0,0,0,493006 By the way, does anyone know the size of the threads on a Singer 69 screw?
-
Still looking. Any help will be appreciated.
- 29 replies
-
- singer 45 throat plate
- singer 45 needle plate
- (and 2 more)
-
What do you think about this Singer 45K69
Evo160K replied to Evo160K's topic in Leather Sewing Machines
Thanks Jimi, I'll add it. Jimi, you don't ever need to apologize to me, as far as I'm concerned, you can do no wrong. -
What do you think about this Singer 45K69
Evo160K replied to Evo160K's topic in Leather Sewing Machines
That's good to know. Thanks Jimi. -
What do you think about this Singer 45K69
Evo160K replied to Evo160K's topic in Leather Sewing Machines
Thanks Jimi, I'll track it down over here. Got the K69 mounted on the treadle for testing, worked well. Not sure about the length of the stitches yet, they seem to be about 1/4 inch so far. Since there are no decals at all, I'm just going to sand the paint smooth and spray it with the Krylon Appliance Epoxy, that I used on the treadle. It dried very hard and very black, so far I'm pleased with it. Japanning and baking the heavy machine head is just too difficult in my electric kitchen oven. I will finish japanning the k25 head since the other parts are finished. Just need to get my motivation for it back. Been so cold around here, it's not too comfortable in the garage. Thanks again Jimi. -
What do you think about this Singer 45K69
Evo160K replied to Evo160K's topic in Leather Sewing Machines
Hi Folker, Jimi, Folker, yes of course it was a joke and a funny one at that.......I laughed. Mine was supposed to be as well. Everything's cool. Jimi, that's fine, looking forward to your new design, good luck with it. Jimi, I'm having trouble finding something called universal dissolvent or dissolvent. Is that a product name or a generic reference? Thanks Jimi. -
What do you think about this Singer 45K69
Evo160K replied to Evo160K's topic in Leather Sewing Machines
Funny Folker, very funny. You obviously haven't seen my sewing. Yes I have the machines, but not the skills. Jimi has the skills and the talent. I think she would prefer that. -
What do you think about this Singer 45K69
Evo160K replied to Evo160K's topic in Leather Sewing Machines
Jimi, I'm seeing where mineral spirits rather than turps is often used to thin varnishes, minerals spirits is less expensive and has less odor than turps. Is mineral spirits what you used? When are you going to sell me a pair of your sandals for my wife? -
What do you think about this Singer 45K69
Evo160K replied to Evo160K's topic in Leather Sewing Machines
Thank you Jimi, thank you very much. All the best. -
What do you think about this Singer 45K69
Evo160K replied to Evo160K's topic in Leather Sewing Machines
Thank you Wiz, Folker, Jimi, thank you very much. You guys sure know your machines. Like I've said several times in the past, if it weren't for you, I'd never attempt to restore these old machines. So I asked the local, retired gentleman who maintained 300 or so machines for a local tent, awning and flag company to come by and take a look. He's helped me with the other three machines.....Singer 45K25, 45K53 and the Claes shoepatcher. The timing was off and of course the tension. It's sewing well now. Here's what it looked like before he adjusted the timing. The piece of paper is 4.5 mm up and down, and the needle is a No. 24 Schmetz leather point.. BDC TDC You'll recognize immediately the shuttle point was way below the scarf, but also I though the shuttle needed to be adjusted as well, which I wasn't sure how to do. That' and I wanted the machine checked over. Also I couldn't get the handwheel off, I was afraid to pull or pry on the cast iron. He put a piece of wood into the inspection hole and jammed the crankshaft while he rotated and pulled on the handwheel....came off right away, no sweat. He also told me when I put oil in the oil hole for the crankshaft, I should rotate the handwheel until the wick in the cap of the connecting rod is directly under the oil hole, so the wick will move the oil to the crankshaft bearing. He said most machines are made with an oil wick in the crankshaft cap. Those Singer engineers were sure clever!. Now that it's sewing, I'll go ahead and clean it. Jimi, what is that "diluted paint thinner" you use to remove those outer layers of paint? Thanks again all. -
What do you think about this Singer 45K69
Evo160K replied to Evo160K's topic in Leather Sewing Machines
Thanks Wiz, very clear explanation. I will get the 6 cord, and yes, I have 25 and 26 leatherpoint needles. Since the seller knew nothing about sewing, and I couldn't test the machine, I couldn't check shuttle timing, which I'm beginning to suspect. The mechanics instructions I have are a bit unclear on shuttle timing....to me that is. I'll post a couple of pictures for comments. Hi Jimi, no I haven't done much with the tension other than set them to feel about the way I set the K25 and K53. The thread is staying taunt until just before the point reaches the needle plate, and last night a small loop was forming, but the shuttle seemed to pass just below it. Like I told Wiz, I suspect shuttle timing.......I'll post pics. Thank you both for hanging in with me, I'm grateful. -
What do you think about this Singer 45K69
Evo160K replied to Evo160K's topic in Leather Sewing Machines
Yes Wiz, I will do that, thank you. What size do you suggest, and what's a good source for it? -
What do you think about this Singer 45K69
Evo160K replied to Evo160K's topic in Leather Sewing Machines
Thank you good people for your thoughts and thank you Jimi for your pictures. Without you all helping me, I wouldn't begin to work on these machines. Here's where things stand at the moment, the machine will not pick up the bobbin thread, it won't even initially pull the bobbin thread through the needle plate to get it on top. I tried lowering the needle bar 2-4 mm, no help, I went to a number 24 needle with the same thread thinking that wouldn't allow the thread to slide through the eye on the up stroke thereby forcing a loop to form.....no dice, a loop will not form. Obviously I'm doing something wrong.......I'm at a loss. Any thoughts? I'll try to do a short video if I can remember how. Thank you, thank you very much. -
What do you think about this Singer 45K69
Evo160K replied to Evo160K's topic in Leather Sewing Machines
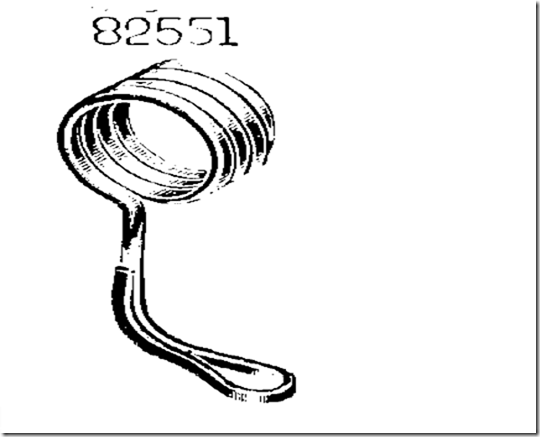
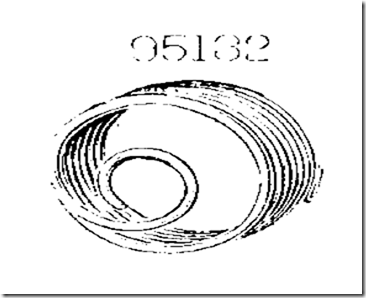
Hi Jimi, Jimi, your needle plate looks really good. Did you make the two-teeth feed dog as well? Nice work. Thanks so much for all of your time and effort in copying and sending that Numerical Parts List. That's extremely helpful, saves so much time. I owe you. About the knife blade you mentioned, did you notice in the parts list it was offered in three sizes: 95111 small, 95112 medium and 95113 large? Do you think that's to accommodate various thicknesses of thread? "anyway your tension stud looks like it was changed because the one in the parts list # SS439 has a short length of body from the thread to the disk. the one you have has a longer length of body, that is why that disk is so far away from the thread path." For some reason the image of the SS439 you mentioned above is not shown on Plate 1337 in my parts list or anywhere else for that matter. I believe the images in your parts list are an older version than mine. Something else I noticed in the parts list is the 45K69 uses 82551 Thread Controlling Lever and 95132 Thread Controlling Lever Spring. (See attached pictures.) The K68 and K71 don't use these parts. The 82551 lever is used on the 45K21,K25, but the spring is different., On the K69 they're used on tension screw stud SS391. So are these the parts that form the loop on the K69? Since the 45K68 and 45K71 don't use these two parts, how is the loop formed on those two subclasses? I'm so puzzled as to how the loop is formed on the K69. Jimi, would you be able to take some close-up pictures of the faceplate on your machine? Also if you get time would you please make photocopies of the parts images from your parts list (you sent the numerical list) and mail them? I'll pay for everything. What do you think about Wizcrafts comment above about the paddle spring on a 29k needle bar? How the hell does that loop form on the K69? Thanks again for sending the numerical list and for the hand-holding. -
What do you think about this Singer 45K69
Evo160K replied to Evo160K's topic in Leather Sewing Machines
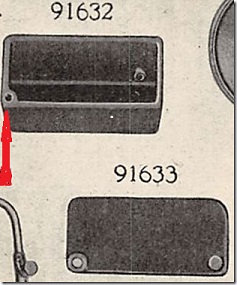
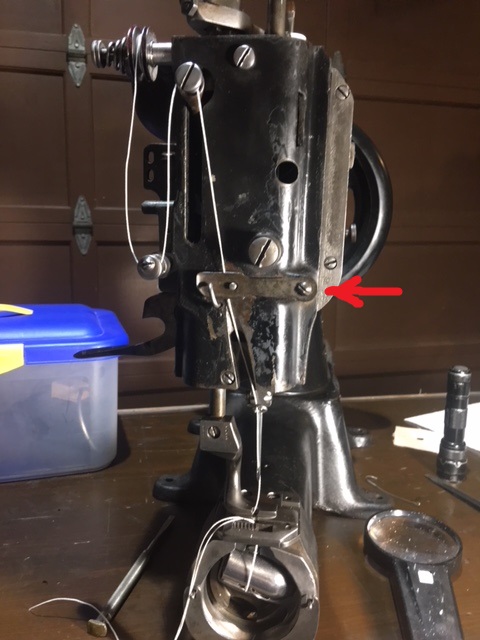
Thank you Constabulary, Wizcrafts and Jimi for your thoughts, thank you very much. @Constabulary Yes it seems I have been bitten, not sure if that's a good thing at this stage in life though. This K69 is indeed a sole stitcher.....I'll never use it that way, just enjoy working on them. I am wrapping the thread around the pulley, I learned that from you and jimi while setting up the 45K53. I was also wondering why there's no thread regulating spring. Then I noticed in the parts manual, those two springs (they're stacked one over the other) by the red arrow in the picture below, are adjustable with that domed head, split screw. They can be adjusted to "pinch" the thread between the springs more or less. Do you think that serves a similar function? @Wizcrafts When you say "double or triple wrapped around the top roller", by top roller are you referring to the pulley on the top tension assembly? I ask because there are rollers on both the (upper) thread take-up lever and (lower) auxiliary thread take-up lever on the faceplate with the facing screws, that the thread passes through. Btw, the thread doesn't seem to be slipping on the top tension assembly pulley. Do you think those stacked springs work similarly to the check spring assembly? Thanks Wiz. @Jimi That 95111 knife wasn't on my machine, is it on yours? Btw I had the 91794 thread retainer and screw, but have managed to misplace them. "i am just guessing but that disk with the hole on the side #17547 where the thread passes through after the first set of disks, would make more sense right after the disks." Can you explain that a bit more? I agree the hole in that 17547 disc is not in the thread path the way it is now. "on this one there is no thread take up lever spring, instead looks like the roller and stud moves up and down with the needle bar. #91764, 91787, 91788." That is correct, the roller and stud move up and down with the needle bar. The picture below more or less shows how that's done. There's a piece, 91764, attached to the needle bar that engages the curved slot and moves that lower take-up lever as the needle bar moves. So I'm still puzzled as to how that loop is formed with this machine. Jimi, does your parts list have a Numerical List of Part Numbers? Mine doesn't, makes it more difficult to maneuver in the parts list, but it's doable....just slower. Thanks again one and all. -
What do you think about this Singer 45K69
Evo160K replied to Evo160K's topic in Leather Sewing Machines
-
Hello vintage iron admirers. Recently, I picked up this Singer 45K69 circa 1919 from an eBay seller who knew nothing about it. It was even filthier on the outside than it is now, but the gearing and shafts are fairly clean inside. The screws don't appear to have been abused. The foot, dog and needle plates look to be in good shape as well. It has 2-3 miserable coats of rattle can paint and no decals. It came with part of the heater tubing, but nothing else. It turns over freely as the seller said, however it's not sewing.......it's not forming the loop for the hook to catch using 346 bonded poly and a #26 needle. It may be a timing issue, but before I start doing something I'm not sure about, perhaps you can offer your thoughts. I believe this subclass normally uses heavier thread, but since the loop doesn't even begin to form, I think it may be something other than timing, perhaps a missing part. I'm not sure if the tension assemblies are positioned properly either, although the tension on the top and bottom thread feel good.......similar to my Singer 45K25 and 45K53. Would you please look at these pictures and tell me if it's threaded properly and what's missing or incorrect? Any other comments you care to make will be greatly appreciated. Before I go too far refurbishing this machine, I'd like to know if it sews. I have a copy of the Singer illustrated parts list, but no service manual. Thank you good people, thank you very much.
-
You're welcome Gecko. Gecko, as Jimi said, the foot is bent, here's a picture of mine. Should be easy to heat and straighten. Hi Jimi, Constabulary. Jimi, you know what an expert is don't you..........a former leak!
-
I would ask for a picture of the entire back side and a picture of the entire faceplate/shuttle end, they would show if parts are missing or broken. Believe me, most of those are near impossible to find and are difficult to fabricate. The parts in the shuttle area are available, but as Jimi and Constabulary said, they look to be present on the table at the balance wheel end.
-
It's difficult to tell much from that angle. Perhaps the seller will send you more pictures. If so, here are two similar links (different formats) to the Singer45K53 documents that are in the Smithsonian Institute, they'll show you the original machine and tell you what it can do with the proper attachments: http://www.sil.si.edu/DigitalCollections/Trade-Literature/Sewing-Machines/NMAHTEX/0160/ http://www.sil.si.edu/DigitalCollections/Trade-Literature/Sewing-Machines/pdf/sil10-160.pdf Here are a few pics of my machine to use for comparison, it's quite complete: What is the seller asking for the machine? Restoration gets expensive fast.
-
Gecko, If you can post a picture or two of the machine, I can compare it to my 45K53 to see what else, if anything, the machine is missing. Is the seller the person who used the machine?
-
rk5n , My 99 yo Singer 45K53 has the same belt/pulley arrangement you describe, even has the consew CSM 1000. It all works fine, no belt slippage, however the previous owner must have tightened the rubber v-belt, because it has a metal "staple" in it. If you don't want to use a staple, there is an outstanding rubber adhesive called RP-30 by Adhesive Systems, Inc., www.instantca.com that works great.


