HorsehairBraider
-
Posts
669 -
Joined
-
Last visited
Content Type
Profiles
Forums
Events
Blogs
Gallery
Store
Everything posted by HorsehairBraider
-
Great work. Your nose button is beautiful, and so is your heel knot.
-
Wow! Very nice. Those whips are beautiful.
-
Leather Splitter For Whip Makers
HorsehairBraider replied to TrustCommunicationConsent's topic in Braiding
I've got the one that Pepelimoco is talking about. It is made by White Buff of this forum. They are awesome. I used to hate splitting, now I love it and try to split everything I can. The rest of the tool works great too. It's the best string cutter I've got... I think I have 3 other types. The beveling on it is as much a piece of cake as the splitting is. I don't make whips myself but I am betting you will really like that tool. -
When you have finished braiding a length, find a nice clean piece of board, and a nice clean place to do this, and put the board on top of your braiding and then roll the braiding back and forth under the board. If you have clean shoes and a clean floor (I sure don't!) you can also roll it under your foot. You just roll it back and forth, all along the length. That will even out the braid and smooth it. Never judge your braiding until you have rolled it... Don't know of a good leatherworker in the Netherlands though, sorry about that. Maybe someone else does.
-
Oh hey, aren't those gorgeous! I especially like the second one, as I think that knot's very cool. Very nice work!
-
When you are worried about not having enough length, you can sometimes get that last few inches out of your strings in this way: tie your ending knot first, don't wait until you are done braiding. By tying that knot first, you can work it all the way down to the very tippy end of your strings. Then you start braiding and go to the end. (Obviously this will not work if you middle the strings and start in the center.) This way your ending knot is tied with a ridiculously small amount of length, none of your length gets wasted by having enough string to tie a knot and then cut off the excess. But I agree with the others, I think you probably have enough.
-
How to I get my heel knot to cover the entire area?
HorsehairBraider replied to seveneves's topic in Braiding
Seveneves, what rgerbitz is talking about is covered in the book "Braiding Rawhide Horse Tack" by Robert L. Woolery. I think he explains it pretty well but best are his pictures which (for me anyway) say a whole lot. I'm not good at saying things but I'll take a try. I think you can make the knot you are currently using work. Are you tying the knot with the bosal held nose button down, or are you tying with the nose button pointing up? I would suggest to tie the first way, with the nose button pointing down as I think it's a LOT easier. Take off your knot and start over, this time keeping your foundation turk's head or casa knot a lot looser, paying attention to keeping it tight at the "bottom" where it meets the arms of the bosal. Then start your interweave and be prepared to just keep going. If O3U3 does not cut it, keep going... even if you have to get up to O17U17, keep increasing. If you are careful to keep the "bottom" (it will turn into the top when the bosal is right side up) correct, pulling the passes down where they belong, you should not have a problem getting this knot to cover your foundation. Sometimes though you do just have to use a different casa knot. With practice you get so you can tell from looking at how the foundation knot lays, once you tie it. You can see the foundation you just tied simply won't work. And with even more practice, you can call it before you tie anything at all. -
I've done this before. I made a whole bridle that way. I was worried about strength so I used a very strong core, but that may have been overkill. It works great and I use it to this day. That was a while back and I did not have a good way to bevel the strings, so I can tell you for sure, it looks better if you bevel the strings. Hey, that's how you learn - by screwing up!
-
Next big project Romal Reins and I have some questions.
HorsehairBraider replied to megabit's topic in Braiding
Well in that case, no prob with strength issues! Sounds like you'd be safe in any eventuality. I've seen some (store-bought) romal reins made from some pretty cheesy leather, that's why I worry. I use a spade bit too on some of mine. When they are trained to it, it's the best bit in the world. I've got some that are hand made and really like them. -
How do you handle tamales while braiding?
HorsehairBraider replied to Pascal Olivier's topic in Braiding
Well... I find mine tangle less when they are all the same length. I don't put them in sandwich bags (although I think that is a good idea!) but I absolutely am prepared to STOP, and RE-DO them any time they start to get too loose. I find the time I take to do this saves me a LOT in braiding speed! I try to keep them fairly short below my braiding. I find them easier to control if they are just one hand width below the braiding edge (we'd call that a "fell" in weaving, don't know if braiders have a word for that). That way I can lengthen them with my hand while braiding, I don't have to stop for it. Wind them carefully, then they won't tangle. When they start "falling" down their length a lot when you go to lengthen them, time to re-wind! -
Next big project Romal Reins and I have some questions.
HorsehairBraider replied to megabit's topic in Braiding
I will use just about anything for cores. (Well, OK - not baling twine. Usually.) I've used some nice cord I got at the hardware store, an old set of split reins that I split, rawhide, one strand of an old reata etc. I don't think there are any rules there, except that the romal needs to be a little heavy. Don't use a light-weight core for that. I've seen a lot of different patterns for knots. What I would suggest for your first set is - pick one that you think, "Nah, that's too easy!" because by the time you get done tying them all, you'll be pretty happy with yourself for doing that. So use lots of ring knots, or some other knot you find easy. I've currently got two sets of romals here, a leather set and a rawhide set, and if you like I'll take a pic of them for you. The leather set (which is hanging right next to the computer, it's a set I've got in for repair) has A LOT of knots on it. I would not suggest to tie that many, only because you'll be thinking "When will this ever end?!" and you want to be sure and have fun. Can't remember the knots on the rawhide set... they are out in the tack room. But you know, there are lots of pics of romal reins online. I don't know what leather you are using for your 4-strand, but you *might* want to core the reins... OTOH, I do tend to over-engineer, always thinking "What if they break!?" I don't like being stuck in the middle of Nowhere with a busted set of reins. But sometimes, your leather is fine, and you just don't need it. -
Nice work! And I like the way it looks on that horse. Is that the horse it is for? I like the brow band. I have done something like that in horsehair... maybe I'll post it one of these days.
-
Thanks everybody!
-
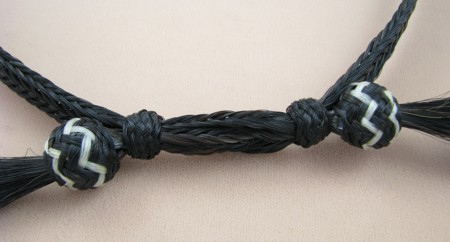
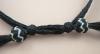
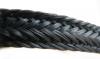
Greetings fellow braiders! I was sure busy over the months leading up to the holiday season. I call it the Christmas Crisis. However I did get to make some neat stuff, and this is one thing I thought you all might enjoy seeing. This was for a lady in CA. Her horse had passed away and she saved the tail. I used up pretty much all the hair she sent me, but I made more than just this hatband. The hatband turned out really neat. Here it is: And of course, you'll all want to see the details. Here are the knots, and a close-up of the braided length: Let me know what you think! I hope everyone had a great holiday, and may 2010 (the start of a new decade!) be lots better than 2009. Happy trails!

-
Do you mean the length of the reins? I think it depends on the horse... I ride some high-headed horses and use shorter reins on them than I would on a "peanut-roller" type horse. Anyway for rein length, I always went out and looked at the horse as he was standing there tied up, and used a piece of rope to go from one side of his head to the other, with a little raised up part where the saddle horn is. Usually (for me) each rein measures about 50", so I double that. The romals I usually make 40" (and then add the popper on the end). Whatever looks good with the length of rein, and the height of the horse. As far as a core for a romal, I'm pretty thrifty that way. I'll use a piece of cord or rope if I have it, or a piece of rawhide or leather, or an old split rein cut down etc. Whatever I've got.
-
I agree. I think of it like cruise control. I learned to drive on old trucks that did not have power assisted steering, cruise control and so on. But once you use it, you think, why would you go back to not having that? It makes life so much easier. Sure, I could wrestle the steering wheel, or even get by with no brakes! But to what purpose? To prove how "tough" I am? I think it proves more how stupid I am, not to use what is available. And you know, when you use lace that is even all the way around, it is SO much more fun. And to come right down to it, that's why I braid - because it *IS* fun, and I get a great joy out of it.
-
Nice work, guys! To address the question in the OP: I've used a splitter to thin down lace I thought was too square, but mostly what I use the splitter for is to make the lace the same thickness throughout the length. Even stuff I've bought that was commercially cut can vary in thickness, which just bugs the crap out of me. I want the lace to be the same thickness not only throughout the length, but throughout the entire piece. I had made myself a jig for this, but now have a really nice one that is much easier to use than the one I'd made myself. I've never had a beveler until recently, and now that I have it I love it. But for years my work had these sort of square edges... I don't like it, but that was all I could do at the time. Now I look back at some of my old work and think, wow, that could have turned out *so* much better if only I'd had this or that tool. But that's how it is - you do the best you can with the knowledge and tools that you have, at that time. You can't do better than that; and I try not to regret some of my old stuff, because that was how I learned. (And besides, I had made a headstall I still love to use, no point in not using it just because I own better braiding tools now!)
-
If it doesn't fit, I just change the turk's head... I keep going until it is right. Just increase it if it is too small. There probably is a math method to figure this out but I am a math moron. I use my experience to judge where to start and adjust from there.
-
I just tie things too. If it's handy, I use a rubber band. I can slide things around under the string or rubber band and get them the way I like them. When I start braiding I do clamp it all together, or alternately, I use my string to tie it to whatever I'm bracing against. (A fence post etc.) Just a suggestion on thread titles... if you name it something specific, it will help people search through and find the info they need. If you titled it "How do you start braiding a bosal" then people who were interested in that could find it... and those of us who might have an opinion on it would be more likely to respond.
-
Wow. Did you braid it all in one go? If so you are one tough hombre. How much does paracord stretch? You might have a really "humane" reata there... one that the critter can about run back to the herd with before he feels it...
-
Man, that Brian is a handy guy to have around! I first found this forum through the KHWW site. I never said thanks... thanks, Brian!
-
On how it would lay on the nose... What I was envisioning was going through the two layers all the way down to the end of the leather, and then switching to the outside layer only (that layer that you see, and that is *not* against the horse's nose) and going through just that one layer, then going through both layers going back up the other side. You can see why I don't write braiding books. I am no good with written explanation! I'm a lot better in a one-on-one situation. Being able to explain it in words is most definitely a gift, and one that I do not have. Anyway, I don't think braiding along the outside bottom edge would cause any problems, but then I don't have it in my hands and you might be able to see something I can't. Maybe the person will like it so much they will brag to all their friends, and you'll get a bunch more orders in! I have to admit, sometimes when I finish a special job, I have that thought and sometimes it scares the heck out of me! :D
-
Well it looks great for your very first one. On ending, I don't know if this is what you had in mind, but I might punch holes along the front part of the end piece of leather, where it goes over the metal, and try to make a complete circle, splicing it in so the sequence stays the same. Yikes. I don't know if that communicates my idea very well... In edge braiding I always try to make a complete circle with the braid, so that I could undo a few holes in the very first part and weave in the last part as I was finishing, using those first two holes or so and braiding into the part that's already there. I try to use pretty stiff or firm leather for lacing, because it *will* stretch, and it's annoying to get to your last hole where (in my case anyway) I was matching up with the first lace I used, and have the working end be all skinny and worn out. Using shorter bits of lacing can help that out, then each piece only goes through so many holes and you splice in a new piece. I've never seen a mechanical hack covered like that! I always saw them with braiding. That's a cool idea.
-
OK, just heard from John! He says that if you are having trouble with PayPal, to write him and he will send you an invoice, so you can pay with that. He just did it for me and it worked like a charm. Here is the email, take out the spaces of course and replace the "dot" with a . and replace "at" with a @. jcturner at clear dot net dot nz He asked me to do a favor for him and post the following where ever I could. I will also post this on my website when I finally get a chance to update it:
-
I've just written the guy, and if/when I hear back from him I'll post here what he said. It sounds like a very cool project, what a wonderful way to memorialize someone, and what a very kind friend for doing this.