


TwinOaks
-
Content Count
4,513 -
Joined
-
Last visited
Posts posted by TwinOaks
-
-
Great ideas, folks! Here's mine: Haggle on the price. This may seem blasphemous to some people who've been taught that the price you see is the price you pay. But ask anyway...what are they going to say? NO? Gee, then you have to pay the listed price. This is especially true if you find 'close outs' or 'clearance' items. I think a lot of people will be surprised at how much a person will compromise when they're trying to get rid of 'stuff'. If there's only a few pieces of a certain item ask for a substantial discount to take all of it.
-
I'll make another when my wife gets her M&P compact in the next week or so, so I should be able to improve the little things:)
I made that last night out of some ?scrap? leather I picked up. I think it's about 8/9 oz and the boning was a devil of a task. I really see what you meant about getting the belt loops to line up. The finish is really just opposite of yours, as far as dark on light vs. light on dark. I used med. brwn Fiebings applied by brush, then Neat-lac'd the whole thing.
Thanks for the clarification on the design, and for those who ask about it, you'll definitely get the credit for the design. My wife will be wearing hers 'open carry' at the little store she works at, and she gets quite a few LEOs dropping in. If there's an interest in the design I'll steer them your way...until I design something as good but different that is.
Off topic here, but my wife is wondering if anyone knows what will take Fiebing's med. brwn off of a kitchen table....
-
Jordan, your work has inspired me to make a holster for my HK USP along the same design. I think I prefer a little cant to the holster. Is this an original design or a modification of an existing design? In any case, I like it.


-
1911 giveaway?!?!?!? SIGN ME UP TOO!!!
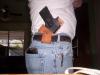
I forgot to mention this earlier, but my IWB can be seen in "finally remade the blooming thing" I know it looks rough, but it is flesh out, and since I don't have a sewing maching, I'm learning to hand stitch
 . The important parts are how well the holster retains the pistol, and how comfortable is it. After all, if it's IWB, no one should see it anyway.
Note how much cant I have for the pistol and how much of it is above the belt.
-
I guess you can send me your 1911! :DAhemm..."cold dead hands" ...what can I say? It's a Colt.

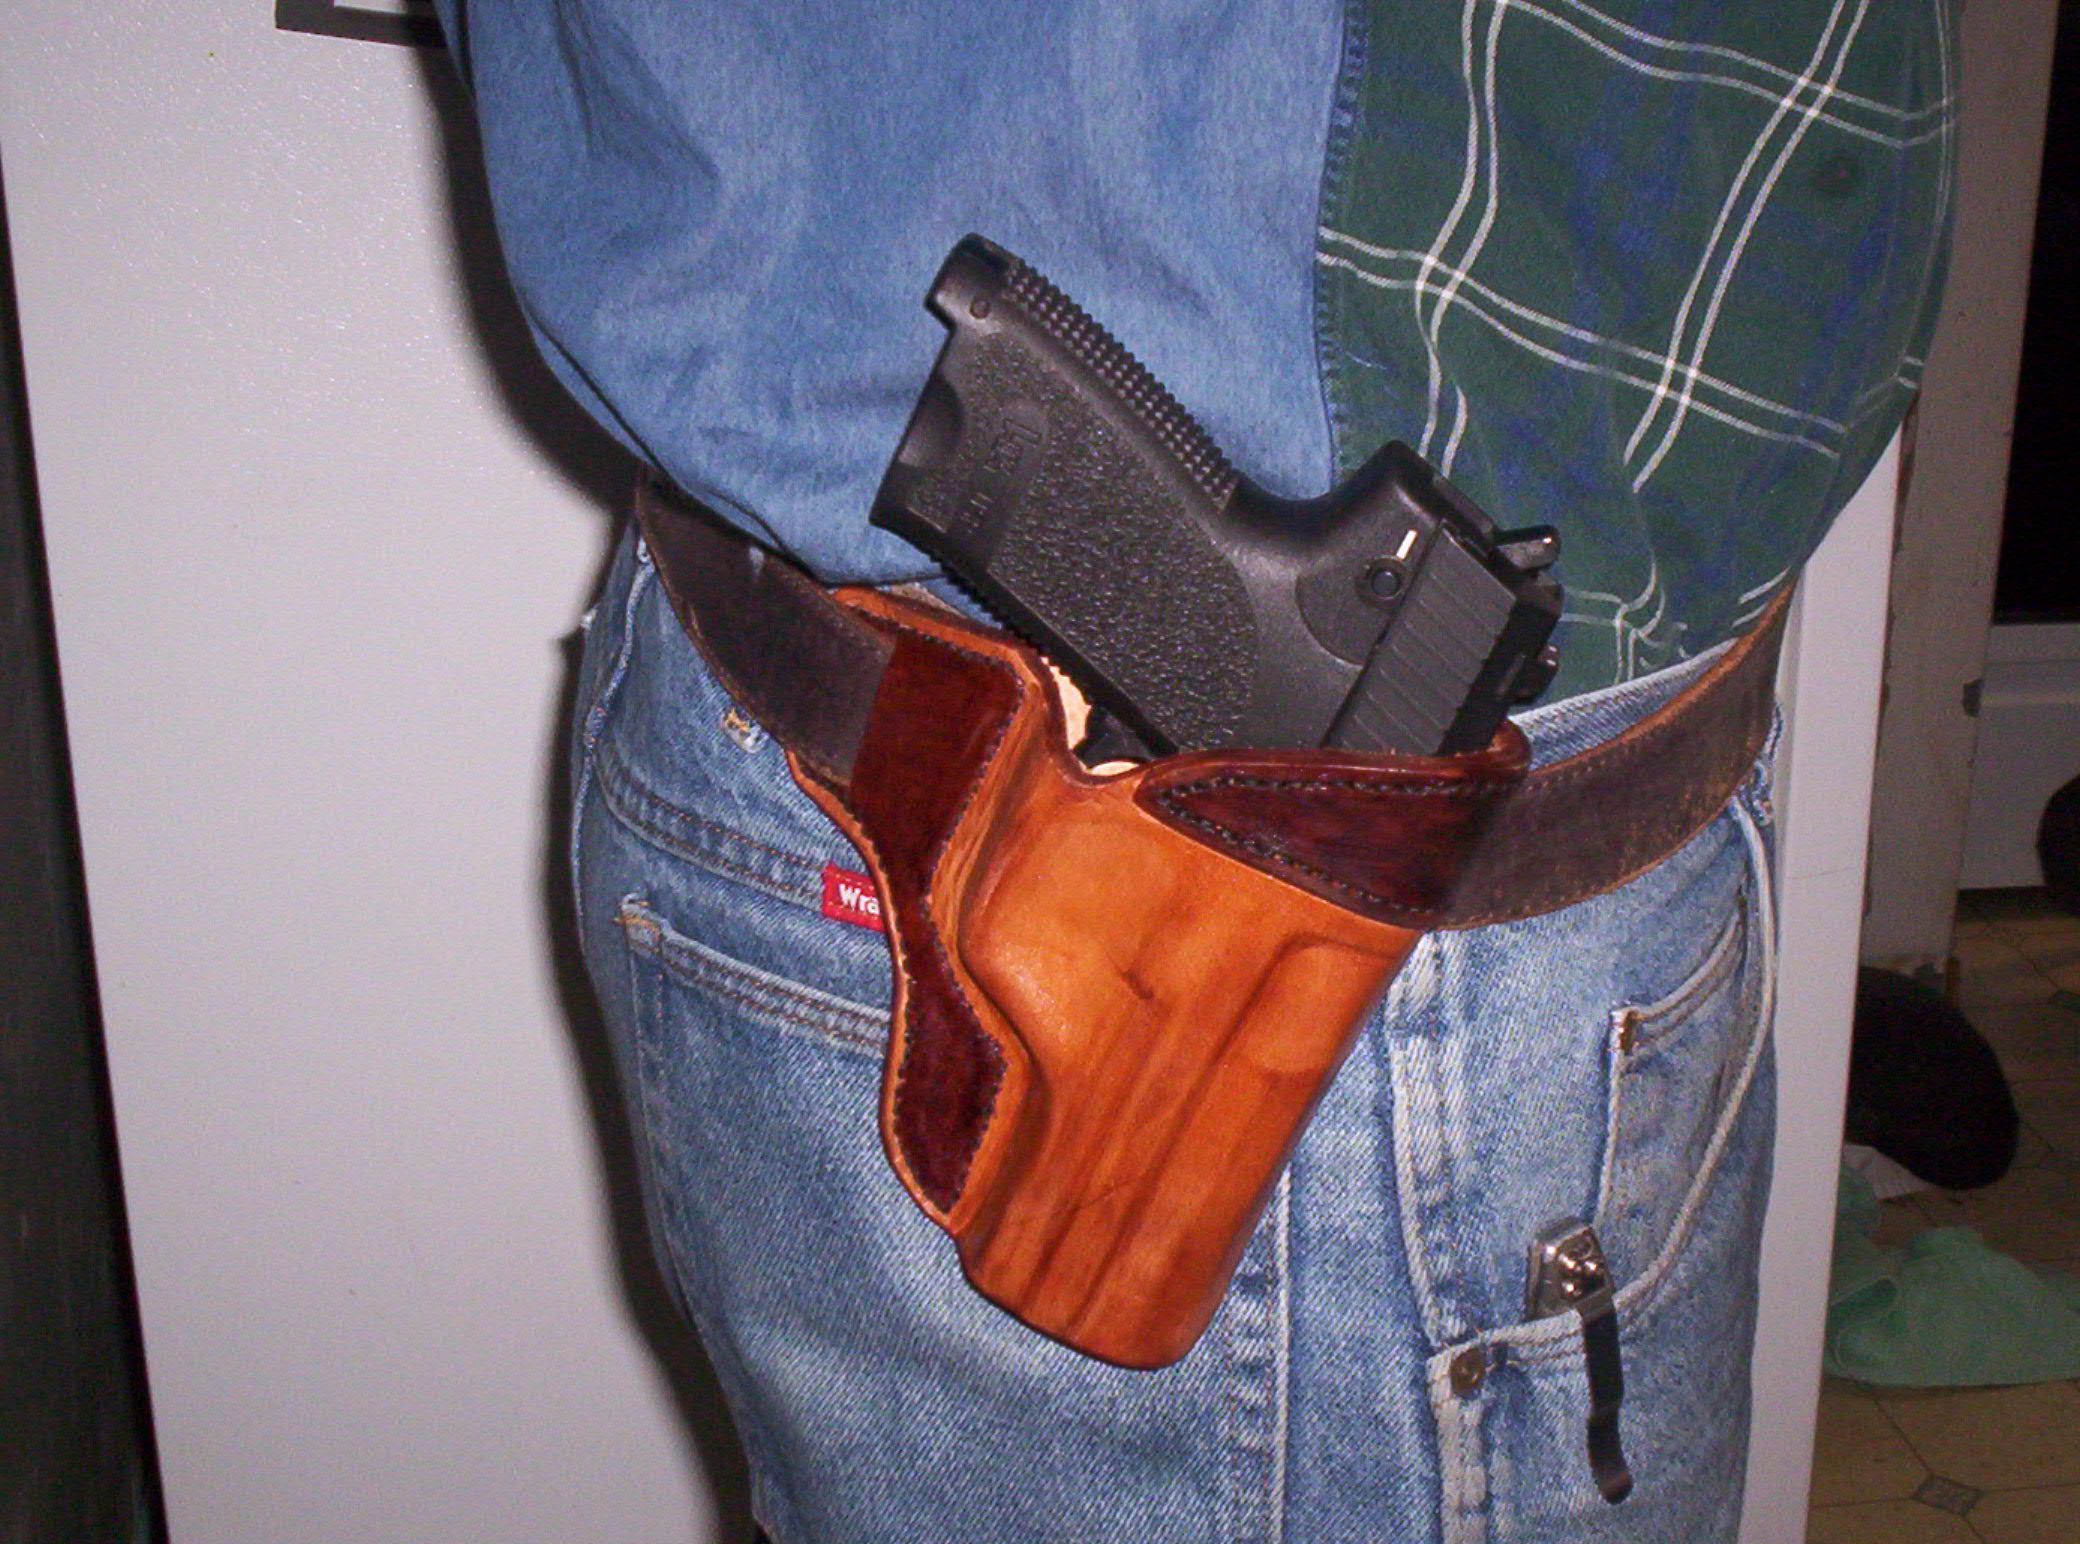
Though the Glock is wide, it CAN be concealed. You just have to play with the cant of the holster to point the bottom rear corner of the grip towards your ribs. I carry at about 5:30 (right handed). That helps use the shape of the torso better ( on me) Also, as mentioned, try to keep the grip a little higher out of the waist band. When you do this, don't stitch so closely to the trigger guard, and don't worry about a 'sight channel'. Mold the leather in close on the trigger guard. That helps with retention, but allows you to pull the pistol straight up. Once you break past the molded guard, the muzzle will have cleared enough to prevent sight hang up. In effect, you draw the pistol at an angle from the molding of the holster.
Semper Fi
-
Ahh, I hate travelling to areas with no ISPs.....
No retention...hmmmmm. Well, here's an idea: Take the outer piece and wet mold it, complete with all tooling. Fold the top, or reinforce it with a strip of thick hide. Prepare to stitch the front to the back but before you do, add a welt of whatever thickness (like on a knife sheath) needed to eliminate the retention properties of a good holster. Now, you've got a tooled and molded holster that won't hold the gun. If you want some type of minimal security, drop a magnet in the bottom of it. Dye to preferred color and sell for high dollars.
See, I just solved all the problems

The ring binders I mentioned are standard school stuff. They're really nothing more than a plastic folder, but some of them have thicker covers. I'm sure it'll still take a bend if pressed, but it seems pretty durable
-
One thing about IWB holsters is that no one has made one yet that can make a gun thinner. With a Glock, you've got an inch ( + a smidge?) thick pistol, plus the thickness of the leather to deal with. Then you've got the back of the grip to deal with. The biggest issue is probably your clothing.I wear a full size 1911, in an IWB that I made, and it disappears under a t-shirt. Difference? My cant is a lot sharper than yours, and the pistol is thinner. That double stack mag is hard to hide. Try going with a larger pant size, it'll be a lot more comfortable. Safe the pistol and stick it in your waistband with no holster. Once there, play with the angles to find one that hides well. You're doing well, just keep trying.
-
Of course, after responding once, I always go back to the OP and see what it was he/she was originally asking.....
You were concerned with the weight of the leather in regards to it's bulk, since you don't want back to back 8-9 oz leather.
I think you're in the realm of reinforced leather here. It doesn't have to be Kydex, but you may consider sandwiching a firm/semi-rigid polymer sheet between the exterior and the lining to help keep shape. Especially around the mouth. I wouldn't recommend using metal ( like milt sparks) b/c you'll be into finding thin and narrow stainless steel spring metal. A polymer ( part of a 3 ring binder cover???) seems like a better choice as you can shape it, and sew to/through it. And.....it's thin enough to sandwich and never tell anyone

Hope that doesn't add to the confusion too much.....
-
For the high rider, I think you'll have to concentrate on the fit of the holster to the barrel. Top should be well molded, of course, but for the quick draw aspect, you might consider sort of a 'split' top end. The molding of the holster, and reinforcements, keep it in shape and help retain the revolver, but once the draw starts, it's almost a touch free path to clear the holster. You didn't mention if there would be any type of retention device, like a thumb strap.
Somewhere in the 'net, I saw an IWB for a snubbie that basically held just the barrel in the pants, while keeping the frame and cylinder above the belt, locked into a plastic contraption. Once the frame released from the 'lock' it was a free draw. I'm thinkin' that's kinda, sorta, what you're looking for.....but in leather.
Now the only question is...where do we get the itty bitty maker's stamp that says "Leatherworker.net Thinktank Conglomerate"
-
And now we know what became of poor old Kermit the Frog......
Very nice work, and a reminder to step outside 'the box' when we do our work.
-
It's only got one screw in it, and it works wonderfully. After it wears for a while, I'm going to disassemble the loop part and see if it needs a washer or the like to help distrubute the load on the leather. But so far, it's good. The loop stubbornly refuses to tilt off of its angle.
I did think about opening up the muzzle, and might still do it, but I want to see how it does for a while. A little extra at the muzzle isn't hurting anything right now, and I know I won't get any trash in it from that side.
-
Generally speaking things shrink when cooled, and expand when heated. Water is an exception because it sets up in a crystalline structure called ICE. I will not say that kseidel is wrong, as I don't have the oils used, nor have I experimented with them. That said, I think that the phenomenon is more likely a combination of things happening. If the leather had only oil in it, then any excess should leech out and get all over everything. Water can get into leather a variety of ways- casing, condesation, rain, sweat (in the case of a saddle, both horse and rider's sweat), relative humidity, suspensions, the new ECOflow colors, etc. I'd be interested to find out if perhaps the culprit to the ruined leather is the case where moisture is trapped in the leather by oiling it when it's wet, and then freezing temperatures cause micro ice crystals to form. Fast freezing will typically not show the same results as a slow freeze, because the ice crystals set up differently. Do it fast, and presto it's frozen. Do it slow, and the crystals will form along an axis, kinda like snowflakes. If allowed to set up along that axis, it's paramount to pushing a bunch of small knives through the center of the leather. Perhaps more experiments will be done by kseidel, and the results will be published here.
Kseidel, Please don't take this as anything against you. You've seen the results first hand, and I don't intend to argue on what you've seen. I'm just hoping to offer another explanation.
-
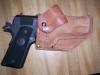
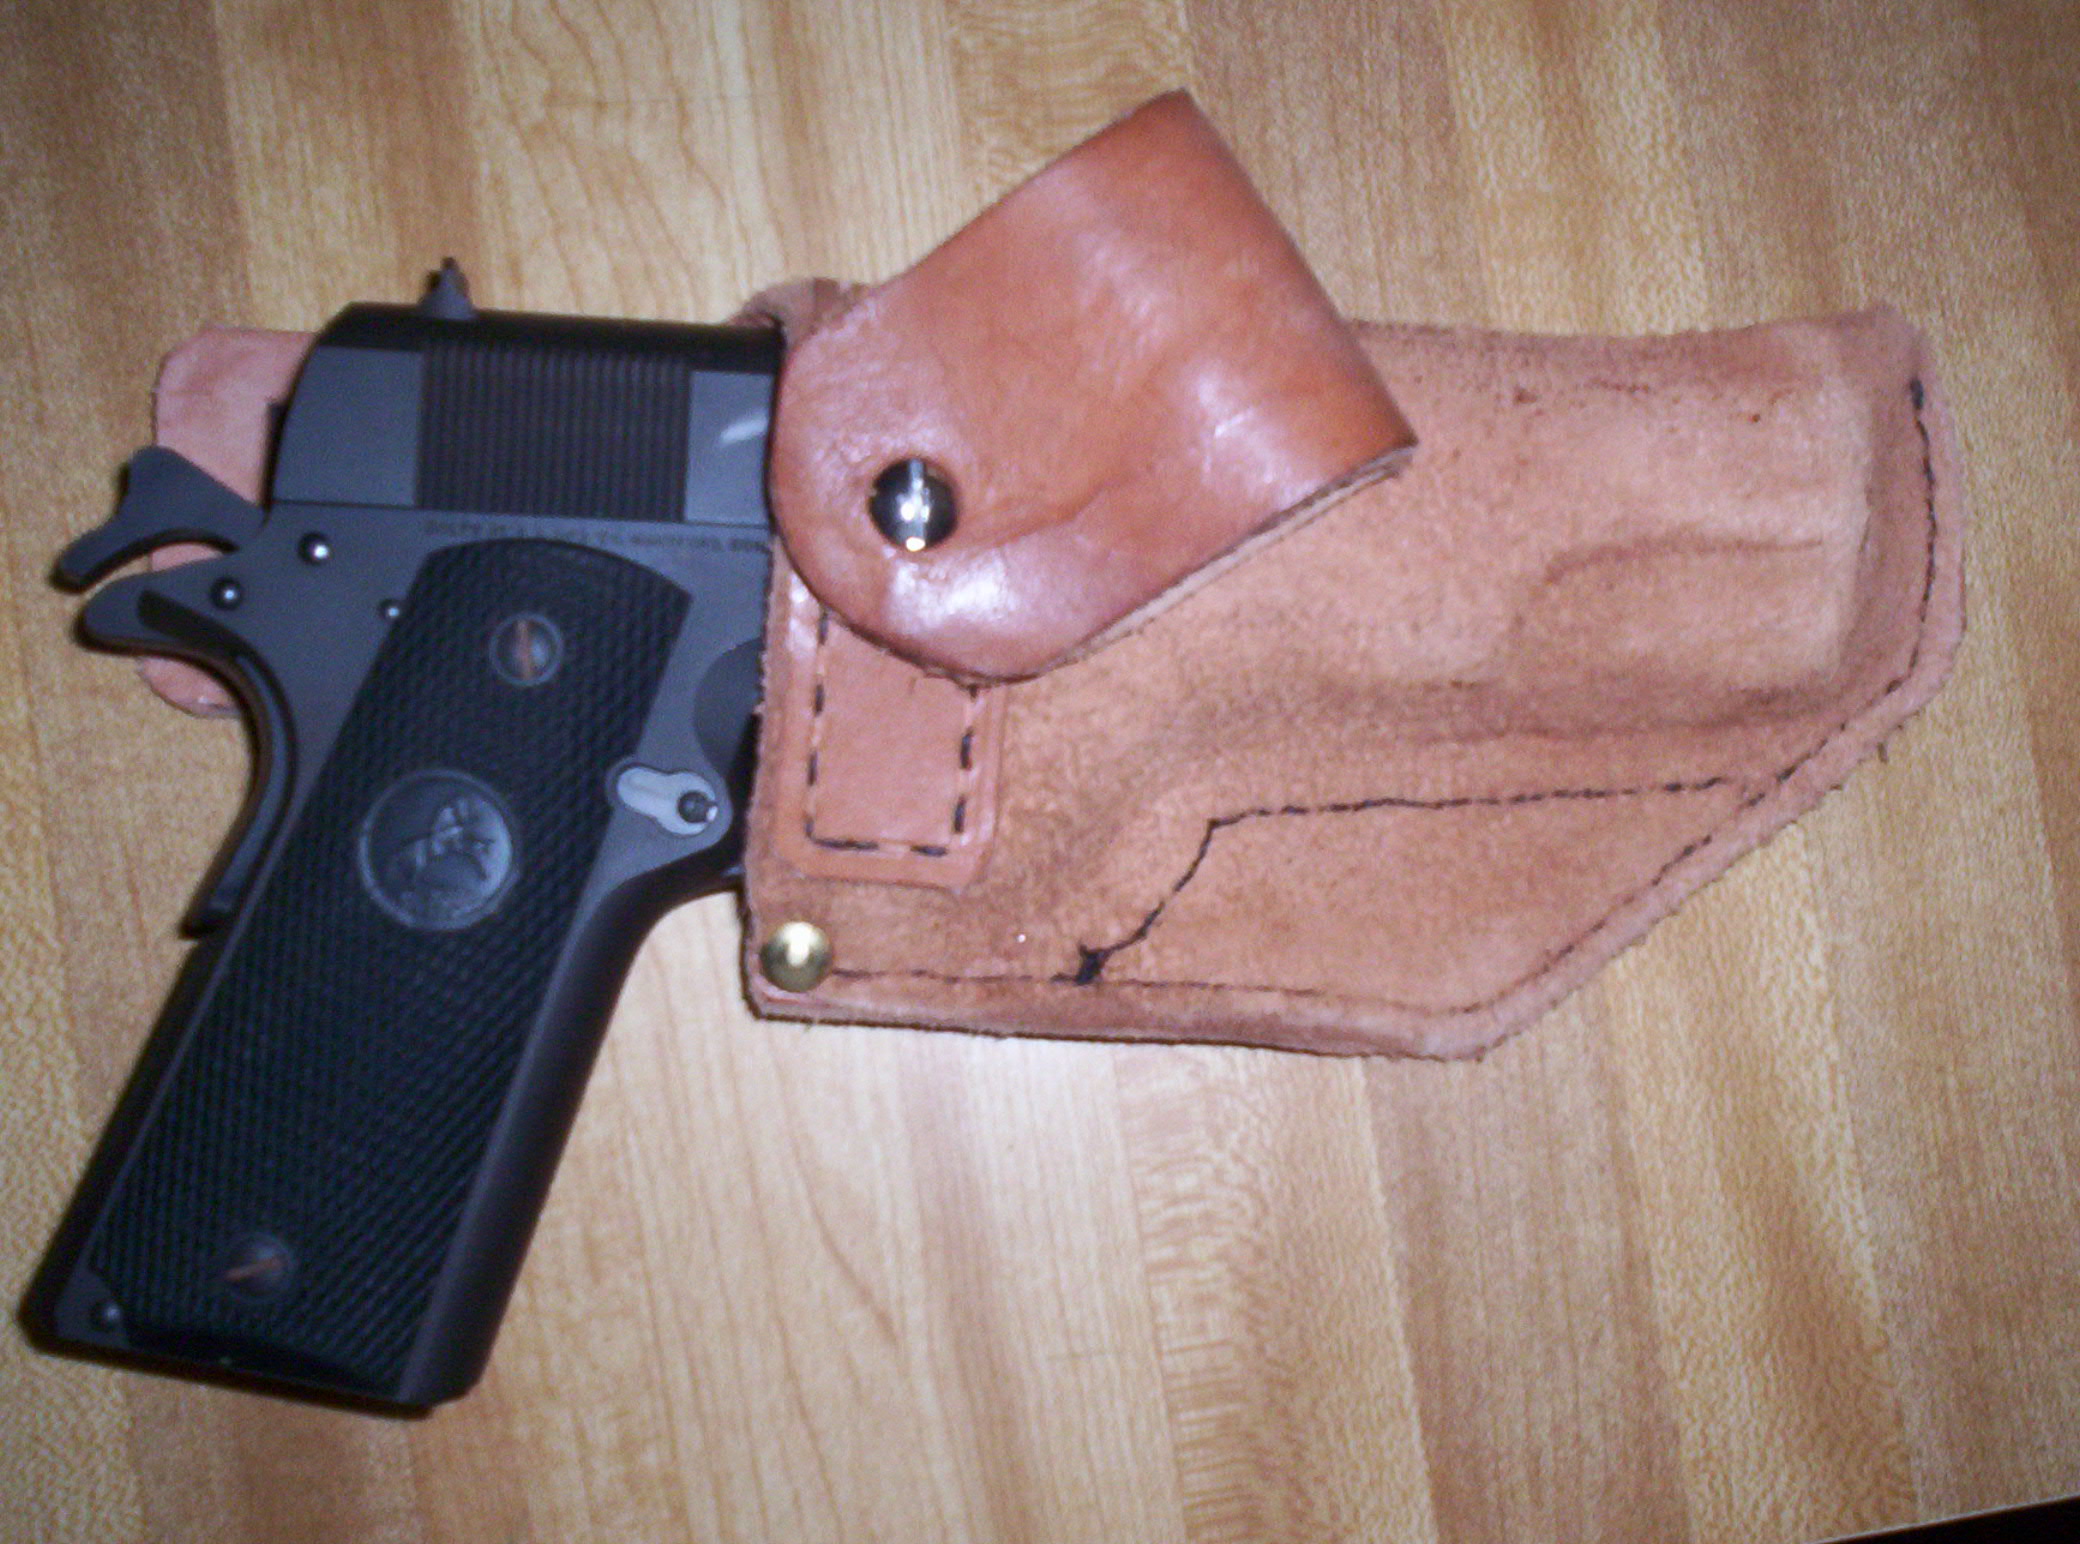
 Well, my first holster is now in the scrap pile. I made it out of chrome tanned leather, for two reasons: 1. I have plenty of it, and 2. I had no idea what I was doing. Now, it's remade in veg tan, and I wet molded it, then stitched it by hand. The rivet is strictly utilitarian, to prevent stretching of the stitch when reholstering. It's my take on what would happen if a Milt Sparks and a Horsehoe Leather holster were left in a dark closet together. The belt loop is pretty wide, and held on with a chicago screw, so the rake is adjustable. Comments and suggestions please ( and be gentle- it's the second time I've made my first holster)
(And yes, I'll make a new wallet as soon as I get some leather to do it)
-
If you find you're burning out, go with it...just leave a little something left smoldering

Grab some vegemite, a few cold ones, and go bush for a few days. Just before I started with this leather work ( new medium for me) I started feeling the pressures of working away from home all the dang time, started missing all the little things that calm me down, then WHAMO ! I started feeling all artsy again. I lost the creative bug about 8 years ago, and now it's back with a vengence. Hang in there it'll be okay. If you don't feel like doing any leather work, don't. It's a terrible thing when an enjoyable hobby turns into a demanding job.
-
I don't know about the stamping on that large of a scale, but for some patterns, I use a fine stylus- a ball point pen works too- and just trace the major lines through the paper. Case the leather first, and trace lightly. Using a pen allows you to see where you've traced the pattern, and it transfers to the leather like a light reference line. It's just visible enough to work with, and completely disappears when you tool. The downside of trying to transfer a printed image, if you reverse it, is that you put toner on the leather. That's why I just transfer the image through the paper, instead of from the paper.
-
Well, I thought it could be used to bleach leather. I've done some pieces that required WHITE and I don't really want to get into partially painted pieces- keeping mostly with the natural look ya' see. So, I thought it might bleach the leather whiter than just the tanned color. I also tried it to try and pull a drop of brown spirit dye out of a piece. oops. Sometimes the obvious needs to be clearly printed on the label: If you are new to coloring leather, do not dribble this stuff where you don't want it 'cause it will NEVER come out. like I said...oops. Thanks for the info on the uses of the O.A.
-
Well, I see Kate got to it first, but I'll also recommend medicine droppers-----or syringes. If you're only using a small amount of dye/paint they're invaluable. This is especially important if you're mixing colors. The syringe has the advantage of (usually) being graduated, so you can record and repeat fairly precise amounts of each color in a mix. That can help you make multiple batches of a color that should remain purty dang consistant.
-
Hey Hilly,
these are kewl!! Thanks
-
I've heard about this modeling tool a few times on here, and his web site doesn't have one listed. Can someone post a pic of it so we can see what we're chasing after?
-
Post-modern-neo-classical-avante-traditionalist-conservative-goth, with a blend of light and dark moods that mixes to a nice plain gray. Sorry- I'm too new at this to have a style.
-
If the leather has a white-ish or a gray white center, it's probably chrome tanned. Possible that you got some Latigo for chaps-not sure on the suitableness of it for holsters. If it's CT, definitely don't use it, unless you're looking to refinish some pistols.
-
Johanna, they're discussing the label for the leather work.....not YOU.
-
Great start! For your edge bevels, overlap the strikes less. For most applications, overlap only 1/4 - 1/3 the width of the beveler, and it will smooth out a good bit as you walk it. For your backgrounding, I see a few 'open' areas where it looks like you missed a strike. You might want to try a pear shader for some of the backgrounding, and I always try to overlap the backgrounders too. I haven't done any floral work, so I don't feel qualified to critique that aspect of it. Overall, it looks very nice for your first try. Keep at it, and if you still have the template/ sketch that you worked with ( or just use the first piece as one), recarve the same image again. Compare what you've done to other Sheridan style carvings, and make the changes to your second piece. You'll surprise yourself with how much better the second is. Keep pounding the leather.
-
Hi all,
I have some powdered oxalic acid in a Tandy bag. It is unhelpfully devoid of instructions. Will someone please provide the uses and directions for using crystallized oxalic acid?

IWB holster for Glock 27
in Gun Holsters, Rifle Slings and Knife Sheathes
Posted · Edited by TwinOaks · Report reply
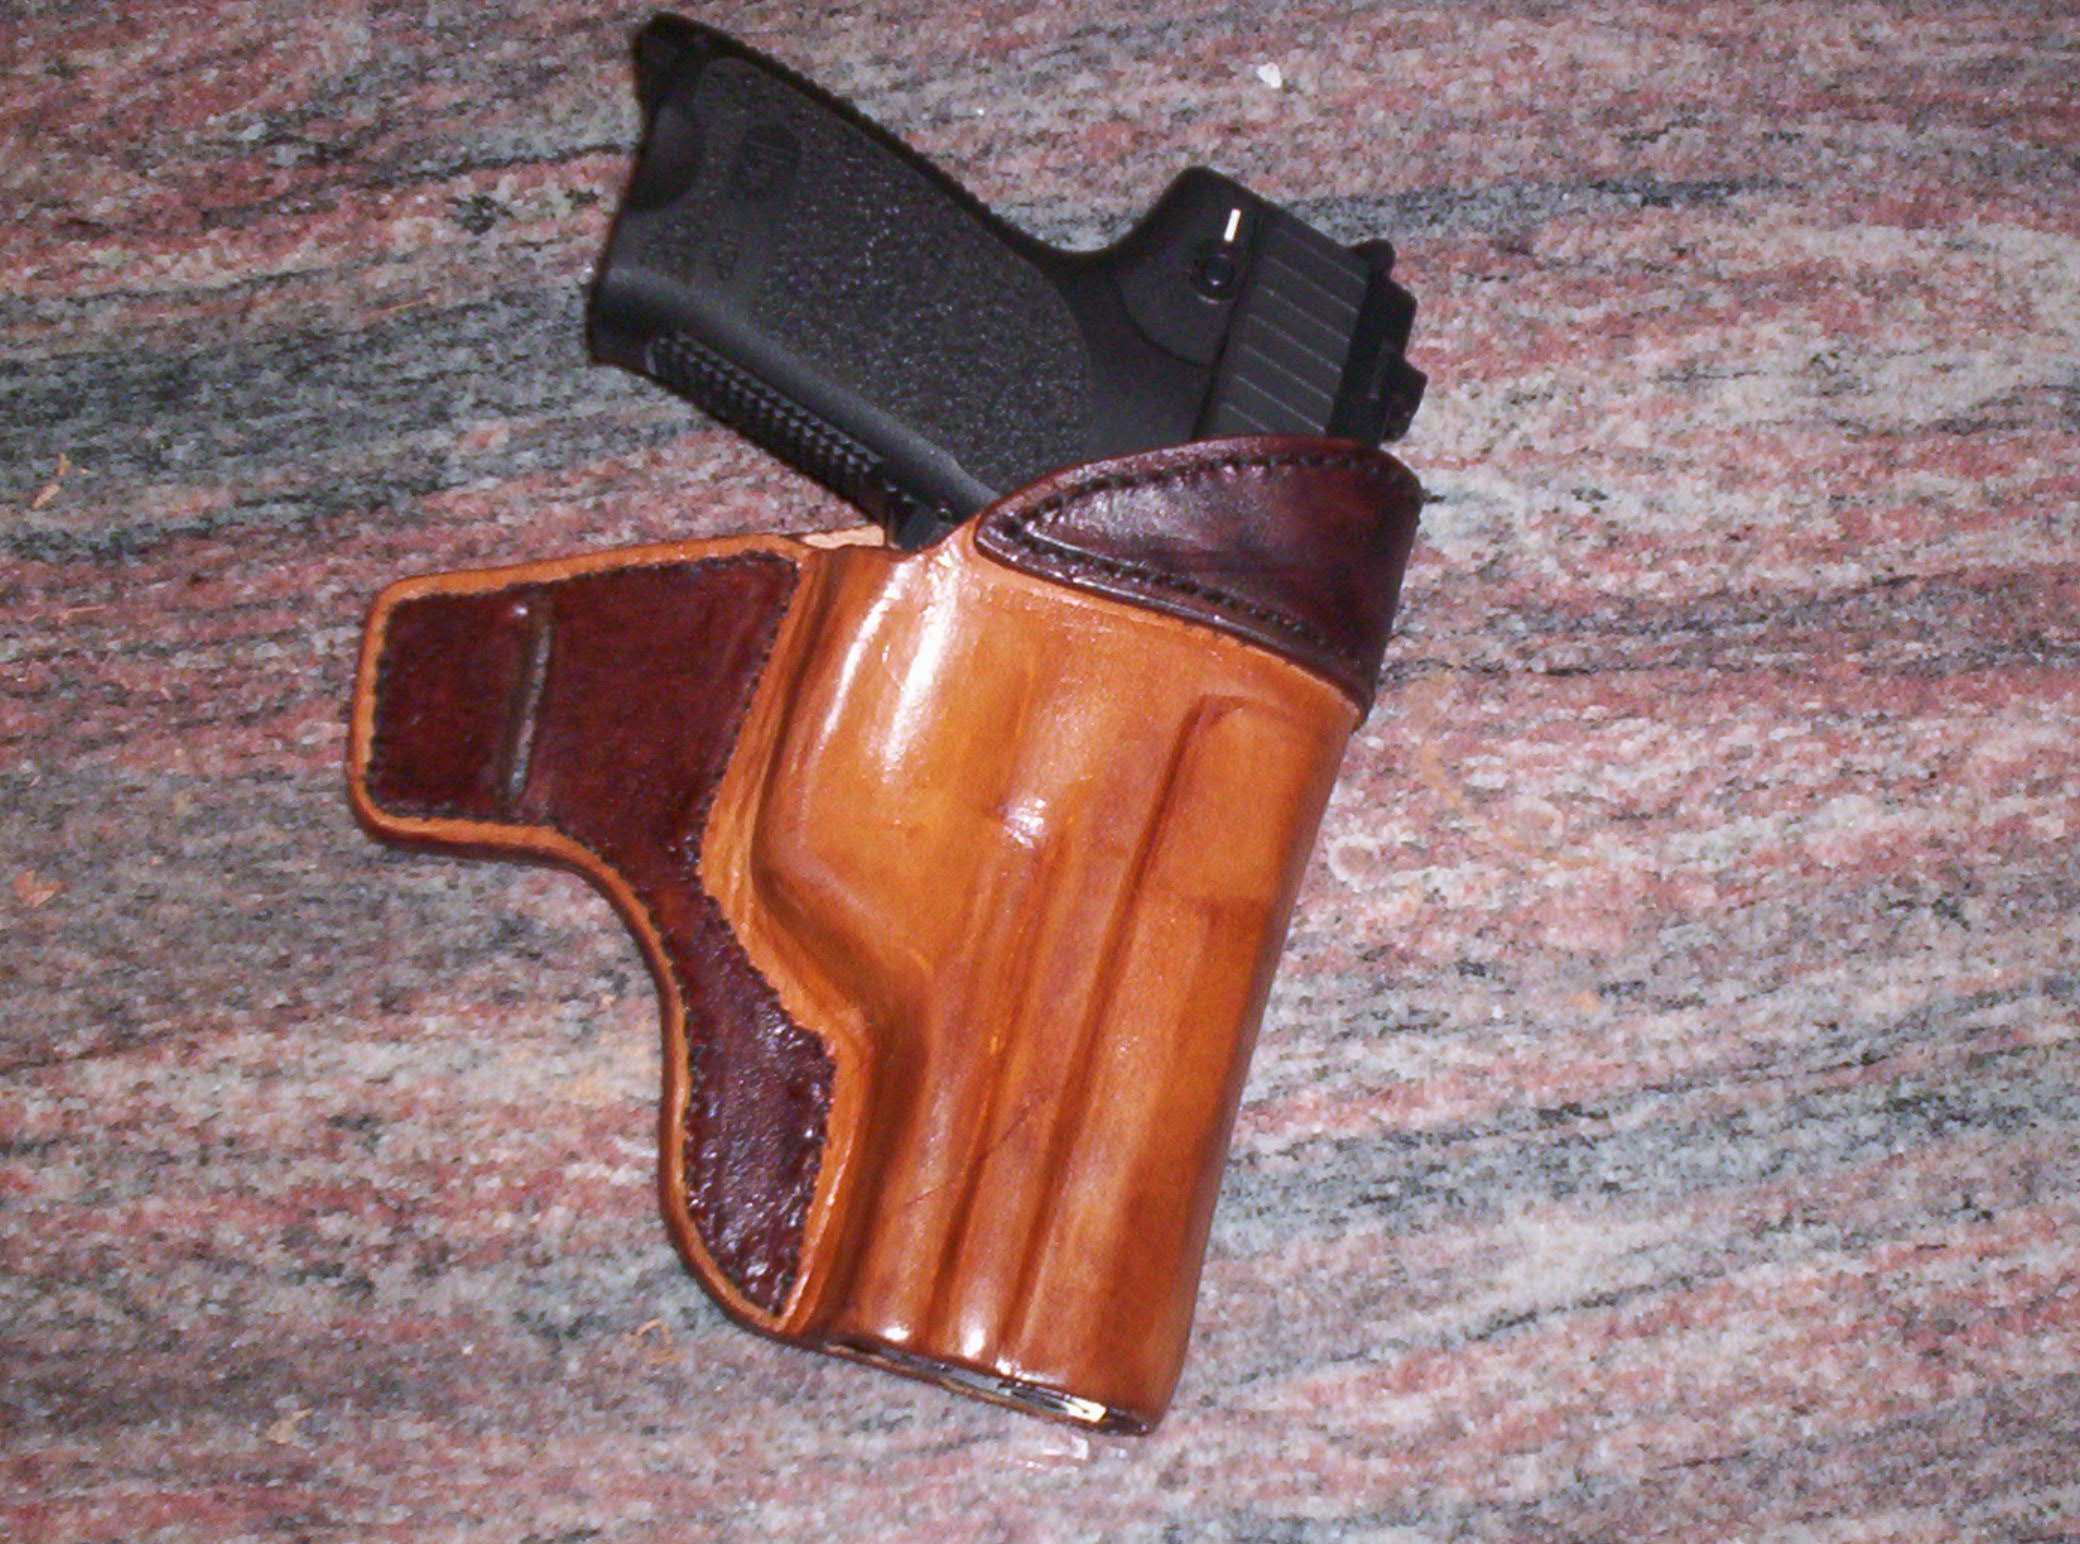
Kman, what I was getting at is to use the rest of the holster for the retention, and the part that's above the waist is little more than cover. The leather around the trigger guard should not be what's holding the pistol. If that was the case, regular holstering and drawing would wear out the retention mechanism, requiring constant remolding of that area. For an IWB holster, the belt is what is holding the pistol, and all of the holster that's above belt is protection for the pistol. The sight rail is a gimick unless the holster is carried with zero cant. If carried at even a slight cant then the draw motion is UP not forward, and once the motion starts the sight clears the holster through simple geometry. That same draw is why I stated to not stitch too close to the trigger guard. You need to allow room for the upward motion in a forward raked holster, and if you look at the pic at the top of the thread, you'll see that is what we're talking about. I guess I should have worded it " don't stitch so close that the leather is too tight to allow an upwards draw of the pistol, because if you do, the leather will be too tight to allow adequate 'wiggle' of the pistol during the draw (because we all know that your adrenalin absolutely kills the fine motor skills you need to draw a pistol at a precise angle, instead of just yanking the thing clear of the holster and loosing a round from the hip) and may hamper your ability to draw, possibly with adverse effects on your present state of being alive." Would that have been better?
Incidentally, since you've dropped some names in the holster making community, please check out the holsters made by Milt Sparks (Summer Special model) and Horseshoe Leather holsters- particularly the model 62 IWB holster ( which is what I modeled mine on). It is a flesh out IWB, without even the details of boning---and the stitches are not tight to the shape of the pistol.
In contrast, the OWB holsters have incredibly fine boning work that looks like it was vacuum pressed. They DO have tight stitching to aide in retention, probably because the belt is on the wrong side of the holster to retain the pistol.