


TwinOaks
-
Posts
4,513 -
Joined
-
Last visited
Content Type
Profiles
Forums
Events
Blogs
Gallery
Posts posted by TwinOaks
-
-
Just curious as to an effect here, but is the interior of the image beveled as well? Some of the marking on the 'left' side of the image look a lot like what I did when I used a modeling spoon to try and burnish. If the effect is to present the image 3-D, and raise it off the background, use less tooling inside the lines, and more backgrounding/matting around it. If you're trying to sink the image into the background, then reverse that- more tooling inside, less outside. Don't worry too much about it though...it's better looking than my first attempt.
-
Thank you Mr. Siegel,
Your responses are well phrased and insightful. I am new to leather working and rely heavily on statements from others ( on and off this board) for information in numerous related topics. Your direct input here has given me ( and presumably others) a better understanding of your company's goals. While I am not at the point in my leather working career that I need specially made materials, nor answers to technical questions about tannage, it is nice to know where to look for them when I eventually do. Best of luck,
-
Beautiful work, Kevin, inspiring even. I really like the contrasting and the awsome liner.
-
Well, as of today, I've had no problems running on either the desktop or the laptop,...or both.
Seems like all is well here in Leatherland. I've been able to access everything just fine- in fact, I kinda pushed the envelope a little: I logged on from the desktop with two windows active, then simultaneously visited via the laptop with 2 windows, all from bookmarks
I think it's fixed.
I've got some spare line 24 snaps if no one can find their ducttape for Beav's hat

-
I'm having an intermittant problem- some of the uploaded pics, when opened, are 3-4 times larger than my desktop, so I only get the top left corner of the pic. Before the crash, I could grab and shrink it, but now, it just clicks off to somewhere that I can't find it again. I've tried to reduce it through the control bar (windoze OS) but I can't locate the actual window where the pic is. Any thoughts as to what's going on?
A suggestion for larger than limit pics for upload: If the pic is larger than the uploader will allow, go to a photo hosting site and store it there. Then in your topic here, just copy and paste the
-
Johanna, I know you said wait on Siegel's, but...
Hilly, I've GOT to contrast you on TLF. I stopped in the nearest TLF on the way to north 'Bama just before Christmas, picked up a few things- catalogue, stamp, discount coupon...
Stopped back by the same TLF on the way home and found a few out of stock items. Of the ones I was looking for I was given a voucher by the store mgr for the discount price, and an expected date for arrival of the mdse. Since I live 3 hrs away, I told him I'd just have to pass, but thanks for the voucher offer- I just didn't know when the next time I might return would be. The next offer? Discount a second item at 50% and a little off the entire order. Sold.
To me that was really trying to make the customer happy ( and get some more money I'm sure) But what I got was something else I needed anyway so I came out ahead. I certainly hope your experience was a localized event, because the people I dealt with were definitely doing all they could to help the customer.
-
Okay. I thought 'rotoknife' and round knife were being used interchangebly- thanks for the clarification.
-
Alchohol based....doesn't alchohol mix with water? Could you leave a bottle of eco open and let some of the water evaporate out of it then add isopropyl back to it? Hmmmm....experiment time. :alarm:
 :alarm:
 -
Ok, I hope I don't step on anyones toes, and I hope I didn't over look it by reading too fast,I think ya'll forgot to mention the round knife. I know ALOT of people that that round knives and head knives are just for saddlers. but in my opinion the round knife is single most valuable tool when it comes to ALL forms of leather work. I promise you. if you take the time to get it SHARP and keep it that way, you'll wonder how you'll ever got along without it.
I haven't used a head knife yet, but from the old 'how to' on the main page, it looks extremely multipurpose. Right now, I can't afford to drop $50 or more on a single tool, so I'm making do with a razor knife. You distinguish head vs. round. Is the round knife you're talking about the little mini pizza cutter do-hicky?
-
+1 to other's comments on finishes. Something I've had some success with in a few belts is carnuba cream. It takes a few coats, and you have to work it in well, but it really helps the leather. Atom wax may be along the same lines, but I haven't used it. Neat-lac is a nice finish, if the collar needs to look good.
-
Great job on the repairs! It's great to have this back.
Thank you, all, to the folks that made it happen.
-
Very nice piece! Only one thing I can see you could improve- At the heel side of the bevel, run a modeling tool along the ridge to smooth is out a little. All in all, a superb job.
-
You must've seen that bad deer drawing I did.......Cow with a coat rack....I didnt' let it get very far before deciding that, yes, the kids could join me today for some random stamping practice...
Thanks all for the comments. Since posting the pic, I've burnished all the background, and the body a little bit. Even without highlighting it, or even a finish, it pops off the page more. If I can get the new .img small enough, I'll replace the pic.
-
I was wondering if there might be any books out there that explain the tools and there uses, I see certain pieces of work and tools and I'm trying to figure out what certain ones functions are.
I picked up "Tech Tips", by Al Stohlman, just before Christmas. It's a wealth of knowlege, and shows in fully composed pieces how stamp type "x" is used. In some, there's even pointer arrows with a (Craftool) number showing the exact use of a stamp in the compostion. Excellent book to learn with, but is only one of many. I'm sure some other members will have more titles for you.
-
Well, I listened to Kathy, I think, and worked more on the 3-D modeling of my figures. Tell me what you think.

Mike
-
Hey All
I have a fine art background and am very excited about learning Leather working, my question is what do I need to begin, I would rather spend a bit more upfront to get quality tools etc than buying a "starter kit" I'm interested in motorcycle seats, boots, vests, and watchbands primarily.
I know this may be an extensive list so I dont mind calling someone on my dime and writing it myself to save someone alot of typing.
Glad to see the forum restored and thank you!!!
Eric
Welcome to the club, we're glad to have you.
You need some basic tools to get started, and actually, a small starter kit isn't a bad way to go. I think that very few leather workers went out and dropped a few grand to get tools to see if they were any good. Plus, when you start with fewer tools, you learn that you can use just the toe, just the heel, one side only, etc., and you can still do quite a bit. That carries over to other tools as well, and you'll find that one stamping tool can actually do more than you thought. A good mallet is a must and here it's better to err on the light side of things. The leather you'll be working ( 2-5oz I think for seats and watch bands) isn't all that thick, and a lighter touch can keep you from going all the way through. Swivel knife- spend enough to get a good one. I'll leave it at that.
Keep in mind that you get what you pay for, and while Tandy has plenty of good tools, other folks make them too, and some of theirs sell for ~$60 per stamp. I'll presume that you have studio space, so that's covered, and you've signed up here. So now you only need leather. As you progress, you'll get more stamps, knives, dyes, et al. Start small, both in tools, designs, and leather. That way, you'll get what you need and know what to do with it, instead of having a box o'stamps and not knowing how, where, or why a particular tool should be used.
Don't be surprised for some extensive lists to be given here....the above is just my .02.
Ahhh! One last thing.....when you start dying leather, wear an apron, and get some disposable (latex?) gloves.
-
Hi,
I'm new to leather, but I like figure carving too. On some of the scraps I've made, I've found that using a modelling tool in place of the knife works well. It gives you what you want ( a feature) without the definition you get when you cut the leather. Around the eyes and nose, in my limited experience, I've found I can use the spoon and the undercut tool to achieve the look. That way I get a softer look to it.
-
I'm in LA....lower Alabama, in the Mobile area.
-
Thank you for starting this site! It's a wealth of knowledge, all for the asking. Keep up the great work.
-
Hi to all,
My name is Mike. I'm new to leather working, and found this site whilst searching for info on leather. My primary interest was to make an IWB holster, which I did on my own. Then I found this site and discovered that chrome tanned leather is just about the worst choice I could have made. So I'll be unstitching that holster, and remaking in vegtan. The holster is the first thing I've ever done in leather work, and the second was a pic of a friend's Arabian:
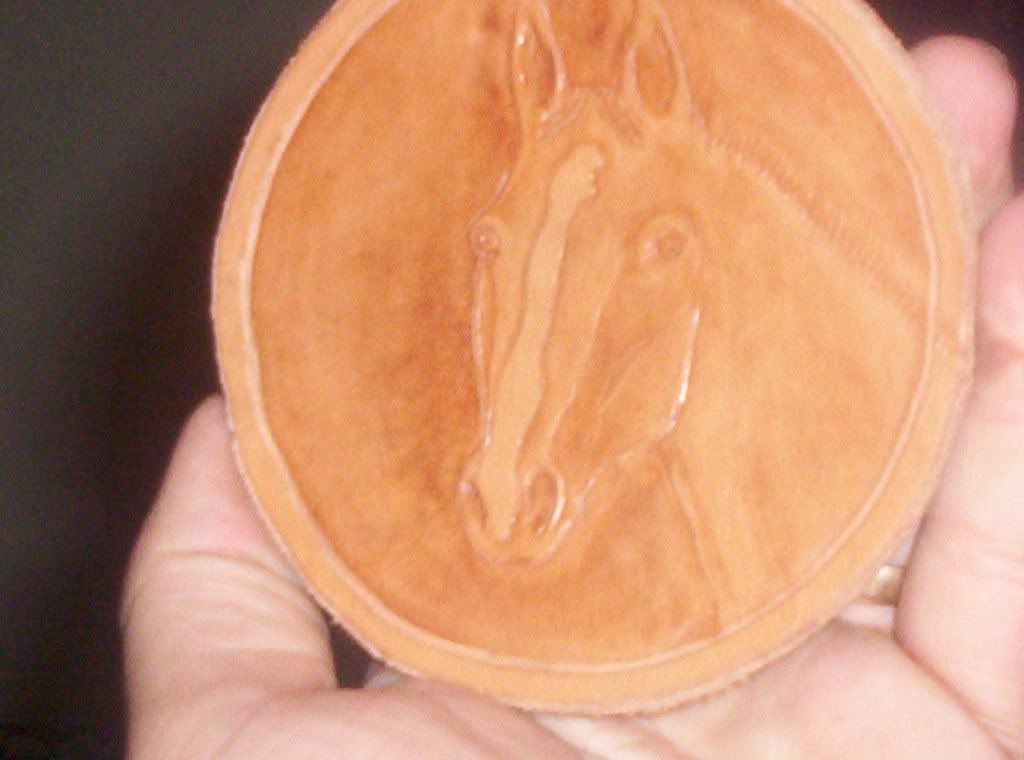

I find this type work very relaxing and rather satisfying so I'll probably keep doing it. I look forward to being a part of this community....and trust that I'll wear out this keyboard typing questions!!!

P.S. I've been informed by my boss, er...wife, that I'll be learning to make tack for her...and her friend...and some other people she knows....

New Member
in Member Gallery
Posted
Absolutely incredible work. As a beginner, work like yours is simply inspiring.