


TwinOaks
-
Content Count
4,513 -
Joined
-
Last visited
Posts posted by TwinOaks
-
-
"other regulated materials, domestic"
Basically, it's got some ingredients that airlines/shipping companies don't want on their airplanes.....just in case.
-
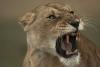
I'm still working on the printer issue....But I'm reading and learning as well as I can. I'm really interested in the embossing. I surfed a bit and found this pic for those looking for ultra realism. The angle is a little different, but I believe all the elements are present.
If nothing else, free hand the pattern and pic then go from there. Say, when does this challenge expire? I might not make a Jan. deadline...
Oh, and Johanna...If you decide to incorporate a .PDF version, please allow the original .jpg to be accesible. Some of like to play with aspect ratios, and do a little digital editing on the side.

-
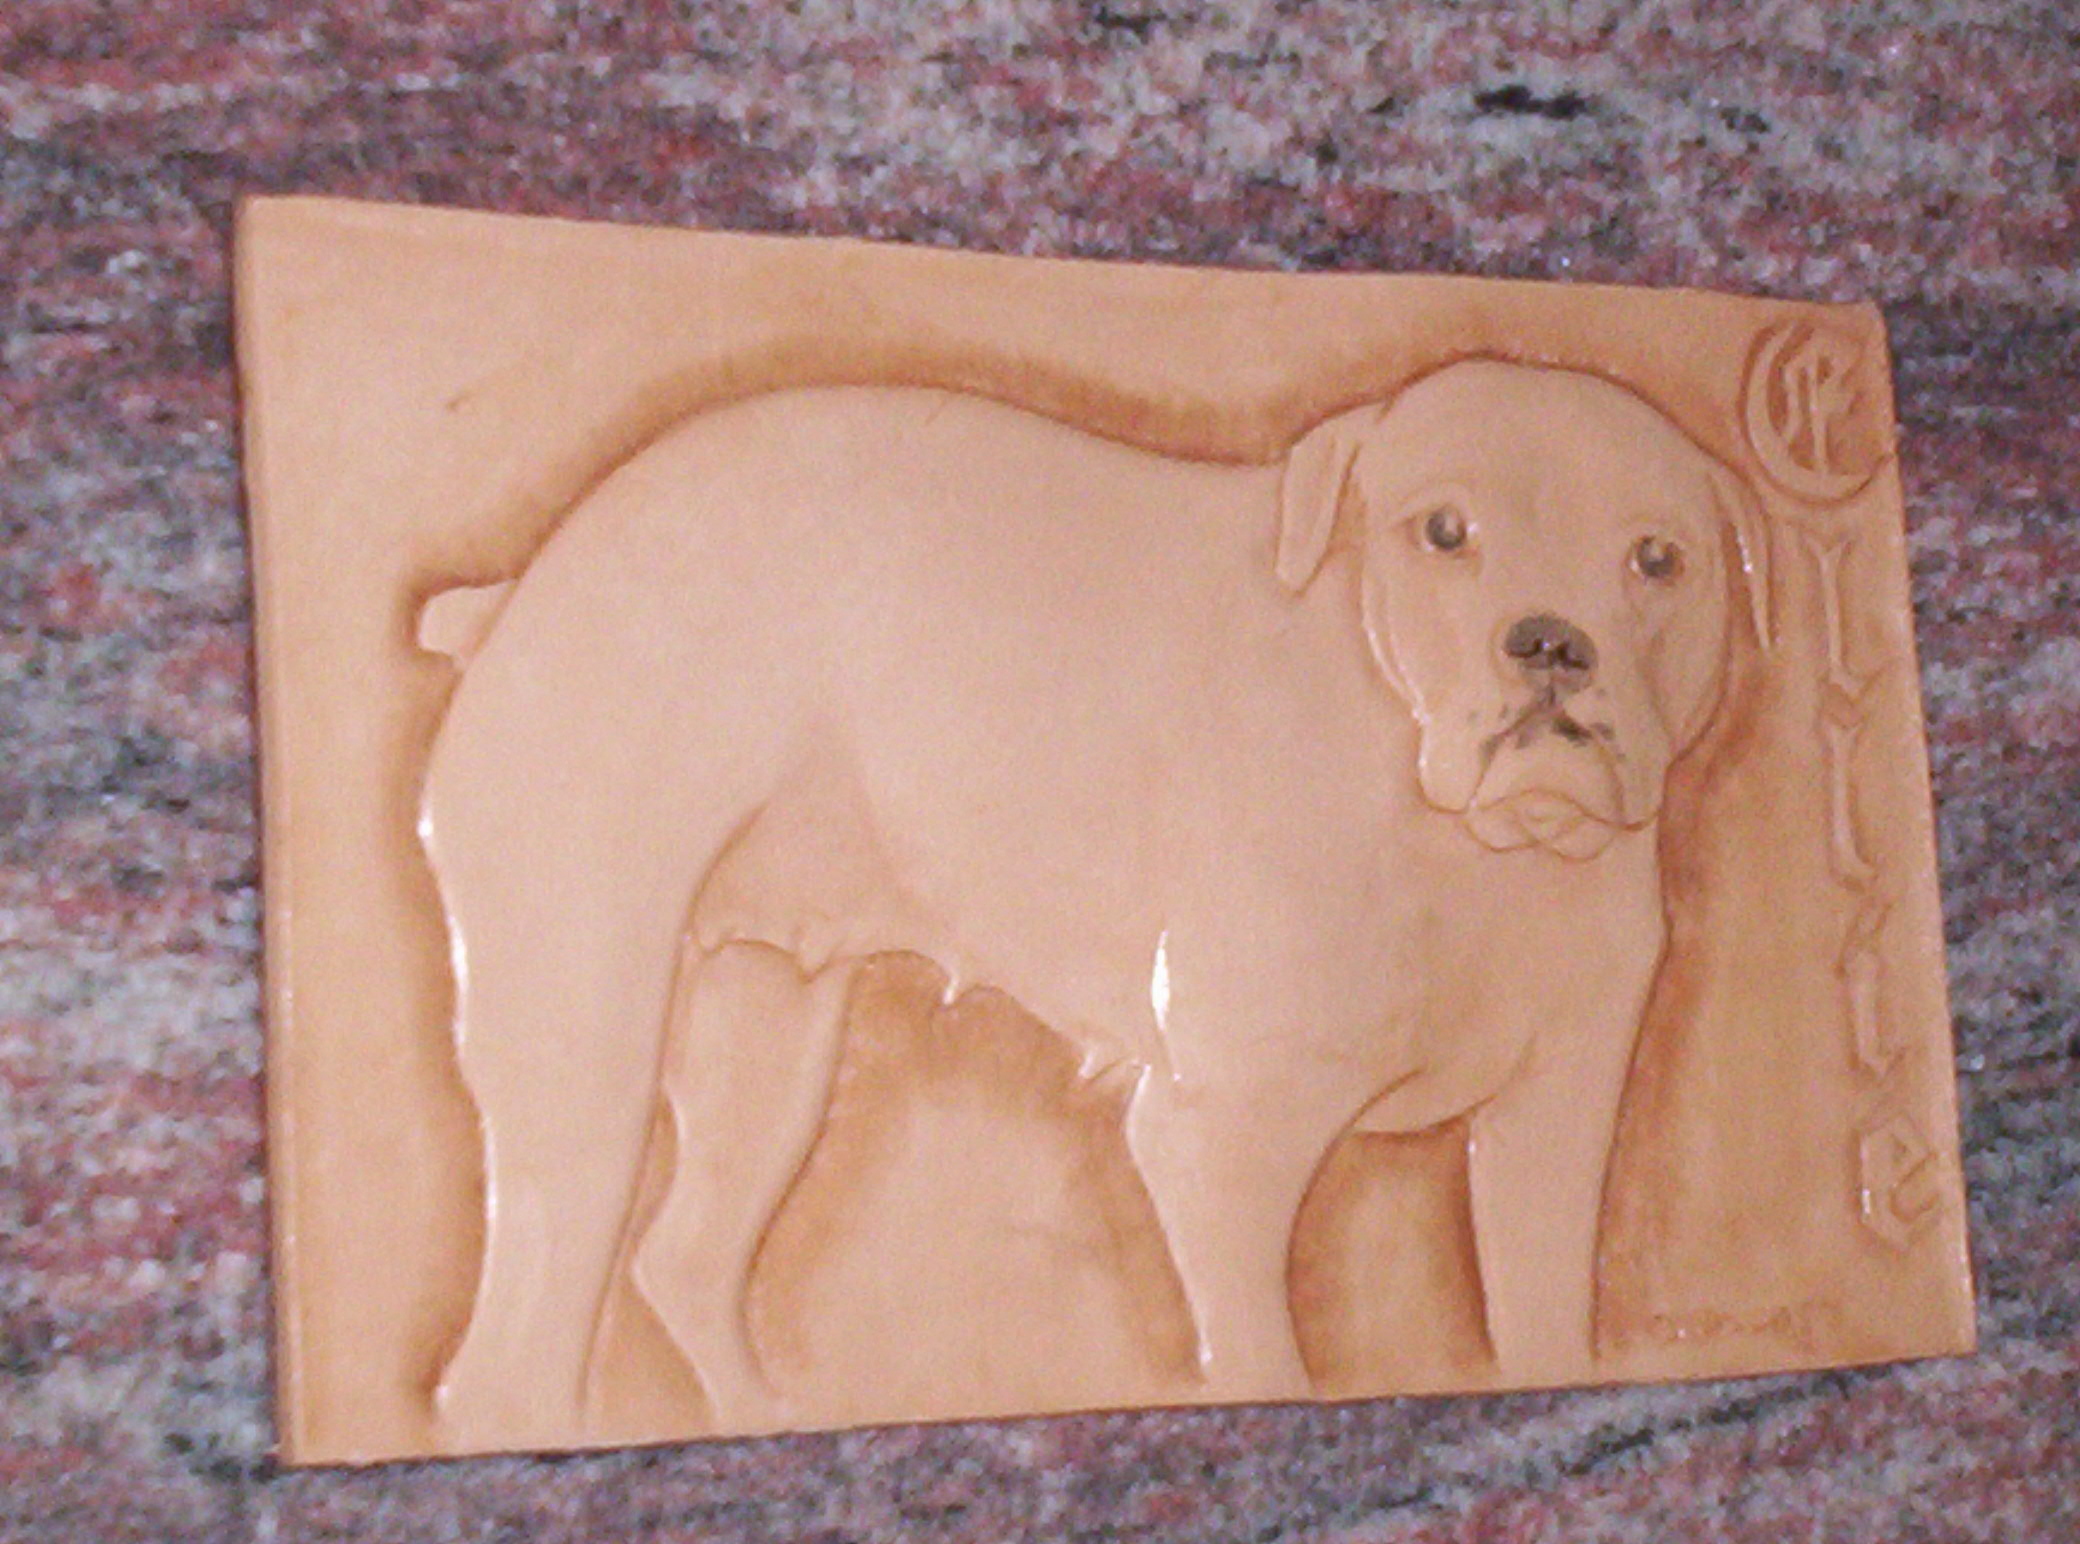
Here's the remake of the piece I killed (mentioned in '..Dyes..')
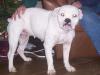
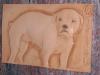
The body of the dog doesn't have much tooling for musculature, but it is fully embossed. The right side of the dog is higher than the left, and the head is pushed out even more. The dog is totally white, except a few blotches on her muzzle. That presents a slight hurdle since I wanted to keep a natural leather look. Interestingly enough, Eco Super Sheen and Resolene have a slightly different tone when dry. I used the SS on the dog, and the Resolene on the background. It's hard to see in the photos ('cause I don't have a lightbox or a good camera) but the head is raised about 3/16" above the background. Also included is the source pic, for comparison
-
Report: Oil applied over any type of sealer or dye is disasterous. Of course it could be user error on my part b/c I haven't used oils in over a decade and have forgotten all I knew. So...for me Ti White was a boo-boo.
I'll stick to what I know for now, and as time and funds allow, will perhaps reinvest in some good oils. Tina, good luck with the lioness, and keep posting results.
-
Thanks for all the replies, and yes, I just recarved it today. The old Architect's addage "If you can't hide it, make it obvious" just doesn't seem to have taken spirit dye into account. The whole problem with any fix was that the dog I carved was s'posed to be white. I did dye the whole original piece to match..then tried a few other things....and well...now I have a med. brown carving reverse highlighted with titanium white artists' oil paint. That's when I reached for the clean leather. I'll post pics over in Figure Carving this afternoon.
-
If all else fails and the bag still smells, you can try to find a product called "OdorNix". The manufacturer (when I knew him) was in Madison, Alabama. Odornix is an enzymatic odor eliminator. One of my regular customers in the WallyWorld garden center showed up one day with her ever present yellow lab who'd just been sprayed by a skunk. It took two bottles- one for dog, one for car- but it completely killed the skunk spray. Good stuff, and it will even pull VOC smells from clothing. Infact, here's the first hit that I got on Google: http://www.denniscastro.tv/websites/odornix/maincatalog.html
It specifies Urine as an eliminatable smell. Hope all goes well.
P.S. I'm in no way affiliated w/ the Odornix products or company, and will not profit from posting the link.
-
Okay, I'm ready for the heckling..
I've used a woodworking tool for that before. Sureform, I think is one name for it. It performs suprisingly well, and I've used it to uniformly reduce the thickness of some scrap before. It certainly isn't on par with a splitter, but, it'll do a good job of smoothing out the flesh side.
-
I'm seeing an embossing wheel, some 2" strap, machine stitching, and some exceptionally shiny brass rivets...and yes, I'd sell a 'regular' leather knockoff of that for 7500.
-
There's lots of this on any one of the gun forums- My favorite:
"Why do you carry a gun?"
"'Cause a cop is too heavy."
-
AAAAAHHHH!! Homework!!!!!! Run!!!!!!
Actually, it's an excellent idea. It gives us opportunity to develop new skills, and we don't have to worry about the copyright on the pic, as permission is implied when it's submitted.
Or is this just a clever ruse to identify your competition....?
 LOL!
LOL!Looking forward to this carving....as soon as I can get a printer that works.....and I recarve the piece I destroyed with a drop of Feibings' med. brown.
-
Well, Tina, I'm about to find out.... I gotta do something, or else I'm out a piece of leather, and a coupla hours...see my post for more....
-
Well, folks, I finally joined the "I dripped dye where ?!?" crowd. I just finished a 4 hour carving and embossing project and dripped med. brown dye right in the middle of what's supposed to be WHITE
 (natural). So, is there any way to remove the dye? (of course not, it's da good stuff)
Now, will paint cover stain? Stay tuned, we'll find out after these messages.
While I'm destroying this piece...Any suggestions other that painting it?

-
Congrats on being the proud parent of a leatherworker.junior!!!
just like anything that's massed produced, I'm sure the kit was an accident. In the future, just open the package in the store. If it's off, you can remedy things in just a few moments. If there's more than one that's out of tune, then the manager needs to know so that others don't have the experience you did. Thanks for sharing this, as I'm gonna put my words to practice.
-
Hi Eric, the following is my opinion only, and I'm still pretty new to this, but it's based on things I've made and observations of things other have made.
Belt- 5-6 oz should be a plenty, even for a work belt, and allows lots of tooling. Dress belts can be thinner.
Wallets- 3-4 oz for them, just be careful tooling them. 2-3 oz if there won't be too much heavy tooling
watch bands- 3-4
cell phone cases- Really depends on the style. A simple pouch can be more substantial, but if you've got a lot of creasing, folding, and sewing, lighter is better. Tandy's little one piece kit with the clip and 4 rivets looks about like 2-3 oz. I made one for my wife out of 6-7, and that joker was murder to get the small creases lined up for sewing. Then again, it should out last both of us.
Thicker leather will allow deeper tooling, thinner is better if there's folding involved. One thing to remember about wallets, is that they'll most likely have a liner of sorts, and the pockets/ slots.
-
Uhhh, yeah....How does one get guacamole out of leather...?
-
Wellll Obviously somebody is making a killing off of his leather work...did ya see the size of the rock on that woman's hand?!!!!!
Nice work, there, I'm as impressed with the scale as I am the craftsmanship.
I'm guessing workshop space isn't an issue here......
-
Seems like the 'know how's have answered the 'what's , I'll just stick to "welcome [insert majority of Johanna's text here]. Glad you joined up.
-
All this talk about night latches and the problems with using your hands....and not one person has bothered to mention to the youngin's that a horn ain't a handle. With all the interest in "western pleasure" riding I'd think that some saddle makers would just make a quick detachable horn. Nice little twist lock jobby so that if the saddle needs to be used for roping it can be, but for the 'rent-a-ride' crowd you can just take it off. I like the comment about cutting off the horn, then taking the saddle away. It seems like sometimes that's the only way to teach a person to use their butt. Now, for all readers that don't already know it, A Horn Is Not A Handle. It's an attachment point for the dumb end of a lasso, so that the poor horse ain't got to hold the rope with his teeth. There, I've said it, and I'm sure there will be dissenting opinions, but there it is.
Now before anyone goes too far in their assumptions about me...No, I'm not a ranch hand; and my wife's horse died before she'd let me ride him. However, I was taught by a 'lifer' from Idaho, using an unbroken 4 year old stallion as the class room. A few moments after getting on his back, the show started and I wished to high Heaven that the horn on that saddle had never been invented. It was like the launch tab on a rubber band gun. ( I can still hear Lynn yelling "Let go of the @$%$%^$%^ horn, you idiot!") Two days, and three fifths later, the stallion and I came to an understanding- If I didn't hold on to the horn, he didn't give me flying lessons. Besides, if your hand has a death grip on the horn, you can't use it to flap with.

-
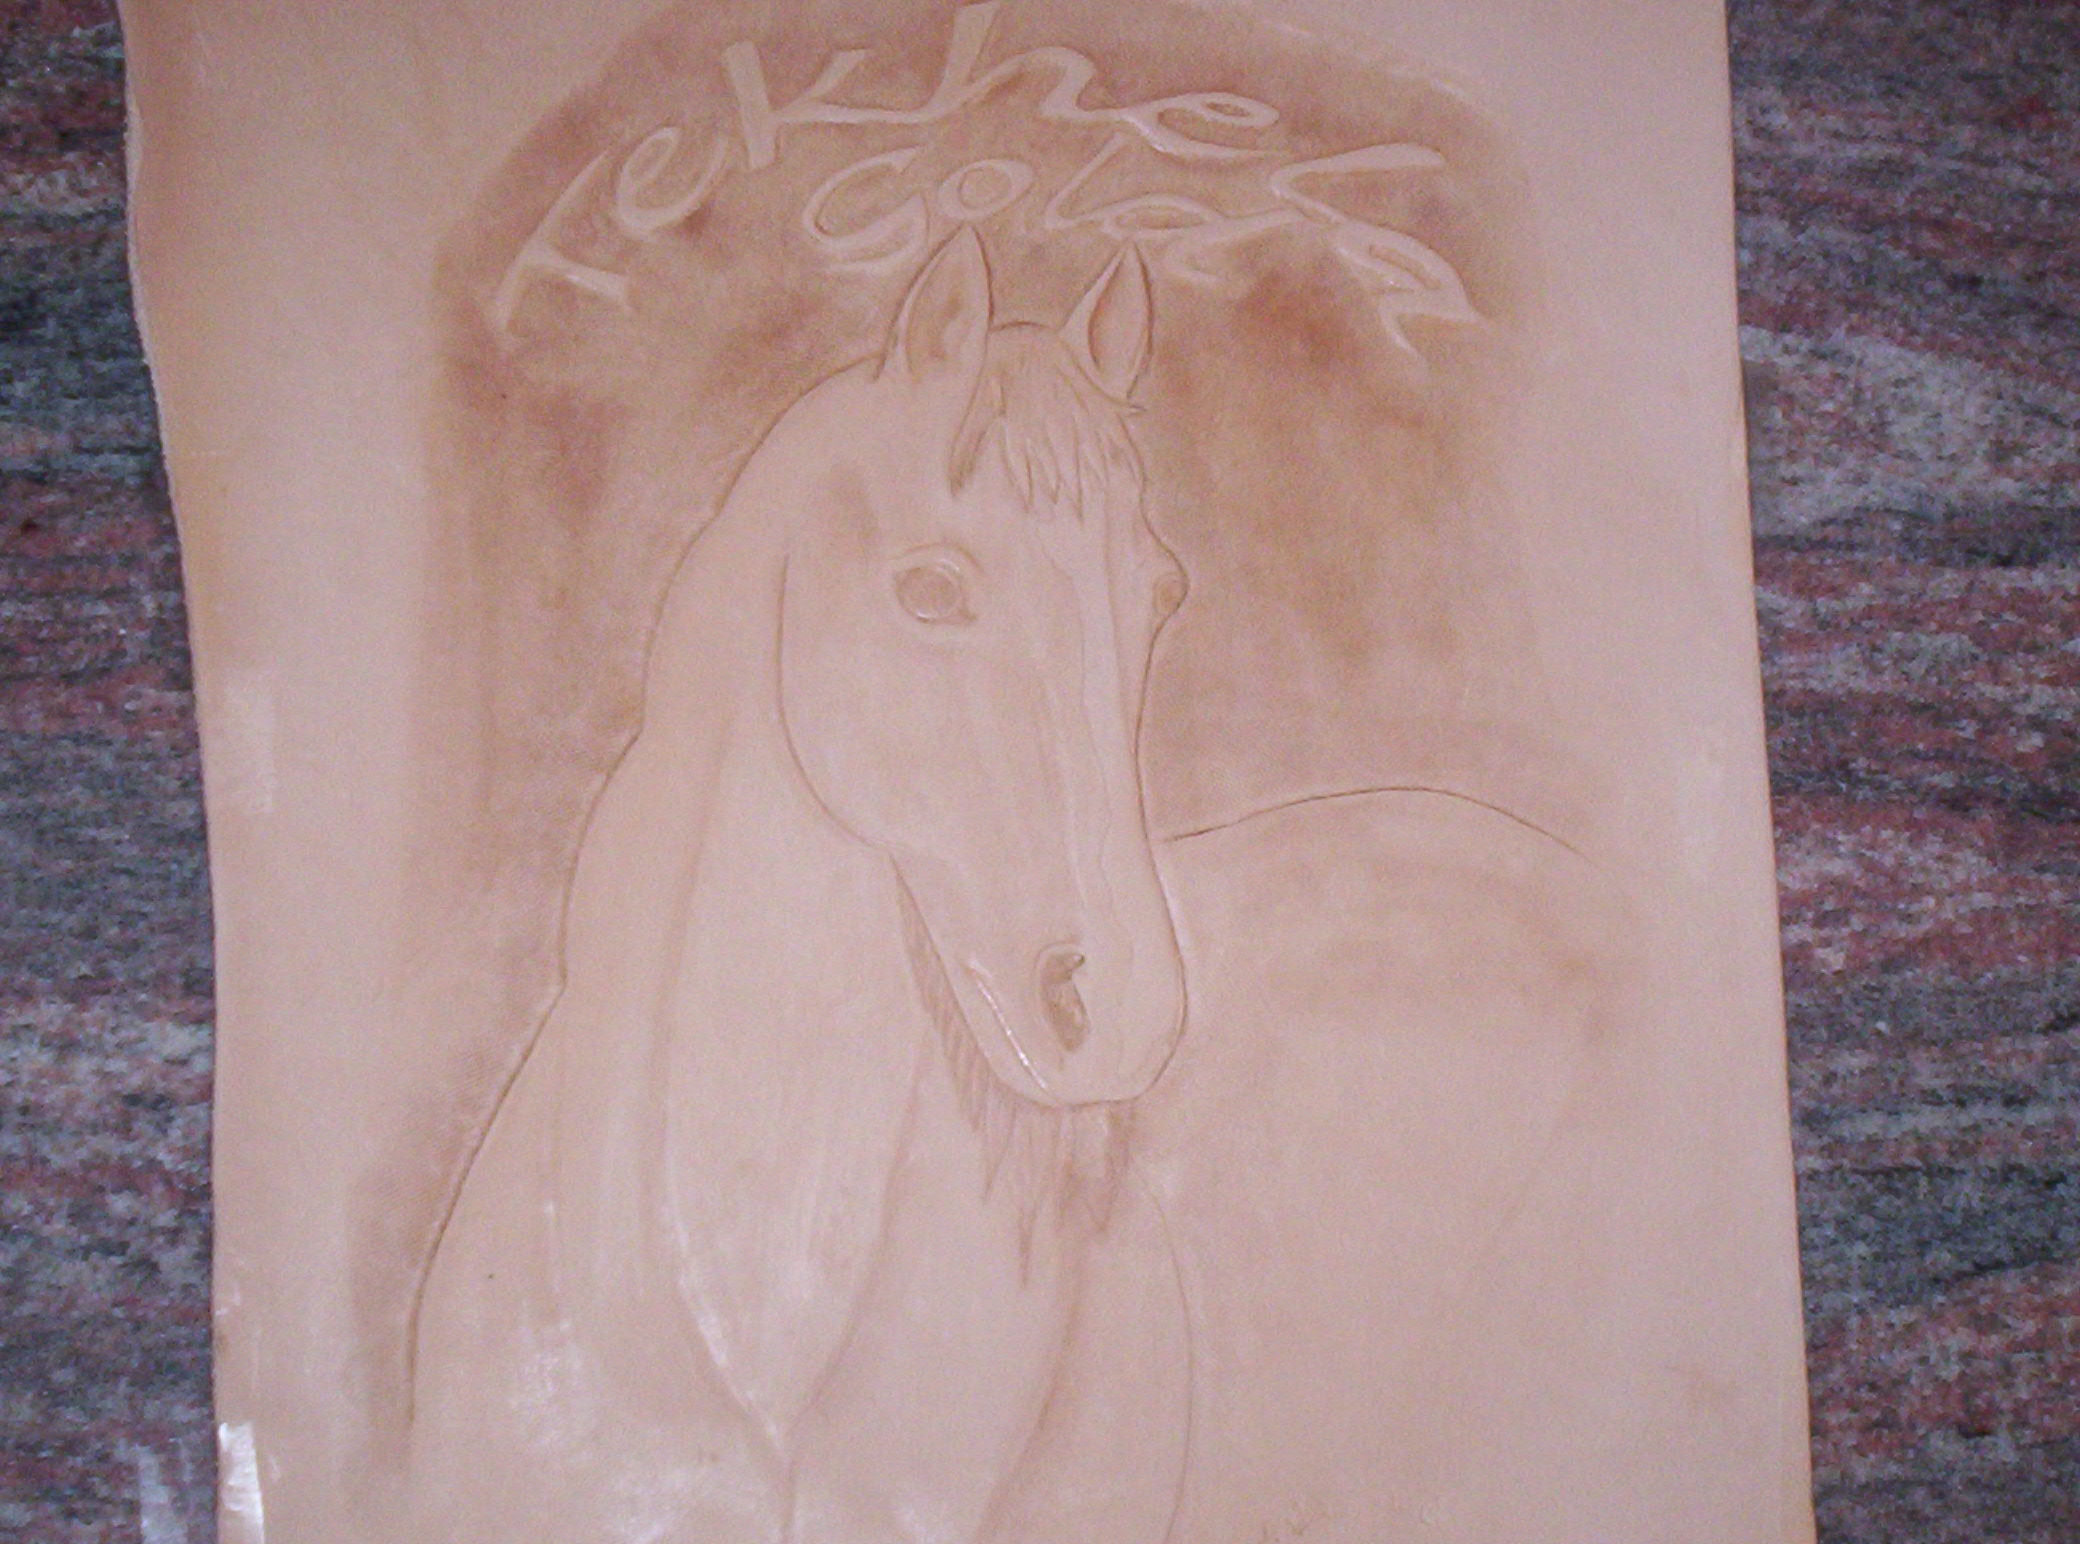
I forgot to mention this in the original post, but here goes- my target clientele won't really be stretching to afford anything. The money is there, and this will more or less be my break into this type of business. That said, I'm looking for a fair pricing guide. Michael Sheldon's $35/hr seems pretty fair to me, and seems to jive with other professional labor costs. This will hopefully get me introductions to folks who want more of this type work. The pieces will not be the same- I'm shooting for custom carvings- portrait style
Being fairly new to leather, I may run into requests for work that I'm simply unprepared for, and if that's the case, I'll certainly post it here.The pictured piece will most likely end up as a jacket panel. I've got a source for stitching this to a jacket, and simply need to put a good finish on it ....Neat-lac? Resolene?
-
 Hi to all,
 I"ve been presented with an opportunity to do some custom carvings for some people, and wondered how much $$ is considered appropriate. The work will be done on purses, jacket panels, and some may be as large as a double bend. Also, I've made a few 5x8 pieces that are frameable. I've had some input from several people locally, but none of them are in any type of leather production. So, as asked: How much is this type of work worth? The inlcuded pic is suitable for 8.5 x 11 inches, framed.
-
Excellent job!!
-
Take copies of the police report(s) to your bank(s). When my wife's purse was stolen, I called the cops and made a report. To the banks the next day, where we were able to prove, with the report, that the $400 dollars charged at gas stations wasn't done by us. The scary thing is that almost half of the fraudulent charges on the two cards were done within 30 min of the theft's time frame ( we narrowed it down to about a 15-20 minute window). And yes, it had been left in the car. CYA very well.
+1 Kate, on keeping nothing in it. About 15 years ago my sis' car was burlarized. They never broke the window either- instead, they pried the window frame away from the body of the car and just reached in to unlock it. All the crooks got was some costume jewelry. It took a totally new door to fix the damage. Now, personally, I like the idea of bait and switch...in a boobytrap-ish sort of way, but I hear that can lead to all sorts of legal problems.
-
Have you tried burnishing the leather yet?
-
Ah, now I see the shield!! Excellent fit that it isn't visible in the first pic. Now, about the computer classes...to have the pic show up like this, the only thing you need to copy and paste is the part that looks like this---> blah blah blah yackety smack , and leave out all the parts with <center>, etc.

here's my first, chrome tanned leather and all
 . I made it nap out to better grab me and my clothing. On day I'll get around to remaking it in veg tan, same patter...but neater.
 With a full size pistol, one thing I've learned is to make the holster a little 'fat' to allow muzzle swing on the draw. With a shorty, it's no issue at all.
Notice how I "accidentally" cut my self off in the photo to hide my gut. Something to learn and remember, grasshopper.


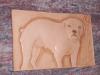
Embossed dog
in Figure Carving
Posted · Report reply
Sorry for the delayed response...I just got home.
Thanks everyone for your comments. Regis, I did just start. Infact, the very first piece I carved was back in Nov. of '07. The real issue for me is finding time to beat on the leather. The pieces I've posted are really the only pieces I've done- the posted dog pic in this thread is number 9 (number 8 is hanging out to remind me about being careful).