


TwinOaks
-
Posts
4,513 -
Joined
-
Last visited
Content Type
Profiles
Forums
Events
Blogs
Gallery
Posts posted by TwinOaks
-
-
Bernie, thank you for your generosity in sharing your skill and experiences with us.
-
Read this part and then go do it....isolate those from any other leather IMMEDIATELY. Bagging them in ziplocs is fine, as long as they're zipped. Now...Shtoink is right on track with making patterns out of those. You might be able to clean them, but the leather is probably rotten. You'll need a specific work area to clean those, preferably outside and away from any other leather. After you spend several hours or days cleaning them and soaking, and re-conditioning them, you'll be able to tell if you got all the spores that are buried down inside the leather....if you didn't, it'll come back pretty quick.
At that point, you could use them as a pattern for new bags, then give the old ones back and tell your customer that they were beyond reasonable repair. Your customer will probably appreciate that more than losing something in them when they fall apart. Incidentally....if they are sewn with natural fiber thread, the thread is more than likely rotted as well.
-
If that's a rig for a 3" 1911, it looks like there will be a LOT of empty space at the muzzle....sure it's not a Commander (4" bbl) size?
Also, if that is built as a horizontal holster, you NEED to put a thumb strap on it. Just about any pistol is going to be butt heavy enough to compromise retention/security on a ' no strap' design.
-
One issue you may be having is that the leather you're using isn't thick enough for a single welt. That can easily be remedied by having some thicker scrap pieces on hand. And should you need to add additional welts, cut the welts at a taper.
The other that I can see is, yes, you need to form the leather for the handle....or stop the pouch below the scales. You could even go so far as to have the welted section stop below the scales, and use a slightly wider pattern for the containment of the handle. You cut the pattern out in somewhat of a wedge shape, and when you stitch the sides 'straight', the excess leather of the wedge will bow 'up', giving you the room you need.
You still might need to do a little wet forming for a snug fit, and you'll want to play with tooling on an arc, so that the pattern will come out straight when you bow it.
-
Not sure where you got the idea that hermann oak is difficult to get...you can get it from springfield leather in anything froma square foot to a side. No input on the W&C.
-
You might also consider oil tanned leather.
And here's somthing that i'd like to gripe about.....the saddleback page "leather 101" is VERY misleading, and full of inaccuracies. So, if you are using that page as a source for leather knowledge.....find a different and better source.
Of particular note: In the section with pics of "cheap" leather....it's a completely different type of tanning. They're using real pics of different leather types and claiming superiority based on the implication that they're the same type of leather....then use their false claim to justify their pricing.
They seem to be using oil tanned; veg re-tan; or bridle leather. They're comparing it to alum tanned / "tawed" leather ( perhaps latigo).
COMPLETELY different leather. And they've inaccurately described full grain and top grain....there, i'm done griping.
-
Google-fu says that it's primarily an additive that acts as a carrier for other things......and at roughly $1200.00 / gallon (listed at $1169 for 4 liters). I don't think i'll be trying it....ever.
A commonly used alternative to NF is extra virgin olive oil; then theres Lexol, and I also really like Aussie leather conditioner.
-
The little tab lifts to release spring (or cam) pressure that holds the teeth closed
-
And, when it's wet and easy to mark, are you setting it down somewhere, or placing it in a drying rack?
-
Since i don't use facebook, i guess I need respond here....
I only use black. But it's hard to find anyone that carries .125".....aka 1/8th. SLC said they could get it, but they'd need something like a $1200 order to start with. Are you looking to carry the kydex on your site?
-
First off, the dye doesn't polish up...that's the leather. It's taking a light burnish fromthe buffing.
Next....you don't really have to put a finish on the vinegaroon. You do need to oil it, or rub in some conditioning. There's a lot of information about the 'roon in the threads about it.
As far as a 'flat' finish....any (grain side of vegtan) leather is going to get some shine to it when it starts getting used...it's just part of how the leather wears in. You may want to try just conditioning the leather and see if it will stay 'flat' enough.
-
That's true to an extent, Dwight, but he also carries a 200+lb great dane around with him. At that point, a gun is just window dressing, because if trouble STILL comes looking for him.....the gun probably wouldn't matter much anyway!
-
Or, if you don't want to use the lacquer, you can use Resolene.
It's an acrylic finish, but very long wearing. I used that on a leatherman pouch, nd it has held up very well over several years.
-
One of my friends asked me to help him make an IWB for a 5" .45LC SA revolver....odd thing is that works just fine!!
-
Slick has hit the biggest point here: you need sharp tools to cut things. Look at picking up a few regular hole punches in the sizes you use most. The interchangeable tip punhes are really only suited to punching through really thin leather or vinyl. Look at the end of the punch, and you'll see a very pronounced shoulder to the cutting edge. That shoulder is actually preventing the ounch from getting through the leather. If you grind/ sand that down, you'll have a much easier time. Or....just get an actual hole punch in the correct size, it's a very obvious difference.
Here's a pic comparing the two...same size hole:
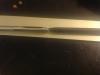
Once you have your hole punches with some proper angles, you'll still need to sharpen it. There's some videos on youtube that demo it very well.
Alright...punches addressed. Cutting surface: you need to have a soft surface to protect the punch's edge, and under that you need something with significant mass. The mass under your cutting surface can be as simple as some heavy lumber, a sturdy table, or a block of rock. My set up is a 'poundo' board on top of my granite slab. When I tool, I just flip them to put the padding under the rock.
So....what should you hit it with? As much hammer or mallet/maul as you can comfortably use. It's okay to hit it more than once....and that's where the mass under the cutting board come into play. The more mass you have, the more the tool will cut because the energy from the mallet/hammer isn't enough to move it. That means all of the energy is going to be used in driving the punch through the leather.
If you try to punch holes on something flimsy like a card table, you'll notice a lot of bounce, and te hole may not be struck through.
-
I've found the key to facial/portrait work is to remember that there's TWO sides of the leather you can work from.
-
You are most welcome. I'd forgotten about that tutorial until electrathon mentioned it.
-
-
This thread is well over a year old.....If there's no response by this time tomorrow, it will be locked.
ETA Just checked and the OP hasn't been back in almost a year....so this one is done
-
you bury the end between the pieces you're lacing and overlap the start/stop of the two.
-
The only way you should see any problems is if you deliberately use the same styling/font/colors....basically, if you use your name, you're fine. If you use THEIR DESIGN....they have a case against you.
-
Welcome to the forum!
-
Since i don't do a whole lot of lacing anymore, the number might be off.....but you can get pretty close to the length by measuring the total linear distance and multiplying by 7.
-
I think that's a fantastic discover! I don't think the printed stamps will have the life expectancy of delrin/acetal (and certainly not steel), but for new designs, or limited use things, it'll be difficult to beat. The dpi seems a little coarse, but like you said....first stamp. I'm sure that you can play with the settings and get it sorted out.

Wicket And Craig English Bridle Vs Hermann Oak
in All About Leather
Posted
I'm pretty sure i completely missed the English Bridle part of that question.....however, it might not hurt to give them a call and ask.
I presume this is not what your asking for: http://springfieldleather.com/30895/Side%2CHarness%2COld-World%2CRusset/