PeterD
-
Posts
47 -
Joined
-
Last visited
Content Type
Profiles
Forums
Events
Blogs
Gallery
Store
Everything posted by PeterD
-
Yikes! Misspellings, bad english, and poor grammer, it must be the end of the work day. Hopefully my leatherwork is better than my English.
-
I do a bunch of them and they are pretty simple. Although I do it a bit different from above since I use two halves of leather to cover a bottle. It is usually 6-8 ounce for maximum protection of the bottle. First measure around the bottle. divide by two and add 1.5 inch to the measurement. Then cut two pieces of leather that wide by an inch taller than the bottle. skive the inside bottom edge to a 45 for a later bottom. Glue only the very edges together. After the glue sets wet the leather and put it in a plastic bag in the refrigerator over night (to ensure the leather is completely saturated.) Then set up two sets of sewing needles, insert the bottle, pull tight and start sewing up from the bottom. go up an inch or so then change sides (make sure you keep the skived edge just below the bottom of the bottle.) When you get to the skinny part of the bottle start forming it around the neck and sewing it up. When you get the leather sewn up as far as you want, then finish off the sewing and cut the leather off flush with the last stitch. At this point I normally leave the leather to dry (dont worry that it doesn't look good, when it dries it will pull right up tight and be beautiful). After it is dry first put it on a piece of scrap for the bottom cut the circle and do a opposite to the 45 bevel on the bottom and attach with a 45 sew through. both the bottom and the sides. You can then either trim the excess leather off or sew a couple of handles on, trim out the excess or punch a hole for a thong. Then dye the bottle and burnish the edges. and you are done. P.S. My wife onced slammed a bottle of $80 scotch on the cement and it didn't break. So the medieval purpose of protecting the glass would seem to be a valid premise. If you want to put a nice stamped or carved desing(basket weave is particularly nice) do it before you do your gluing and overnight casing.
-
I don't remember. In order to make it work I started with the smallest setter and light tapping to get the flare to start, then progresses to the larger ones keepting the flare going. However I have found boot hooks that use two rivets and that is much easier. Nor sure where I got them I have two types; a weathered looking brass and a black type.
-
This is an easy trick I learned that can work quite well to give you the illusion of height to your celtic knowtwork. Rather than my posting a picture just grab a piece of scrap leather and make a figure eighte rope and tool it to see if you like the effect. When beveling the knot work change to a ribbed beveler when crossing over another piece of the knotwork. Then when finished beveling the entire piece use a hair blade to follow the knot work. The hair blade really make it stand out and the ribbed beveler really makes the knotwork look like it goes underneath the other loop. This can be especially effective it you are laying your knotwork over some other design or picture. Of course you can do the beveler and not the hair blade for a little different effect.
-
I make them myself using posterboard. If you cut something short you can just duct tape some more on and recut it to proper size. After a bit you get a good feel for leather thickness allowances. If you need it flexible then run it over the edge of the table a few times to break it down and make it more pliable. When making things like knife sheaths, holsters or archery equipment you can tape the pattern together and put it one to determine if it really works. Then flatten it out and your back to your pattern.
-
I found a piece of metal that would fit tight into the boot hook. I then rested the boot hook on a couple of pieces of scrap leather on my anvil. I was then able to use a snap setter to flare the back end.
-
Lets see, right now I do rapier in the round with dagger, cane, cape, etc. Armored combat. SCA activities, longbow archery to include fletching and bowyer, traditional bowhunting and motorcycling.
-
I use an awl. Used properly it doesn't weaken the leather. A drill removes leather an awl spreads the leather. It is also much faster if you learn the technique of manipulating the needles and awl at the same time. Always make your awl hole so the flat side of the hole is against the pulling side of the thread and don't pull the thread tight like your trying to garrot a sentry. Snug saddlestitching will stay tight, it doesn't require a come-along to keep it tight. I would suggest Al Stohlman's "Art of sewing leather" as a good overall reference. Now having said that, there it a place for everything. I may drill holes if going through a really thick pieces of leather like a mug handle. I use an awl for most everything else unless it is something that is an odd sewing job like a soft quiver or tube were I use a lacing punch to prepunch everything.
-
Hi everyone! How do you go about cutting out a piece from say 10 oz leather? For example, a curved pattern that you need to cut out several identical pieces? I only have a utility knife right now but have a hard time with sharp curves. I imagine a smaller, x-acto type knife might work best? Also, does the leather need to be cased before cutting pieces out of it? I don't case it because I am usually cutting it from a larger side and it wouldn't work. For tight or intricate cuts I will cut a piece off a bit bigger than the pattern Then trim straight lines around the pattern. I.e. to cut a half circle I will cut four straight lines along the pattern then trim the corners formed by the straight cuts then trim those corners and eventually you end up with a half circle with no straight lines. I did this last night to form a belt end. Two slices along the end, trim the corners, even it up and you have an ovaled end for your belt. If my leather is so thick that you can't cut through it on one slice (with a good sharp head knife that doens't happen much) than I carefully make a couple of passes to start carving a groove that will be easier to follow when I start using more pressure.
-
On those infrequent times when I listen to music, I put on Celtic, medieval or SCA Philque. Usually I put on a movie that I have seen about 8,000 times. It becomes white noise until a good scene comes on which allows me to take a mini break from whatever I am doing.
-
That sounds like a great book and thank you for the link I am going to add it to my favorites. It looks like a lot of good things there. Here is a book I just bought for those interested in medeival leatherwork. Not only pictures of pouches but line drawings showing how they were made with enough detail that it will be easy to make a pattern from. Contrary to popular belief the medieval flapped pouch was seldom just a pouch, but was actually several pouches combined into one unit. Just like we put several pockets on a pair of pants. The book also has a short piece on sheaths and leather covered bottles as well as leather bottels. Purses in Pieces: Archaeological Finds of Late Medieval and 16th-century Leather Purses, Pouches, Bags and Cases in the Netherlands (Paperback)
-
Sword scabbard
PeterD replied to TomBanwell's topic in Gun Holsters, Rifle Slings and Knife Sheathes
Many of the swords were leather covered wood, but many were not. I know three primary techniques to make a good sword. (I am sure there others) 1. make a wooden scabard and cover it with leather. since structural integrity isn't a concern for a wooden scabard use rather thin leather for ease of sewing. 2. Make it like a modern knife sheath (Back, front and gusset) with minimu 6-8 ounce leather. Yes it will bend if it doesn't have a sword in it. But with the sword in the sheath it is plenty tough. By adding an extra "throat" piece for attaching your belt/baldric you strengthen it even more. 3. Backstitch a sheath. Similiar to the commercial site you were directed to but you can finish it off and the backstitching serves to stiffen the sheath. done right most people will assume this is has a wooden core. ( I don't recommend it if your sword has a sharp edge on it.) -
I have found some great tools in antique and junk shops. My stiching pony is similiar to the first one you show. It gives me about at 15" throat and the wooden screw tightener sits on my knees when I sew so that any chair becomes a stitching horse, including a recliner. I also found a hammer with the rawhide inserts for about five dollars. With new inserts it is like a brand new forty dollar hammer. An interesting note is that someone sometime ago listed stitching ponys and horses as leather stretchers and so you will often find them labeled in antique stores. I actually went to a museam desplay of old tools and the guide was going into a detailed explanation of how they would stretch leather with them. I ended up climbing over the ropes "with permission" and showing them how a stitching horse is actually used.
-
Hello Mark, I am new here myself and have found it to be a great source. Peter is right, they had rivets but didn't use them very much as such; Armor to leather perhaps but for the most part you should ask yourself if a rivet is really needed. For example if you are using rivets on a knife sheath to keep the blade from the stitching then you are probably need to get a better design for the sheath. Conversely, some cases (like for a multi-tool or big folder) might need rivets at the top to keep the leather from ripping out of the stitches due to the strain of pulling the tool out crooked. The US Cavalry had rivets but didn't like to use them (at least during what we refer to as the indian wars) At one time rivets were authorized by the Army for emergency tack repairs only. If you ever see something very old dried and cracked and torn apart look under where the rivets are. Then look what happened to where it was stitched. There are times when rivets are not only necessary but are the only thing that fit the bill but not as often as they are used. An example would be putting on a belt buckle. If you don't want to sew, use the thong through the three hole method and not only will the buckle stay on but it is easily changed out.
-
I think I have got what I need to do the Job now with out having to do this Thanks David Wolf Having made a couple of hats in the past. I used an article from a mid 70s leather magazine. From what I can see on the gambler hat page the tandy instructions are almost, if not the same. As you make your patterns, a bit of modifiying will mean you can use the free gambler pattern for almost any style. For example to make a high crowned pinched front just point the top piece of the hat and raise the front of the hat portions. for a narrow top both front and back just narrow the top piece in front and back. For an Indy Jones type use a 2.5 inch brim a pinched crown and a very slight rise in the front for the height. After you finish put a black leather band on the outside and you are finished. Hats are pretty simple if you take your time and remember that the hole in the brim for your head must be larger than your head and if using veg. tan should be shaped like your head which probably isn't a perfect oval.
-
It is specifically designed for the type of shooting we do in the SCA. If the quiver is constructed properly, when you round your back to bend over the arrows will be held in place and not end up on the ground in front of you. A deeper quiver slows your draw down. Using that depth quiver with a special strap to keep it in the right place you should be able to get off eight to ten aimed arrows in thirty seconds. The normal quivers you see commercially are usually to deep and ride to high on the shoulder. The only way to get arrows out is to push the bottom of the quiver with your bow hand.
-
I saw the thread on a new head knife and thought I could pass this out. I took my head knife and cut off an inch of the handle. Now when I hold it, the back of the handle presses into my palm below my thumb. This allows my thumb to extend down to the blade while my first two fingers set on the blade about 1/4" or less behind the edge. For leverage the knife handle is pushed into my palm rather than using hand muscles to push with. When doing very fine work like cutting a 45 degree edge on some thick leather I can literally walk the knife down the leather. And when doing tight curves I can put my fingers on the leather and ease the knife into the leather to avoid cutting to far or off the line. (As I recall I learned this from a Stohlman book.) If making large straight cuts I just pull my fingers back from the knife edge and put the edge of my hand on the project and push with my palm. I am not recommending this for anyone just throwing it out for discussion. Perhaps others can come out with any little tricks they might have. I have noticed over the years a lot of people who shy away from the head knife simply because they don't know how it is used. On a humorous note I once had a guy in a quiver making class I was teaching warn everyone to step back when I picked up my head knife since it was razor sharp. I got the impression he thought it had a malevolent life of it's own and might jump out of my hand and attack someone.
-
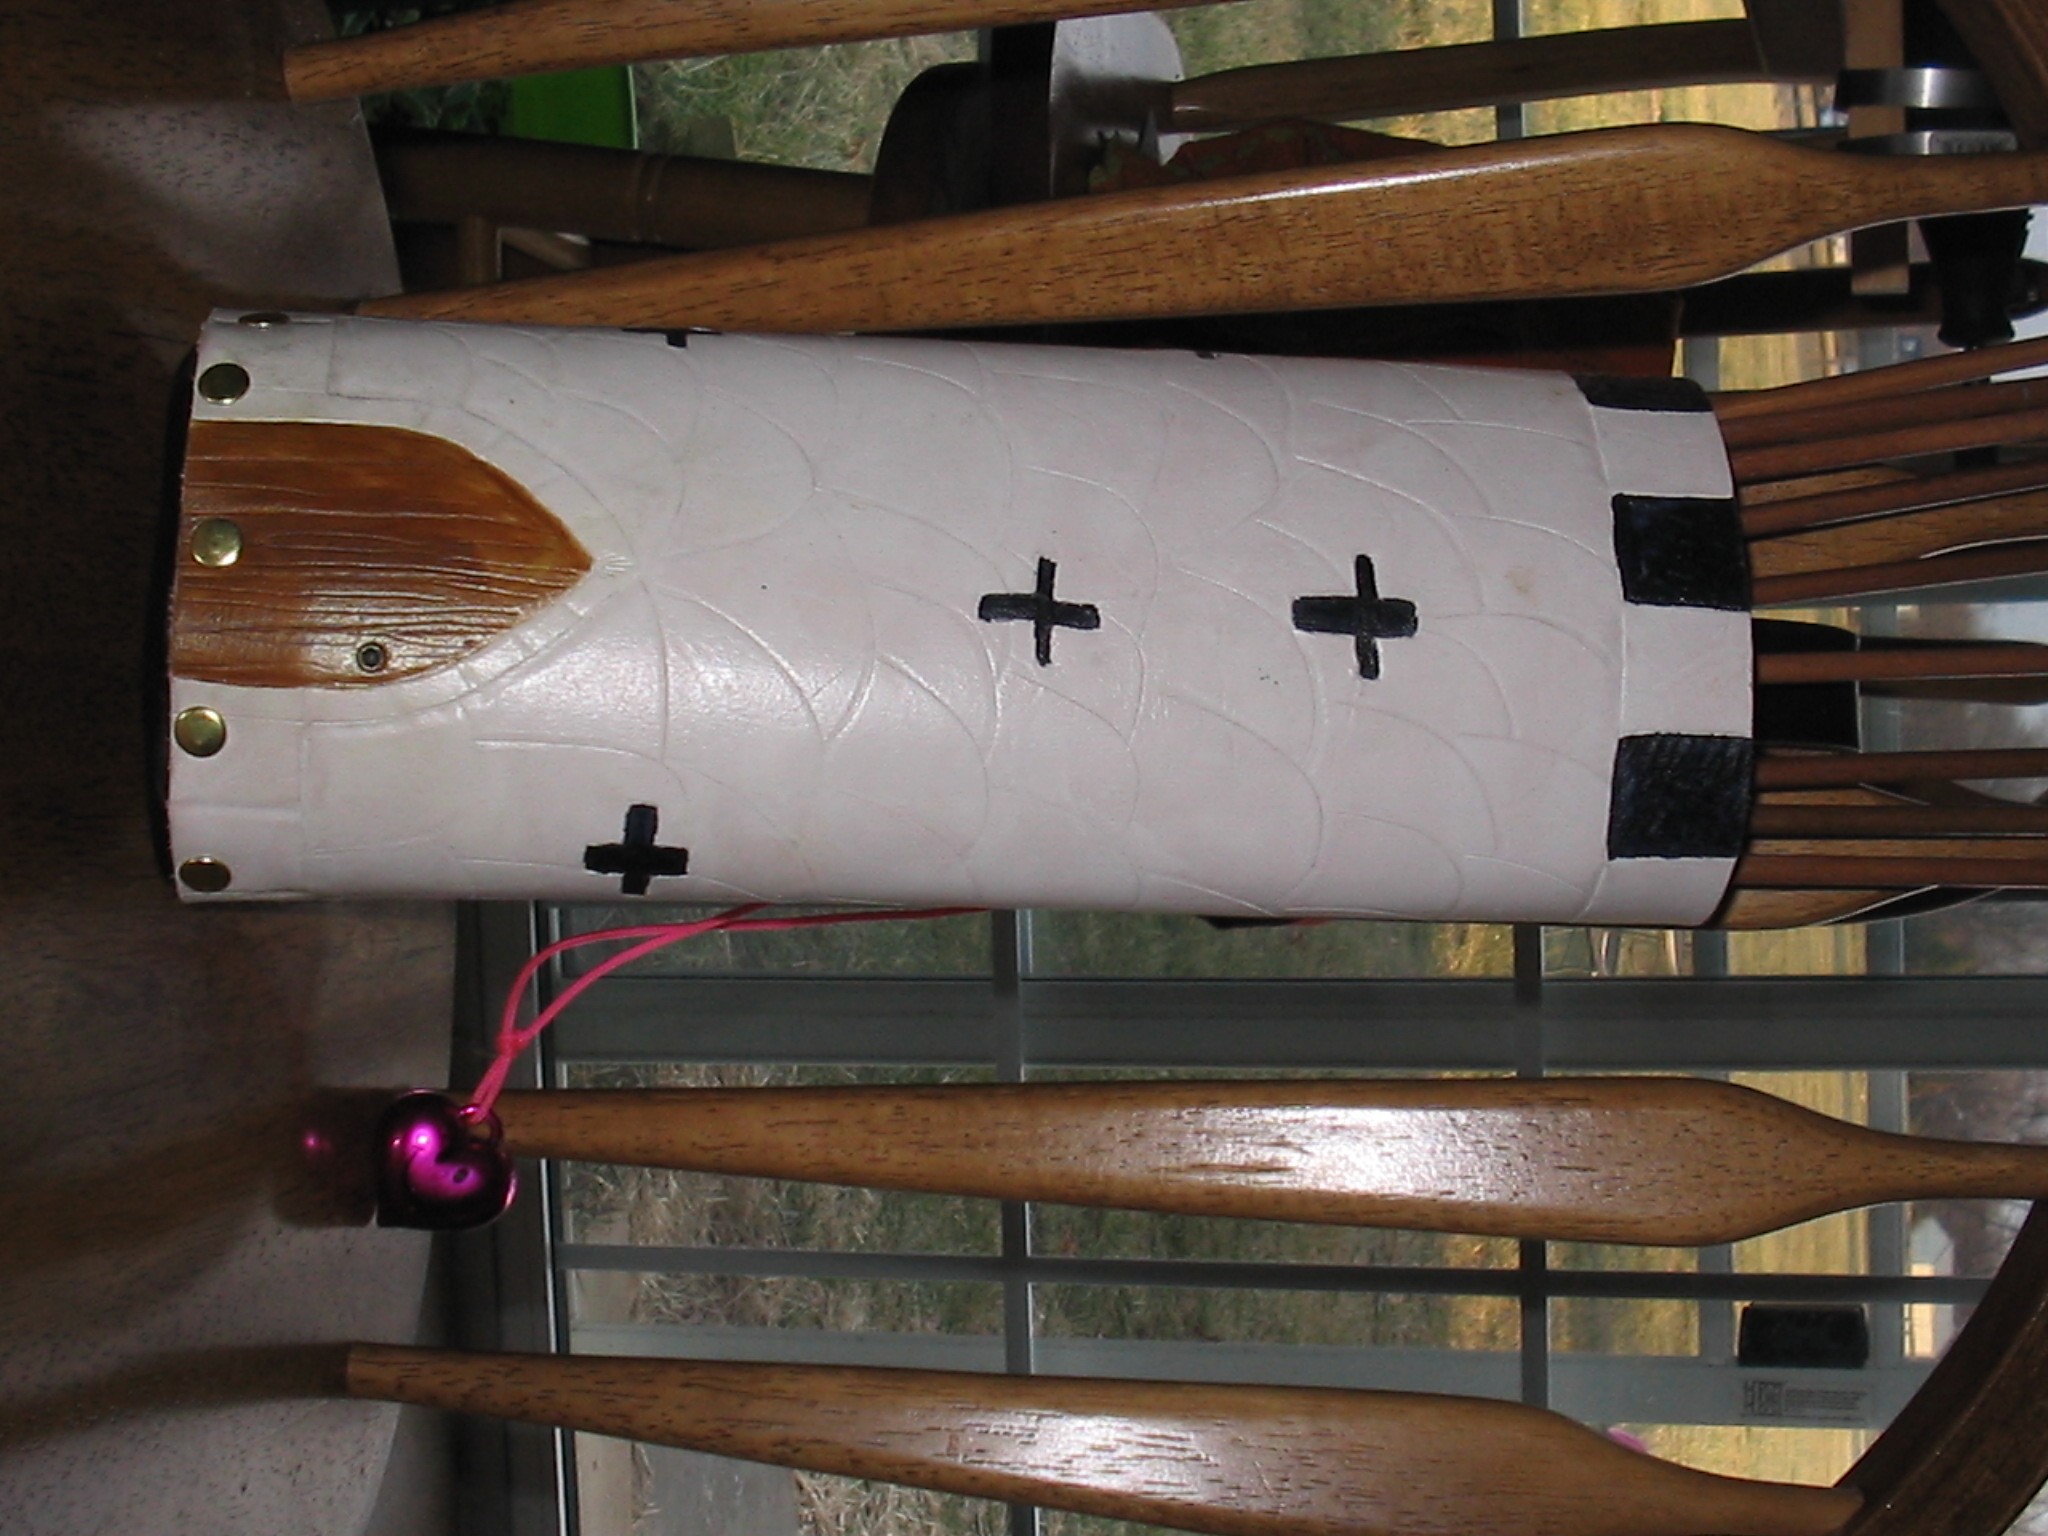
Here are a couple of quivers I have made in the past. The castle quiver was for a friend's little boy who loves all things knightly. His Dad's formed quiver was made on a wooden form I carved and has my friends arms on it It sets so the arrows are always at hand and no bow bump is necessary to retrieve an arrow as you see with most back quivers.

-
I remembered I had a couple of pictures on my cell phone of the latest quiver I did for a friend. Hopefully you can see the two pictures. An interesting side note is that when I finished it I put my arrows in it and it didn't hang right. Then I remembered that I use 29" arrows and the lady uses 24" arrows. After I switched to my wifes 24" arrows the quiver hung just right. I guess that is why they call it custom work.

-
Just wanted to say hello. I signed up last night but needed to get my tail back into my studio to continue working on a knife sheath for a friend and a new set of arrows. I started with leather working back in the mid-eighties with knife sheaths. And while I don't do it professionally, I have, over the years, made sheaths, quivers, holsters, chaps, boxes, jacks, belts, shields, armour and a couple of what I laughingly refer to as art pieces. (When they passed out talent, I was off looking for a beer or something. For certain I was not in the room.) I also have a day set aside each month for people to come over to learn leatherworking. My normal procedure is for them to work on whatever they want and then just show them the techniques they need to complete it. I may copy a style, but do all my own patterns since I originally got into sheathmaking because I find a lot of good knives but very few sheaths that are as functional as I like. The same goes for quivers. Some of my recent completed projects are: Art Vincent styled target archery quiver, 14th century crossbow quiver from Phoebus Graeme's "Book of the Hunt", 12th century pouch and a childs quiver decorated like a castle tower. My three personnel quivers are: 1) loosely based on the back quiver from the Bayoux tapestry. 2) a side quiver I call my saddle gun quiver since that is what it looks like. 3) Hunting quiver that while covered with a basket weave pattern is designed to be functiional more than pretty. My next project will be a leather buckler for my rapier fighting. I also may need to replace our matched set of drageon carved leather jacks. I look forward to meeting the people here and trading ideas. If I get a chance and can figure it out I will try to post a couple of things I have done.