Ard Righ Art
Members-
Posts
16 -
Joined
-
Last visited
Content Type
Profiles
Forums
Events
Blogs
Gallery
Store
Everything posted by Ard Righ Art
-
No lack of either of those around here (or overpopulated critters), and I need to begin hunting again myself. Season's not that far off. Though I've never lacked for offers of hides, learning the finer points of using as much of the animal as possible might be a new skillset for those I know. Might as well try to pick it up myself. New assignment for the year :-) I'll start researching now. You may hear from me if I have questions about the process later. Sorry OP for the thread hijack!
-
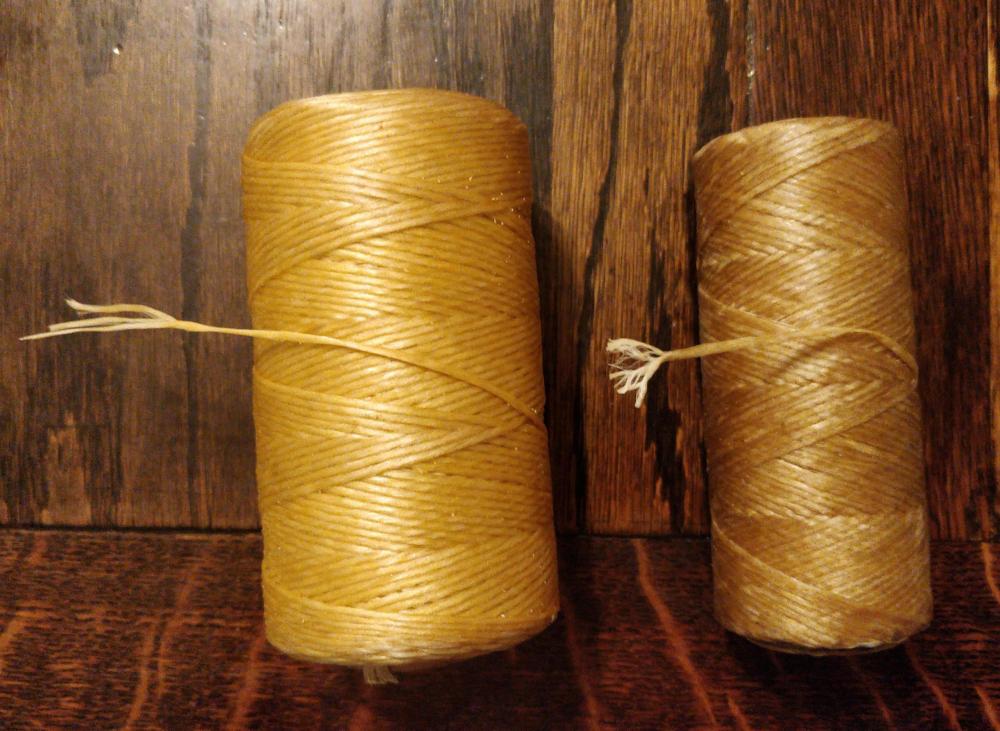
I seldom use it myself. Pretty sure that roll on the right is from the late 90s. I bought the new roll hoping to save the best for my best work (like I saved old antique stain for the colour, though the new Tandy gel has marvelous properties, and old super-shene for resisting as long as I could make it last). I think I will learn how to collect my own. It's definitely a skill set I need to round out my abilities and life skills just in case. Not to mention the justification for the extra zero (not really, but one can dream) you get to make when you advertise that certain products have handmade dyes, stains, finishes, etc...
-
I've wondered just how many sources there are for the artificial. If it's like most things these days a couple at best. I looked at the native suppliers not for the artificial, but to see cost of getting actual sinew, so I can compare or use it on special projects. I get that sinew is supposed to separate. But it seems that the manufacturers have struck upon that sole property, forgetting others like sticking back to itself. I wish I had taken this picture earlier. When I pulled the end off the old roll, I wasn't even sure it would come. By the time I got it free it looked like it had been chewed up to a finely frayed fibrous pulp. Unfortunately, I rolled it back together, then refrayed it for this picture. The new stock separates into three main strands, which further separate into smaller ones, but re-adhesion is non-existent. Needles shred it. With waxing and a long enough lead I can get away with short stitching runs, but I think it may be relegated to the give to kids for throwaway projects pile. It was a bit steep for that.
-
Thank you all for chiming in. I think I'll give Maine Thread a try since I didn't gather anyone had used the "sinew" products of anyone other than Tandy yet. They did come in big rolls that last a long time, if you aren't making dreamcatchers or the like I reckon. I have a fair bit of waxed poly in black and brown, but they seem to have some colours that look like they would go well with some of my stains and dyes. Plus I'm always looking to find new suppliers of quality stuff. I am thinking too of getting some real sinew to play with, along with a little bit of the artificial from one of the Native companies I found after your @Sheilajeanne recommendation. I'm not sure about cross border shipping of genuine, so I'll have to figure in cost and customs headaches on that. It's not really a priority for anything I have planned just now, but there are times when it is just the look I want, however. Curiosity may make me try it next free moment when I have the room in the budget. Isuppose I could try to harvest a critter myself. It's been a very long time. Last time I tried that my large canine couldn't resist that framed up hide. I just barely resisted stretching him out on it, as he actually about outweighed the buck... If anyone does find a better artificial sinew than what is currently being offered by my favourite place to gripe about, please share. I'll do the same, and report back what I find on a new thread (I'll be here all week...)
-
Came here to find out whether other people had the same problem or it was just me. Once upon a time, Tandy's artificial sinew was wonderful stuff. (Think 90s). I finally ran out, or low enough to want more, and got some a couple of years ago. The color is different. The stickiness is non-existent. I can't seem to stitch long before it starts falling apart. Trying to roll it back together, no matter how clean I wash my hands makes it dingy. If I manage to get something stitched without all these problems, it turns dingy or black just from exposure to the elements at shows in no time. (Yet it doesn't take a consistent dye to cover this). I have a little of the good stuff left for special projects. It's just one more thing they have managed to completely ruin over the last decade or so, as far as I can tell. Does anyone have any success stories, tips, or recommendation for a new supplier? I couldn't find my beeswax today, so tried paraffin. It marginally helped with the unraveling, did nothing for discoloration. Thanks, @Sheilajeanne for reminding me I could get just one candle at a show. Thanks in advance to anyone with recommendations.
-
@KYCat I am sorry, I haven't been actively checking my email used to register here. I guess I should change it. If you're still interested, I use 3-4 oz for items like journal and flask covers and necklace inserts, and 8-10 oz for belts, straps, barrettes, and even bracelets (though I am thinking of making those less sturdy/thick in the future). Slower speed makes a lower power burn through more. I am thinking about experimenting with whether faster speeds at higher power create less burning and how to measure this. I have opted for slower out of concern for the fact many of my patterns have a lot of twisting and turning on them, and high speed could result in jerking the laser head around more, and does create more over-travel as the laser changes direction. This is more important with raster images than vector cuts I think, but may still be a concern. With a program like lightburn, you can get a time estimate and discover that this speed induced over-travel can ADD time to a project as the laser travels farther on either side to change direction. But that's of topic... Not all laser controllers measure the speed/power parameters the same way. I have used full spectrum and glowforge, but it's been a while so I don't remember which is which, but some use speed as a percentage of full speed rather than a set distance per unit of time, and some use power as a unit rather than percentage. IIRC, full spectrum has a power option assignable to each color, and an overall percentage of power that is applied across the board, which can further reduce or fine tune your control output. Regardless, your two variables are speed and power, and you have to experiment around a bit initially, as well as from time to time as conditions, cleanliness, or other items change. On my laser (130w gweicke) I tend to run 30 to 40 mm/s at the power percentages I mentioned above. I guess to consolidate, 5-7 percent for cutting the tooling pattern to about swivel knife depth, irrespective of thickness of leather. 20-25 percent to cut all the way through 3-4 oz, and 40-50 percent to cut through 8-9 oz leather, including holes for stitching. If you use a ruida and lightburn, you may want to experiment with the minimum power output setting to prevent overcutting in corners, as it slows there, resulting in a deeper cut if the output remains constant. This is with light wetting, not actual casing. And painters' tape over stitching holes to lessen smoke/char. Those tend to really gather it. I have been told under a certain power output (some said 15%) there is no difference, but experimentation appears to contradict that. Once you run a test pattern on each thickness of leather, your parameters should remain relatively close. Just write it down or save your test piece. Hope you're having fun with it. *Note: "my" laser is actually a makerspace unit. My local-ish library has a maker lab and lasers. But the big private maker space has better equipment and less bureaucracy if something breaks. I did the math and realized I could be a member a long time before I began to approach the cost of buying my own. There was some initial discussion about my using it commercially, but I was able to demonstrate that I only really need to use it a few minutes at a time at relatively low powers so they've been happy to have me aboard.
-
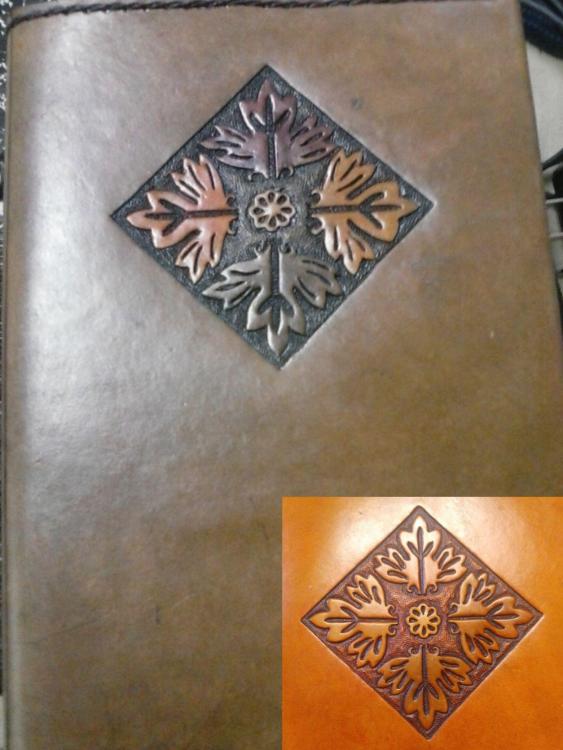
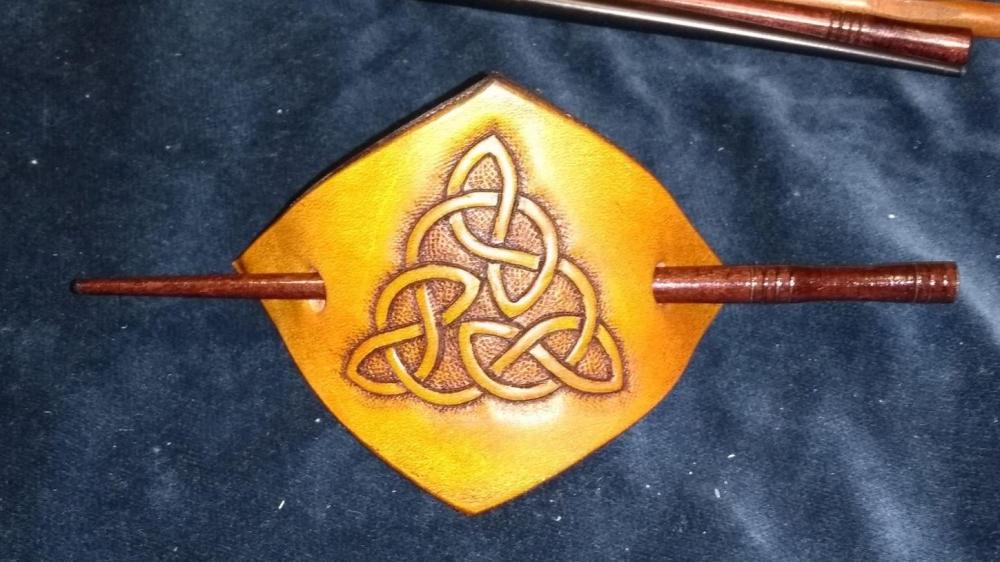
Yes. I tried lots of different ways over the years to transfer patterns to leather more efficiently. Running a laser with as low power as you can use to still mark the leather is definitely the best. Even then, as you will see if you are trying to score a line for bending, the laser cuts the outermost layer of the leather, which you may not want for folding. In the video above, the guy thinks he should lose focus for a thicker line. I understand his thinking, but he was hypothesizing without experience. Thinner is definitely better. You can easily run the knife along the markings. This makes a different sort of cut than just using the laser, because of the angle of the blade. But, you may find that experimenting with replacing the swivel with the laser is also fun and has a few benefits: It obviously allows greater production in less time. It allows more regularity - though there are pros and cons to that, but by the time you bevel you will get back some or a lot of the "human touch" - and can allow you to really test your ability to tool a *small* pattern. You can also go large and find yourself biting off a lot more pattern than you thought you were going to chew. Some tips I have picked up along the way, mostly through the school of hard knocks. Wet the leather first, not necessarily fully cased but enough to cut back on the burn. If you are going to have a deep cut edge or holes on a thicker piece, you may want to tape there with really low stick tape, though that has its own issues. Test cut every time. Try various power and speed combinations for both the pattern depth and cutting through. The laser will vary in power with lens cleanness, tube age, focus, etc. Also, you'll want to try to have the same degree of wetness on your test piece, which ideally will come from the same leather you are using. The lasers I use go about bevel depth at 5-7%, and cut through 3/4 oz in the 20s, 8/9 in the 40s or 50s. Cut the design first, then cut out the holes, then the edges. If you cut holes with the machine, you may find dye or stain bleeding through to the flesh side. If you use a liner, this is not a problem, but if it will not look good, punch by hand. I have not seen that it has caused any issues, but could argue that a line of burnt holes may be weaker than punched ones - don't put them too close together. It's also easy to put more holes than you needed, and therefore more stitching time than you needed, when you're designing. On the other hand, if you remember to mirror your hole-line and cut out the insides of the project, you can really save time and body pain, and have it all line up the first time. Rather than score fold lines or punch lines with the laser, make a tiny dot at the ends and use a straight edge to avoid finding that you have cut the epidermis and weakened a fold. Lasers can't supplant everything and by hand is still faster for some steps. Strike to the depth of the cut. Maybe use a patterned bevel and a heavier hand or mallet. The edge will be straight, like this: |/ rather than a V, if you don't use a swivel. You can dress it with a ball end or other tool to get some of the angle back. You might be in the habit of doing that anyway. You can use the burn as part of your pattern, it gives a nice contrast to it without staining/highlighting the whole piece. Once you've taken the time to set up a pattern and item, it's done. Sort of like making your own kits, with the caveat that you have to make the test cuts every time. --- I started my quest after speaking to a guy at a fair who "used to do everything by hand like you, but ... could only make [X] grand per year, so [he] started embossing everything with instead." I ceded the production time issue, especially as I am not able to do this full time at the moment, but really didn't want to quit tooling. I know some folks don't see the use of tech as art, but I think it can be, or we can resolve to meld them and do our best with whatever technique we light upon. I also have items that are completely traditional and always will be, and have a higher value because of it. For my business purposes, I am finding it takes both kinds to make it worthwhile at the moment. And I have fun either way. --- The pictures below are a journal cover cut by hand with an inset of one cut by laser, a lased barrette, and a small necklace. The first one is not a great example in some ways because the staining is so different, but it still shows some of the differences. The barrette was stained lightly, I don't have a handy pic of one natural. The last is just a small size pic either 20 or 24mm. That is not too small to do by hand, but it is more consistent to make a few without waste of time or leather with the laser.
-
Not necessarily a solution. I too had a black German Shepherd at one time. He couldn't resist a buck I had framed up for scraping. Fortunately, I suppose, I did manage to resist framing his hide up in place. At 90 pounds, he would have fit nicely. Wasn't sure he had enough brains to tan his own hide, though. Beautiful dog. Great one in a lot of ways, but he was a bit willful, and liked leather. Friendly to anyone not in uniform, oddly enough, maybe he just didn't like the way they approached. Gave him to a man with a farm.
-
Aging.... blurry vision when tooling
Ard Righ Art replied to chriscraft's topic in Leatherwork Conversation
I find shining a reasonably bright light on the subject really helps with focus, and was going to suggest that to the OP, but you already covered it more adequately than I would have. A lot of what my optometrist calls second order problems can be alleviated by fixing other ones instead. I finally got my shop set up with bright light from both sides, prior to that I would use a single lamp with a goose neck that I could move from my left side when drawing/tracing/cutting to the right for beveling/tooling. On the road, I just move a lamp from side to side as needed to avoid those pesky shadows. -
Cutting Leather With Laser Questions
Ard Righ Art replied to pillpusher's topic in Leatherwork Conversation
Jumping into an old thread. I met some guys at a makerspace using a CNC machine to rough out a 15th c. violin pattern. The maker commented that in the old days, the master would have had a shop full of apprentices slaving away bringing the instrument to the point it could be brought to him for finishing. He was merely replacing the shop full apprentices with a machine. One impetus in this evolution was a discussion with a guy who was selling bracelets by the truckload at a festival. He stated that he used to be a hand-tool only person like myself, but found that limited his time to only so much production per year, capping his income at [a figure that would make me happy]. Now he has a shop full of people who roll them off a belt embossing machine, cut them and snap them, and is able to make [well over 3x said amount]. Wow. I am a businessman, but I just don't want to go that route. After a lot of thought and experimentation, I have come to the point where I am content with using the laser to replace my swivel knife, and tooling from there. I have played with using it to cut out the patterns and add stitching holes, but with the machines available to me it has been faster to make a score and then cut by hand, so far. For instance, using the laser can cut the patterns for 18 bracelets at a time, but a strap cutter set to my index marks is still faster for cutting the bracelets apart from each other. I also found that casing the leather, at least lightly, cuts down on char and smell, but it does add a variable to the cutting properties. Other tidbits - I need to see if Corel's centerline trace function would save me a lot of time over using Adobe (expensive) or Inkscape's (free) edge trace functions, which require deleting the double line obtained by the fact that their functions see both sides of a line as separate lines. I have finally gotten settings that will cut or deeply score the edges, and hit about the right depth for subsequent tooling. Between the savings of time in layout, measurement, placing the pattern just so, tracing, and cutting with a swivel, I estimate I am knocking off about 40% of my time for an end result that is still clearly tooled. I can do it either way. My high end pieces are still hand done from start to finish. I have lots of interesting conversations with others when they ask the inevitable, "did you do all this by hand?" question. Very few people have been utterly dismissive, so far. If they are tempted, I grab a piece done both ways, and ask if the difference is worth the extra price. Though to be sure, I am not discounting the laser production as much as they would like, as it is a capital expense that has to be recouped. Here is a laser then tooled piece from about a year ago. Someone pointed out I had been lazy with the bevel marks and could have gone deeper with it as well. I need to make some contemporary photos to see if anyone thinks I have gotten better on that. -
- 20 replies
-
Thank you to all. I thought I would get email notifications of replies, but apparently need to work on that setting. There was a lot more on here than I expected when I logged in.
-
I think I have been letting things dry overnight at least between steps. Most of the time ;). At shows I have been known to fudge that but explain to the customer if I do. It seems to cure out in about a day even if I am too quick on the top coat. But that has always been like on like. Acrylics to acrylics or neat lac to spirit dyes. I think I will get some RTC, super-shene seems to have gone to skim milk the last several years, and the Eco pro finish isn't always cutting it, especially with mahogany stain. I did bend before dyeing this project. Yes there was a little wrinkling when flat, but not noticeable when folded. I also waited 24 hrs and decided on leather balm with atom wax. Somehow I've had the idea that wasn't a true finish, but my local Tandy guy suggested it. Because it was due too soon, and I was unsure how oil would darken the dyed portion, I didn't oil it at any point. I suppose I got a notion of exactly the look I wanted and only then began to try to hammer out the details. All in all, I think it turned out ok, no cracks. I may chase the owner down if anyone thinks the leather balm won't cut it.
-
The cracking occurs on bends or folds with the dye. I have not had issues with acrylics in the past, other than the propensity of cheaper ones to wipe off when finished or antiques and finished. Though I have never painted a full folds, slight bends have been fine with them, and the "professional finish" - also an acrylic based product - has seemed to stand severe folds pretty well. I cannot recall if I noticed any cracking with just the dye alone prior to finishing it. I will perform that experiment tomorrow. That's a good idea. Thank you
-
Thank you,
-
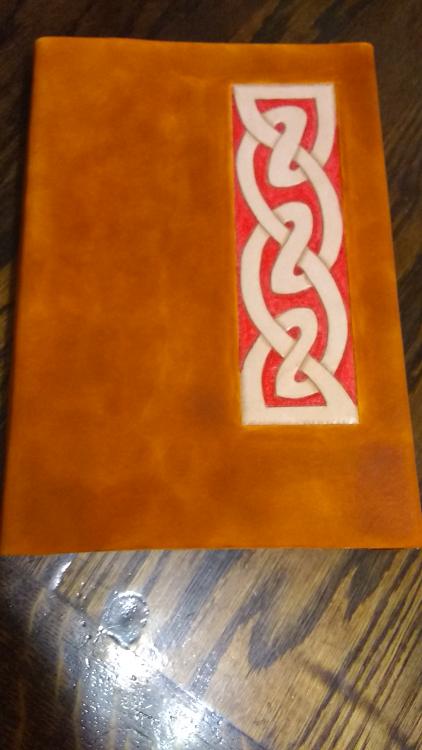
I have been working on a journal cover. After a small misstep, I decided the nice golden colour that Angelus offers would complement the pattern and colouring done with an acrylic ink. My problem is that I have found finishing the dyes with an acrylic, such as Tandy's Professional Finish, seems to lead to cracking when the leather is bent, at least in the handful of bracelets, barrettes, and small journals I have done that way. It also occurred to me that the dye had simply dried the leather, and led to the cracking. To try to alleviate this from either cause I have creased and folded prior to dyeing The dye contains denatured alcohol and glycol ether. I have considered finishing it with clear-lac, but wonder if that is a good fit over the already acrylic-coated tooled area, and have also read that it does not handle well with being frequently bent. I also would like to keep the resisted part as bright as possible. Any suggestions would be welcome.


