dikman
-
Posts
4,838 -
Joined
-
Last visited
Content Type
Profiles
Forums
Events
Blogs
Gallery
Store
Everything posted by dikman
-
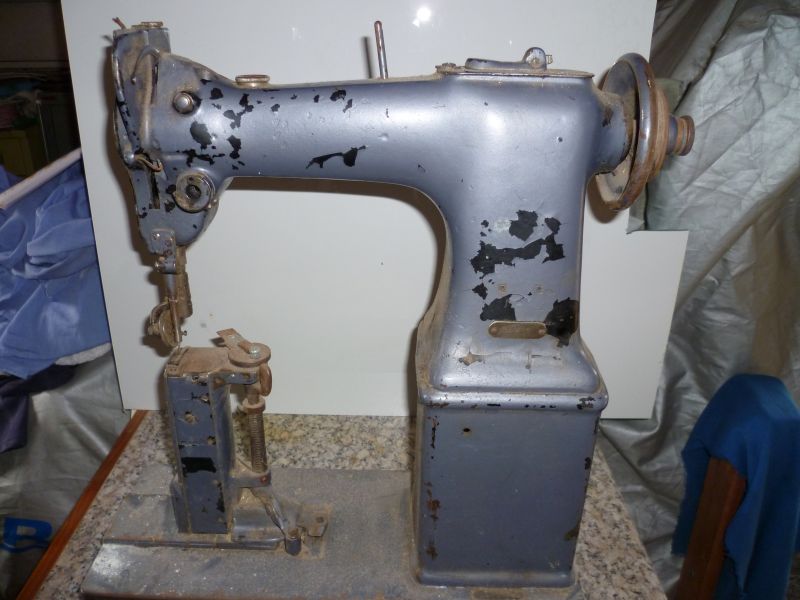
I found another cone-shaped spring that fits inside the original (!) so I've added that to give more tension. Seems to work at the moment, but when I ran some stitches on a single layer of 4 oz leather I noticed that if I pulled the bobbin thread (after I'd cut the thread off the machine) that it pulled through the top thread of the last couple of stitches. I'm wondering if the needle is making too big a hole. Except for that it looked good. I've also fitted a larger pulley to the handwheel. The original was 2 1/4" (inside groove measurement) and the new one is 5", so that has slowed it down quite a bit. It was still hard to start slowly, however, and would take off fairly suddenly. I then realised that with the motor off it was very hard to turn the handwheel, so I started looking at the clutch arrangement. Once I'd figured out how it was supposed to work, I got stuck into it. The friction material (asbestos?) is in good condition, but there was a high spot that was dragging when turning the pulley. The yoke it's mounted on looked like it was supposed to slide slightly, but was extremely tight. I stripped it down, lubed the slide and re-adjusted the support screws on the yoke. That made a huge difference, as it is now much smoother when it engages. If I can fit a slightly smaller pulley on the clutch shaft that should also help. A handbook on the motor would have been nice, but I can't find one. Yes, I know, a servo motor would be nice but they are rather expensive here, unfortunately. Next step is to locate some needles. It appears to use an obsolete class of needle, according to the people I spoke to, but they said to take in the existing needles and they should be able to sort out what I need.
-
Thanks Darren, I've seen your posts/photos on the Able 290 and wondered what you used. My winder has worked out pretty well and is mounted in the same position (the only practical place to put one). I turned down the bobbin winder shaft on the lathe and then found it only fitted one bobbin! Mine came with four bobbins, and they all had a different size centre hole, so I had to drill them out slightly!! I've also made an adjustable guide to keep a consistent spacing if sewing along an edge. I really need to experiment with making a decent presser foot next.
-
G'day Subelec, l too have all sorts of arcane hobbies, and have found that many things I get interested in have an initial steep learning curve. All part of the fun..... Yes, I too noticed that after applying the dye (Feibings spirit dye) the leather tends to go stiff as a board (although when making holsters this isn't a bad thing, as it helps keep the shape). I now apply a couple of coats of hot neatsfooot oil (make sure it's pure, and not "compounded" stuff), leave it for a day or so and then apply the wax finish. Lots of good info on this site - it's just a matter of finding it!
-
No worries, 25b (I didn't, for one moment, think you were trying to be a jerk).
-
In that case I'm happy to cede to your greater knowledge/experience. All this is still new to me and as I said I've been doing lots of reading, trying to learn something. It's most likely, then, that I've mis-interpreted what I read. I definitely recall reading about a type of thread that was more UV resistant, and the way it was written I thought that the V referred to that aspect. See, I've already learned something today .
-
What you're saying makes sense, electrathon. When I started (not very long ago) the guy at the leather place where I bought the leather said that's how to do it. Lots of videos and articles say the same thing, but I did wonder about the fact that I was cutting into the leather itself to do it. It does seem that, like many things, it's not set in stone, so I think I'll try using a creaser to give me my stitching lines. One of the issues that I've had using a groover is that if there's the slightest variation while dragging it along it makes it difficult to correct the "glitches", 'cos it's actually cut into the leather. Red Cent, I've already made my own roller (cost = $0) from a piece of aluminium stock that was the right diameter and already had a hole through the middle, bent up a frame and turned a handle down. Works fine for flattening stitches etc.
-
As I understand it, electrathon, the main idea behind grooving is to recess the stitches to reduce possible wear. When I first read that, it sounded fairly logical. But is it really necessary? Does it really do any good? I'm asking 'cos I don't know much about anything and am wondering if I'm wasting my time doing it.
-
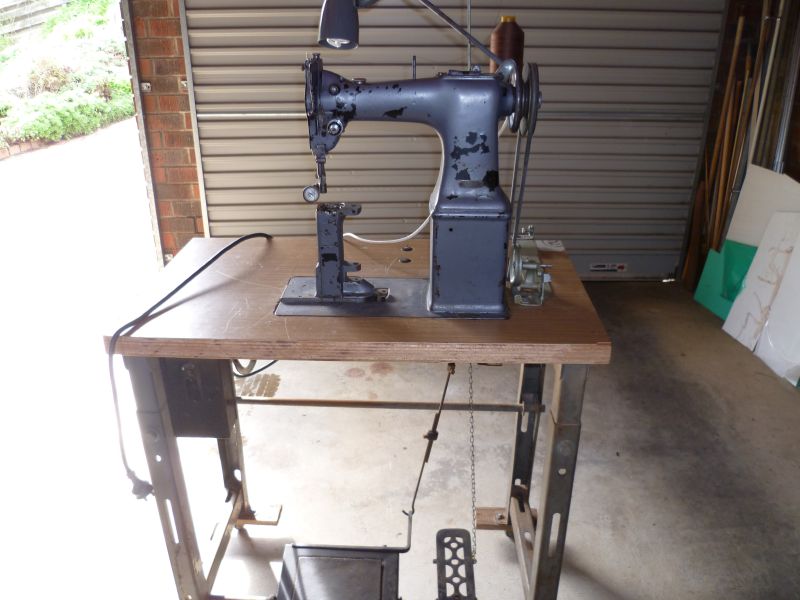
That's one of the things I like about it - the (very) basic, agricultural simplicity. I've modified mine a bit, put an adjustment on the springs that pull down the presser foot, smoothed off the teeth a bit on the foot, replaced the spring on the thread adjustment screw with a locking nut ('cos it tended to shift), made a table to give me a flat surface next to the feed area and I'm modifying a bobbin winder from a Singer 201K (the supplied one is a joke). A very useful little machine.
-
Thanks Wiz, I was wondering whether that could be the case with the coil spring. Looks like I'm not finished with it yet. Oh, and there's no thread release on this machine.
-
25B, can't remember exactly where, as I've been searching far and wide trying to learn about sewing thread, but I seem to recall that it was to do with a sailmaking site. Gore Tenara is definitely something that I came across (odd name).
-
No worries, mate. That one would require a fair bit of work to make it fit!
-
Well, I almost got it right...... Referring to the chart you provided, 69/T70 should measure .292 mm diameter, mine measures roughly .11 mm, so it definitely aint 69. I've contacted the seller to try and find out exactly what it is that they're selling. Oh, and further searching came up with V also being used to indicate a higher UV resistance for the thread!
-
"Standard" tensioner? What's that look like? The parts breakdown in the manual looks pretty much the same as my 201, so I just assumed it was the same type. If there's a better one to use let me know. It would be nice to repaint it, (Singer black and gold?) seeing that it's flaking off, but that may be sometime down the track. As it's an industrial machine I just assumed that the grey finish was par for the course. I'm thinking of making a small table to fit around the "post" so that I can also have a flat area to lay the work on.
-
Thanks Art (I think....). So, #69 refers to the Tkt size? Which equates to T70 (Tex), which in turn equals 630 Denier.
-
I went out to play with it a bit more, and think I've got it! I've identified three issues. 1. I wasn't holding the thread tight enough at the start (LumpenDoodle2 was right in that regard). This was allowing it to pull back into the shuttle. 2. It needs a lot more tension on the upper (needle) thread than I thought it would need. I'll need to look at my tensioner, as it's almost maxxed out tension-wise now. 3. There is a "bobbin case lever" to the left of the hook. Its function is to turn the bobbin case very slightly, at the right moment, to allow the needle thread to slide past the bobbin case. It looked like it was working ok at first, but then I noticed that there seemed to be a very slight resistance to the thread sliding between the lever and the case. I re-adjusted it slightly (we're talking 1mm here!) and that looked like the final piece to the puzzle. I ran a quick stitch on a piece of 4-5 oz. veg-tan and didn't look too bad. I then tried it glued to a piece of 7-8 oz, the first run was ok but the second broke the needle (mainly due to the lack of slow speed control). The larger pulley I fitted actually works quite well on thinner stuff, giving me reasonable control, but on thicker material it jams if I start real slow. If I can rig up a pulley reduction system that should solve that problem. So far it's cost me $36 for the neoprene for the belt and $20 for the junked 201K (for the tensioner). Not too bad, considering what the machine is probably capable of . Thanks for all the help, folks.
-
The title pretty well sums it up!! I recently ordered some "#69" thread. When it arrived I noticed that the spool is marked "210D", which I assume refers to Denier rating? I then spent some time looking at various conversion charts, and researching thread designations, and came away very confused!!! So, what does "#69" mean? Does it refer to Tex sizing? If so, that doesn't convert to 210D. I also expected the thread to be thicker, as it doesn't look much different, size-wise, to ordinary cotton thread that I have. And I thought needle sizing was confusing.
-
I have been holding the thread, but it still did it. I think, though, that the problem is definitely the top (needle) thread being caught somehow by the pickup hook on the shuttle. That would indicate slack thread somewhere. A bit frustrating, but I figure I must be close to getting it working - I'm just not game to run the motor until I know it will do a reliable hand stitch.
-
So, I've got it working - almost. Made a suitable tensioner from the 201K I bought, fixed the thread guides (missing springs), re-timed the shuttle and re-adjusted the needle hook, made a new drive belt from neoprene, fitted a larger pulley to the handwheel to try and slow it down a bit (original is 2" diam, new one is 4"), re-connected the pedal for lifting the roller wheel and gave it a good oiling. Oh, and I took to the table with a circular saw (much too big!). Running without thread it punches through leather quite nicely, and while it will do 1/4" it's really at it's limit doing it. I loaded it with thread (the bonded stuff that came with it) and ran it by hand to see what would happen. The needle picked up the bobbin thread ok, and watching the shuttle it appears to be working ok, but for some reason it seems to drag extra thread down into the shuttle (through the needle hole) from underneath the material. I can get a row of stitches, but when I remove the material there are about three lines of thread disappering down the hole! I'm a bit perplexed at the moment.......
-
Making A Fat/wide Awl Smaller And Narrower
dikman replied to NewYorkerInSydney's topic in How Do I Do That?
If the awl is made of good quality steel, then I'd be surprised if sandpaper or files would do much, as I would expect the steel to be hardened and tempered (if you can use a file on it, then it's what I would call pretty "ordinary" steel). An oilstone should do it, but it may take a lot of work. Best thing would be a water-cooled grinding wheel. If you use an ordinary bench grinder be very careful, as it will overheat the steel in nothing flat and basically leave you with a sharpened iron nail! -
For those who may be interested, the tensioner from my 201 has the same mounting system, i.e. a shaft extends from the rear of the tensioner assembly and slides into a hole in the machine body, where it's held in place by a locking grub screw. Main problem is the shaft is too short to lock in place. I located a used Singer 201K today (this is a later model than mine and has an electric motor) for $20 (!) so I went for a drive to grab it, as I figure just buying a tensioner assembly - if I can find one - would cost me more than that. I'll strip it for parts and dump the body, as it has no real collectable value, and this should give me a good supply of the various screws that Singer use. Extending the tensioner shaft is going to be a bit tricky, however, as the rear shaft is steel and is pressed into the front part, which is aluminium!! A bit more pondering is in order........
-
As the saying goes "great minds think alike", Constabulary . I have a Singer 201K hand-crank unit, and looking at the tensioner assembly it looks pretty similar, so I'm going to remove it today and see what it will take to fit it. The only other thing I don't have is the thread roller which fits below the tensioner, but it may not be necessary for my needs. If I do need it, then I'll make one.
-
Thanks Evo, that's the same as the one I already found .
-
Thanks guys. I've spent a fair bit of time searching the 'net, and there's not what I would call a lot of info about this particular machine. I've got the user instructions (which at least tells me how to reset the shuttle timing) and a parts list, but I suspect that this isn't going to be much use as I haven't been able to find any spares listed anywhere. I know it was made at the Bridgeport plant in the US, and is rated to 2500 stitches/minute!!! I got it hooked up to the motor (beautiful old motor) and had it running briefly - until the leather belt snapped! My biggest problem is the missing thread tensioner assembly. I will have to try and find something from an older Singer and adapt it to fit. The owner said something was broken, but it turned out that he was wrong (he admitted he doesn't know anything about it mechanically), I found that there is a locking collar (for want of a better description) on the top shaft, and this had been tightened to stop any rotation. I'm guessing that this is to help with re-timing the shuttle, which I have to do as I removed the drive belt while trying to figure out whether the problem was in the upper part or the lower shuttle area (at least this showed me where the problem was). It's a bit of a beast, but should do nicely for my needs, once I get the missing tensioner sorted. Plus the price was right, nothing but a lot of effort dismantling it all to get it home - that motor is heavy!!
-
A friend rang today and said he had an "industrial" sewing machine, was I interested? Of course, says I (although I was aware that many so-called industrial machines aren't. Anyhow, turns out it's a Singer 51W59, a bit the worse for wear and unused for a long time, as he said that "something broke" on it. I've got the machine itself and just have to arrange to pick up the table and motor assembly (I could see the Singer label on the motor underneath the table), So, can anyone enlighten me on this particular machine? Just noticed that the thread tensioner is missing.....
-
Thanks for the reply. I'm going to keep the stamping to a minimum (along the edge of the belt and holsters) so I think I should be ok. With my previous holsters I had to stain before stitching, as I was using a contrasting thread. These will have a brown thread on a brown holster so at least I can stain them after stitching, which should make the job easier. Yes, soaking and molding after staining does make the colour run slightly (and colour my hands!) but it actually worked out quite well, as it evened out the stain a little and gave it a slightly "worn" look, one of those little "accidents" that worked in my favour.