


particle
-
Posts
1,352 -
Joined
Content Type
Profiles
Forums
Events
Blogs
Gallery
Store
Everything posted by particle
-

This Week's Avenger Style Holsters
particle replied to particle's topic in Gun Holsters, Rifle Slings and Knife Sheathes
Thanks fellas - I was real happy with them. Haven't tried the thread lube attachment yet - wasn't sure how necessary it was. I would like to get a different foot though... And maybe the holster plate - the reinforcement piece tends to get in the way when I'm sewing the holster closed around the bottom of the slide area. -
Ladysmith Holster
particle replied to LITLHOF's topic in Gun Holsters, Rifle Slings and Knife Sheathes
IWB = Inside the Wasteband OWB = Outside the Wasteband Does your sister have a preference? Give us a link to a photo of a holster you'd like to make, and we can help you figure out how to make it. Google "Leather Holster" to start, then point us to the photo of one you'd like to mimic. -
Very nice! Love the color you achieved on the leather. The hardware is cool! Nicely done.
-
Show Me Your Backside Of Holsters Sewn With Boss
particle replied to particle's topic in Sewing Leather
Thank you sir - I appreciate the compliment. FYI - I finally got around to posting the final pics in this thread. http://leatherworker.net/forum/index.php?showtopic=22189&view=findpost&p=142221 -
Well, I tried a few new things this week - not the least of which is my new Boss stitcher. After hours of fiddling with test strips trying to get the tension right, trying to get rid of the loop in the thread and it being pierced by the needle, ripping out the stitching and doing it again, etc., they're finally done! Guess I'll start 4 more tomorrow. One of the things I tried with this batch is airbrushing the oil dye. I think I need to thin it a bit, as it kept clogging my airbrush - I'd have to run some cleaner through the brush, then go at it again for a few seconds till it clogged up, then clean it again. Doing these in a big batch revealed a lot of little tips and tricks (most of which I missed as I went along). Hopefully the next batch will go a little smoother now that I actually have a clue how to assemble these. Well, for the most part, at least. Anyway, enough babbling - here's some pics. The whole group of them. Counterclockwise from the top (all have Neatsfoot Oil Compound, and all use Fiebings Pro Oil dyes): Natural Light Brown Light Brown (Reinforcement Piece), Dark Brown (Body), airbrushed Black accents at edges Dark Brown, airbrushed Black accents - airbrush was messed up and kept spraying dye even when I had the flow cut off - came out too black Natural This is the first one I did - and revealed that I had little idea how to actually use my Boss tension settings. This is the Light Brown version. I LOVE this color. Way nice. Need to practice my belt slot edges (evident on all of them). I intentionally left the edges natural on this one, as I cut the stitch groove after I dyed them (oops). I actually kinda like the way it looks... Stitching was a little better on the back of this one. My favorite of the bunch... Kinda barfed on the edge when the dye bled onto the natural face of the sweat shield. Cut my belt slot a tad close to the stitching.... oops! And, the last one of the bunch.
-
Show Me Your Backside Of Holsters Sewn With Boss
particle replied to particle's topic in Sewing Leather
Okay - Denster's looks way better than mine, but I think I'm getting the tension closer. Here is the backside of a couple I did this week. The first in the group - note the inconsistent tension, needle thread showing through, etc. Ugh. This is one of the last ones I sewed after the excellent feedback from this thread, and after tightening the bolt on the thread take-up lever. -
FYI - that's a really good price. The last couple I watched before I bought mine (brand new from Tippman with the holiday sale discount) went for over $1,000 - one was obviously quite a few years old. I'd expect this auction to sky-rocket right before it closes.
-
Show Me Your Backside Of Holsters Sewn With Boss
particle replied to particle's topic in Sewing Leather
HS 98-3 (see attached)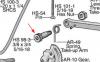
-
Show Me Your Backside Of Holsters Sewn With Boss
particle replied to particle's topic in Sewing Leather
Thanks for the compliments on the website. It's not 100% yet, but getting close. Want to add more details to the individual model pages with more options (maybe....), maybe shoot a video of me building a holster (since they seem to be hard to find on the net), process photos, etc. Most of all, thanks for all your help with the Boss stitches. I really appreciate it. -
Show Me Your Backside Of Holsters Sewn With Boss
particle replied to particle's topic in Sewing Leather
Okay - I figured it out. I was flipping through the manual and took a look at the schematic diagram. I noticed the thread take-up lever had an adjustable screw with a spring tensioner on it. I popped the back cover off and tightened the screw a bit, and not I'm not getting the thread loop problem anymore. Afterward I sewed on another holster and it worked fine. I guess it was dropping back down just a bit under its own weight after the stitching lever is retracted, so tightening the screw a bit helps it to maintain tension as the lever is moved. -
Show Me Your Backside Of Holsters Sewn With Boss
particle replied to particle's topic in Sewing Leather
I'll look tonight - not sure if the leather needles came in two sizes, or just one. My 10-pack will be here in a couple days - just shipped yesterday as they were back ordered. -
Show Me Your Backside Of Holsters Sewn With Boss
particle replied to particle's topic in Sewing Leather
Yes - still having the looping problem. Can't say what needle I'm using at the moment, but it's whatever it came with out of the box. But, I did order a 10 pack of 794 Size 200 needles along with a few different colors of 277 thread from the Tippmann site. Yes - both the primary and secondary have a full loop around them. I pulled the manual out last night and read it to make sure - the graphic doesn't look like they indicate a full loop on the secondary tensioner (not when compared to the graphic for the primary tensioner). But, I read the text instructions, and it actually says to go completely around the secondary tensioner. So, that's what I did (and was already doing). I think I may shoot a video, post it on my website, then send a link to Tippmann (and this thread too). -
Show Me Your Backside Of Holsters Sewn With Boss
particle replied to particle's topic in Sewing Leather
You should have gotten both pointed and chisel. I'm using chisel in mine. I was wondering about the bobbin thread too - it did seem different than the large spool of thread that was included. -
Show Me Your Backside Of Holsters Sewn With Boss
particle replied to particle's topic in Sewing Leather
Okay - I didn't get around to taking any photos of the stitches, but I sewed on a few more holsters that I started on last weekend. I think the bobbin tension was WAY too tight. I loosened it quite a bit, increased the presser foot pressure, and tightened the main tension a tad. Seems to be working much better now. Question - did Tippmann stop putting the thread guide on that's mounted to the left side of the casting - the last guide right before the thread goes down through the needle bar? Mine doesn't have one, and it's not shown on the current schematic on the Tippmann site - if I put my finger gently in the groove to put slight tension on the thread, I don't have the looping problem where the needle tries to penetrate the thread forcing me to push the stitching handle forward again to take up the slack. -
Show Me Your Backside Of Holsters Sewn With Boss
particle replied to particle's topic in Sewing Leather
Thanks - I'll increase the presser foot pressure tonight - probably lowered it too much to minimize the tracks left behind. I noticed my stitch length was slightly irregular - this is probably why. -
Show Me Your Backside Of Holsters Sewn With Boss
particle replied to particle's topic in Sewing Leather
Thanks Denster for the thoughtful response. Do you ever find that you have to press the lever forward again to pull the thread up tight and away from the needle? I try really hard to make sure I'm pressing the lever all the way forward until it stops (I even sew very slow to be deliberate about needle placement, strokes, etc.), then when I start to make the next stitch hole, the needle is about to penetrate the thread that wasn't pulled completely out of the way - so I have to press the lever back forward again to pull the thread tighter. Kinda annoying... I pushed the lever all the way forward (firmly) and tried to wiggle the thread take-up arm, but it didn't move, so I assume it's adjusted correctly. Without a trigger pull gauge, any tips on other ways to check the bobbin tension? Seems like with another sewing machine I've used in the past, you held onto the thread and dropped the bobbin carrier. It should slip a little, but stop under it's own tension. I realize the Boss bobbin design is different and you can't set it this way. -
Okay - I got my Boss, have practiced a bunch with it - at least to the point of using the entire sample bobbin that shipped with the machine, and even made a quick sheath for my round knife. I'm using the standard leather needle and thread that was included with the machine, which I believe is 277. Last night I attempted to sew my first holster with it. It's obvious I needed a little more practice... One thing I quickly found was that I needed to plan the direction I sew better as the heel of the foot dug into the leather pretty severely where it wasn't flat (was sewing an avenger style). I also think I need to use the overstitch wheel to mark my stitch locations so I can plan a little better for corners and such. Plus, this will allow me to possibly run the wheel over the back side of the leather to round up the stitches and make it look a little cleaner... Some places it looked like the bobbin thread wasn't being pulled up into the leather, while other places (and my practice pieces sewn in the scraps from when I cut out the holster pieces - same leather) looked just fine. One stitch actually skipped as I turned a corner - I ended up pulling all the thread and sewed the opposite direction through the same holes. Anyway, I'm curious to see what some other holster maker's backside (of their holsters....) looks like for comparison. Maybe since I've been hand sewing I'm expecting too much, but I still think it should look a little better than it currently does. I'll try to post pics tonight. Please show me yours if it was sewn on a Boss.
-
Sewing With A Tippmann Boss
particle replied to JeffGC's topic in Gun Holsters, Rifle Slings and Knife Sheathes
FYI - regarding my question about using waxed thread in the Boss - from the Tippmann FAQ page: 6. What type of thread should I use with the boss? Included with the Boss, is size 277 white nylon thread. It is bonded nylon with a left twist. Tippmann carries a full line of colors and sizes. If buying from a different source, make sure you purchase a quality thread. Polyester thread is also used widely with the Boss. Waxed thread and linen thread are not recommended. -
Sewing With A Tippmann Boss
particle replied to JeffGC's topic in Gun Holsters, Rifle Slings and Knife Sheathes
Thanks Denster - I just tried making a sheath for my new round knife so I could get a little more practice before committing my Boss to its first holster project. Once I was finished stitching, I used one of my clay modeling spoons and smoothed out the presser foot marks and flattened the stitches. Then, I decided to roll over it with the overstitch wheel. I think it looked better before the overstitch wheel... It looked cleaner and more consistent. Afterward, it just looked all wobbly-funked. Glad the clay modeling tools worked out for you. Did you find them cheaper than the regular leather arsenal of tools? It's been about 10 years since I purchased mine. -
Sewing With A Tippmann Boss
particle replied to JeffGC's topic in Gun Holsters, Rifle Slings and Knife Sheathes
I also just got a Boss, and would like to add an additional question (just logged on to post it, and saw your wonderfully timed thread). To answer #1, I would not suggest grooving the back unless you are sure of the groove placement. You can't aim the exit point of the needle like you can with an awl (obviously, but thought it was worth mentioning). I would instead get a test piece of leather that's the same thickness as what you'll be sewing, and adjust the stitch length until it matches your preferred over-stitch wheel. Once you're finished stitching, moisten the leather and run over the stitches on the back side to push the leather back down in the hole and round up the stitch a bit. That's my plan, but I look forward to seeing what others with more machine stitching experience have to say. 3) Can you use waxed nylon thread in the Boss. I just bot a big spool of natural colored waxed nylon for hand stitching, and would like to use it on a holster. Will this gum things up? -
Thanks Boomstick! My Boss should arrive today so I can finally start machine stitching! Wohoo! You're right - wearing them is extremely important. I admit, I am guilty of falling back on my daily-carry, which is a Kahr P9. It's just so small and light. Plus, my holster for the Kahr is IWB. I don't really have the proper cover garments to wear my 1911 OWB. The times I've worn this design around the house though, it was very comfortable (aside from the time I sat down and snagged the bottom of the holster on an arm rest and the beavertail rearranged my ribs... And you're right - it's been very educational to stick with one platform to learn with. It's allowed me time to focus on boning without the worry of learning the shape of a new gun. Thanks for the compliments - it's been a fun experience! I still need to see if there is a way to pull the gun in tighter to my body - but I think a lot of my problem is I simply don't like tightening my belt very tight. The curse of a desk job.
-
I was digging around in my control panel for my website, and noticed Concrete5 last night. Looks pretty cool! Glad to see your post saying you're pleased with it. The shopping carts - do any of them allow delayed payments? If I'm going to take an order for a holster, I don't want to bill the person until the holster is complete. I figured I'd just use my website to submit an order via a basic 'form' with drop-down option lists. I complete the orders in order of their receipt, then generate a paypal invoice once the order is complete. Do you have any examples of sites y'all have created with Concrete5?
-
Thanks Storm for the compliments! I love the colors of your coasters. Have you seen what these things sell for?? Definitely a good product to add to one's catalog... In fact, my mom and step-mom both wanted to buy a set, and I totally forgot till now! I think coasters are the perfect practice piece, especially when you consider being able to sell them when you're done! And thanks for the link to my blog! I haven't updated it in a while as I changed jobs in October of 2008. I don't get the opportunity to do many 3D renderings anymore, but that's a result of the slowdown in the economy. I think your coasters turned out awesome!
-
If you're already giving the guy a substantial discount, do not, under any circumstance, pay him a referral fee. By giving him a discount, you are essentially ALREADY paying him a referral. If your standard rate is $60/hr for your services, and you're only billing him $40/hr, that's the same thing as kicking back to him $20 per hour in referral fees. Tell the guy that you appreciate the referral, but you're already giving him a discount. If he wishes to profit from your services, he needs to tack on a percentage to your invoice and pass it along to the customer. You can politely tell him that out of respect for his business you have chosen not to advertise in that area. Sink or swim, and it sounds like he's looking for a life raft. I run a small drafting and computer 3D rendering service. If an architect comes to me and asks me to do a rendering for X project (which is usually how I get the work), I tell the architect I will charge $1,800 for the rendering. The architect usually takes my quote, files it away, then reports back to the client that the rendering will cost $2,000 (or more). I lost nothing - I still got paid what I thought was fair, and the architect got paid for doing nothing. Do I care? Not really, unless their increased fee causes me to lose the job, but I know what my time is worth at the end of the day.
-
Thanks Lobo - I'm just now seeing this response. I had forgotten all about this thread. I just ordered a Boss, so I can cut out the 4 hours of hand stitching time for each holster! I like your approach to selling items, and appreciate your thoughtful response. I'm curious how many people actually make a living out of building holsters. I'd love to, but wasn't sure how realistic it was. But, seeing how everyone is so back-ordered, it doesn't seem too unrealistic...
