Shelly
-
Posts
328 -
Joined
-
Last visited
Content Type
Profiles
Forums
Events
Blogs
Gallery
Store
Everything posted by Shelly
-
Well, I'll throw my hat into the mix here - I've read lots of variations on cutting fringe, and haven't seen one that mentioned how I do it, so I'll tell everyone, then I'll duck for cover! First of all, I do not 'add' fringe to shotgun chaps, etc, if it isn't supposed to have a double layed fringe, or, a different look, such as rough out leggins with slick out fringe, etc. When I do shotguns, (we'll use them as the example in question here, as this is probably most of what I do in chaps), I make sure I allow enough material on the leg beyond the zipper to accomodate the fringe. Once the chaps are basically finished, except the cutting of the fringe, I have a few basic tools for that job. First - I make sure my allowance is trimmed to allow for the length of fringe requested, (in the case of 99% of what I produce, that means the fringe will be cut at an angle, and will be at least 8" long) - I use a plastic triangle, can be purchased at most drafting supply stores, art supply, etc - this is not 'light' material - this has a 90 degree angle, with shortest side and middle length making up that angle, the longest side will be the 'cutting side'. The long side is at least 8" - this is the 'cutting edge', the 'zipper side', which I will lay straight on top of the fringe, against the bulge made by the zipper beneath, will be kept at the same angle thruout the process, which is perpendicular to the zipper, even at the top of my chap leg, where I always start, on both legs (the shortest side is at the bottom). As I cut each strip, as narrow as possible, I move the plastic down - this effectively holds the soft leather down under the plastic wedge, gives me a crisp edge to cut against and allows me to keep the hand that isn't working the cutter out of the way, and I use it to put whatever necessary pressure is needed to the plastic wedge to allow me to cut clean. I've never, ever, had a problem, or cut myself, doing it this way. I use a good rotary cutter - preferably one that can be used right or left handed, (I posted pix of the type of rotary cutter I like some months ago in a different thread, but don't recall which). By starting at the top, working my way down, and doing the same on both legs, it stays uniform from top to bottom, and matches as closely as possible, leg to leg. Obviously, there are many ways to get to the same place, and I know how each has developed a way that works best for them, and, once habituated, anything else can, and will, feel totally wrong, since it's not what we're used to doing. I have cut fringe with sharp leather shears, and did it as told in an earlier thread - start in, and let the shears 'glide' thru the leather, to cut. I've used round knives - have had many different ones over the years, and feel, for me personally, they are not the best tool for this process...and I try to have my knives super sharp, at all times. The last thing I would like to mention - rotary blades are wonderful tools - but, like any other blades, once they are dull, discard them and replace with a new one - your job goes a lot smoother and faster. And, to everyone that sharpens 'disposable' blades - I've known many over the years that did so, and took lots of heat in some shops I worked in because I would not do it - it's hard to do, number one, it's not worth the time you spend to do it, compared to the cost of a disposable blade (called 'disposable' for a reason), and you can seriously hurt yourself trying to buff or sharpen one, just to save a little - my advice: don't. If you feel you are not making enough money on these sort of jobs to afford to replace the rotary blades or disposables, or whatever, then you need to go back to the good books we have available on how to price your work so you can actually cover costs, expenses, overhead, salary, and profit. NOW - LET THE MUD SLINGING BEGIN!!
-
Also, 12 plait on the reins, with a 16 plait on the romal, makes for a nice, useable set that is good for everyday as well as show - collector type sets will be braided with more, finer strands...i.e: 24 plait
-
I use round leather cord for core material - same as what Louis Ortega used in his...(I have some of his core material that was measured off for reins, romals, and graded on each small tag - written in Rose Ortega's handwriting)...!
-
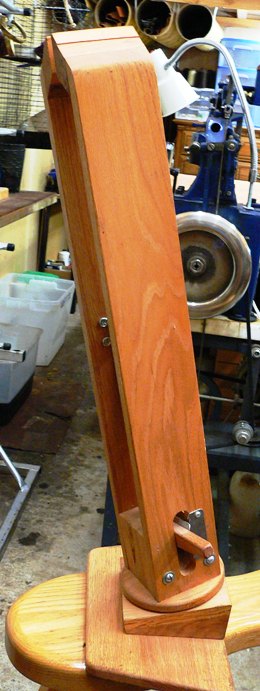
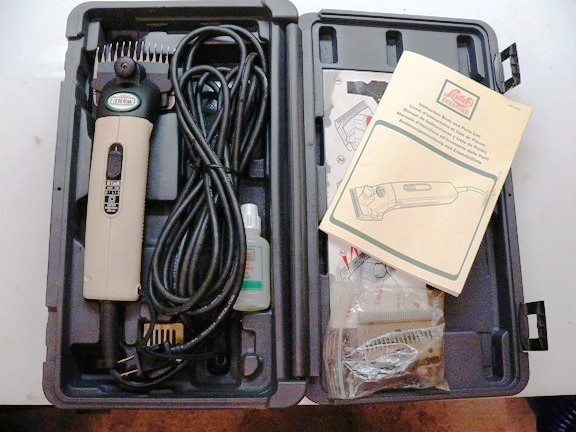
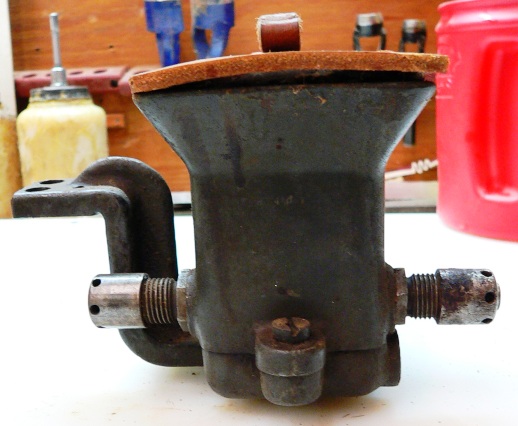
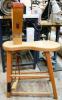
I thought I'd give a heads up to all here on the forums - I just listed 4 items for sale, after a total spring cleaning and rearrangement of my shop. I will post pix of my shop next week, once I have some of the 'little stuff' done... I listed a really nice stitch horse that I purchased about a dozen years ago thru Douglas - he had a good carpenter that was making them then. I don't need it, as I now have a new one, also bought from Douglas - new one is a regular Saddlers stitch horse, so I don't need two. I did use this old one for everything as well, and have been able to fit skirts into it as needed, just had to put them in to accomodate the strap and spring in the jaws, so it's a good tool for someone that isn't necessarily wanting a stitch horse for strictly saddle work... Also listed is a Stitch Pony, it swivels, and has a foot lever to lock the jaws, and foot platform to rest your feet on for stability - the jaws rest between your knees - a good alternative for anyone wanting a 'third hand' - I used this one for holding my braiding while plaiting, so I could watch a tv program in the evening after working in the barn all day with the horses - all in my previous life, before I went fulltime in the saddle shop. The third item listed is a set of Lister clippers - I had two sets, and decided I would sell this set, as I always use the other. This set is complete with case, a second set of blades, (a close clip and a set for wool), the instruction book, and oil bottle. In great shape, never dropped or damaged. (Can't say that about my other set - my helper dropped it on the head once!) The last item listed is an original Landis 3 wax pot, complete with the thread strippers in the guides. No bolts to mount it, tho... My user name on ebay is michellel8366 - if you search that user name, all 4 items should list for you... Thanks for taking a look!


-
My Toy Fox Terriers get to come to the shop....have a pen set up in here to keep them out of trouble - LOL! Main reason is the local mouse population - I have a pet squirrel, and the mice like the same stuff as the squirrel, so get into Sammy's food...last week, I did a spring cleaning, revamped, rearranged the shop. Sammy now lives up high on the wall in her big cage, and the mice now can't get there. But, I still have live traps set, and catch 3 or 4 a day...hence, bringing in my TFT's - they are big-time mousers, and, as icky as it can be, love to catch and eat these little varmints...! (Just try to get one away from them - not happening, once they catch it! They know what they smell like, and can entertain themselves at length searching for these rodents...! But, I do have to watch them, as they also like to chew on veg tan and rawhide scrap when it's on the floor, and I agree that it doesn't break down well at all. Have to be careful about plush toys as well - my dogs have a mission with new toys, and that is to find and remove the squeeker as quickly as possible, and don't need to be doing surgery to remove the plastic or the stuffing of the toy from the inside of the dog!! Shelly
-
Hi, I wondered if this was the same person....I have seen this in person! My husband and I have known Kenny Eppers for umpteen years, including his wife, Nancy. (I think since the mid '80's)... Great work, super color, and use of natural materials (horse hair, etc) When you posted the pic you did earlier, it made me think of this one, as I saw it last year in Waco, when we stalled next to Kenny and Nancy - our tack stalls adjoined at the end of back to back stalls there...fun people, and Nancy does some braiding, as I do... Thanks for posting such pretty work! Shelly
-
HI, Actually, I don't use the liquids - paste here, as well. I was really hoping you might have given them a try and had a comment or two about them...maybe someone else on the forum has used them, and can tell us what they do/don't like about them, and what applications they like to use them in. I've been having issues with some of the edge dyes...on my headstalls, personal goods, casework, etc, and saddles on occasion, if I dye edges, I can wait overnight before applying finish, and the dye wants to strip off on the wool pad, and muddy the tooling - pisses me off! I've tried really light applications, etc, and get the same results...one thing I tried recently that was interesting - did a belt for a customer, and, rather than using the same old steps as before, I had seen Feibings had a edge dye that has the sponge applicator, sort of like shoe polish - gave me the idea to try using a big Marks A Lot, with the real wide end - the permanent type. I used that on the belt, did my finish, and had hardly any bleedoff to speak of on the wool pad. I considered that almost a home run - pretty easy to apply, not messy, and after I let it dry a few hours, was easy to finish and it didn't muddy up the rest of the work...I was hesitant to mention this method on the forums, just because it didn't seem to carry over as 'very professional'...but, sometimes if it works...I wish I could find these markers in mahogany or cordovan...some type of brown...
-
Keith, Do you like to use the antique paste, or the liquid form of antique??
-
I own a Consew 256 - purchased it in 1984 - does everything from chaps to jacket zippers, and have sewn tons of strap goods on it, belts, headstalls, etc. I guess the only thing I don't like about it is that this model doesn't have a reverse. I purchased a Campbell awhile back and that machine now does strap, chap tops, belts, headstalls, etc...I like the stitch it makes much better. I think this Consew will be here forever - it will always have a niche!
-
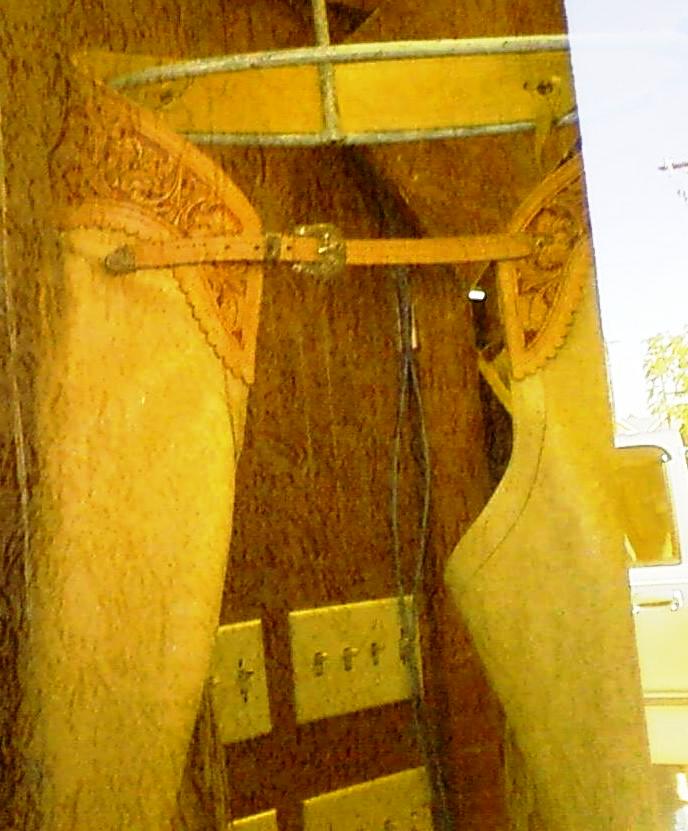
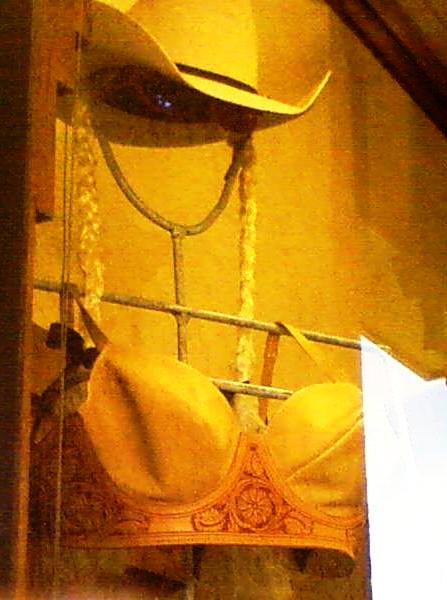
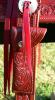
Well, here's my contribution to this subject - I'd said awhile back that I'd take a few pix of my friend's nice work on a leather bra, chaps, when he made his 'cowgirl' - these aren't the best, as I took the pix thru the store window, and it has the glass and reflection, but I think all can see enough to show his take on it...the store has the 'set' priced at $1700.00, and has had quite a few ladies try it on, no takers yet...

-
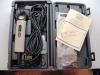
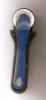
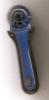
Most chap leathers are 4 oz or less, and soft enough to be a pain to cut with anything other than a rotary blade - I have several, and find the best one is one that takes a 1 3/4" blade, dials in from 'light to heavy', depending on the leather you plan to cut, and, because I'm left-handed, I especially like the ones that can be flipped over to accomodate either left or right use. My assistant is right-handed, so this is a plus...I don't remember if I purchased this one in the pix at the local Walmart (Sewing section), or from one of my supply catalogs...it is marked 'RS-45', made in Japan, and I think it has KAI on the handle...one of those logo sort of brand name things...might be able to see it in these scans... These can be flipped over, so you can see the edge of this blade on the line you want to cut on. the other styles of cutters don't make it as easy to work with as this version...I have several, and both of us will use this particular cutter over the others...so it's not just a 'left-handed' thing!
-
How long did that take you?? From the looks of it, she drives it a lot! Nice job!
-
I understand - I think I will do that on the next few I have to do with floral binders, which are coming up pretty quick. You do beautiful work, really clean, and the lines are great. I also noticed that you did this one without any welts at the leg cut - nor did you pull more slack to the back of the fork and cheat it there and have to lace it...very nice work! I assume it's about 7" high in the gullet, but that may not be a good measurement - depending on the bars, etc...I'm getting ready to build on a few of Jon's trees, and I'm hoping my end results will be a 'step up' in the right way! Trees are pretty enough to just not want to cover the darn things!!
-
Troy - I've never tooled the floral binders on the roll - have been wanting to do that, basically like you have said, to do the set stamps on the bench, and the carved binders on the saddle - is there a procedure that needs to be followed in order to keep the carving looking crisp, deep, etc?? I've wondered if the binder needs some type of block under it to support it as it's being tooled - I don't expect any problems with carving it in, the tooling part is my biggest concern....
-
Try this one - I checked my book and then checked for appliques in Bruce Grant's Encyclopedia...this looks like the right one to me. It's a two strand hair braid applique - you have to do these on scrap first to work out the spacing for the slots and the size of the strings you are using, as the pic if it on the saddle is tighter than the example of how to do the job... Pages 454 and 455 of Bruce Grant's Encylopedia of Rawhide and Leather Braiding
-
Marketing your item on ebay, craigslist, etsy............
Shelly replied to CollinsMS's topic in Marketing and Advertising
Interesting reading...I don't think he's been run off - I think everyone will have an opinion about this type of subject, and, if it doesn't agree with his, we should all happily 'agree to disagree', and take no slight from it... Personally, I am always interested in the 'inner workings' of admen, etc, and why they get paid so much money - same with building websites, etc - can we do the deed ourselves?? Probably - if we know what we want in the end...I like knowing if it's worth my time to do something myself, or pay someone to do it... -
OK - I've read thru this entire thread, and I have a question that doesn't seem to get an answer here...if I have a belt, or any piece that is carved and tooled, for that matter, all of my instincts tell me that it's not a good idea to 'soak' these pieces in vinegaroon, to get the black color, because soaking it thru is going to swell up the finish cuts, and generally make a nice carved piece look bad...the other thing I get from reading this is that by pre-treating the leather to make it black, I will probably not be able to carve and tool it afterward, either...? I have had a few requests for chap tops that are carved, stamped, etc, but they want them totally black, to go with the black chap leather, so I've not tryed this process as yet - I have used Fiebings dye, USMC black, many coats, let it soak in, then go back over with a light coat of oil and Tan-Kote finish. Unfortunately, it's not so great - the Tan-Kote wants to lift the dye in areas that the dye didn't penetrate as well, so I end up with some small areas that need touched up...I'm looking for a better way to do this, and thought this might work... I do like the idea of using it for dying my rawhide...also need a good brownish/tan, and I understand that Ortega used Rit Dye in Red for those projects that included a red highlight in the braiding...I need to go thru a book I have that has a lot of Indian lore, covers much of what they used for dyes on leathers and rawhide, etc...all natural, ground up and steeped in water, etc. Maybe Troy can tell me how he approaches carved/tooled/stamped pieces that need to be black??
-
Hermann Oak - Russet skirting...and just keep oiling until it gets dark....biggest problem I have is with slick leather, the grain doesn't want to take the oil as well as when it's carved, tooled, and stamped, as that 'breaks' the surface and oil soaks in fast - the skirts were cased and slicked out before they were fit, so the light areas seen just didn't want to get darker - this was oiled only on the lightest areas for 4 days and didn't change it much...I can only figure the fibers compressed enough to cause it to be such a pain...so, no dye used, to answer that question...
-
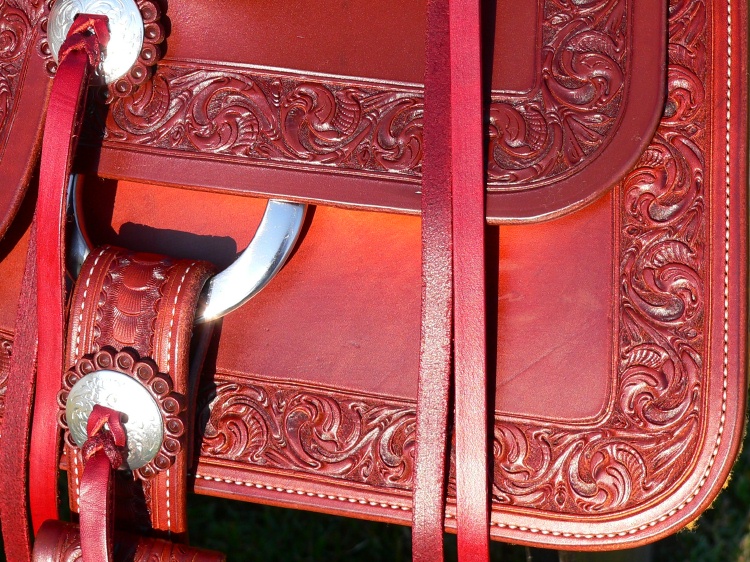
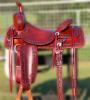
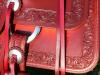
A few pix of a cutter I delivered last Tues...has an acanthus border, customer didn't want flowers, so I had been considering making a saddle with this design...sent him a sample by email, and he went with it. He already has at least a half dozen of my saddles in his barn, and this is the fanciest of them...basically, he orders the same setup - 7/8 dropped rigs, beveled stainless hardware, rounded corners (4" circ.)...so, half are RO/SO, a basket stamp or two, and a geometric design - that one has a stamp pattern his grandfather's saddle had - I did a rubbing from it, and had Barry King make the two stamps necessary for it...from an old Miles City saddle, so that's what we call it...! Now working on another reining saddle - not too fancy - but will be making this with square skirts, leg cut, inlaid seat, inskirt with beveled stainless rear dees, Nettles stirrups...will be building on trees ordered from Nikkel and Watsabaugh later this fall...

-
I buy boxes from a local company in Ft. Worth that makes custom boxes. I get U-line's catalog, and, although they have many items that are great for shipping - I could not get the kind of box I needed from them. I use a full overlap flap box, 275lb, rather than the type that the flaps meet in the middle. My feeling is that I owe it to my customer to ship their saddle in a quality, sturdy box, especially considering what the value of the saddle is - (usually more than $4000). FYI - I charge the customer for the cost of the box, figured into the 'Shipping/Handling' fee - the size I order is 30"x20"x20". Anything shorter in length than 30" is not sufficient. My skirts are never longer than 29 1/4" - I order my saddle boxes to accomodate the largest skirts, so I'm not worried that I won't have a box that's big enough, and I won't have to 'stuff' the saddle in there, possibly causing more problems than just saving me a few bucks on the cost of a box...last time I purchased they ran about $13.00 ea. I will save any good boxes that I get supplies in - for shipping smaller goods. Saves having to order additional boxes, and, if I need to send something Priority, the USPS will give you a 'Priority' box, in various sizes. With all these options, I don't have to purchase any boxes other than saddle boxes... I usually ship saddles with Fed Ex Ground or UPS Ground, with an average weight of 42 lbs...both companies will charge by the size of the box, as well as the weight of the box...I always insure for the full value (I know of shops that have had saddles 'lost' by both of these companies - and never recovered, then had hell getting reimbursed for the full value of the saddle shipped with them-these companies only want to pay 'wholesale' cost) Knock on wood, I've never had to go thru that...and, again, I have all of this 'built in' to the average fee I charge for shipping/handling...
-
-
Thanks for the compliment - I agree that the darker the leather is, the harder it is to see the carving - I do enough carving on cutters that the owner wants a very dark oil finish to know that the darker it gets, the more 'invisible' it becomes...anyway, the one I'm working on now, will possibly post here if I can get some good pix - (rain forcast for the next few days), will have a dark finish, and it's similar to these...have to ship it pretty quick, so will see how it goes for pix. Got one right behind that is a floral border, with the space for the carved area 1 1/16" wide. Entire saddle will have this border - a repetitive pattern, but pretty, and the men seem to go for this one - not so 'feminine'...will see about posting those pix as well...again, it's a cutting saddle, and the required 'heavy oil finish'!
-
I'm actually a Margarita girl, myself....! As to having a lot to say - what do you expect?? I'm female - most of (not all!) us are this way - personally, I've found most men to be very similar to what Jeff Foxworthy has said in his dialogs - 'We are very simple creatures! Give us a beer and show us something 'Nekked'!' (Just teasing all of you guys out there...!)
-
I hate tame roses on saddles, just because I've never seen any that are well done enough to make them look good - even the best ones I've seen don't make me want to do them! This is the best work I've ever seen for tame roses on leather - and makes me think that by doing the roses from photos - buds, half opened, etc, and different angles/views, I could possibly do a rose saddle...hmmm...do I want to do it and have to do it again...?! Might just have to put them on a notebook cover and see how that works out... I'm thinking that a photo can be manipulated within a computer program to give you a line drawing of what you are after, with the shading, etc - I've played with my Corel program when editing horse pix enough to know it's there - and now can see that it could possibly work with this type of application - also wonder if that is how Rick Bean gets his images ready to transfer to leather - his figures and scenes on his saddles are like b/w photos, but add in the 3D look that he gets by manipulating the image with the tools, etc. I'm not trying to oversimplify - maybe I am, as I'm just speculating...now my wheels are turning for a reining saddle with different images on it from every maneuver in a reining pattern...sliding stop, spin, circling, etc - maybe also images of the horse going thru the training process with the intro to the saddle, etc...also have some other ideas for a 'theme' saddle...might be able to do some of this over the fall and winter... Awesome work, Bobocat!! I would also like to come 'sweep your shop' for you for about a week or so!!
-
Mine's an Osborne 86 - has a thumb press on the right to open the roller to insert material, and a screw adjustment on the bottom to raise/lower the roller, and screws at the rear to adjust the roller so the material is coming into the edge of the blade at the proper place - I've found that I need to keep the roller about centered with the edge of the blade on whatever thickness I'm doing, do all string for a project before I change the settings, and do this consistently each time the roller gets adjusted to take another thin split - as it gets closer to the depth you are after, you must be careful that the roller isn't too far forward of the edge of the blade, as it will 'bite' into the string, and cut it off - does this more often with good rawhide string than anything - too far back from center (more 'underneath' the blade), just won't allow it to split much if anything) - just have to double check everything when you are getting close to the end of splitting them down to what you want. Then some practice strands are always good, sort of 'sacrificial lambs', so to speak, to make sure you have it splitting correctly... I think this style of Osborne Splitter adjusts the depth by twisting the handle - opening this up to insert material should be a matter of pushing the handle away from you. (I think! Had one like this in the last shop I worked in, but I didn't use it, as I had my own at my bench)...as for adjusting the roller in/out from the blade edge, I'm not sure...would have to see more closeup pix from the other side, etc, to say for sure...