-
Posts
25 -
Joined
-
Last visited
Content Type
Profiles
Forums
Events
Blogs
Gallery
Store
Everything posted by ValinorKings
-

How to wire rocker switch on Artisan servo motor
ValinorKings replied to ValinorKings's topic in Leather Sewing Machines
Trust me if I had the chance to I would have. When removing the housing it stuck pretty good and then came flying out unplugged. So never even had a chance to see it’s original state. Thank you so much for the explanation! I’ll give it a whirl when I get back to the shop and let you know it goes. Much appreciated! Also apologies for the thread mislocation. I thought I HAD set it up in the sewing machine topic section.- 2 replies
-
- wiring
- artisan toro
-
(and 1 more)
Tagged with:
-
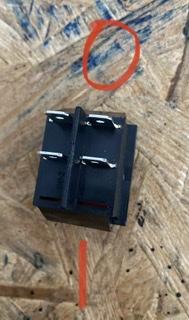
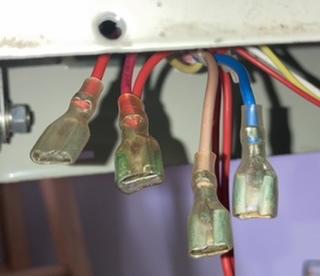
Howdy leather friends! I have an Artisan Toro 3000 that I need to replace the on/off rocker switch on the servo motor. I got the switch housing, exact same one, but i can’t figure out how to reconnect it. 4 prongs, 4 wires. 1 red, 1 double red, 1 blue and 1 white/ taupe(?). I’m not electrical savvy in the slightest so please forgive my ignorance. I’ve included some pics of what I’ve got. Thank you in advance!
- 2 replies
-
- wiring
- artisan toro
-
(and 1 more)
Tagged with:
-
I'd definitely recommend Jeff at Grey Ghost Graphics for a stamp if you want your actual logo and not just the traditional "maker" stamp. He is a great dude and mine has been kicking ass for some time now.
-

My take on a fanny pack
ValinorKings replied to ValinorKings's topic in Purses, Wallets, Belts and Miscellaneous Pocket Items
Haha not real sure why ants... It was the clients request, so I obliged! Thanks for the kind words too! -
Just finished this up and I'm super happy with how it came out. Especially the rich finish. It's kinda hard to tell but it's covered in ants. And I couldn't find an ant stamp so every single one of them was hand carved one by one. It was reeeeal fun... Haha. The inside is "upholstered" with faux lynx fur, fancy touch. Let me know what y'all think!
-
Some of y'all might have already seen this in the "Show Off" section, but I figured I'd put it where it belongs. For anyone to whom this is new, know this: This will NOT be used by anyone, it was just sort of a practice run to see if I could do it. Hence, no mounting hardware. So don't worry, haha. Feel free to critique and/or question away! -Seth
-
Special thanks to Seth and Tom at Tandy in Winter Park for the help with this tough ass cuff And in case anyone's wondering, the finish on this ID case is just neatsfoot then Eco Flo Green Tea Hi-Liter sealed with Saddle Lac. Came out pretty awesome, with the natural leather peeking through and whatnot. Take it easy, y'all!
-
-

Here we go! First seat all done!
ValinorKings replied to ValinorKings's topic in Motorcycles and Biker Gear
Thanks a lot for all the encouragement, y'all! And yes this was just a practice seat so no one will be riding it. I should have mentioned that more clearly, haha. Thanks again! -The Wolf -

The humble beginnings of my first seat.
ValinorKings replied to ValinorKings's topic in Motorcycles and Biker Gear
Thanks Troy! Yeah there are a few things that got realized "in retrospect" but that's the fun of learning. Luckily this is just a demo seat so no one will actually be riding this... At least not that I know of! I also happened to use like 7 oz leather which I found was a bit thicker than necessary so it would be pretty strong... Maybe, haha. Thanks again man! -
I can honestly say I'm a lot more happy about how this turned out than I expected. The pan is a bit flat for my taste, but it was the cheapest I could find on eBay and this was just so I could test my abilities. And sorry for the blurry sideshot. Let 'er rip! -The Wolf
-

The humble beginnings of my first seat.
ValinorKings replied to ValinorKings's topic in Motorcycles and Biker Gear
Thanks y'all! Yeah I'm really happy with that stamp. Got it from Jeff @ GreyGhostGraphics.com He's a super nice dude and it was only $65 using MY custom artwork! -
I know the holes are a bit wonky but be gentle, haha. I've never had to punch so many holes one at a time! Freshly carved After some neatsfoot oil Stained, antiqued, and saddle lac'd I should have some final product pics up by tomorrow! Thanks y'all and I welcome any tips or critiques, as always. -The Wolf
-
I think it looks excellent Dave! They should like that design, it's modern old school just like their bikes. The sparrows are a deeper cut into traditional tattoo flash than most people are familiar with and you translated them wonderfully to leather. A+++ as always. -The Wolf PS- I tried that modified basket weave you suggested with a florentine lace and it came out awesome!
-

Handbags for the neices
ValinorKings replied to resqman's topic in Purses, Wallets, Belts and Miscellaneous Pocket Items
I know I probably don't have much room to be giving advice as I'm about as far along in leatherworking as you, but I can say that this forum will be invaluable as I have also taught myself everything I know so far, with a good deal of help from all the great and talented crafts people here. I feel as though I have progressed pretty quickly and what I can most attribute that to is practice, practice, practice! I probably pound leather at least 3 or 4 hours everyday some days 10 or 12 (yikes!). You might not have that kind of time and that's ok. Just keep it up, because that's definitely what helped me. Just having the tools in my hands so often. A lot of the things I was confused about ( like walking the tools, how to properly use a veiner or camo tool, etc) all eventually just came naturally with repeated use and that's about it. Anything else that I just couldnt get or got impatient with I learned here. Keep it up and cant wait to see more cuz it's looking good! -The Wolf -
Haha, i was afraid that wouldn't go unnoticed. I actually DID dye and burnish the edges, I just got so stoked to take a picture that i did so before I even finished it, haha. Thanks!
-
-
Lookin' good as always Dave. Those are some perfect straight lines and I love that FAT lacing! Is that just single loop with a huge lace?
-

Some recent stuff
ValinorKings replied to ValinorKings's topic in Purses, Wallets, Belts and Miscellaneous Pocket Items
Thanks a lot Dave! It's actually the standard Craftool backgrounder. Funny story, that was one of my first pieces and at the time I only had the "basic 7" tool set and the background tool it came with was the small one you would normally use for corners and such. Since that was the only one I had I did the WHOLE background with that tiny tool! It took the antigue (eco flo gel antique) nicely since it was such a small background pattern. Thanks again man! -

exile
ValinorKings replied to Kevin King's topic in Purses, Wallets, Belts and Miscellaneous Pocket Items
Awesome work, man! Is that a commissioned piece for Exile? If so, how did you score that?! -

Please help! Motorcycle solo seat question!
ValinorKings replied to ValinorKings's topic in Motorcycles and Biker Gear
Thanks a lot man! That totally makes sense. I'll let y'all know how it turns out! -
Ok so I have all the supplies I need and I pretty much understand everything about what goes into this project EXCEPT one very important thing: How do I attach the side covers to the actual seat pan? I've thought about an eyelet lacing system and I've heard tell of riveting it to the pan (a la Paul Cox). The pan is 10g steel. I feel like the riveting would be the strongest but if so I gotta admit I have no idea how that process works. Do I need to drill the pan? Is it necessary to use a pneumatic rivet gun? Aside from that one detail I got it down. Any help would be greatly apprectiated because there is NO GOOD HELP on the internet or anywhere that I could find. Thanks y'all!


