azrider
-
Posts
450 -
Joined
-
Last visited
Content Type
Profiles
Forums
Events
Blogs
Gallery
Store
Everything posted by azrider
-
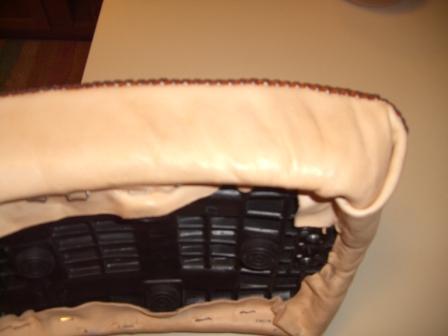
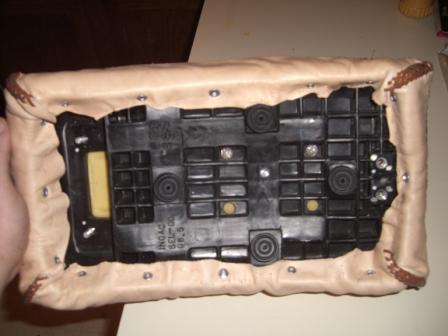
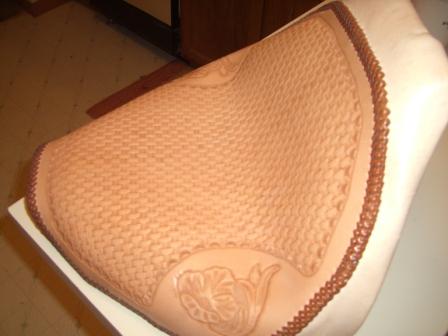
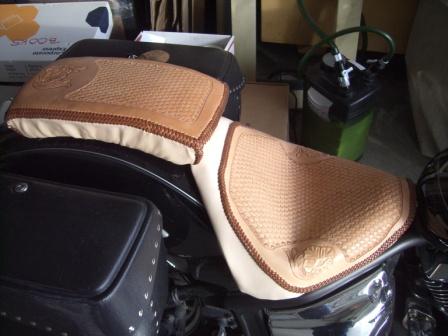
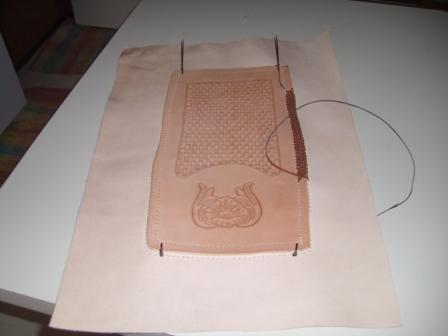
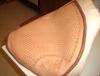
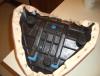
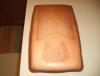
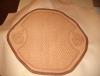
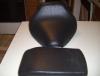
Well I ended up reattaching they pylon to the pan. I continued the mexican basket weave down the corners, and cut a lot of extra leather out of the corners as well. Since the staples didn't work, I bought a riveter. I drilled holes in the pan with no padding or leather on it, and then went and streched the leather while dry to attach it. You can see the diffrence in the first two pictures. For the drivers seat, I never even got the leather wet. I drilled holes in the pan again, and then riveted the leather in place. As I assembled it, I realized that removing the stock foam and putting less foam in the seat changed the way the top fits. At this point I didn't want to go back and redo the entire seat, so I will live with it. There is a picture of the top and bottom of the seat, and one of a test fit of the unstained seats on the bike. There are definate areas for improvement, but the construction went well over all. I am going to start staining and sealing them today.


-
Nicely done. What finish did you use on it?
-
Thanks McJeep. Its for a Yamaha Vstar 1100. I traded my sportster for something that was a little more comfortable for long rides. I think I am going to redo the mounting of the leather on the pylon. I was hoping to mount it with out any wrinkles, but ended up folding the corners like wrapping paper to smoot out the wrinkles. I am going to cut the excess leather out, and stich the corners from the top to the base to sooth them out. I also need to get a rivet gun, as the heavy duty staple gun I have just didn't work out. More pictures to come, and hopefully this week I will get the main seat covered.
-
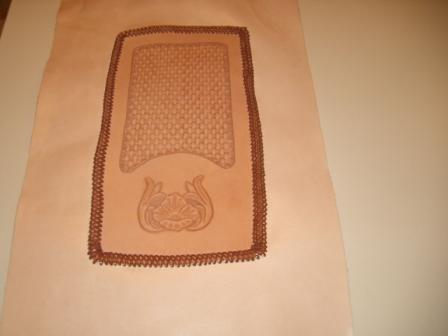
I finished lacing the top pieces for the driver's seat together. To give you an idea of size, the piece is about 14 inches wide. I took the leather for the passenger pylon and dipped it in hot tap water. I wiped the top with a sponge to makes sure there was no spotting, and let it dry for about an hour before I started working with it. I spent about 30-40 minutes getting it in place, and had some problems getting the wrinkles out. If I ever do one of these again, I will cut and stich any side with corners, to make it closer to its final shape. I ended up just folding the leather.
-
So I am recovering the stock seats on my motorcycle. I grew up riding horses, and wanted something that reminded me of an old saddle. I am reusing the foam on the passenger pylon, and re-foaming the monstrosity of the drivers seat. (With the foam off the pan, I sit 3 inches lower, and 2 inches further back. It will make the bike a lot more comfortable.) I tooled the top for the pylon out of 6-7 oz leather, and the sides are 2-4 oz. This is my first attempt at any serious lacing. I had two questions for those that have done this before. 1) Do you glue or attach the top piece to the foam? The stock pylon was not, but the drivers seat was glued. 2) How do you soak the sides to do the wet wrap? I don't know if the top should also be soaked. Any insight would be appreciated. Here are some pictures of the work so far, and what the stock seats looked like.


-
Thanks for the suggestions. I need to work more on the beveling, and have been having trouble with keeping that smooth. I used a smooth bevler on the carvings, but used a checked on around the circle for the backgrounding. I just got the checked one, and only have it in one size, so didn't want do this one with it yet. This was also the first time I tried carving the lettering instead of stamping it. I ended up doing all of the letters with a really small bevel. One question, I have a modleing spoon tool I got with one of the "standard kits" when I was getting back into leather working. Every time I tried to use it, it burnished the leather much darker then areas where I didn't use it. Is that normal?
-
This was my first attempt at figure carving. I traced the design from an ad, and gave the shop the piece. It was fun to do, but has lots of room for improvment. Suggestions welcome.


-
This is awesome. I am getting ready to do some leather for my bike and will be doing all wester styled, and looks like I will be using Saddle Tan. (I have been trying out other colors to see what I wanted.) What did you use to seal the leather in case it gets rained on or anything?
-
Thanks for the suggestions. Dave, you suggested not using slits for these projects, which makes sense. Would the diamond shaped holes made by a four prong punch have the same issues? I noticed on all of your seats you use a round punch, what size is it? I have some Fiebings dye, but want to check out thier antiquing gel and the leather balm with atom wax. I think the store I have been going to in Kansas City can get them. (Its almost two hours to the nearest Tandy from my house.)
-
Thanks for the suggestions. No pictures yet, as I am still planning. Once the bags get here, I will measure out what I need and get the leather ordered. As far as the color, I will be going for a brown with these. Like the color of the Acorn Brown Eco Flo, but like I said, concerned with the durability.
-
Too much at once? Anything would be helpful. I talked to a shop in Kansas City, and he said to use the eco-flow with saddle sheen over it. Not sure how that will hold up long term. I ride about 8000 miles a year, so it will be getting used more than looked at.
-
Well, I got a new (to me) bike a few months ago. Since its too cold for this desert rat to ride in Kansas right now, I want to do a few things for the bike. I was hoping for some suggestions on how best to make them. Going for a western saddle kind of look on all the gear with floral and basket weave. Seat- Plan on recovering the original seat and pillon. Going to use the stock covers as templates, (maybe trim down the foam a little in the back) and lace the pieces together. Grips- stamp and punch holes in them. Lace them up. Bags- bought a pair of LeatherLyke bags off ebay. They are salvage recovery, and have road rash. Planning on pulling all the vinal off and using it for a pattern. Will lace the pieces together, and bond them to the plastic shells. Tank Bib- Make pattern, stamp, and glue felt to the back. Lace edges. So some questions: 1) Finish. I have been using Eco-flow Antique and Fiebings black dye. I would like these to be antiqued with black on the background of the pattern. Do I need to get a diffrent type of antique since Eco-flow is waterbased? What should I use to seal the leather that will hold up to occasional rain and not ruin my jeans? Do I need to do anything with the back side of the leather? 2) Glue. What would work best for glueing the leather to the ABS plastic shells for the bags? I should be able to lace it most of the way around the bottom, but there will be a gap, and the leather will work best if attached. 3) Lacing. Are grommets needed? This is for the seat, bags, and grip covers. Thanks for any and all suggestions.
-
Thanks everyone for your tips and suggestions. I am starting another project today while the finish on this one dries so I can keep practicing. Didn't get a thumbprint tool, but did get a smaller pear shader so that should help. Going to keep making practice pieces until I like the results. (and I already screwed up the dye on this one.)
-
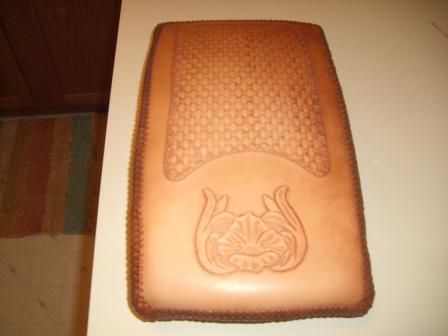
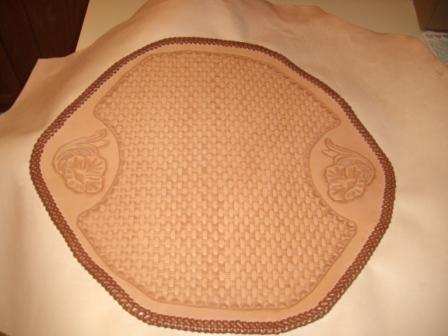
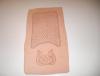
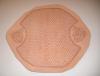
Here is the second one. I think I actually like it better with out the backgrounder. I am going to leave one of each, because that should make it easier to figure out which side is the front of the checkbook. One question, any suggestions to make the flower center look better? The seeder I am using (I think that is what it is called) does not look all that good. This is also the first time I have done a basket weave pattern. I don't like the way the edges came out, and after looking on here, I see a lot of folks use diffrent tools along the edges. What type of tools/ paterns work best? Going to start with the dye and the finish today. Will post pics of the final piece in the critique section.
-
Odd question for a leatherworking forum, but I figured someone on here has go to know. My wife and I just bought a used leather couch. There are some marks from permanent markers on the leather, and a gum stain on one spot. Is there something that will remove these without damaging the leather? Thanks for your help.
-
Thank you for the tips. Is it better to cut from the center out, or from the outside to the center? I actually cut this with a ceramic blade for my knife. I bought a bunch of tools from someone who was getting out of the hobby and the ceramic blade was in there. It made a huge diffrence, and my steel blades were not dull! What does the "thumbnail" tool that is mentioned on this site look like? I have a tool that looks like a beveler, but the tip and the surface are rounded like a pearshader.
-
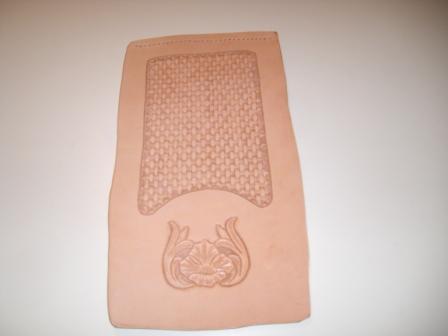
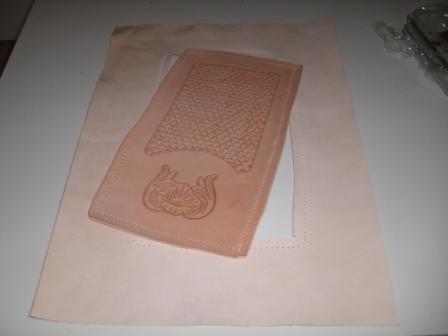
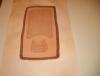
So after looking at everything else on here, I am embarassed to post these, but I need to practice to get better. I want to do a motorcycle seat with floral and basket weave, so I am making a few check book covers that will let me practice. Here is the first ever flower I have tried to do. I am going to start the mirror image soon, and really need to improve the decorative cuts, pearshading, and useing other tools for texture. Any and all suggestions welcome.
-
Very nice work. How did you do the finish on it? Curious as to what will be durable as a seat and last for a while.
-
Thanks for the welcomes! I have not really done much with any leather working in the last few months, so tonight I pulled out my stuff and finished stamping the belt I started a few months ago. I also made a key ring with a basket weave pattern. I have never been able to get the spacing right on that tool, and the post in the stamping section helped. I forgot how much fun this is.
-
Just want to say thank you. I have never been able to figure out the spacing to use the basket weave tool. This helped.
-
I have done a few projects with leather in the past few years, and did some as a kid and in boyscouts. I have been having a lot of fun with it, but am still very much a beginer. I do love the fact that no one has a belt or wallet like mine, and am really looking forward to more projects. Here is a wallet I finished about 6 months ago. It is a Tandy kit, and is well broken in now. My current project is a belt. The blank was purchased from tandy, and I messed around to come up with this pattern. I am going to put a sealer on the raised edges, and then us antiquer on the rest of the belt. I was very excited to see some posts of people doing motorcycle seats and bags. When I put the bike up this winter, I am going to build some bags and recover the seats. Looking forward to learning a lot here.