Dave9111
-
Posts
63 -
Joined
-
Last visited
Content Type
Profiles
Forums
Events
Blogs
Gallery
Store
Everything posted by Dave9111
-
Binding with a right angle binder on a walking foot machine
Dave9111 replied to Dave9111's topic in Leather Sewing Machines
I was looking at Sailrites binder. It says its suitable for gentle outside curves. They only have a straight binder for sale. No right angles which I have been told is required for tight inside and outside curves. But they do have heavier bias tape, which Rochford does not. Rochford only has straight cut tape, which seems strange. Perhaps I need to simply buy some of Sailrites bias tape and try that with the binder I have. Im going to drive right by Sailrite tomorrow. I think Ill place a pickup order and try and get it tomorrow. But I wont be able to try it for several days since Im driving to my daughter's house in Chicago. -
Binding with a right angle binder on a walking foot machine
Dave9111 replied to Dave9111's topic in Leather Sewing Machines
Ill look. I buy from Sailrite occasionally. They are about 45 minutes from me. Good idea. -
Binding with a right angle binder on a walking foot machine
Dave9111 replied to Dave9111's topic in Leather Sewing Machines
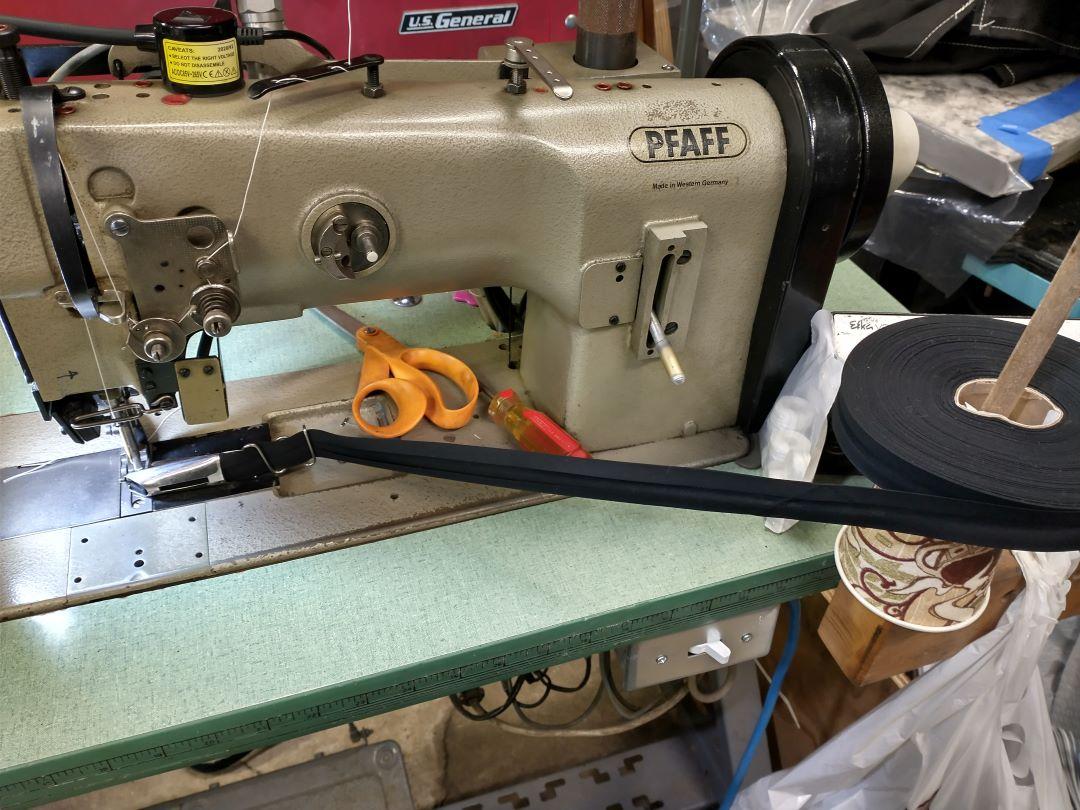
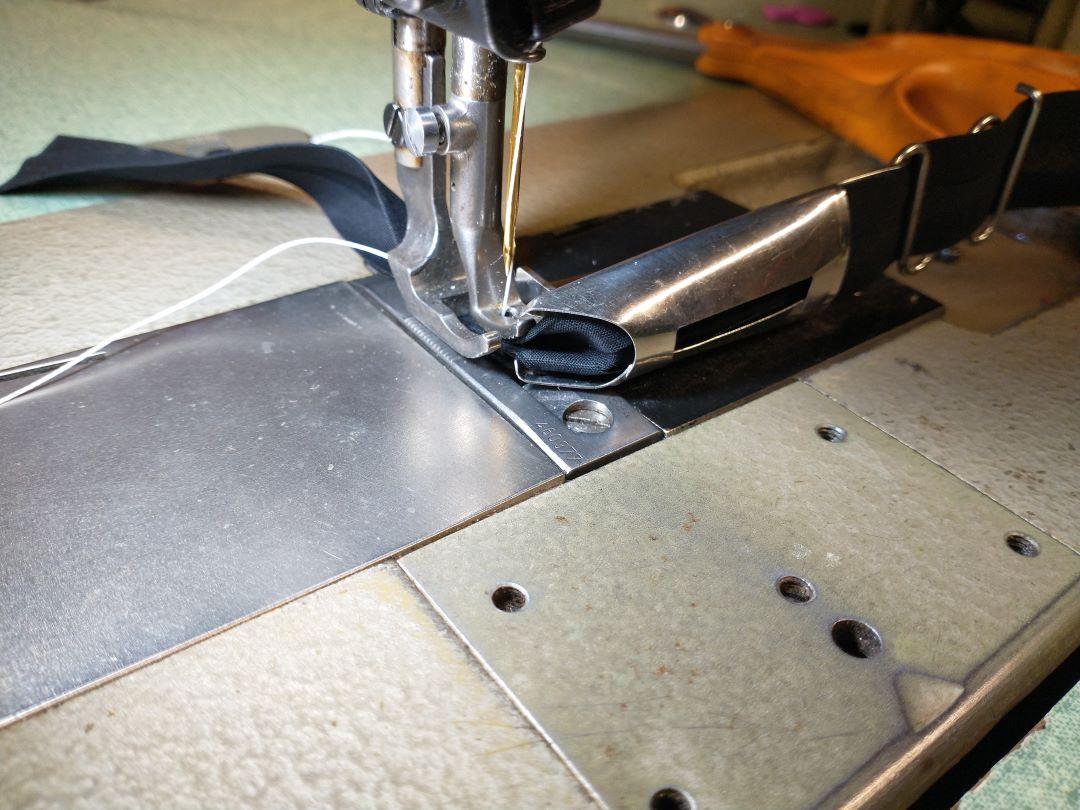
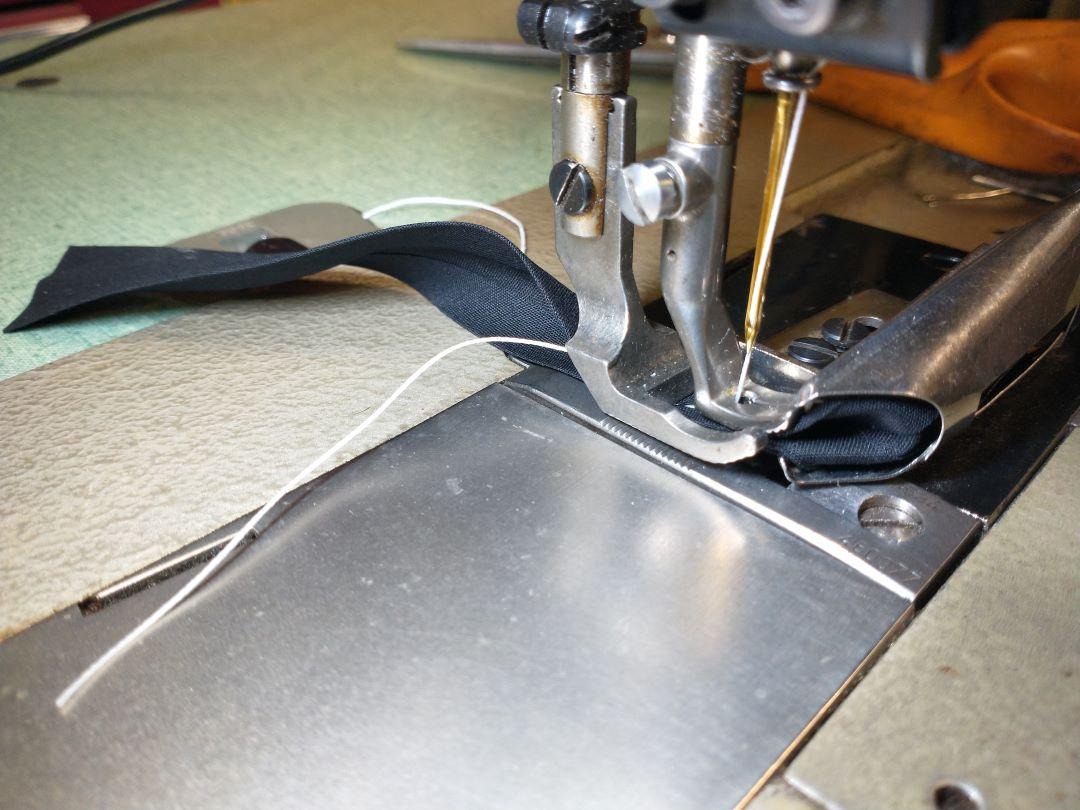
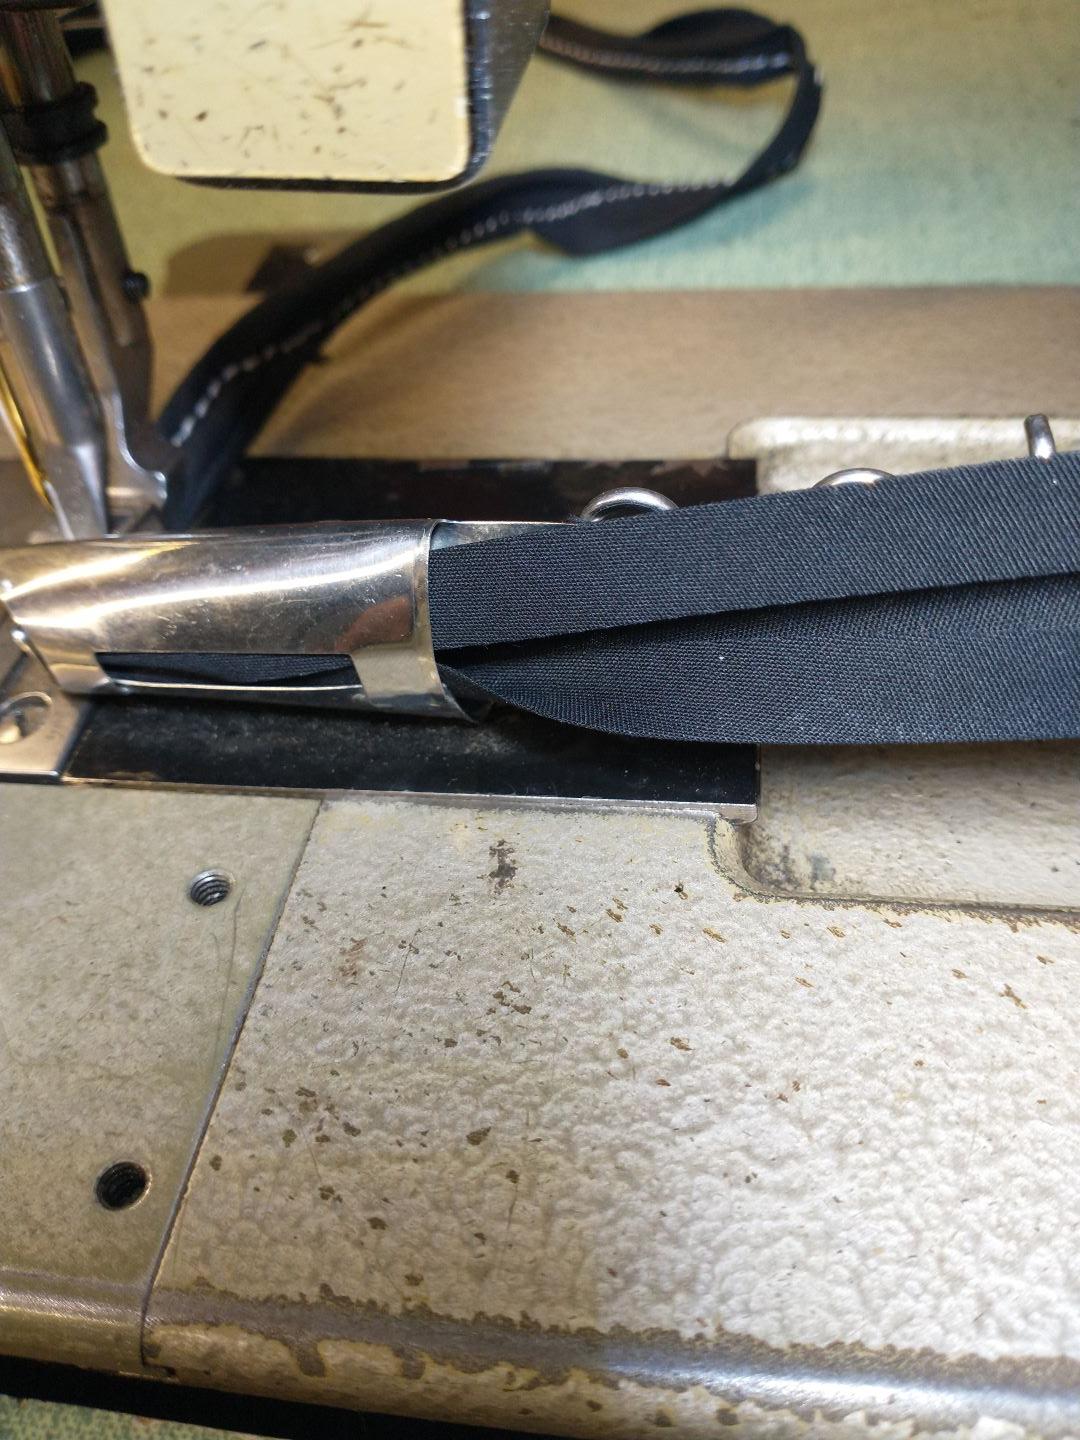
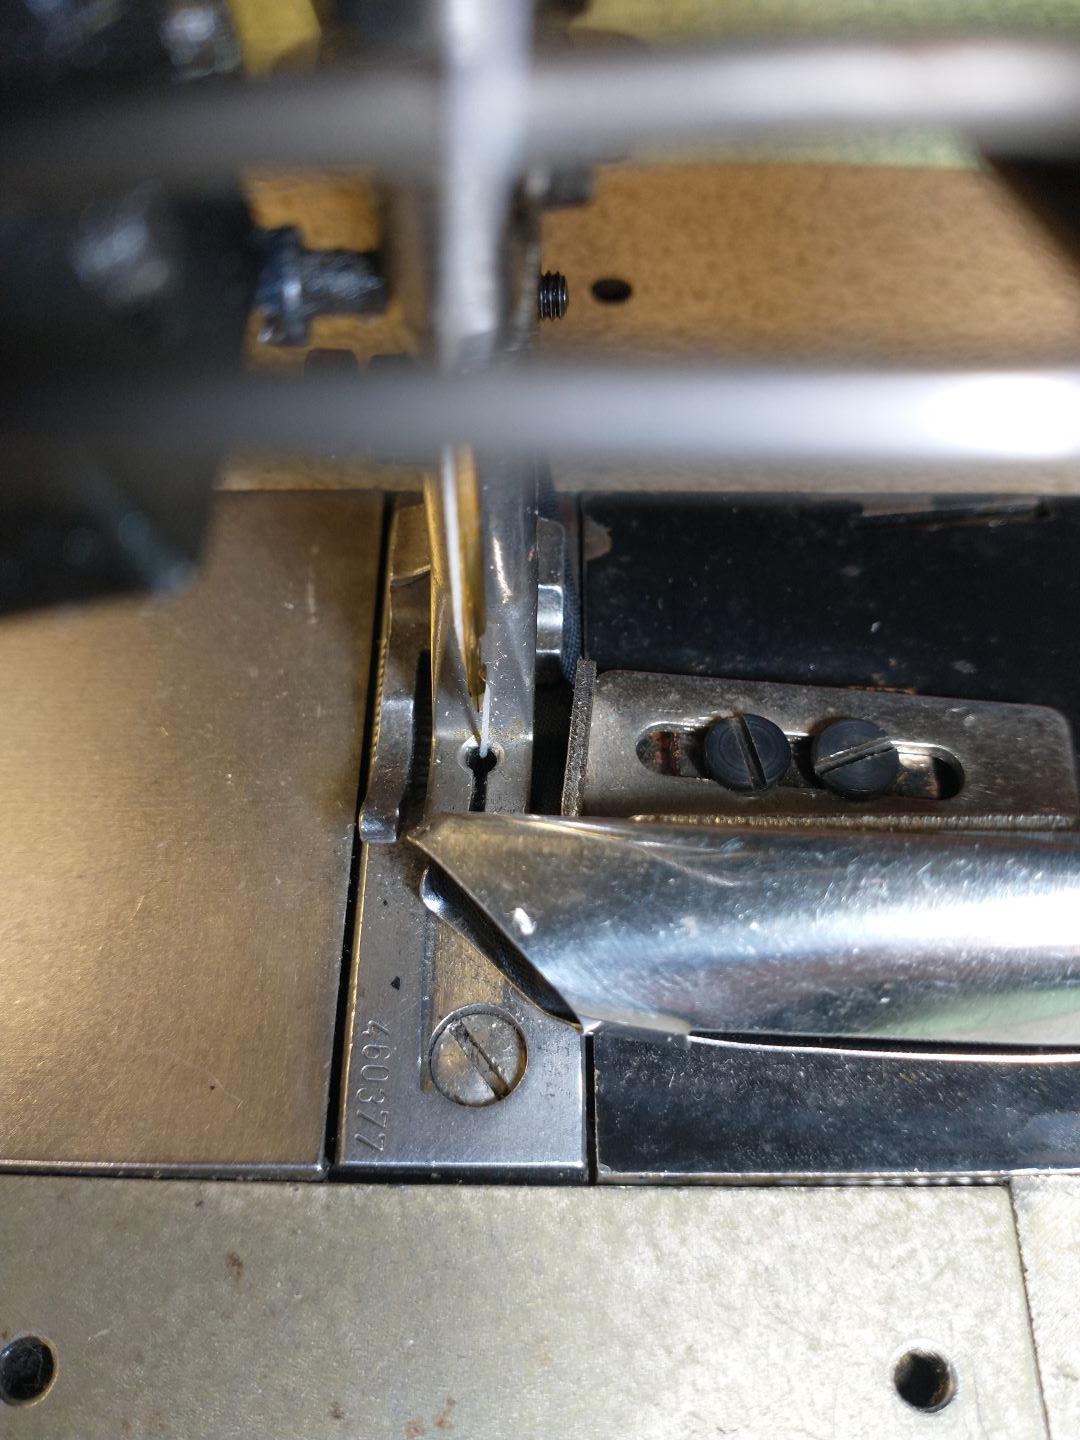
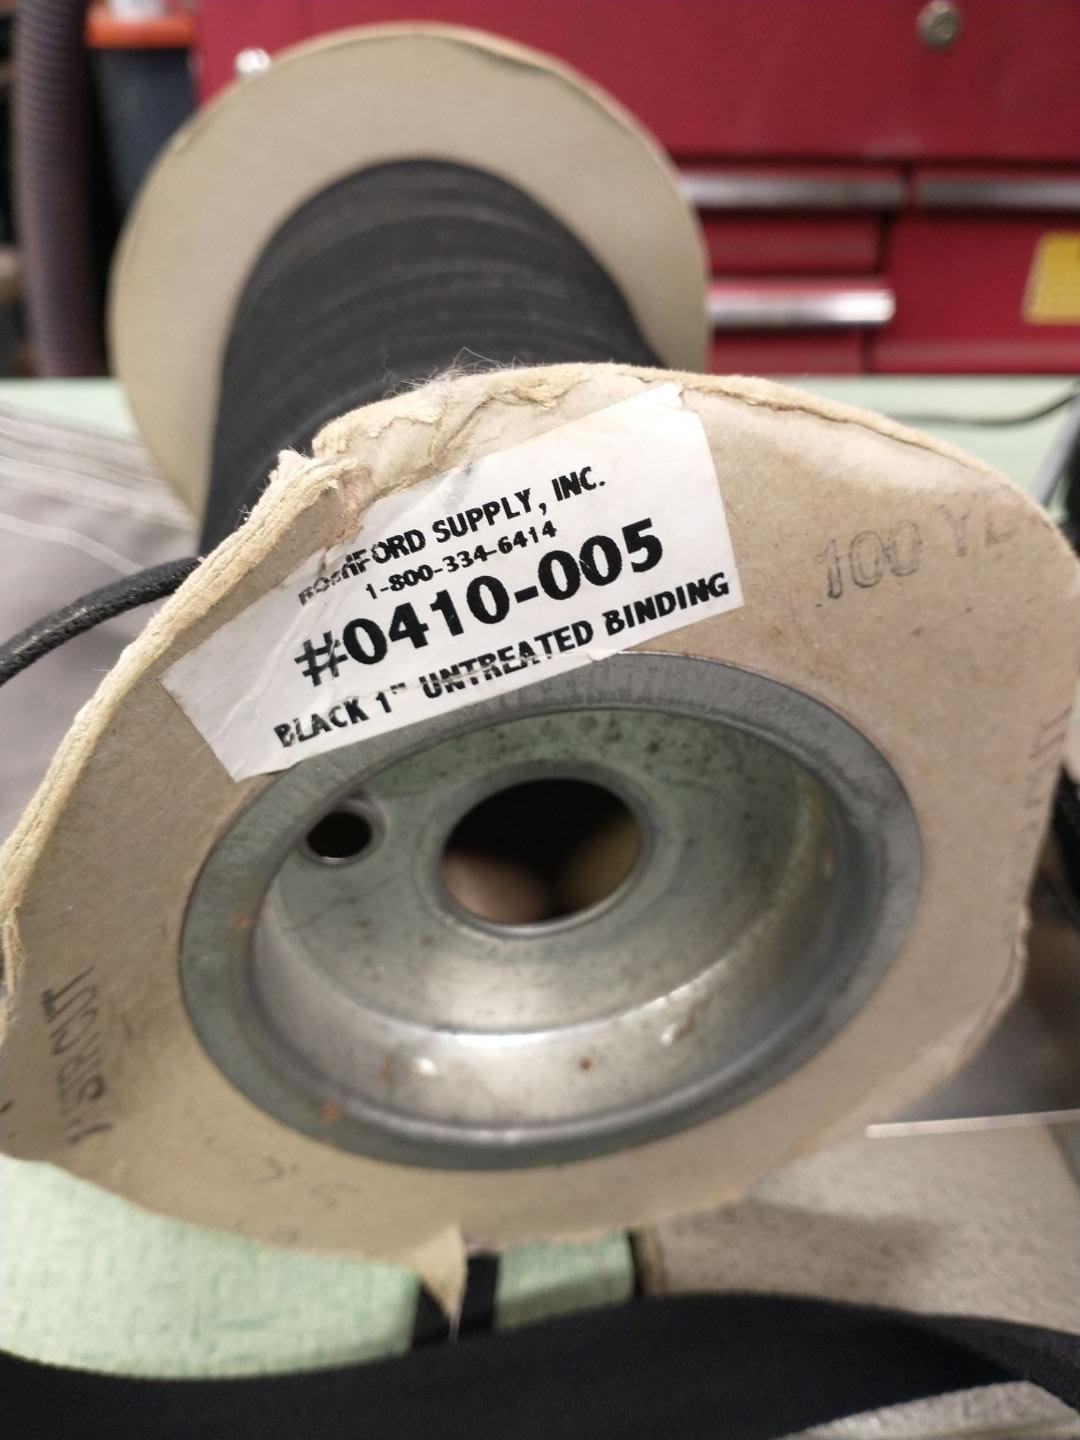
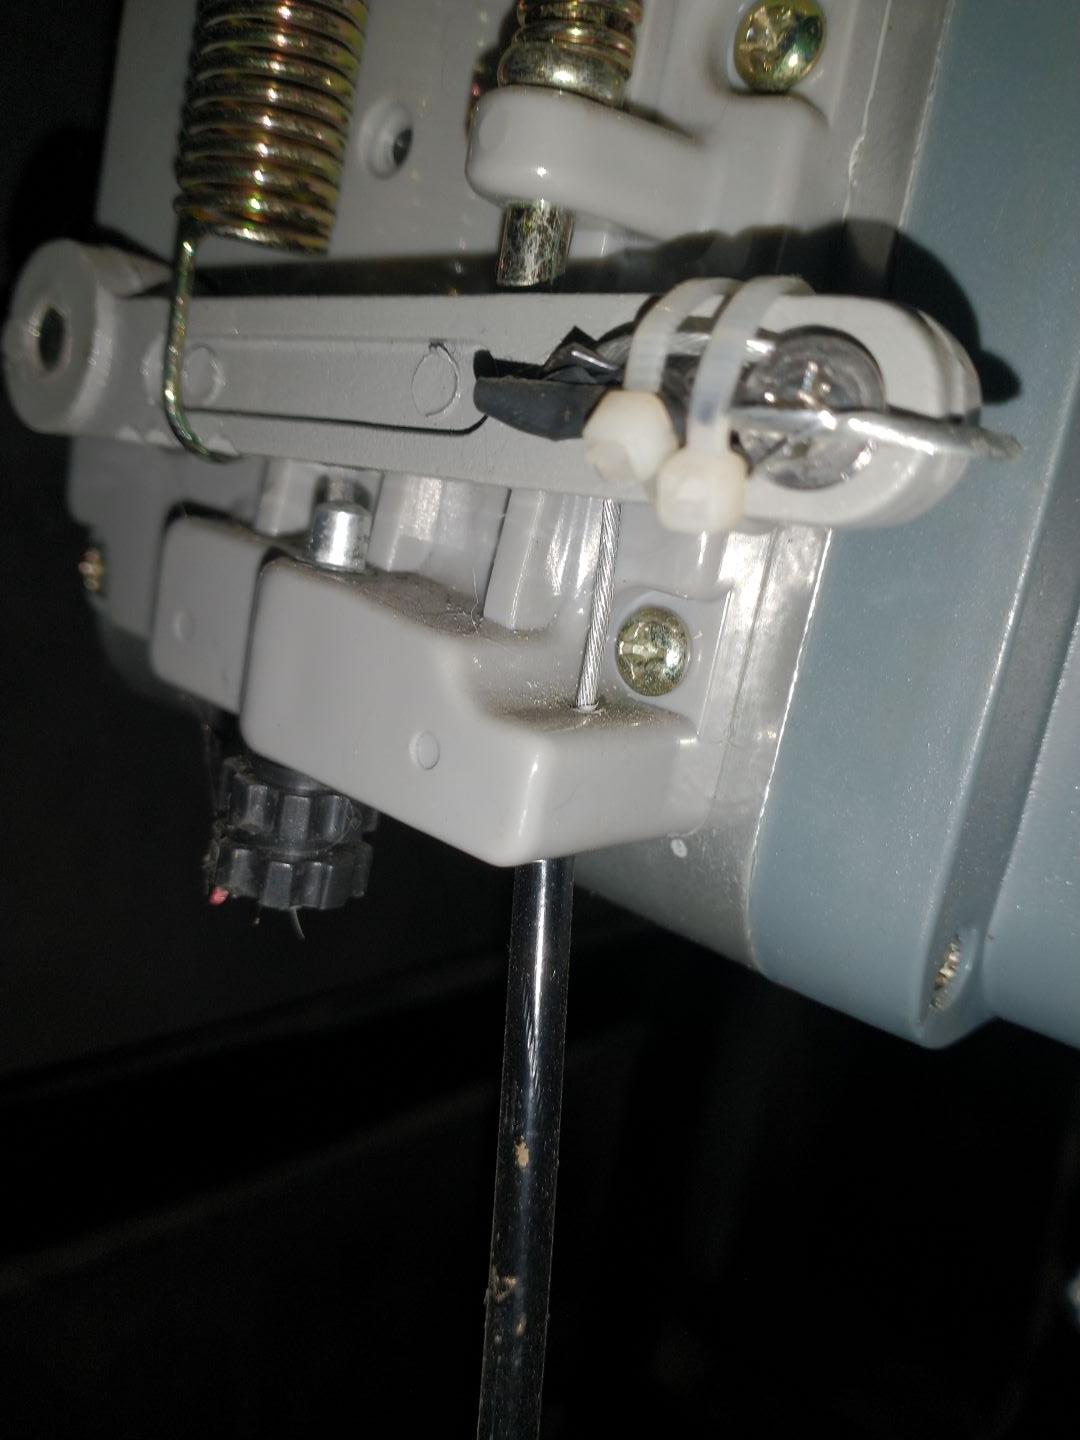
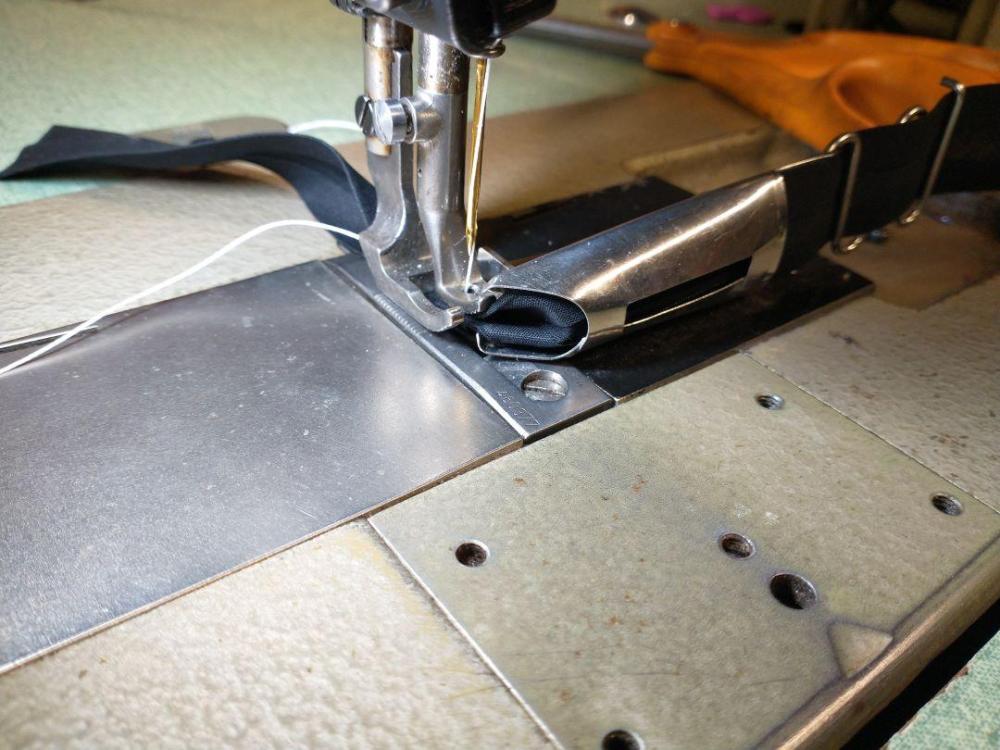
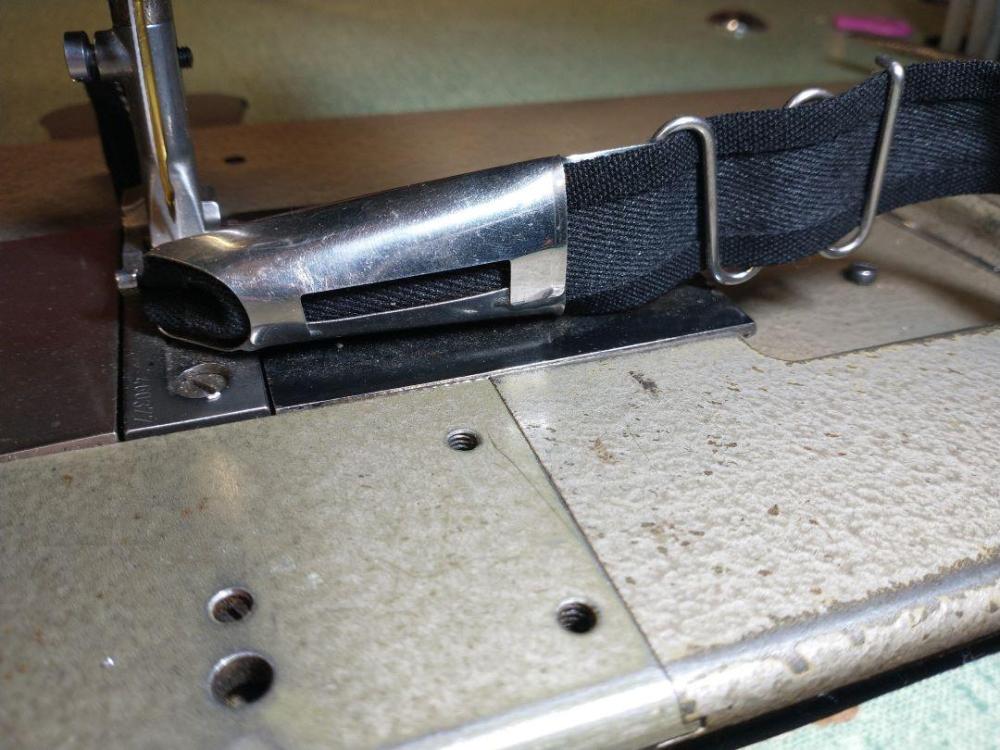
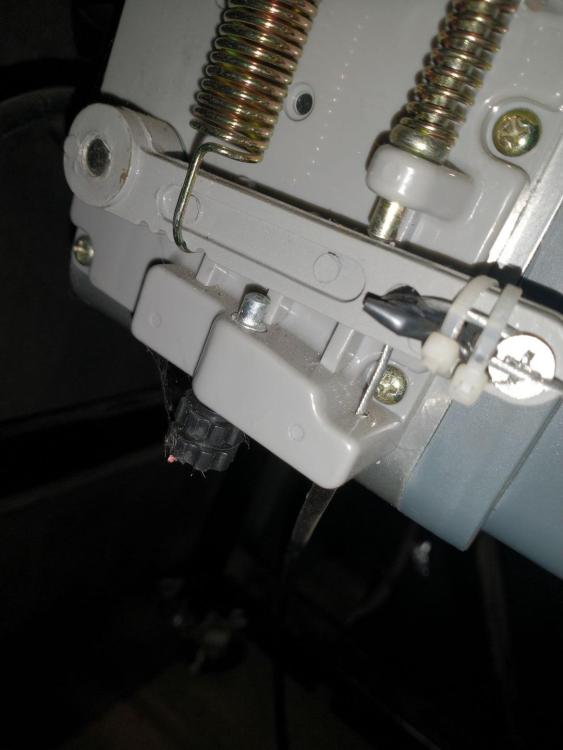
I received my Wawak 1" binding so I decided to try it. The pictures mostly show the Wawak Bias Tape Binding. The picture with the cylindrical roll of Rochford tape is what works in this binder. The picture with the coarse tape in the binder is the Rochford tape. The Rochford tape is straight cut and when sewn doesn't want to turn corners. I was hoping the Wawak bias tape (the flat roll) would turn corners, but I can't get it to lay down properly properly prior to stitching. So the Wawak Bias Tape binding was an utter failure. It won't work in this binder. It slides and then rolls one edge before it gets to the right angle turn. I tried several things and the binding will not track straight in this binder. I think this binder is simply not compatible with thin bias tape. It works well with the Rochford tape, but the Rochford tape is probably made out of 6 oz canvas. The Wawak bias tape is probably 1-2 oz fabric. Huge difference. I think I am trying to run light clothing tape in a binder made for canvas tape. I thought Rochford might sell bias cut tape similar to what works, but they do not. Its all straight cut. NylonRigging... if I buy some mil spec binding, which I think is similar to molle tape/webbing(?), will that turn corners? Do you think it will go through a right angle binder? Or perhaps I should get a different binder and put it on lighter weight straight stitch machine? Most of what I want to do is bind 2 layers of 8 oz canvas. But I need to be able to make inside and outside turns. Similar to a safety vest binding which was mentioned. I have a common, straight stitch industrial machine, non walking foot, which could be setup with a different binder. It isn't getting much use anyway. In many cases I really don't need heavy binding. Its fairly expensive. The cheaper Rochford 1" tapes are about $75 for 100 yard. The more expensive tapes are about $150/100 yards. The Wawak tape was $14.00 for 55 yards and it is heavy enough for a lot of what I want to do. I was hoping I could run the light, cheap binding in this binder, and be able to turn corners, but apparently the binder was designed for 6-10 oz fabric binding. Buying a $400 binder setup doesn't make sense since I don't do that much binding and for the most part I am not getting paid for my work. I've sold some covers on Ebay, but the sales are not significant. This is primarily for my own use. I have a couple of boats and a bunch of equipment and I seem to constantly be making covers or bags for this and that. I made a large cover for a trailer recently that was 15ft x 46 ft in size. I need to make a sailboat cover and there are places on the cover that I would like to be able to bind and there are many tight turns. You might notice in the picts that I am not using a stubby binding foot for the front foot, I have one, but it was interfering with the binder bracket. So I changed it to a small regular foot to try and figure out what was going on. What do you guys think? Thanks!


-
Binding with a right angle binder on a walking foot machine
Dave9111 replied to Dave9111's topic in Leather Sewing Machines
Thanks for the replies! :-) I'll get you guys some pictures today. I have several of those safety vests so I know exactly what you are talking about. Some of those binding curves are rather tight. This binder setup was made specifically made for the Pfaff 1245. It has a boss brazed to a new bobbin cover plate and the right angle binder is screwed to the boss. I think it cost $80 or $90, 10 years ago, so maybe $150 or more in todays money? It very well may be a China cheapie on a custom cover plate. I'm thinking that the binding material I have been using is simply wrong. I ordered some medium weight bias tape from Wawak and it was supposed to be here today, but the freezing rain and ice is delaying the shipment delivery until tomorrow. My tape feed to the binder consists of am inverted plastic drink cup with a hole in the bottom ( custom! ) , and a 1/2" dowel sticking upright in my tool holder block on the machine table. The cup spaces the reel off the tool holder. That actually works pretty well! The tape falls maybe a foot from the right side of the table to the binder. -
I am using a Pfaff 1245 walking foot and I purchased a right angle binder setup probably 10 years ago and I have never been able to master this thing. I bought 100 yards of polyester single fold binding from Rochford supply years ago and it works ok on straight runs or large curves. The Rochford binding is rather stiff so I have to fight it when doing tighter turns, about 6 inch radius and less. So I thought I would try and buy some double fold polyester binding off Amazon, it was cheap. Its a thin material but it doesn't work well in the binder. Somehow it rolls sometimes after making the turn in the binder. My guess is that it is not stiff enough. So what next? Rochford, Wawak, and Amazon all have a lot of binding, but I have no idea what will work well in this binder. Do I just keep guessing and buy a few different kinds? Wawak offers heavy, medium and light single fold binding. Is there any standard for what is Heavy, medium and light? Would woven, unfolded, twill binding possibly work? I never thought that binding would be this challenging! Are there any how-to's written on how do run a binder? Are straight binders more forgiving than right angle binders? Thanks, Dave
-
This has worked very well. When I move the machine, I hook the "pedal" brake lever on the back frame crossmember and roll it around. I have my machines on casters. I thought I might need to weld a cross bar on the brake lever as you did, but just using the brake pedal as is, works fine.
-
Moving Industrial machines around the shop and outside
Dave9111 replied to Dave9111's topic in Leather Sewing Machines
Good idea! -
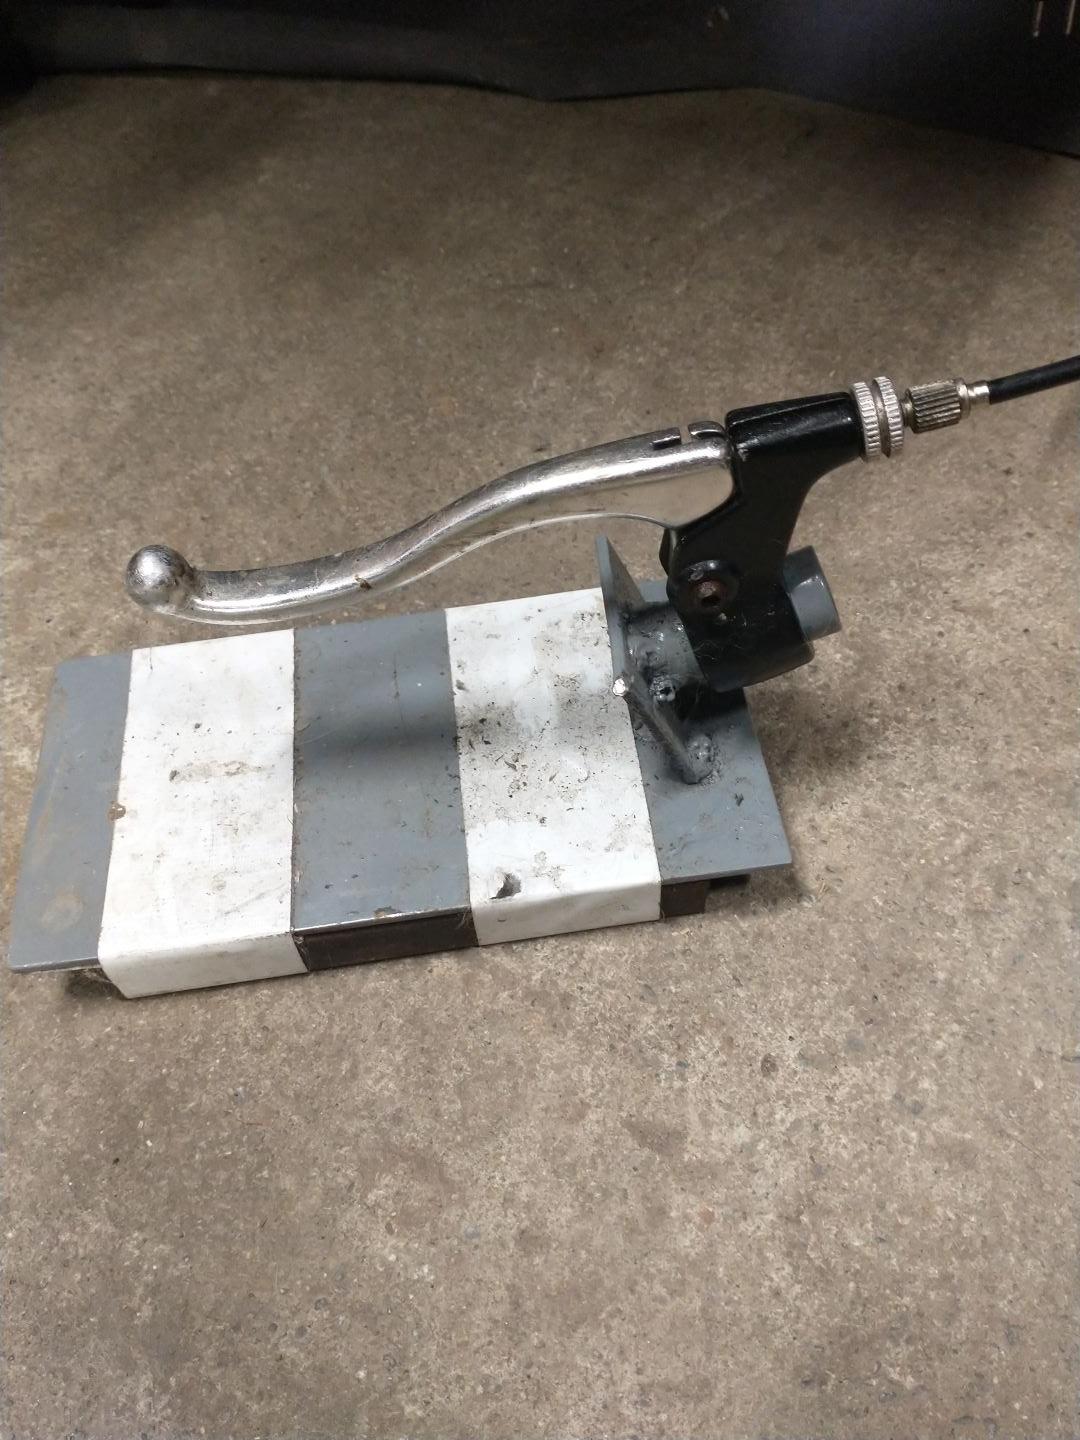
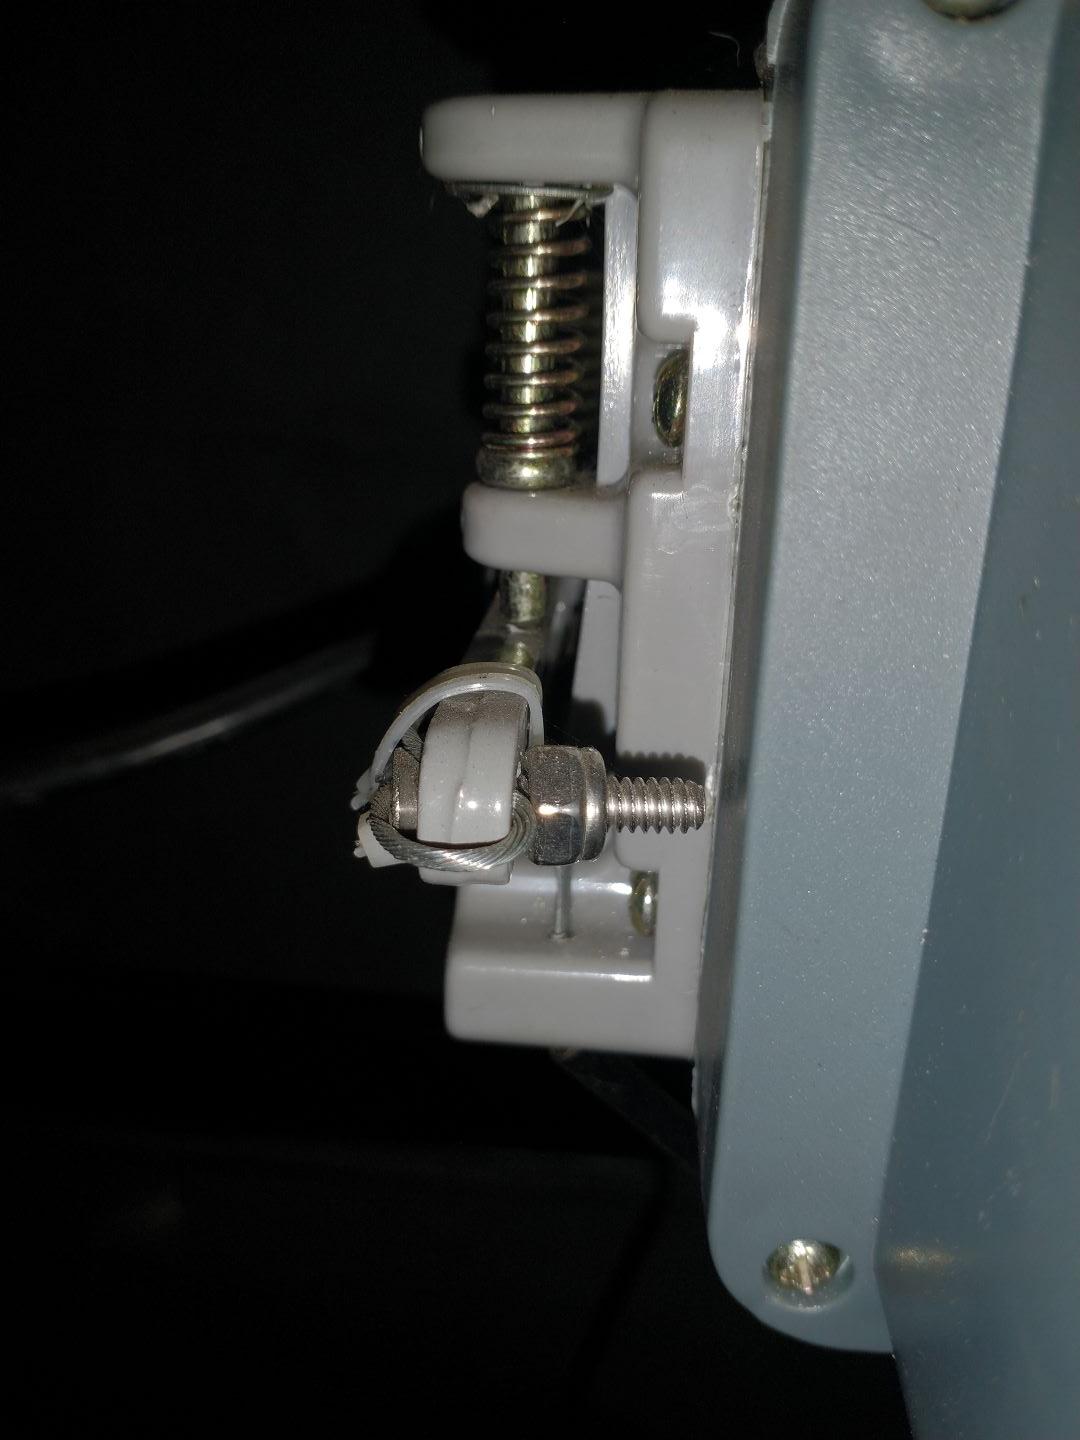
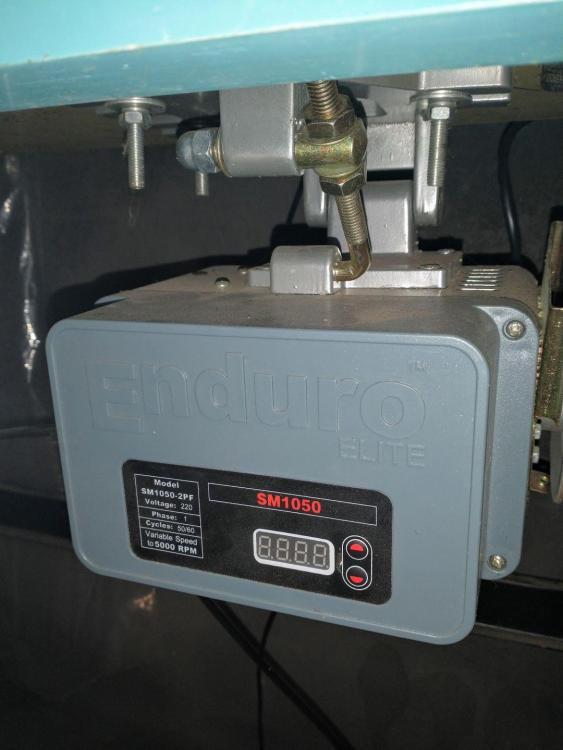
Here are some pictures. The cable goes up through a small hole, slightly larger than 1/16", which was drilled up into the plastic boss. The cable housing (black vinyl covered) simply sits up against the plastic boss. The cable then goes into the backside of the left most hole, comes out the front and then goes into the rightmost hole. A screw and nut was used to clamp the cable to the plastic arm. The screw is smaller than the hole, so both the cable and the screw fit through the hole. I ran the loose end of the cable around to the front and tie wrapped the loose end to the arm so it wouldn't get in the way. I think that is a 10-24 flat head screw. The base of the brake lever was a chunk of scrap steel I had laying around. It wasn't heavy enough, so it skittered around the floor when my foot touched it. I welded a chunk of 3/4" steel to the bottom plate to give it some weight. The tape wrapped around the base was used to create some friction so it stays in place. That is white Gorilla tape (thick duct tape). I did have to lubricate the cable in the cable housing at the brake lever end due to intermittent sticking. I sprayed it with some chain and cable lubricant. The lube got rid of the sticking issue. The servo motor is an Enduro unit I bought off of Ebay. It has a needle positioner. It says on the unit that it is setup for 220 volts, but it runs like a champ on 120 volts with no changes, other than a different plug on the cord. It has more than sufficient power. I have run hundreds of feet of fabric through this machine.


-
Moving Industrial machines around the shop and outside
Dave9111 replied to Dave9111's topic in Leather Sewing Machines
I like the idea of your tilt hand truck! That's a lot better than what I tried!!! I have a hand truck that is aluminum and it converts into a flatbed, but it won't do what your truck does. The kickstand with wheels is really nice. Thanks for the idea! -
What would it cost to add a commercially available puller (Racing or otherwise) to a Pfaff 1245 walking foot machine?? An educated guess is ok. Most of the Racing units I have seen have a mechanical geared connection to the machine and the transmission and shafting is quite elaborate and it looks like the shafting might get in the way. It seems like an "electronically geared" connection to the machine should be possible. I've worked on industrial machine control systems that do that. I have a puller which is built into a Pfaff chainstitch machine and it is really nice for longer runs. I have less material slippage issues when I use the puller. It seems to be noticeably better than a walking foot setup alone.
-
Moving Industrial machines around the shop and outside
Dave9111 replied to Dave9111's topic in Leather Sewing Machines
Just a follow up: I did attempt to make a lifting dolley that lifted by the table top. It failed. Turns out lifting from the top requires a rigid frame (heavy steel) which was in opposition to my goals of a simple compact dolley. As I result I put all of my machines on casters. That is the way to go for me. If I need to move a machine outside, I have a small steel top trailer that tilts to the ground to create a ramp. The trailer was built as a rototiller trailer, so it is small, but large enough. -
I have been running Dabond 2000 V92 thread as the top thread in a single needle, 2 thread chainstitch machine. I'm running V45 for the bottom threads which seems to work well. This is with the 401 chainstitch, so the bottom threads wrap through the eye of the top thread twice, hence the smaller bottom thread. I want to stick to a bigger topstitch thread for UV resistance since this is for covers, left outside. This has been working ok but the bottom chaining was not entirely consistent. It was like the bottom tension was varying. I decided to buy another roll of thread for the top thread, and I found some A&E Sunstop V92 and decided to try it out. I replaced the Dabond V92 with the A&E Sunstop V92 and my inconsistent chaining issue went away entirely. I made no other changes. The A&E thread is much more pliable than the Dabond. This machine runs without a lot of tension compared to my Lockstitch machine, but I did not expect this. Has anyone else seen Dabond cause issues like this? I think Dabond is just too stiff for use in a chainstitch machine. Unfortunately information on how to run a two thread chainstitch machine seems sparse on the web. Google searches oftentimes come up with nothing. So this machine has been a learning experience! Dave
-
I have an Enduro drive as well, and saw this after my table was found missing the pedal. I welded a base bracket for a brake lever similar to the one shown in the picture. (Mine doesn't look as nice) I didn't add a cross bar to the end of the lever. It works fine as is. If you look at the picture of side of the Enduro motor/drive unit you will see the nicely milled bracket that holds the cable. Just to the left of that is a plastic boss. I drilled a hole up through the plastic boss from the bottom and threaded the cable into it. Just above that is a hole in the plastic arm. I threaded the cable into the hole from the backside and used a screw clamp cable stop to prevent the cable from slipping back out of the hole. Zero machining was required. It works fine. I have the Enduro drive on a Pfaff two thread chainstitch machine and it works great. The brake cable/lever was a genius idea. And the machining while nice, is not required. I used a chunk of steel and piece of handlebar to attach the brake lever to the plate for the foot pedal. It weighs several pounds so it tends to stay in place. What is really great about this idea is that the pedal is moveable. When I am sewing large panels of cloth for covers (3 - 40ft x 5ft panels in a recent project) I can sit at an angle to the machine to feed the machine and I can move the pedal to suit, which means great pedal control in just about any seat position! How nice! The brake pedal idea is truly genius. Thanks!
-
Moving Industrial machines around the shop and outside
Dave9111 replied to Dave9111's topic in Leather Sewing Machines
I've decided that I'm going to lift the machine via the table top. There is a couple of machines on the web that can do this but they are quite elaborate. I'm going to try and keep it simple. I like the jack simplicity but I don't think lifting from the K leg even at the top is a good idea for me. Reason being that I have one really heavy machine head, and I'm pretty sure the k leg wouldn't stand the strain. -
Moving Industrial machines around the shop and outside
Dave9111 replied to Dave9111's topic in Leather Sewing Machines
Hoyer lift. Gosh I think my sister in law just sold one from my mother in laws house. Never thought about that. I have looked at some commercial solutions and it seems like the lift has to pickup the table top to go "off road", or off a hard floor. Looking at my machines, that is really the only common pickup point. So I will make something up and share it when I'm done. I'm thinking a 1/2" or 3/4" steel pipe frame, some large air tire casters I already have should make up the bulk of it. A lever mechanism (maybe?) to raise the machine, etc. Or maybe just tip the frame? Thanks for the ideas. I do have a little trailer I'm not using... hmmmm... -
I have my share of industrial machines and I sometimes want to move them around both in the shop and outside for a larger canvas job. Sometimes into a box trailer that has a ramp door. I have flat moving dollies, but small wheels don't make rolling easy over uneven pavement. And they don't work at all in gravel or on grass. Yep, off road sewing! I have some large covers to modify and alter and putting the machine in the lawn under a tree can work in nice weather. What do you guys do? This has come to a head since I bought a two thread chainstitch machine and the head is really heavy - well over 100lbs and I want to be able to move it without planning for back surgery. My machines all have the common K stands. On the lighter machines (like a Pfaff 1245), I have mounted casters on the bottom of the K legs. And that works in the shop. But that's about all. Thanks, Dave
-
Nice! Thanks
-
This has been mentioned a few times in various message threads regarding the Enduro motors that were/are sold on Ebay. But I just wanted to put this down as a topic for you guys out there who grabbed some dirt cheap Enduro motors as I did a few years ago. I have a few Enduro 1050-2PF, 220 volts, servo motors that I bought off Ebay a while ago. They were dirt cheap on one point. Like $35 each or so?? I have 240 volts in my shop so it was no big deal to run some cords to feed these motors. However some folks have mentioned that these can run ok on 120 AC. I'm setting up a new to me Pfaff Chainstitch machine so I dug out one of the 1050-2PF units and hooked it up. I had to put a plug on the end, so why not try out 120 VAC? It works fine. I tried a wooden hammer handle torque test ( start the motor with a wooden hammer handle forced onto the edge of the V belt pulley ). The motor has plenty of torque at 120 VAC to grind grooves into the hammer handle from a dead start. I belted the machine to the motor and it all works fine at 120 VAC. The display and control buttons are working just fine as well. I have not tried hooking up the needle positioner sensor. That is next. This unit also has a 24 volt solenoid output for a foot lifter. But I probably won't use that. Obviously these motors were designed to operate on a range of input voltages. Why these don't show that on the boxes? I have no idea. Note that I cannot find any laboratory testing approval of any kind (UL, etc) on these motors, the boxes or the paperwork, so make sure you turn them off when you are done sewing. I'm ok with that myself.
-
I finally got to test the new Groz Beckert Gebedur Titanium needles (134-35, #23 R) on the same machine (Pfaff 1245) with the same material and the needle thread shredding is no longer there. So that fixed the shredding issue. However, comparing the #23 Groz Beckerts to the Innova #22's that I have been using shows that the #23's are a lot bigger. Does anyone have the dimensions of a #22 system 134-35 needle? I don't care if its metric or imperial. I'm wondering if the #22's I have are undersized. I have searched for it, but its not popping up. #22 is stamped on the shanks of the Innova needles. I think Innova is the distributor. The individual packs of 10 only say made in Germany with a small logo. I've had these needles for a long time. Its a 100 pack. The #23 Groz Beckerts are noticeably cutting the threads in the material. The holes made are clearly shredded just a bit. This is on Weathermax 80 outdoor canvas which is a very tight weave fabric. I'm not sure if I should be concerned about that or not. I'm thinking probably not. When I run through two layers of Weathermax 80 with a Polyester binding, there is not noticeable tearing on the binding. The stitches look great. This was when the thread shredding became a real issue. I was occurring when just running through two layers of Weathermax 80, but adding the binding was a killer. The stitch formation also appears to be better with the #23 needles. So you guys were right. The needle was the problem. Thanks for the help!
-
I did obtain some #23 needles. I now have some Groz-Beckert chrome needles and then I found some Groz Beckert Gebedur Titanium needles. Ill try these out this week and let you know what happens. Its threaded properly.
-
Answering my own question: I pulled apart the stitch length control mechanism behind the knob. There is a cam in there that accepts a pin. The pin moves the stitch length mechanism which changes the looper tensioner and the feed stitch length. The pin was off the cam apparently. Putting it back together after cleaning and oiling and I can now change the stitch length and get rid of the fabric bunching in front of the puller. The puller and feed dogs now work together. Time to put the machine on a stand with a servo motor.
-
I bought a Pfaff 5642 two thread chainstitch machine. Yes, I know its a 401 chain stitch machine (like the hem on jean pant legs) but I have wanted to try one out after seeing so much commercial canvas sewn with one. I think its a late 80's machine. Not having a bobbin is a big advantage when doing larger canvas projects. This machine is built like a tank. I've seen engine blocks with thinner cast iron. This machine has a built in fabric puller. The bottom roller is knurled steel and the top roller is soft rubber. When running the machine by hand, its obvious that the puller lags the feed dog. Material begins to bunch up in front of the puller. I pulled the center cover off the machine, and the shaft that drives the feed dog is geared to the bottom puller drive roller. So it appears that the puller "pull" is a fixed amount for every stitch. Does that mean that the puller dictates the stitch length? I'm new to "pullers". If I make the puller drive roller larger in diameter, more material will be moved for each stitch. I could make a bigger drive roll or temporarily wrap friction tape around it to make it bigger. What do you think? Per the manual, the stitch length is adjustable per a handwheel at the right side of the machine but that doesn't seem to be doing much. Perhaps I need to tear into that to see if something has fallen out, disconnected itself etc. Every machine I have purchased has had something wrong with it. This is likely not an exception. But at least it sews, nothing is worn loose, and internally it is very clean. Thanks!
-
Thanks guys. The little plastic pots I've seen say v69 thread max. But maybe thats wrong. I really thought a 22 needle should be big enough but ill get some 23s and consider your needle brand recommendations. Im sewing mostly through two layers of WeatherMax 80 poly canvas and sometimes also two layers of polyester binding. With the dense binding it can be a challenge.
-
No. Im using a #22 needle with V138. If i lube the thread, no issues at all. I take the spool off the spool rack and spray it with silicone lube. (A bit messy). But of course it not consistently lubed throughout the spool. I think a lubricator would solve the issues. I like things to "just work". Thanks for the reply!
-
I have issues sometimes with heavier thread, like V138 shredding at the needle on my Pfaff 1245. I have sprayed my thread spool with silicone spray and that helps but its not consistent. Perhaps I need to spray it more consistently? I went looking for thread lubricators and not many are available. None looked worth the $. Many said V69 and below. Im pretty sure many more were available years ago? Should I make one? What do you guys do? Dave