TinyL
-
Posts
153 -
Joined
-
Last visited
Content Type
Profiles
Forums
Events
Blogs
Gallery
Store
Everything posted by TinyL
-
Good morning, I bought a border tool from Tandy thinking it would be obvious on how to use it. Boy, was I wrong! I have absolutely no clue and was wondering if someone would have the time to explain how to use it. Now matter which way i turn this little piece of plastic, I just can't figure it out. Thanks in advance! TinyL
-
Hi Gesa - how did you achieve all that detail in the guitar? To me it looks like a sepia colored photo come to life. The precision is outstanding. Do you have a trick (that's easy to remember) to decide what to bevel vs. what to leave alone and how does it relate to shadow that was from the original picture? I apologize for all the questions, but what you've done is something i'm looking to achieve in my work. Thank you, TinyL
-
Thank you Lace and TomSwede for your compliments. It's a means alot.
-
Yes Kani I do draw. Well actually, let's say I did. It had been on and off for quite some time(mostly off). My husband convinced me that I could do his seat, and after a little research and a set of used tools off of ebay, I tried the leatherworking. I have to admit I really am enjoying, as well as cherishing the "rediscovery" of what I can do artistically in this fantastic new medium. Not to sound hokey, but it had been awhile since I got excited about something I could do. Drawing is wonderful, but very two dimensional. Carving leather uses the same skills as far as transferring your design to leather. But geez, what you can do with a few stamps and mallet is amazing. I guess this just really appeals to my tactile senses which is something I never got from a drawing or painting that I did. I don't mean to run off at the mouth. You know when you reach a certain age, and youth and oppotunities have come and gone, it's kind of wonderful to find out that maybe you won't just lay down when they are ready to put you to pasture.
-
Thanks Kani. My brother in law is in love with his seat!
-
Thanks for the compliments guys! Here are some more pix with details. Chris


-
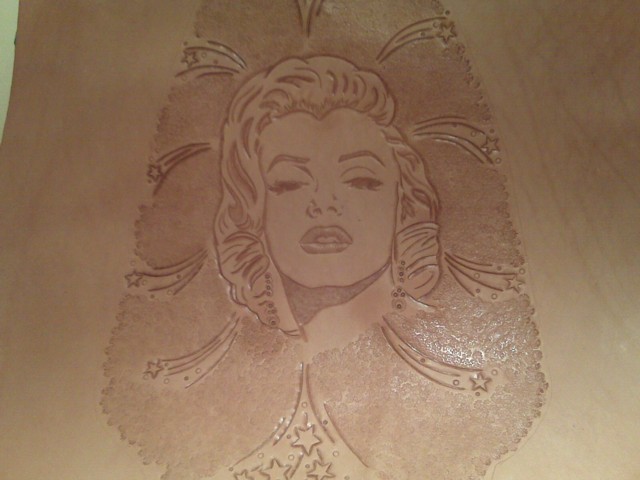
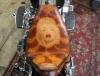
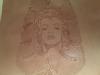
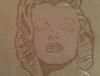
I just completed Marilyn for my brother in law.

-
Thanks Sasquatch and Greybeard. I started lacing last night. I hope to finish this weekend. You know how it is with work and family getting in the way. Just kidding!
-
Thanks Kustomizer!
-
Thanks for the compliment madmax22 and timd1159. I appreciate it!
-
Hi everyone, I just wanted to post pix of my second seat done at the request of my brother in law. He loves Marilyn! I'm just waiting for him to finish fabricating his pan so i can put it together. I'll take more pix when it complete and on his bike. Have a great day!


-
Hi Randy, My husband got the rivets. I'll have to ask him what type they were. All I know is they are the ones that won't rust. He was able to get a hand tool at Lowes fairly cheaply. As far as the lacing, I did just a criss cross pattern and laced the top and bottom pieces together. I have to say I was able to cheat on the bottom because it is completely hidden and dh couldn't wait for the dye to dry, much less the seat to be attached to the pan. It's not the most professional looking, but as I said, it is completely hidden from view. The ovelap was only 1/4 inch around. I used the thingamajigger that has the pointed wheel(can't remember the name of the tool) and marked the outside of my seat. I then punched 1/8 in holes all around on every 3rd mark. so i punched a hole counted 2 marks, then punched the next hole. I would advise to start at the center of the top of the seat an mark your dots going around both sides simultaneously so that when you get to the bottom center, if you have to make an adjustment for the spacing, you can do so. I tell you what Randy, you found the right forum to help you make your first seat because the guys and gals know there stuff and are really seasoned in this type of art. If you have specific questions, you should start a thread or at least read all the threads under this subforum. That's what I did and it really answered so many of my questions. Good luck to you! TinyL
-
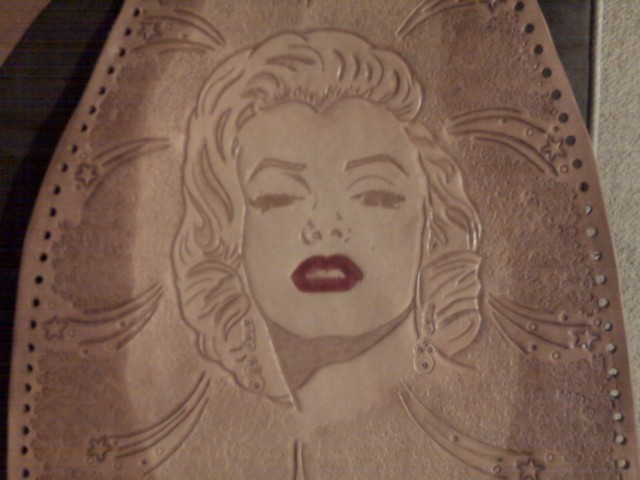
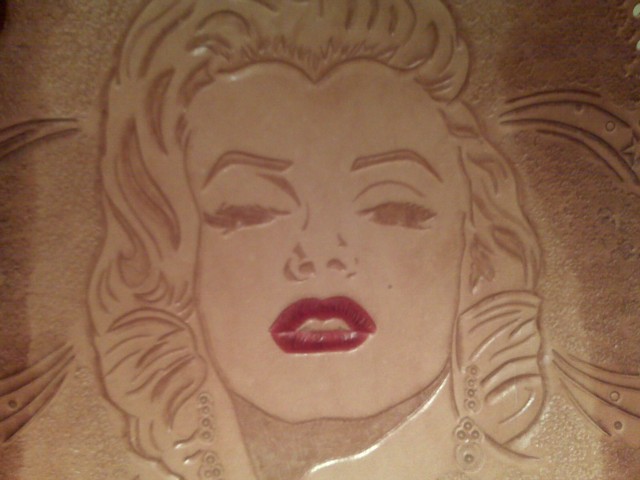
thanks zilla. I used some of your technique and beveled the eylashes and feathering it out. i then matted the eyes down with the pear shader and it gave me the desired effect that i wanted. thanks for your advice.
-
Thanks madmax22, to be honest it was very difficult to shape the leather over the pan and my husband was the one who did the riveting and affixing of the leather to the seat. But he loves it so that's all that matters. thanks for the compliment on marilyn. i followed a tip from Zilla and i'm pleased with the result. I'll post more pix soon
-
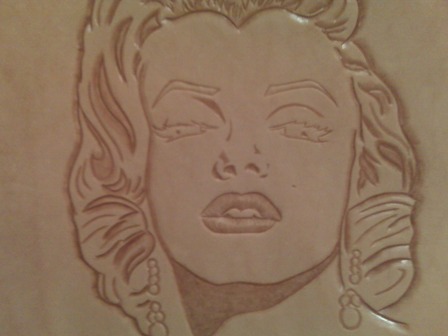
Hi everyone, I would like to ask if I can get advice on how to make Marilyn's eyes and eyebrows stand out. I was thinking of stamping them in but I just wanted some opinions on that option or if there was another alternative to explore what that was. The lips will be dyed red and I was toying with the options of dyeing the eyes and eyebrows black but that is still up in the air. Thanks for the help! TinyL
-
Hey Freak , Thanks for the compliment. I actually started a seat for my my brother- in -law this weekend which is now top priority. It's a portrait of Marilyn Monroe. I'll probably post a pic later because I'm kinda stuck as to how I can make her eyes pop and not look so flat looking and I could use advice about it. Anyhoo, enjoy the rest of the weekend! TinyL
-
or first anything for leathercraft is concerned. I want to thank everyone on this forum for all the help and tips. My husband is thrilled with his Christmas gift and has commissioned me to do the pillion pad now. But he was kind enough to leave it up to me as to what to put on it since i'm the one sitting on it. Thanks again and happy new year! Chris


-
thanks for the tip Russ. I'll check out Tandy again. I wish they were close by but then again that might be too dangerous monetarily.Have a great weekend.
-
Russ thanks for the input. Do you know where I could get the sheepwool? Do you think they would have that kind of thing in the auto parts store in the car wash aisle. This project is turning into a labor of love and I don't want to wreck it. How many coats of anything can go on without losing the integrity of the leather? should i satin shene when i'm done with dyeing and then neetlac the whole thing or will there be a problem because of the water vs. lacquer based thing? Sorry to plague you with questions. I just want to make an informed decision, do the deed, have it come out well and then stick with this formula forever. You know people like that?
-
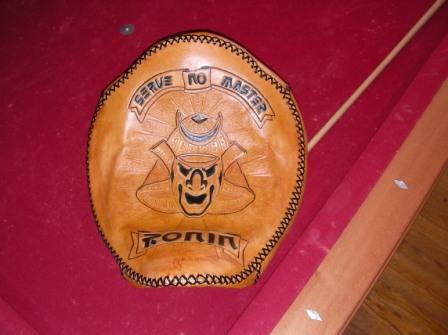
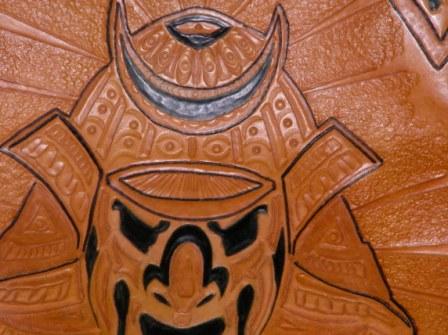
So to be sure, I apply the neetlac to keep the black in(only where the black is), dye whatever else i would like, neetlac that, then neetlac the entire thing. I don't have an airbrush(yet) so what's the next best method of applying? And by the way, thank you for responding. Your work is inspirational. I think I saw in another post how you like to do different things with your leather carving such as your samurai seat and I was really glad I came across your work. I've been blessed with the ability to draw and it was hard to see how to translate that into leather on other sites. You have given me the epiphany, so to speak, where I can visualize it now. I thank you. Chris
-
Thanks for the compliment TwinOaks! You know, I'm not a stranger to the awesome, wonderful AND permanent powers of the good ol' Sharpie marker. When my husband grouted our speckled black granite tile countertop, the supposed black grout came out to be a blah gray. I could not accept it, so I ran to staples, bought a 12 pack of fine tips and proceeded to color every grout line. I then sealed the grout with the sealer and you would never be able to tell that it was colored in. I saw this suggestion in another thread so I might go that route. Thank you so much for your help!