


wyldflower
-
Content Count
60 -
Joined
-
Last visited
Posts posted by wyldflower
-
-
I have a headstall from Buckaroo Leather I bought from a store that was closing down awhile back. It was marked down from $120 to something like $15 so I quickly tossed it into the shopping cart without really looking at it. Got it home and found it had an awful, greasy, oily feel to it. The leather has little body to it and the thinner edges are squishy - waaay over oiled. I've tried drawing some of the oil out in addition to cleaning with soap and water and it helped some, but it's still got a gunky feel to it. Yuck.
Maybe I should hang it on a fencepost outside and see if all that oiling does any good against our soggy western Oregon winter weather.

~Wyldflower
-
Bruce, Luke, and Tim,
Thank you all so much for quick replies and the info - very helpful. Bruce - your comments on ergonomics and lifting height is giving me something to think about.
I think I need to give Barry a call and see what he recommends. Thanks for the advice Tim -and phone number.
I'm glad I at least got to do a little "pretend tooling" to get an idea of what felt right. (Bless the good natured folks at Tandy - never even batted an eye while I was standing in the aisleway, pounding away on my imaginary workbench with their mauls ... )
-
I'm ready to upgrade from my lil ol wood mallet to a nice maul (King or Bearman) - as I understand it, with a maul there is less wrist flex than with a mallet, which for me would be a very good thing.
Unfortunately, I've never actually used a maul, and am wondering what the difference would be round vs. a tapered head?
I'd also be interested in hearing about what weight folks use for various applications.
I was able to heft a few at the local Tandy store and the 16oz seemed like a good all around weight? Right now I'm doing a lot of border work on 7/8 up to 13 oz stuff, and a little actual carving (maybe I should say I'm "practicing" carving! lol)
Thanks much
Wyldflower
-
This is a really stupid question. How do I save the images to my hard disk? I don't get the usual "Save image as" option when I right-click on it.
I feel like an idiot.
Hi bex DK -
I've run into the same problem - not sure if this is the best way around it, but this is what I do when I can't right click to save-as on an image: look up at the top of the screen, just under the ad bars and click on the forum name - this one is Patterns and Templates. That will bring up the post threads. Look real close and you will see the little paperclip attachment icon next to "oak leaf pattern to carve" post. Click on the paperclip, and it should bring up a pop up window showing the attachments. Click on the little icon (not the text link) and the picture should open up in a new tab or window. Then you can right-click and do the save-as thang

(PS: I am running Windows XP and use Firefox)
-
Schno,
Absolutely lovely! Thank you so much for sharing ~ I am inspired!
Wyldflower
-
Hi all -
I didn't see a topic specific to suppliers folks have had good experiences with for online purchases, so I thought I'd start one. I'm hoping this thread can be a spot for folks who are hesitant to order online (as I was). I would ask that folks refrain from posting negative experiences on this thread - I know it happens, but the purpose of this thread is for recommendations based on good experiences

My "A" list - and not in any rank order as they all have been excellent -
Leather Machine Co. and Cobra Steve. There are many posts about Steve taking care of you and having an excellent product - and for good reason he does!
Springfield Leather - I've ordered leather, supplies, and tools. Kevin and SL just plain ROCK!
HideHouse - I ordered tools and supplies - Ron answered all of my questions very patiently and I also got a great deal on some great stuff.
Campbell-Bosworth - tools and linen thread. Very helpful, and they have lots of linen thread choices and a good selection of Osborne tools.
Ialso buy from my local Tandy and Oregon Leather, and have received excellent customer service at both. I entered the leatherworking world not quite two years ago. What I've found is that generally, there is a personal attention to taking care of the customer, and a genuine attitude of caring that goes far beyond the general good business rule of "taking care of the customer is taking care of me". Maybe it's because we practice a traditional art and craft that carries with it a tradition of being personal - that the customer is not just a source of revenue, but a real live person whose name you know. Whatever it is, I'm glad for it and and to be part of it.
~Dixie
-
Ditto from me - I discovered Springfield Leather through LW, ordered the first time because of Kevin's involvement here and very high endorsement he and SL received here, and kept ordering because the quality, service, and pricing are excellent. Kevin's customer service is second to NONE!
~Dixie
-
I just purchased a Cobra Class 4 from Steve, my first machine. Steve has been outstanding. There was a little hitch with the shipping company and when I couldn't reach them I called Steve. He more than lives up to his reputation for taking care of you! I should also add that the shipping company also came through like champs. My new Cobra 4 has arrived, and I can't wait to try her out this weekend. And she already has a name (I name everything) - "Velma"
Thanks again Steve, you are the best!
Dixie
-
Dustin - I have not ordered from Siegel's yet - good to hear that they made things right for you!
Will, $Hobby, and Elliot - Yes, half the fun of shopping there is just going into that building! I have gone over the TLF also, and the folks there have been great, but IMHO the leather just can't compete quality-wise. I also order online, and sometimes I can get leather cheaper that way, but nothing beats being able to see and feel it yourself.
Speaking of which, I went back to Oregon Leather yesterday, as they had some pretty smoke-colored chap leather that caught my eye last time but I didn't have time to really look at. The fellow there (whose name I didn't get but has a charming accent and is really great to work with) showed me some 5-6 oz brown oiltan that had just come in. WOW!! I came home with some, and can't wait to get started on it. They didn't have a lot of it - so if you're interested, I'd recommend going soon.
-
Wanted to share the nice experience I had leather shopping at Oregon Leather in Portland, Or. Staff were helpful, courteous, and knowledgeable and genuinely seemed most interested in helping me find (or figure out) what I needed... rather than upselling for a bigger sale. And I am very satisfied with the leather I bought, too
Wyldflower
-
Thank you Storm! I'm already on Project 2 - a little designing and lots more stamping whoohoo!
TTCustom - Thank you for the compliment, and the thread link. I got the idea of using the Sharpie from LW ... so maybe it was you I copied
Bobby/Hidepounder sure does some beautiful work. I printed out the tutorial so I'll have it handy when it's time to finish the edges on project 2. If I could get my edges half so smooth and polished I'd be thrilled to my toes! -
Beautiful saddle! I can't wait to see the saddle bags and other accessories!
Wyldflower
PS - the tip about black leather hiding blood ... going to be useful lol!
-
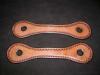
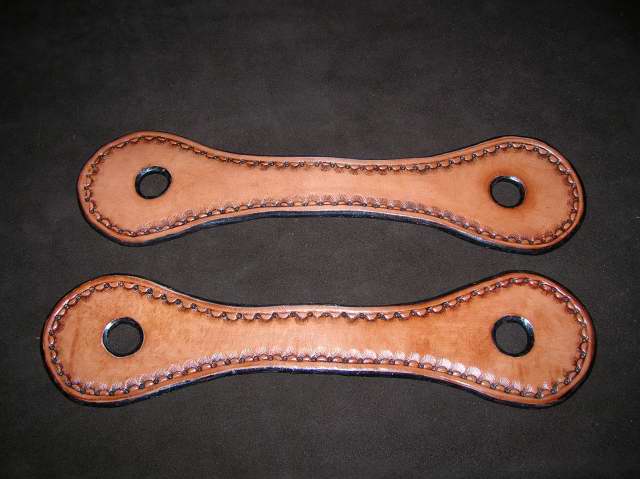
Yesterday I finished my first from-scratch project, a simple set of slobber straps (for the non-horsey folks, you use these to attach rope-type reins to the bit).
I designed the pattern based on a set of straps I had a long time ago. I used a manila file folder to draw the pattern and transfer it to the leather. The leather was some 8-10 oz scrap from TLF. There were some hard spots in it, and I had a lot of trouble cutting them out, so they aren't as symmetrical as I would like. But I got some good practice in sharpening and using my head knife.
I used a couple of the stamps from the beginner set from TLF for the border, and used dark brown antique and then mahogany antique over that. Leather balm with Atom wax for the resist and finish. I forgot to oil before I put on the resist and antique - oops! I put a couple light coats on after I was done, but I can see that it will need more. A black sharpie I had lying about worked pretty good for coloring the edges, and I used saddle soap and a rosewood burnisher to slick the edges. The edges could use more smoothing and slicking up, and boy is that something I need to practice. something to really focus on in the next project.
I had a lot of fun doing this and learned a bunch. Already started the next practice piece, and have an order in for some nicer leather - can't wait to work on some good stuff.
Wyldflower
-
Bruce -
Clyde and Shapeleigh - got it. I haven't managed to get my call in to Lonnie yet -that darn day job gettin in my way lol - maybe today I can get that done. I've noticed that most of the folks here who work in heavy leathers have more than one head knife, so I'm following that lead. An example of what kind of influence you all have had on my leatherworking bug -- not only did I not wince at doubling my knife purchase budget, but I'm told my eyes actually lit up at the prospect of buying more knives!

WhineWhine and egreen - glad to hear that the knives you have are nicer.
CampbellRandall - sure appreciate you responding directly here. I didn't realize there would by any kind of warranty so that is especially good to know. I don't anticipate any difficulty with the distributor with the return.
-
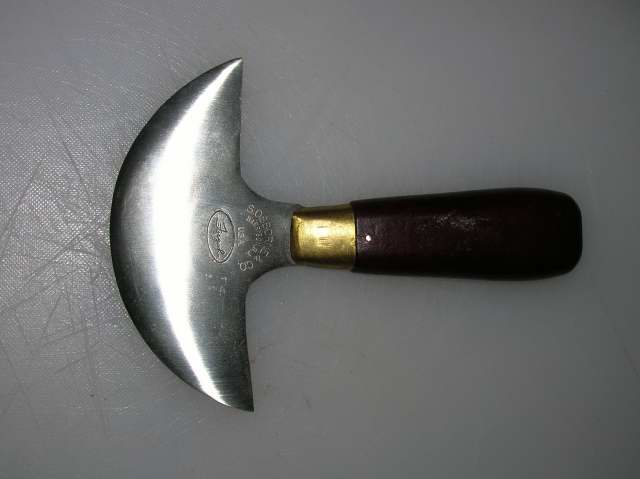
That is a great idea! I'm very curious to see what they say... the new Osborne skiving knife I have is much much nice than this thing.
Looks like a pretty scruffy Osborne knife . . . their finish is usually much better than this. Why not email your pics to Osborne (cso@csosborne.com), and ask if this an acceptable standard?
-
Darc -
I heeded your advice and managed to win an old Newark Osborne on ebay which is on it's way. I'm a little nervous about sharpening it, which part of the reason I did buy the new one -- I'm a little afraid I'm going to mess up a good knife in the learning curve, and wasn't so worried about the newer one. I hadn't considered the difficulty of getting a sharp enough edge, though, for safe and sane cutting through heavy leather, so am glad you pointed that out. I really need all my fingers.
Thank you for the information about the Gomph knives, as I didn't know that they were still available since Ellis Barnes passed away. The idea of a premium quality, new knife that is razor sharp out of the box is enough to beef up the budget, so I'll be calling Lonnie. Thank you for his number. It seems like there are very few of the top knife/toolmakers still taking any new customers so I better get one while I can!
Thanks again Darc!
Dixie
Wyldflower,
of the few modern Osborne knives I have seen, this appears to be their typical quality. Worse yet is the sharpness of the blade. It will take considerable work to bring that blade up to par for doing any real work. I noticed in your profile that you are interested in horse gear and saddlery work... I would suggest you return that knife and get a refund for the forty or fifty dollars you spent and bite the bullet and buy a well made knife... not from Tandy or The Leather Factory, but a good handmade one that will cost you in the area of $100.00 - $150.00. If you are cutting heavy skirting leather, harness leather, latigo, etc... for saddlery work, you will need the sharpest knife possible otherwise you increase the risk of personal injury from a knife that won't glide through leather. You will also find it extremely difficult to cut graceful curves for seats, skirts, fenders, etc...unless you have a knife that is razor sharp. A head knife is the tool that you will probably use more than anything else on your bench, I would not settle for second best with this particular tool. My first knife about 8 years ago was an Osborne similar to what you have and I can tell you from personal experience that you will never get that knife as sharp as it needs to be.
To suggest some alternatives, you could watch Ebay for some of the older Osborne or W.Rose knives which can be recognized by the oval shaped butt of the handle compared with the sawed off handle on your knife. If you find one in good condition you can expect to pay anywhere from $30.00 and up for it. It may require sharpening but that old steel seems to take an edge better than the new blades. Another option is some of the modern knives available. If you do a search on Leathernet for Head Knives or Round Knives, there have been some threads in the past where people expressed their likes and dislikes about some of the modern knives. My personal favorite came from Ellis Barnes company, Gomph-Hackbarth (Rest in peace Ellis)... A fellow named Lonnie has taken over the company after working for Ellis for a number of years before he passed away. I recently received a brochure from Lonnie and it states the price for these knives is $95.00 which is a bargain in my opinion. They are delivered razor sharp and no work is needed to go to work with these knives. Many of the members of this forum have favorite knives as well, so a simple search would be worth the time. If you are interested in the Gomph knives, Lonnies phone number is (520)642-3891
hope that helps,
Darc
ps here's the link to the favorite knife thread.
-
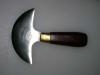
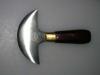
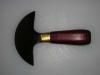
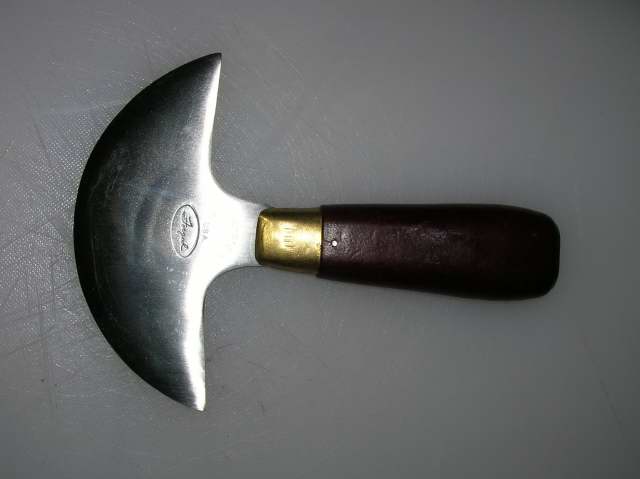
I just received a brand new Osborne 71 head knife that I ordered... and was rather disappointed when I opened the box. The blade is not centered (tang offset to one side), there's a small crack in the handle where the nail head is, and the bolster is grubby with some small denting and scratches. This one looks shoddier than the head knives I've seen on display at the local leather store (they were Tandy or Osborne) ... but that's all I have to compare to.
Is this typical quality for a brand new Osborne knife, or should I expect better? I ordered it from a relatively well known leather tool supplier.
Attached are pictures of the knife ... (dark color of blade in one pic is a shadow from the flash)
Any advice or suggestions on what I should do with this knife (keep, exchange, refund?) are very appreciated.
Wyldflower
-
Thanks Ross for explaining how to do the twist - and the heads up that I'll want an old favorite movie on to keep me company for awhile when I try it, to get me through the twist, stretch, and repeat process
I just sew my fringe on to the leg, and cut it the way I want it. Then I soak the fringe in warm water (I try to avoid getting the leg wet), and start start twisting it. I'll twist up a piece of fringe real tight and then stretch it as much as I dare. If you yank on it to much you will break it off, so just firmly pull on it. Stretching it out seems to set it and keep it from untwisting so bad. Then just let it dry. The thing that I don't like is it makes your fringe all different lengths. It think that the only way to avoid that would be to cut it long, twist it and then trim all your fringe to the same length. But that would be alot of work. Took long enough as it is.
Ross
-
Ross ~
Wow! Really, really nice.
Would you mind sharing how you get the fringe to twist like that?
Hope you treat us to some more examples of your work soon!
Wyldflower
Here is a pair of chinks that I just finished up. The lady that I built them for, picked really good colors I thought. Critique and criticize away, you can't hurt my feelings with an axe.
Ross
-
Thank you, Steve, for the information about the approximate age of the saddle - very helpful and appreciated. I will look around for a copy of the book.
I tried to be as gentle as I could in taking it apart, as I wanted to preserve the original pieces as much as possible. Fortunately the only part that didn't survive were a few of the llittle scallops where the leather wrapped the fork into the gullet - they just crumbled and the nails were a bugger to get out. I couldn't believe how many nails were in that saddle! I saved all of the nails too, except the one that rolled underneath the washer. I will use the original pieces to copy the tooling and perhaps rebuild a replica or very similar saddle to this one.
You suggestion of hanging onto the tree as an example of old time workmanship, besides being great advice, just resonated with my packrat tendencies. I love when those tendencies get some justification!
thanks much
Dixie
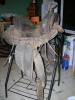
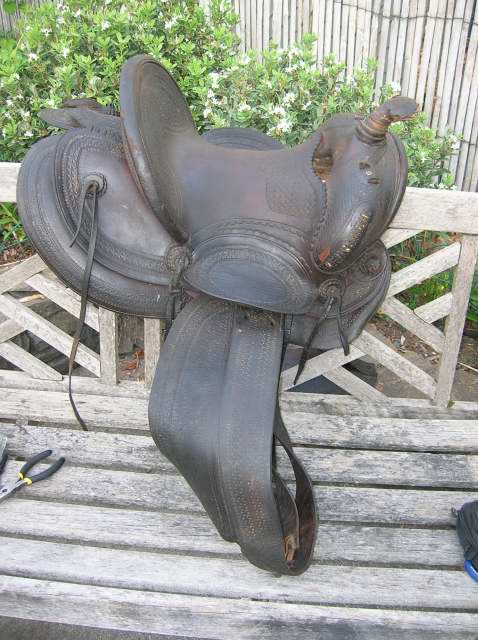
Very nice saddle, lot of history there. Lot can be learned by tacking them apart on how they where constructed.I would save the tree it is a great example of the trees made in that era. some note worthy contruction that would give clues to its era; swell fork, straight up high cantel with very little dish.eight button seat. round skirts(california influence), stirrup leather ouside fender. I would guess this saddle to be some where between 1910-to 1925. A great book on saddles is They saddled the west by Rice. The old time trees may not fit todays horses, horses conformation has changed alot from that era.
steve
-
Howdy again~
I picked up an old saddle at the auction - I really liked the border design, and it seemed pretty intact. Worst case scenario it would be my tear down project. So, I started cleaning it up, but sadly, the leather was in pretty sorry shape on a lot of it with dry rot setting in. No maker's mark or such anywhere. So, I got some great practice at tearing down. It took me about a day total, took a ton of photos and actually had a lot of fun learning about how it was put together.
I'm curious as to the approximate age if any one has an idea. And since I'm developing a taste for these old rigs, if someone could recommend a book or two that would help me with identifying age, style, maker, etc. that would be wonderful.
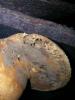
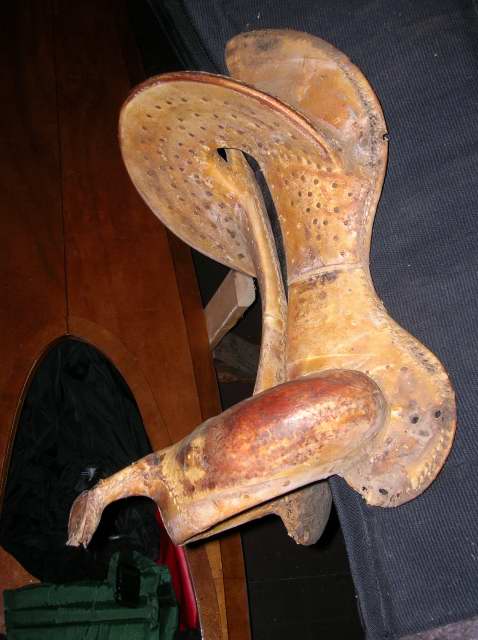
The tree looked pretty good to my totally-untrained eye (pics attached, showing overall and the two iffy spots ), so I took it out to the barn and set it on some horses. This was the first time I've set a bare tree on a horse, so I really didn't know what I was doing, but I was guessing that the bar should "flow" with the shape of the horse, without the edges digging anywhere based on what I've learned (mostly here at LW btw!). This old tree seemed to be made for a "rafter" shaped horse - narrow, whose body sloped down from the spine. I tried it on a friend's thoroughbred, and the angle seemed better than on my paint horses, but it bridged on the outside edges on the front and back bar tips. My first thought is the bar angles are telling me this is a pretty old tree and will not fit most modern horses - am I on the right track?
So... now that I've got it torn down to the tree, and if the tree won't fit many horses, what do I do with the tree? And, how does one judge the condition of the tree, in general and for it's age?
Thanks so much
Dixie


-
Hi Bobby~
Thanks for the information about the tooling! I hadn't seen tooling anything quite like it before - most of the old saddles I've seen don't have any tooling on the seat surface, only on the cantle "dish" part of the seat (sorry, I'm sure there's a proper term for that part of a saddle's anatomy!). That this one had both, but were somewhat different from each other - cool!
If I were to try to preserving this design, how would I go about it? My first thought is doing a rubbing, and then transferring the pattern via tracepaper. Any thoughts?
Dixie
Dixie,
I agree with Bruce and Jon, and as a tooler I am particularly interested in the tooling pattern I see on the seat. It is very unusual to see a pattern that was done like that one, on a saddle of that era. It demonstrates a lot of the design attributes not found until the 1950's and 1960's. The tooler was way ahead of his time on this one!
Bobby
-
Over the past year or so, I generally lurk and learn, and only occasionally post. However, this board has had an huge (and positive!) impact on my little ol' life... thus, I feel I should speak up here. That leatherworker.net is growing such that upgrades are needed is great news! And hats off to Johanna and the other "behind the sceners" who are putting in lots of hard work on their own time to keep leatherworker.net healthy and viable for all who wish to share in this amazing community.
I am like some others here who do not relish change, so I really appreciate the reassurances during this process - especially about the blue skin! If at least the original color scheme returns, I will be much happier. For now, I will have to limit my visits with the blues and black/white contrast until it's back as it was or users can set their own color schemes. That makes me sad, but if the alternative is non-functional board, well that's a no brainer!
I agree with others that post-upgrade, the closer the end-user interface is to the pre-upgrade, the better.
I think as the upgrade is completed there will be many more things to like than to not. We all just gotta hang in there
Dixie
-
Hi Jon~
Ah! I wondered why the border around the skirts and jockeys just ran off the edges! That makes sense. The fleece is in really good shape, and with all the masking tape around the horn, I'm gonna guess this saddle was in use until fairly recently. It's really a shame that it was left out in a barn for the mice to chew on. The more I learn about the history of these old rigs and those who made them, the more interested I get. I'm not sure that's a good sign! LOL!
Any pointers on where to dig for information about the tree design and/or the maker?
Thanks for the info and feedback, very helpful! I was excited to have it just cuz it was a neat old saddle, but I'm super excited to have it now and learn more about it. Only now I still need to go find an old junker to tear apart - oh well!
Dixie
Dixie,Keep in mind, if you want to do a resto on this old rig it should have square, pointy skirts and jockeys. If you look at the present skirts and jockeys, it is obvious at some point they have been cut, resulting in the large radius. I've seen a number of old square skirt saddles done like that. Those big old skirts really curl up at the corners after they've been hanging in the barn for 50 years and they ain't gonna flatten back down so alot of folks just whacked em' off and try and get some more use out em'.
From what I can tell in the photos, this does indeed appear to be a White River style tree. Neat old piece!
Jon


First Chinks!
in Clothing, Jackets, Vests and Chaps
Posted · Edited by wyldflower · Report reply
Here are a couple of pics of my very first chinks. These were also my first larger leather project. I used a Bob Klenda pattern. The only chinks I've seen close up are my farriers, so I relied heavily on photos and guesswork. The person I made them for wanted a Celtic pattern on them with dragon conchos, and Celtic knot conchos on the leg sheilds. The original legshield pattern was too long for as short as the chinks needed to be, so I had to make up a different legsheild design which luckily worked out ok. I also had to learn on the fly how to cut down a pattern sized for a average guy to fit a small woman.
I learned a whole lot, got plenty frustrated, made a bunch of mistakes some of which I was able to fix and do over, and others I had to live with. Lots I would and will do differently next time, but overall, for a first project I think they came out ok. I made them for a family member, and they are happy with them, so that is the most important thing! I must truly have the leatherbug, because I can't wait to start on the next pair!
Some of the things I learned:
Measuring twice before cutting isn't enough for me - three times and maybe four!
I need to do lots more stitching practice with my Cobra 4 if I can't use my roller guide to help me stay on the stitch line
What I thought was a little resist was waaaaay too much - sometimes having a generous nature works against you!
To have faith that one's tooling will get better with practice.
Do not ask someone to try on the chinks half a dozen times so you can stare at them and mutter how the *bleep* am I gonna fix that? during their favorite tv show.
Be as grateful for what you did right as for what you learned from the mistakes you made - both are really important.
Thanks for looking and any tips you have I can add to my "learning list" - they are welcome!
thanks much,
Dixie