Bender
-
Posts
24 -
Joined
-
Last visited
Bender's Achievements
Member (2/4)
-
Thank you! Once again it is a matter of finding out what the heck to use for the search terms! I hadn't been using "die-cut" in my search. Well...duh! Right?
-
Ran a google search and Springfield Leather search and came up empty handed. Wanting to do a one of a kind piece, so just looking for letters cut out of leather, say 5-10 oz veg tan,. Not letter stamps, but pre-cut letter shapes. Think anybody out there has such a critter?
-
Hey! Stuck on contact paper ain't a bad idea! Did use straight edge and rotary cutter. Definitely works. Found that method more time consuming. Hence the template. But it's all about trade offs isn't it? The template has the potential to be a lot faster, BUT only if I can deal with the leather squirming under the template. We're still working on it off and on.
-
Oh thank you BOTH! I had already thought of glue, such as a spray adhesive, but I figured I would still wind up with residue stuck on the leather. And the cutter you linked is exactly what I was trying to do with stacked razor blades! Also keeping the ends "bound" together then cutting one end free after cutting will surely help resist "squirm"!
-
We need to make fringe that would then be rolled into cylinder to make a tassle. But we want to make it with a strand size only about 3/32" across. I've even come up with a way to do it on my own, and it did work on the "heavier" 3oz -5oz. So we're trying my method on some thin 2oz garment leather. We want them to be really wiggly. (It's part of a jewelry design my wife wants to make.) But my method just isn't gettin' it. What I did was make a template of a series of super skinny slots and using a rotary cutter, we cut the fringe. Like I said fine on the heavier stuff, but the thin garment leather actually squirms around under the template even worse. The strands are really bad looking, I did try clamping a stack of single edge razor blades together, but that was just hopeless from the get go. So now I'm wondering is there a method or tool, either home made or to be bought that would do such small fringe strand size?
-
AHA! OK I get it. Too much is dependent upon the qualities of the leather itself. Cool. I'll figure something out. I have a bunch of snaps that have been working for other products. So I'll measure those, figure out what they are and start with just going one post length longer for this new product.
-
Oh Awesome! Now I see I have multiple choices. Which raises a question, any kind recommendation on a minimum/maximum on how far above the leather the post should be sticking out? Obviously too short and the post won't grab. (Figured that one out for myself already. ) But what about too long? I would guess that there is a point where too much post material sticking up makes it impossible for it to be pressed down and grab securely also. Again thank you! As soon as I get my post lengths figured out I'm placing an order.
-
Hey! Since we're on the subject of snaps, are there snaps where the "shank" or "stem" or whatever you call it is longer than what seems to be "standard"? I have run across snaps described as "Line 24" which I think are longer but I can never seem to find any actual dimensional specs on these or any other snaps. I need to make it through 4-5 mm of leather with the head (the pretty side). Where that goes is actually a couple of layers. I have been doing my own searching, but getting nowhere because whatever i find is totally lacking in any sort of relevant info. So anything out there? Or do I need to reconsider my design to figure out some way to have where the snap goes come out thinner?
-
Ok, so no applications of anything during storage. Fine. Probably solves the color problem. And fortunately what we have now actually meets those recommendations. Due to where we live, this summer may be problematic, it gets to near desert like humidity levels, even in the basement/shop. But I'll burn that bridge when I get to it. Thanx!
-
Probably not using the right key words or something but getting WAAAYYY too many results. We're small, so not moving a lot of volume...yet. So this leads me to wonder about storage of leather. I think our upholstery hide will be OK, but about our 10 oz veg tan? Don't want drying & cracking? Sure, could oil it but I seriously need it to not significantly change color. Right now we're using the Bee Natural Leathercare RTC Sheridan Resist & Finish on finished product. working good for our needs so far. But what about hide that hasn't been made into product yet. Now I imagine that taking a hide and storing it flat would certainly assist with the cracking problem. But what about drying out? Should we use that Bee Natural stuff on the hide even for storage before it's made into product? Although it doesn't seem to actually ADD much to the leather would it be sufficient to seal the leather so it holds what it came longer? Heck I'm so new at this I'm not even really sure what sort of time line we're looking at for how long a hide can be stored before its an issue, nor how long a whole hide might hang out with us in storage before it is all made into stuff and sold.
-
Well, by "useless" I meant that it just wasn't delivering enough force to actually drive any sort of hole punch or anything through a 10 oz veg tan. (And yes I repeatedly check for sharpness.) And knowing that such have been in use since rocks were soft, yes I was rather befuddled. But then again, said hammer, being wood, it had an extremely light head weight. I do understand the idea of different hammers for different jobs. One whole drawer of my tool box at work is devoted to nothing but different hammers, from tiny little guys up to a short handled 8# sledge. I wonder though, I use chisels, punches, drivers etc etc almost daily at work. Most used with a steel hammer. Are these leather tools made from a softer or perhaps more brittle grade steel than what a mechanic's punch or chisel might be made of? Would that be part of why these specialty leather working hammers are made of softer lighter materials?
-
I see that leather workers use special wood, leather, or plastic hammers. Fine. But WHY? I'm not doing any stamping yet, just punching holes. Bought a leather working hickory hammer, thinking to do the "right" thing. Basically useless. Tried rubber mallet, plastic faced hammer, and dead blow hammer. All just plain useless. Doing great with a simple brass hammer. So I'm not like thinking I'm some sort of Junior Genius, but rather raises the question, what am I missing? Why use such soft hammers? There's gotta be a reason. Because other wise it seems like it's just making life harder.
-
Yep. I have to make a conscious effort to not wind up in full blown Hoarder status.
-
Thank you guys! Oh and battlemunky, thank YOU! It's nice to know once in a while that I'm not a complete, idiot, just a partial one.
-
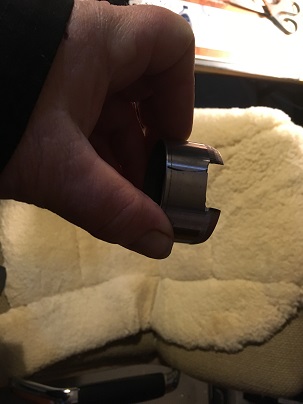
In another post a while back I was asking about cutting 10 oz veg tan, and dies and what not. I knew I could fudge something out of a piece of 2" pipe but I didn't have high hopes for getting and keeping an edge for any length of time. Munging around looking for something for another project, I ran across an old bearing. (car engine T-belt idler bearing) Sure enough the outer race was 2" diameter. I found the steel I needed! Pounded out the inner race, chucked up the outer race on washers and a bolt, on center, the stuck that in my drill press. Running the drill press motor, held a grinder up to it to form the edge, touched it up with a stone, and this thing is crazy sharp, and holding the edge. I even notched the edge so the cut pieces could have a "stem" like we originally wanted.