


TargetRockLeather
-
Posts
154 -
Joined
-
Last visited
Content Type
Profiles
Forums
Events
Blogs
Gallery
Posts posted by TargetRockLeather
-
-
The metal rod doesn't have anything to do with hygiene. It doesn't do the same job as lets say a stone or a strop with compound on it. Those remove metal and polish the edge. The rod on the other hand does not remove metal. It is used to re-align the microscopic "feathers" on the edge that form from normal use of the blade. I don't see any reason not to use a strop if you think it needs it, but in between uses the rod should be sufficient.
-
Even if you buy sharper, better knife, you'll still end up at the same place eventually. No knife will stay sharp indefinitely. If you can't achieve a satisfactory edge on the Osborn, then you'll eventually run into the same problem even on a higher quality knife. I have an Osborn and although it wasn't "great" out of the box, I was able to polish the edge to where I'm quite happy with it. It can be done. My advice would be to keep the Osborn and practice with it until you're happy with it. Also, you should strop it every time you use it to maintain the edge, rather than having to re-sharpen it when it becomes too dull.
-
On 12/12/2021 at 1:59 PM, chuck123wapati said:
are the posts to long for the material? if so they will bend offset every time
26 minutes ago, HandyDave said:I allways use the right anvil and setter sized for the snaps or rivets thats being used with no problems. Most everything has allready been said. And i 100% agree that 99% of the time a snap or rivet sets crooked is because the stem is to long sticking threw the leather. I dont buy tons of different length stems though. I buy the longest of each size then cut them down with dremel or bench grinder if needed so they stick threw only about 1/8" on the leather im working with. And like has also been said gently roll the setter while you gently tap to slowly roll the stem down then a good tap to finish. This is just my 2 cents.
I agree that the length of the post is most likely the problem. Another trick that might work, depending on the project is to place a leather disk under the snap to make the leather thicker for the post. But the best solution is as HandyDave said: grind them to the correct length.
-
10 hours ago, threepets said:
That's what I use too. Easy to work with, cuts easily with just about any type of blade. Rotary cutter too. Best of all it's cheap. Look like Springfield has the same thing for a few pennies less.
-
That's a very sturdy looking jig. I'm sure you get very consistent results with it. The only downside I can think of is that it appears to be built for that knife alone. Too bad you can't use it for other knives. Nicely done.
-
16 hours ago, DaveP said:
I'm using a 8 prong and 4 prong stitching chisel...
In my opinion, a 4 prong chisel can't make a curve as tight as the one at the bottom of your sheath. To me, it looks like you have two straight rows of holes, rather than a softer curve. Have you ever tried using a two prong chisel for the tighter curves? I would give that a try on a piece of scrap just to see if you like the way it looks.
-
This is where I got mine:
https://www.leatherstampmaker.com/
Very reasonable prices. Quick turnaround. Really nice guy too.
-
On 11/26/2020 at 3:16 PM, Chris623 said:
Thanks, tsunkasapa. I just ordered this: https://smile.amazon.com/gp/product/B07C86H7NQ/ref=ppx_yo_dt_b_asin_title_o00_s00?ie=UTF8&psc=1
Ordered the 1 pound size. I think the weight is distributed a lot differently than my maul and think the pivot point will be different, making it feel less heavy. We'll see. If it's not what I need, I'll offer it up for sale.
I assume that by now you've received the maul and have had a chance to use it. How do you like it? From the pictures and the description it looks like a nice tool at a very reasonable price. I'm wondering about the texture of the nylon on the head though. It looks like that would get chewed up over time. What's your opinion after having used it a while?
-
13 hours ago, Rahere said:
Edge burnishing simply polishes the edge, leaving it visible.
I find that in my scenario, where there is a noticeable layer of rubber, I can't get a really good burnish along the center. Glue doesn't burnish. That's the most annoying thing about having the glue layer.
-
Can you stand to watch one more youtube video? Chuck Dorsett over at Weaver just released a video where he compares "wetting" the leather using the method you described to properly casing the leather. He does a sample project using both methods. The properly cased leather turned out quite a bit nicer. I think it's worth a look:
https://www.youtube.com/watch?v=3tf_mcvMLPw
I hope that helps.
-
If the cement in the can is getting thick due to the solvent evaporating I find that the glue lays on top of the leather and forms sort of a rubber gasket between the layers of leather. I recently added some thinner to the can of Barge cement which made it less thick (as when it was new). Now the cement penetrates more and doesn't leave a layer of rubber between the layers of leather. For me it made a noticeable difference.
-
Another option might be a drill press with a burnishing tool inserted into the chuck. You can get an inexpensive bench top drill press for $50 - $150 range. The burnishing tool is very inexpensive. The advantage of having the drill press is that it can be used for many other purposes including drilling stitching holes in thicker leather. You haven't said where you are in the world but in the US you can find a drill press at Harbor Freight.
I think this is the one I have: https://www.harborfreight.com/power-tools/drills-drivers/drill-presses/10-in-12-speed-bench-drill-press-63471.html
1 minute ago, mike02130 said:I bought a burnisher and drum sander for use on my battery drill. It works great on belts and handbags. I also have a 1725 RPM motor with a wood burnisher I turned on a lathe and drilled a hole into the end and attached it directly to the shaft. I've never used a Dremel but I believe they spin at a very high speed; I don't know if that is good or bad.
The Dremel I have is variable speed. I'm not sure if all of them are that way but they are surely available.
-
On 4/11/2020 at 11:18 AM, LatigoAmigo said:
You should use 4 oz. leather; the straps should be 1 inch wide; they should be the same width all over. Once you've made these and worn them for a while you'll have a better idea of what works best. Some suspenders are for function (wider) and some are for fashion (narrower), so that determination will probably drive you to your final design.
On 4/12/2020 at 7:54 PM, Dwight said:A friend had a pair of suspenders with these to protect the leather seats in his Mustang, . . . the others scratched the seats badly.
He loves em, . . . so I made a pair, . . . mine are 1 inch wide, . . . no elastic, . . . and I have no problem at all with them. They are really comfortable, . . . but if I decide to re do them some day, I'll make them 1 1/2 inches wide, . . .
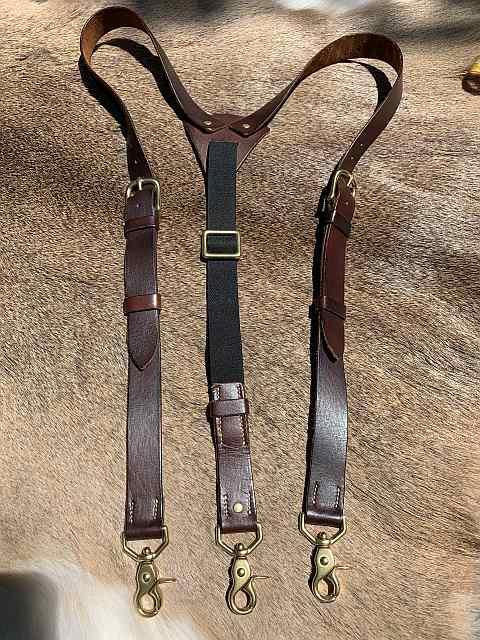
I haven't had a chance to thank you both for the advice. I made mine out of 4 oz veg, 1 inch wide using the hardware I mentioned. I used elastic for the back strap, but as Dwight said I didn't need the elastic. It works fine though and they are perfectly comfortable. This set was more or less my prototype. The next one I make will probably not have the elastic and I'll do a better job keeping my stitching straight. I'll also stitch the "Y" piece in the back instead of rivets. I used the rivets because I wasn't confident in where the placement of the Y would be and what the angles would be. So the rivets allowed me the flexibility to experiment. Here is my prototype, in case you're curious. Thanks again for the advice.
-
I love the orange and black together. You must have had a heck of a time keeping the black from going where you wanted only orange. You could also do an all black strap stitched with orange thread. I think that would look great too.
-
No rivet! Proper stitching is stronger than a rivet anyway. I have tested this myself and the stitching holds up better under stress. Assuming of course there is a welt as previously mentioned. I agree that rivets are used on cheap stuff.
-
4 hours ago, Tejas said:
Might not apply to your application, but I use Renaissance wax on tools.
"Renaissance Wax is a brand of microcrystalline wax polish used in antique restoration and museum conservation around the world. Commonly used to polish and conserve metal objects, ...."
I just had an unpleasant experience with Renaissance wax. About a year ago I started using it to protect some guns and knives that i have displayed on my wall. Last week I noticed that the barrels of a black powder rifle and pistol had started to rust. I had to sand down both barrels and re-blue them. From now on I'll be using "Break Free CLP" or even WD40. I never had rust issues in all the years I've used those. The only reason I even tried the Renaissance wax was to avoid getting oil on my hands and making fingerprints while handling them to show them off. Your millage may vary but I personally wouldn't trust it again. Sounds like Ballistol might also be a good alternative. I may give that a try.
-
19 hours ago, tsunkasapa said:
I start 1/2 the distance of a stitch (aprox. 1/16-)from the edge. All stitching is confined to the belt loop itself. Never had a curl up, never had a thread fail. YMMV
I've often wondered which way is more correct. I've used both methods and can't decide which I like better or which is more durable. It seems that there are varying opinions. personally I prefer the "look" of your method (not stitching the base) but I thought extending one stitch beyond the end of the loop might be more secure. Is either method more "correct" than the other? Might be an interesting topic for discussion.
-
I buy most of my leather from Springfield. I think their quality is quite good, but you do have to pay attention to the grade of the leather. The better grades are slightly more expensive, but decent quality in my opinion. They also sell by the square foot which I like if I need something for a specific project.
-
6 hours ago, DaveP said:
A little too dark for what I thought it would be
Nice job on the sheaths and the knives are absolutely beautiful. If the color is too dark for your liking, you might try mixing a bit of the chocolate into some saddle tan to adjust the tint for the next sheath. Test it on a piece of scrap until you get it where you want it. I think it's just fine the way it is though.
-
4 hours ago, Ed in Tx said:
I highly doubt you are going to find a supplier that would meet all of your criteria for the $50 or less price point. From what I can tell by your criteria you are really looking for 2 different stamps at minimum. You can't have a flat back stamp and the ability to attach a handle in the same stamp. You may need to adjust your criteria or budget.
Actually, you can indeed have a stamp that works both with a handle or in an arbor press. The one I purchased does exactly that. It has a threaded hole in in the back of it where I can screw the handle into it, or leave the handle off and use it with my arbor press.
This is the guy I used: https://www.leatherstampmaker.com
The stamp I purchased there meets all of the requirements you listed except that you will probably only get one stamp for the price you are willing to pay. Maybe he would work something out for multiple stamps. Real nice guy too. I've spoken to him on the phone to explain what I wanted. The stamp I bought is solid brass so it won't rust and can be used for hot stamping.
-
When I first started researching leather working tools, I found this video by Ian Atkinson. He gives a very nice overview of the basic tools you would need. He's also got a list which includes suppliers. In my opinion it is an excellent starting point:
The video: https://www.youtube.com/watch?v=VTfMRaVyCd4
Tool list on his website: https://ianatkinson.net/leather/toolset.htm
Before the comments start, yes, he also sells patterns and finished pieces. He's got some very helpful videos for free though. Check them out.
-
5 hours ago, Bert51 said:
You could taper the straps down to inch at your hardware from inch and a half at the shoulders?
That is probably what I will do if I decide I don't like the 1 inch straps, rather than buy all new hardware. Thanks for the suggestion.
-
12 hours ago, Dwight said:
but if I decide to re do them some day, I'll make them 1 1/2 inches wide
Thanks for that input Dwight. I was tempted to try them without elastic. Maybe I'll try leather only and then splice in the elastic if I don't like it. As far as the width, I already purchased 1 inch wide hardware so I'm going to start with that. I'm glad to hear that you found them comfortable enough at 1 inch.
It's funny, with all of the info I have read about suspenders, I couldn't find specifics such as width from guys who actually wore them. Lots of info about the appearance but not much about how to make a pair that feels good to wear. Thanks again.
-
23 minutes ago, LatigoAmigo said:
I would like to add that you will want to allow for some elasticity in your design
I understand. I am planning to add a piece of elastic in the back, near the bottom to allow it to stretch when leaning over.
24 minutes ago, LatigoAmigo said:how are you going to connect them to your pants
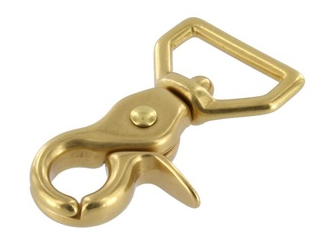
I know what you mean. The ones that clip to waist can either slip off or even shred the fabric over time. I purchased these clips to attach to my belt loops, though I have considered sewing buttons onto my pants to attach to. This is what I am planning to use:
What are your thoughts about the "Y" connection at the back? I've seen some with a metal ring and others riveted or stitched to a leather panel. I am leaning toward using leather rather than the ring. What would you suggest?
Makers stamp
in Leatherwork Conversation
Posted
I got mine here: https://www.leatherstampmaker.com/
I think the quality is excellent. Nice sturdy brass. Very fast turn around time too.