Angster
-
Posts
69 -
Joined
-
Last visited
Content Type
Profiles
Forums
Events
Blogs
Gallery
Store
Everything posted by Angster
-
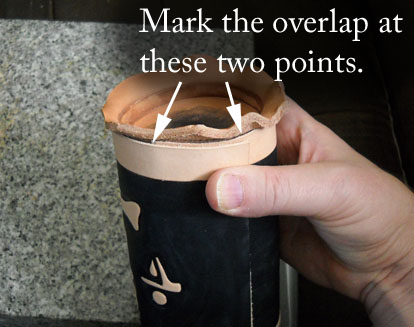
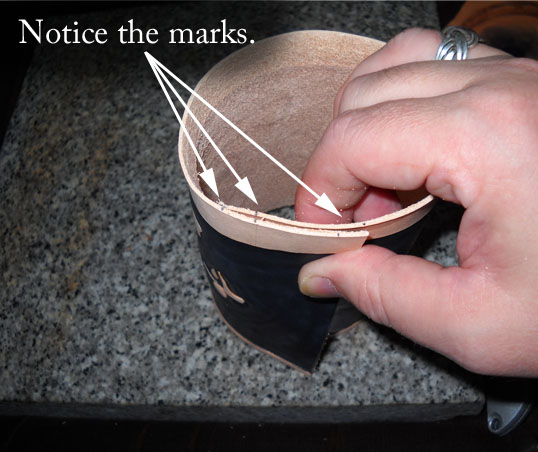
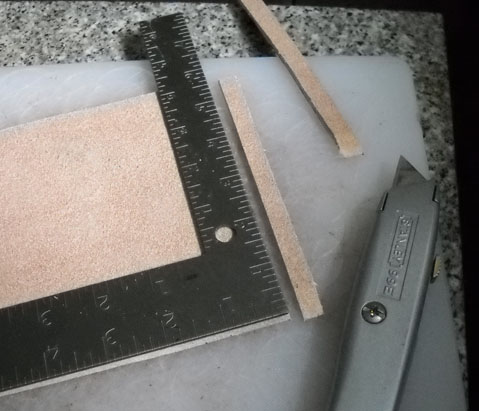
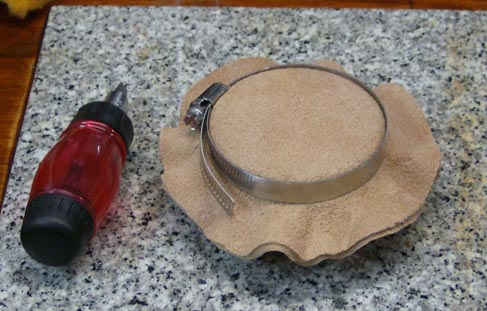
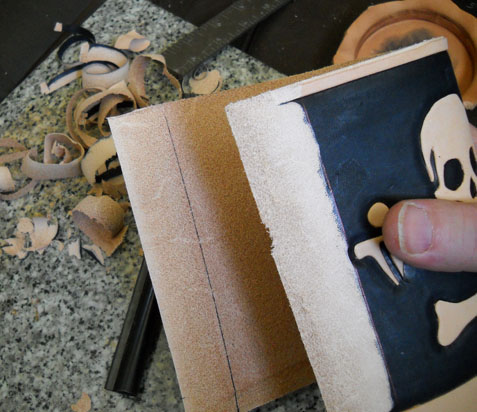
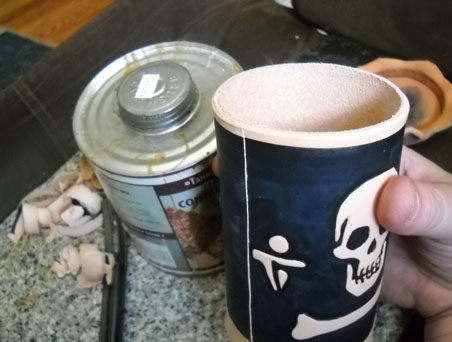
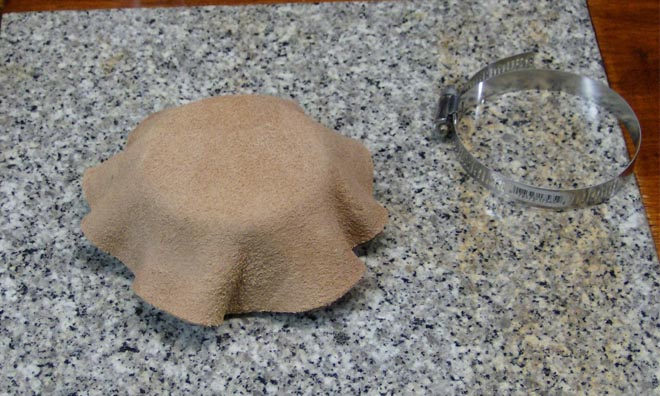
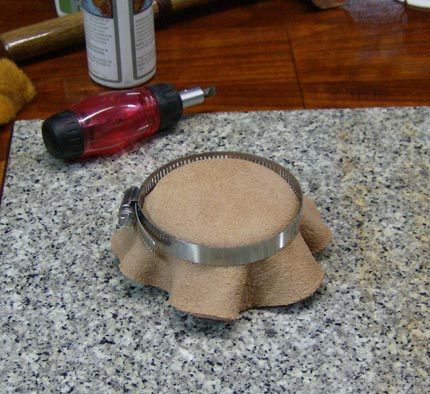
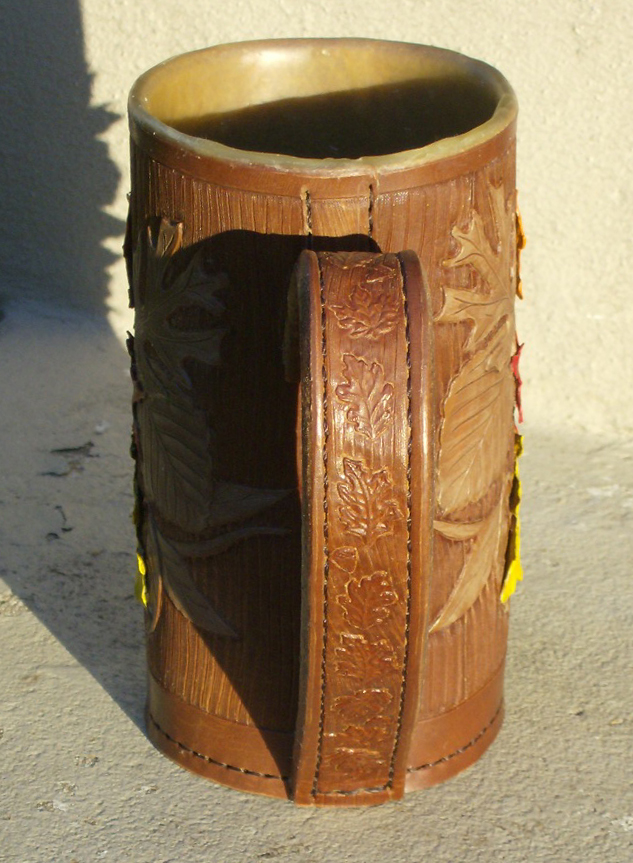
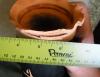
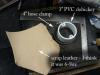
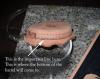
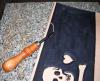
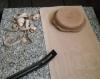
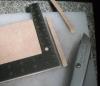
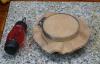
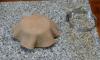
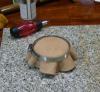
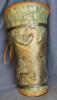
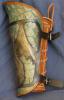
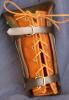
Ok, a while back (yeesh, has it been a yearnow?), I said that I would put together a tutorial on my method on makingmugs. Finally got everything together, so here it is. I've got over 25 photos to go with the tutorial, so I'm going to be breaking itinto several sections. As I'm not good at organization, I don't have aparts/tools list, so it would probably help to go through the entire tutorialto see what I'm doing, then you can figure out what you'll need if you want totry to make a mug yourself. Oh, on an off note, this is just how I doit. Don't hesitate to change some of my steps to fit the way you dothings. Let's get started. Forming the Base To form the base, I use a 3 inch diameter PVC dohickey (I think it's supposed to fit in a floor drain, the screw holes were for the metal screen top) and a 4 inch hose clamp. The leather doesn't have to be too think. I'm pretty sure the leather I use is 6-8oz. Anyway, soak the leather a while until all the bubbles have been released and the leather is fairly moldable (moldible? moldy?). Push the leather down over the PVC until you can fit the hose clamp down flush over the top of the whole mess. As you tighten the hose clamp, you may need to shove and push the leather around a bit to make sure you don't have any crinkles under the clamp. Sometimes I'll undo the hose clamp just to be able to push it down again and get a better grip on things. When you can finally get the hose clamp tightened all of the way down, you'll have something like this. Ok, you're done with the base for now, so set it aside to dry. Making the Mug Barrel For the barrel of the mug, I will use slightly heavier leather, usually 8-10oz. The dimensions are 6 inches high by 12 inches long. Note: The dimensions I'm using are for a base formed on a 3 inch PVC dohickey. If you use another diameter, you'll have to adjust the length of the barrel. I'm in the middle of making a pirate mug for this tutorial. As you are waiting for the base to dry, you can tool/stamp/paint the barrel however you'd like. You will be trimming approximately an inch from the length of the barrel (it will make sense a little further on, trust me), so keep that in mind while tooling/stamping/painting/whatever. Preparing to Stitch the Barrel I put this picture here instead of the first section because some of my points pertain more to this section. Look at the bottom of where the hose clamp marks are. The bottom of the barrel is going to line up here, which is actually fairly easy to accomplish, as that line is a crease that the barrel leather is going to rest against. Oh, also at this point, you may want to trim the excess down a bit from the base. Don't cut up past where the hose clamp marks are, however. Again, the whole trimming point will make sense in just a second... This is just a personal preference, but I will edge bevel the top edge of the barrel, on the outside only. You can fiddle with this to see what you like best. Next, you will want to skive the inside of the bottom edge of the barrel, about half of the thickness of the leather and about as high as the base (the portion of the base that was covered by the hose clamp). Again, this is optional, but stitching through 1 1/2 thicknesses of leather by hand is easier than stitching though 2 full thicknesses of leather. WARNING: If you do this, make sure you're skiving the BOTTOM edge! Yes, I have skived off the top edge before... Now, wrap the barrel around the base, getting it fairly snug. mark the leather at the two points where the ends meet. This will help you figure out how much you'll need to trim. What you will want to end up with is a 1 inch overlap. MATH WARNING!!! Measure the amount of overlap you marked on the barrel (I measure both ends and average the results if I'm a bit off). Then subtract 1 inch, and the result is how much leather you'll need to trim off. ARTISTIC WARNING!!! If you have not tooled the barrel, or it's a repeated stamped design, you'll not need to worry as much about which side you trim down. However, if you tooled a design in the barrel and you want it to face out properly when holding the mug by the handle, you may need to trim a bit off from each end. I wish I could give you a definite method to achieve this every time, but I'm still guessing and fitting it each time I make a mug, so you're kind of on your own, sorry. FINAL WARNING: Make sure your math leaves you with a 1 inch overlap! There's been a couple of times I've trimmid a barrel down only to watch the ends line up, not overlap. Kind of hard to recover from that goofup. Now that all of the math is finished, and you've marked where you're going to trim, cut off the edges of the barrel until you have the correct length. Check the fit again by wrapping the barrel around the base again. The amount of overlap should be about 1 inch. NOTE: The 1 inch rule is not a hard, fast rule. I go with 1 inch because it seems to give enough overlap that the seam is not prone to bending/flexing which would crack the lining. Also, 1 inch is the width I make my handles, so the stitching lines up with the handle pretty well. When you have the overlap to the right size, skive the edges down. This will keep the thickness of the barrel fairly even at 1 thickness the entire circumference of the mug. I skive the outside edge on one side, then the inside edge on the other. To make stitching so much easier, I just glue the barrel closed, lining up where I skived the edges. I've been asked whether the glue would be bad if you're actually going to drink out of the thing. I honestly can't say no way, but consider this. The leather mug will be completely saturated with beeswax, then the inside coated with a mixture of beeswax/brewer's pitch, so there's very little chance of that happening. But, go with what you're comfortable with. That's the end of this section... With the next section, we will stitch up the mug barrel, attach the handle and base.


-
No, the beeswax does not affect the taste of whatever you're drinking. Well, take that with a pinch of salt... That is based on what people who have my mugs have said. Personally, I can't tell any taste given from the beeswax, but I'm considered a non-taster. If you're a super-taster, you may be able to tell a difference. (Wikipedia - Supertaster if you're interested) One thing that may happen, is if the lining was done very recently, you can definitely smell the beeswax and the scent may contribute to an 'altered taste'? BTW. I'm getting the last of the pictures organized for the tutorial. Should have it up soon.
-
Gak! Been crazy busy the past few months. Should have tutorial pictures ready this week, and will work on getting the text done around the same time... As far as using the mugs, they can be used for anything except hot liquids (I've personally used my mugs and shotglasses for everything from water, tea, lemonaide to meade, ales and beers, wine to whisky, rum and so on...). I remember reading somewhere that someone warned about hard liquers and the wax/pitch blends. However, I've not seen anything to suggest a problem and think it might have been geared to leather bottles and storing the liquer for extended periods... Not sure. The blend between the beeswax and brewer's pitch I feel is kind of a personal preference sort of thing. I have a friend that uses around 3/1 wax to pitch, and it seems like his is a bit more prone to leaking from a bad lining (personally I think it's because the high amount of beeswax keeps the lining a bit brittle). With using a 1/1 (50%/50%) mix, I haven't seen bad linings, or leaks... But with any sort of advice, especially from me, take it with a grain of salt and play around. Use what you decide you like, and hang the rest.
-
That's a very inspiring, heart-warming video. I found one like that on YouTube a while back that has some of the same feeling to it. Just goes to show that we are all one people and all we have to do is sing, or dance as it is in this video...
-
In my mugs, I usually go for about a 50/50 ratio, but I don't measure. And it seems like there is a bit of separation of something in the pitch when it's blended with the wax, because I find this thick, tarry substance along the bottom of the can I use for the mixture. I'm assuming it's the pitch as it's very sticky. With that long diatribe, my ratio is probably weakened somewhat from the pitch side, and a bit heavier with the wax... I remember reading up on someone else who was mixing the beeswax and brewer's pitch, and I want to say they mentioned a 4/1 ratio... But I can't remember if it was 4 wax to 1 pitch, or the other way around. All in all, I stick with 50/50 and eyeball it, it's just easier. My blend is still still somewhat sticky, but after a little use, it goes away... I'd just rather put up with the sticky than get the mix too brittle. Oh, and I'm the one with the popcorn trick...
-
If this is your first shot at making a mug, then it was very well done. I'm currently working on building a new work bench for my leatherworking, and as soon as it's done, I'll get a tutorial on how I make my mugs. Again, very nice job!
-
I use a mixture of beeswax and brewer's pitch. They melt at pretty close to the same temperature, and they complement each other. Beeswax can be brittle, brewer's pitch is too sticky. But together, they become slightly flexible and pliant, without being sticky. I've got a couple of mugs to be making in the next couple of weeks... I'll get a tutorial together.
-
That's quite possible, but I'm just scatterbrained enough that I wouldn't be able to say for sure. We are planning on attending Prairie State's show in April. If you're also going to be there, maybe we need to have a leatherworker.net get together...
-
No problems... Help yourself!
-
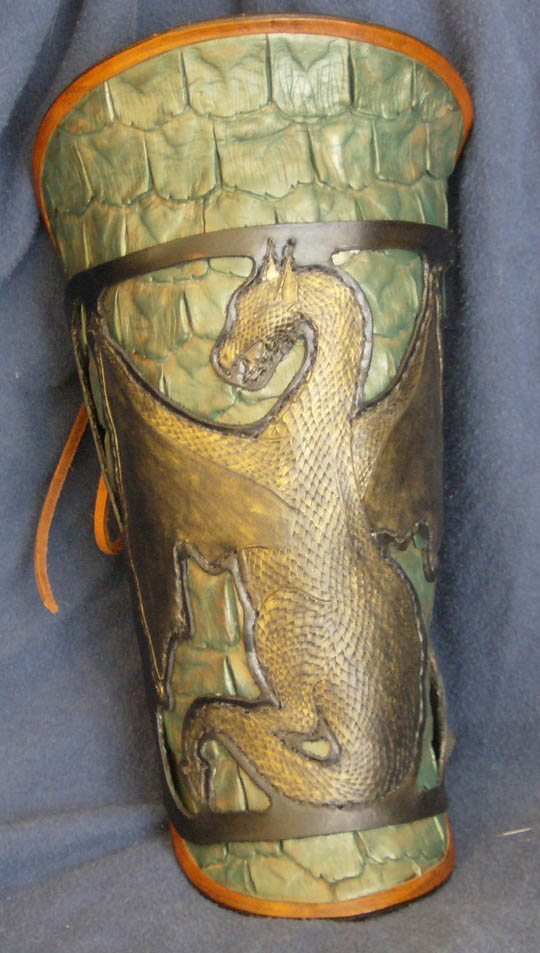
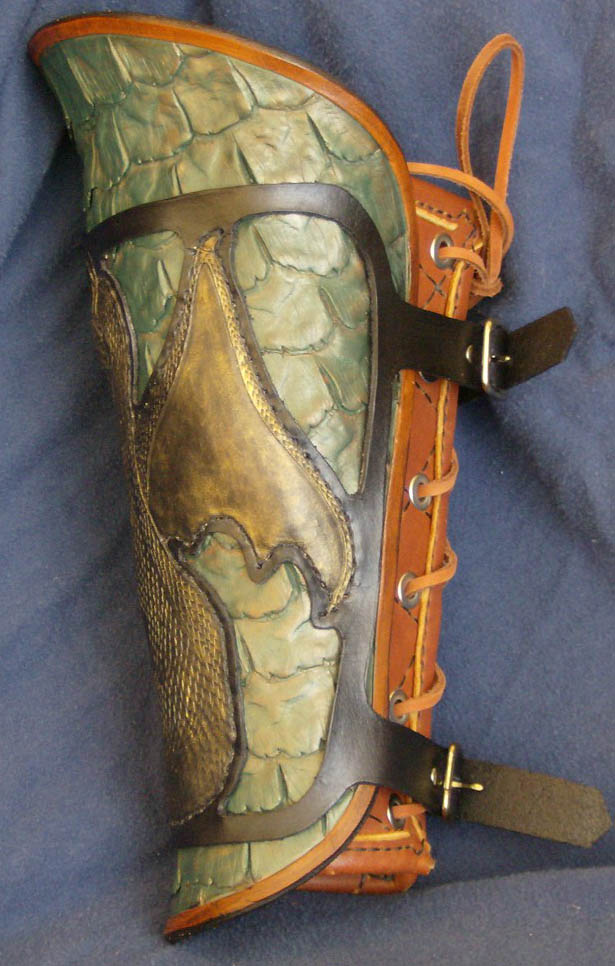
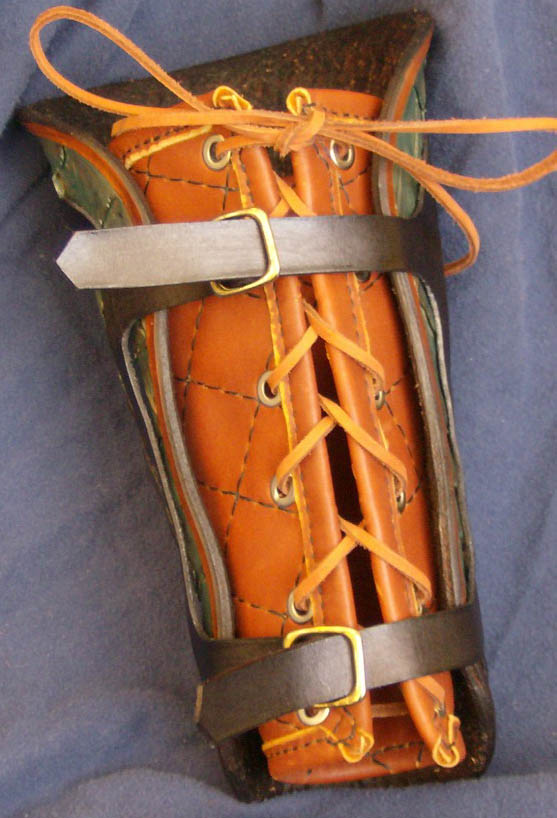
I'm finally getting some free time to work on a new suit of armor for me (my previous armor now belongs to a friend of mine, since he looks way cool in it, and I looked like a complete dork). The concept is to have a suit of dragon-scale armor, but I also want additional tooled designs on it (yeah, the scales are tooled, but is supposed to look like scales, not tooled leather). This is my test piece, and I've already discovered I'll need to adjust the patterns a bit, but the layering of the soft leather, with hardened leather shell wears very nicely. Then I can also tool to my hearts content with the filagree leather on top of all that. We'll see how it goes.
-
My first thought was that it looks somewhat like a satyr. Maybe 'Pan'-tastic? (Ok, the 'tastic' makes the name a bit corny, but hey, you get to keep annoying your kids!
-

Greek body armour called a "linothorax"
Angster replied to Peter Ellis's topic in Historical Reenactment
Very nice work. I made a breastplate for my wife, but she felt it needed something to cover over her hips. The skirting you did would fit the bill wonderfully. Keep up the excellent work! -
For the leather bottles that I've made, instead of using sand, I use good ol' fashioned popcorn kernels. After the bottle is dry and will hold shape, you can lightly tap the sides and convince all the kernels to flee. I also have a friend that used tiny ball bearings... He says that the extra weight of the bearings helps shape the bottle, so you're not spending a lot of time trying to stuff more in. Just a couple of ideas for ya!
-
Saw your post of the visor portion. Glad to find the finished helm and armor. Awesome!!! I think the visor works with the armor, just maybe darken the edges of the feathers, introducing a bit more black. But other than that, I wouldn't change anything. Again, awesome!
-
Azmal. Truly impressed with your work. Keep it up!
-
Very nice work! It looks like you're using screwposts for the articulation? I'd be afraid I'd work them loose. Be interested to know how that works out for you.
-
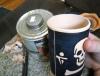
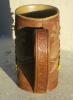
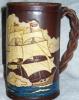
Oops. I forgot to add a pic of my pride and joy. This mug was the culmination of practically every technique I've learned... Formed leather, undercutting, standard tooling, stamping... I did end up selling it to a very nice lady that just had to have it (and spent a good deal of time in the doghouse after my wife found out about the sale...). But, hey, I figure if I made that one, I can make another one...
-
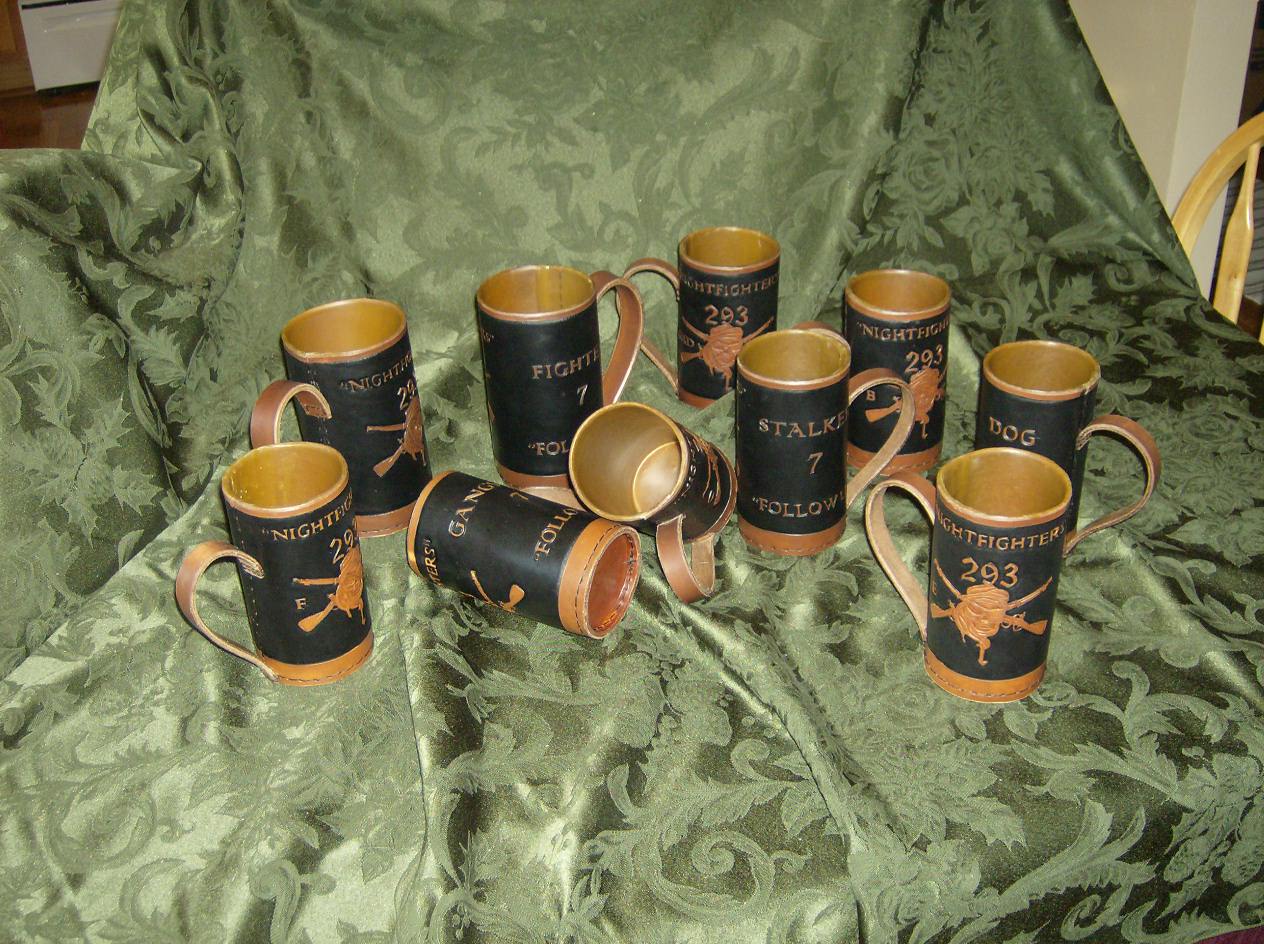
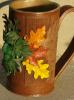
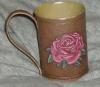
I've been making leather mugs for several years now, and have a slightly different way of putting them together. My method, while not exactly historically accurate does allow you to tool designs on the mug much easier. If there's interest, I'll put together a tutorial showing how I make them. In the meantime, here's a couple of pictures of mugs I've done in the past. This is my wife's mug. She's been using it pretty constantly for the past 6 years. It's held up really well. This is a smaller mug. With this style of mug design, you have the ability to make mugs of practically any size. My largest set of commissioned mugs to date. These mugs are for the command staff of an infantry regiment that just returned from a tour of duty. It was an honor making them.
-
Hello all, and like many of the others, I'm glad to have found this forum. I'm constantly amazed at the beautiful work that is done with leather, and it serves as a reminder that I still have so much to learn. My name is Ben Bass. I have a small hobby-business making armor, bottles, mugs and accessories. I enjoy the hobby, my wife enjoys the business (which means she gets to plan trips to renaissance faires and conventions). I'm finally getting around to redesigning my web site, but you are free to browse some of my previous work at Legendary Leatherworks (current stuff when I finally get the gumption to tackle FrontPage again...). I am the current president of the Gateway Leather Guild, and we look forward to hosting the 2010 IFoLG show in St. Louis. Like the other guilds in the federation, we believe that leathercrafting is a community and our knowledge and skills should be shared and passed along. I look back at the work I did before joining the guild, realize how far I've come with their guidance and support, and know that it is only through the help of others I can do the work that I can now. Which brings me to this forum. Thank you all for sharing your work and skills. I'm inspired yet again to push myself to try new things, new techniques, new projects outside of my 'comfort zone'. I look forward to sharing my projects and skills with you. I was once asked by a patron at my home faire why I was explaining to him how to make a baldric. Wasn't I losing a potential sale? I responded that since he mentioned that he had done some leatherwork in the past, I'd rather share my knowledge than try to make a sale. I've always been like that. So, if you see something that I've done, and would like to know how I did it, please ask!