Angster
-
Posts
69 -
Joined
-
Last visited
Content Type
Profiles
Forums
Events
Blogs
Gallery
Store
Everything posted by Angster
-
Great looking mugs! I'm glad you finally have them finished and posted up! Great job!
-
Urshag, sorry about that... Been trying to get caught up with real life after the IFoLG convention. I don't keep track of the temperature of the wax/pitch blend, but since I only use the double boiler for it, I would imagine it's between 180-200 degrees by the time I use it. The trick with sealing the inside is to pour the mix into the mug quickly then pour it back out slowly, while turning the mug. You want to make one complete revolution of the mug before pouring all of the mix back out, coating the entire inside of the mug. If you look inside the mug, you'll notice where you finished pouring looks thicker than where you started. This is ok. Then wait about a minute (doesn't take long) and do it again, this time rotating the mug in the opposite direction. You'll want to start where you finished the previous pour. This time when you look inside, the coating should be fairly even. Look along the seam and the bottom edge where you stitched. If it looks solid and thick enough, you should be ok with just two pours. There's no problem doing another pour just to make sure. A couple of things to keep in mind. You want your mug to be room temperature before you attempt to seal it. The warmer the leather, the less the wax/pitch blend will 'stick' or cool against the leather, creating the seal. You also want to move smoothly as you're doing the pours. By this, I mean if you pour the mix into the mug and it sits for a length of time, it will heat up the leather and you'll notice the coating is thin on the bottom of the mug. To fix this, just let the mug cool down and do it again. Hope this gives you the information you were looking for. I'm back online more consistently now, so please feel free to ask if you have any further questions. Mark, awesome... I started making shot glasses a couple of years ago and they seem a big hit with the Renaissance Faire crowd. I'll try to get a picture or two posted of what mine look like. Keep it up!
-

2010 Ifolg Fall Show Wrap-Up
Angster replied to Angster's topic in Special Events, Contests and Classes
First, glad to be on board with the communications committee. Second, I'll make sure to get you a CD to post the pictures on the site. As far as the lighting goes... Yeah, you're right. It wasn't something that we thought about when viewing the facilities. However, I think that any event that uses banquet halls will probably have poor lighting (they like the ambiance, I guess). Even the class rooms weren't really bright enough. I'm not sure what can easily be done to make sure there's enough light in the different spaces, other than providing our own additional lighting. Maybe for competition have some sort of track lighting that could attach to the top of the wall sections for hanging the pictures. For the tables, I'm not sure other than having as many lamps as possible to illuminate the tables. Definitely something that needs to be addressed. Let's keep sharing issues, problems, solutions, ideas. Hopefully the future shows will just keep getting better. -
I'll be sending out CD's of all of the award winners to the member guilds of IFoLG here in the near future. If Johanna has space somewhere here, I'll make sure to send her a copy for all of the folk here to view.
-
2010 Ifolg Fall Show Wrap-Up
Angster replied to Angster's topic in Special Events, Contests and Classes
We all missed you there. Loved the jar, it was awesome! -
Yeah, the piece I use measures 3" across from the outside edges. I think it's a drain fitting (it has a couple of tabs on the inside that you can screw a metal plate to). However, I was looking for some more a while back and couldn't find them. I guess anything that is solid and measures 3" would do.
-
Great job! Keep making more of them!
-
2010 Ifolg Pics From St Louis
Angster replied to Leerwerker's topic in Special Events, Contests and Classes
Here's some updates for you. Picture #12 (the building) is John VanZant. I don't think he did picture #13, but I could be wrong. Pictures #21, #22 (the card game), #97 (3D dragon), #100, #101 (tooled dragon), #107, #108, #109 (hillbilly shack) all belong to Roz "The Dragon Lady" Kaohn. Pictures #91, #92 (bird necklace), #125 and #126 (skull notebook) belong to Bonnie Dunnewind (think that's how you spell her last name) Pictures #86, #87 and #88 (vase and purse) are Michiko Matsuda's work. Picture #115 was Anne C. Ross (she didn't know if her work was good enough to be in anything but open... Silly girl) Pictures #137 and #138 (harlequin mug) was Ben Bass (my wife couldn't stand for me not to have something in competition, so this is what we picked). I can probably get you some more names, but this is what I can come up with right now. Thank you for posting all of those wonderful pictures! -
2010 Ifolg Fall Show Wrap-Up
Angster replied to Angster's topic in Special Events, Contests and Classes
I agree with all you say... This stuff is so very cool to look at. But, to answer your questions... IFoLG tracking committee is the official group that keeps track of all of the competition winners. They should have a listing of the results of the show on their website, eventually. I believe they handed out CDs of the results at the Board of Governors meeting to all of the guilds there. I'll check to make sure. As this is something regulated by IFoLG, I feel it is in their pervue to get the information out. Side note (and some good news)... IFoLG has gotten some good folk to assume control of their website. SO, sometime soon, the IFoLG site will start to have some of the webby goodness that is LeatherWorker.net. Pictures... We took pictures of all of the award winners of the show, and we'll be sending out CDs in the next week or two to all of the guilds (whether they were represented at the show or not). I'm hoping to talk with the folk running the next couple of shows to see if there's a way we can easily and quickly take pictures of all of the competition entries. Have some ideas, just need to see if we can get them to work. Since our guild will not be renewing our domain name for the 2010 show, I'll try to find somewhere else we can host the pictures of the award winners. What better way to inspire current leatherworkers to try something new, or interest new leatherworkers to try their hand at our craft. -
Hi all. I know there are several topics here for the IFoLG show that just happened. As the show chair, I'm interested in feedback from all of you that managed to attend. What did we do right, what did we do wrong and did we miss anything? I'd like to gather as much feedback as possible so if we haven't regained our sanity and decide to host another show, we'll be better prepared. I'm sure the guilds getting ready to host the next couple of shows could benefit from this information as well. Only by getting your feedback will we be able to move forward with the shows. Personally, I'm bushed! Finally starting to think I may actually have caught back up on my sleep... The show had some minor hitches that we seemed to have corrected in a timely manner, but as I seemed to be constantly wandering around, I imagine there's a couple of things that I've missed. Let us know what you thought! And thanks!!!
-
Honestly, I've been thinking about that as well... Unfortunately, I've had instances where I've gotten a really cool look, but couldn't for the life of me replicate it. However, I have an idea... Take the leather and just sponge-wet the top of the leather. Then dimple it with either a ball-peen hammer or pear shader. Then you're going to 'bake' it in the oven for a bit. Have the temperature of the over really close to boiling point of water. Since the wet leather will want to shrink when it dries, and the dry leather underneath won't want to, I wonder if it will add a layer of 'shrivel' to the surface... Only problem I see is that the hardened surface of the leather won't then want to be shaped into the mug barrel... Hmmm... Something to play around with?
-
Yes, it will make a difference, of a sort... Both methods will heat wax past the melting point of wax. However, the double boiler will get the wax up to around water's melting point, then pretty much keep it there. A crock pot will keep heating wax beyond that point. DANGER, DANGER. You will need to keep an eye on the crock pot to make sure the wax doesn't get too hot. Not sure, but I think if you just left it, you could get the temperature past the flash point of wax. My crock pot has several temperature settings. I'll start on high, wait for the wax to melt, then turn the crock pot to low. This slows down how quickly the wax gains temperature. You may want to buy a candy thermometer to keep track of the heat of the wax. Keep it around 200 and you should be fine. Look for the thread 'My Take on Leather Mugs'. I have pictures of some of my mugs there. Jason, my crockpot, when full, will melt the beeswax in a couple of hours. I guess it has a cumulative effect on the wax as it melts. Starts slowly, then the melting process sort of speeds up.
-
For those waiting for the tutorial, it is finished. It's in this same forum under the title 'Tutorial on Mug Making'.
-
How long to keep the mug in the wax Since I keep the beeswax in a double boiler, I don't keep as close of an eye on it as if I was using a double boiler. So, when I'm ready to saturate the leather, all I usually know is the wax is melted. That said, there can be quite a difference level in temperature of the melted wax. If it is just at the melting point, it actually won't seep into the leather, just kind of form a waxy coat on the surface. If the wax is too hot, you have the chance to actually boil the leather (turns into some kind of waxy pork cracklin' nightmare). So... I will usually take a scrap of leather (usually the tag end from the handle I cut off) and stick it into the wax to see what the temperature is like before submerging the mug in the wax. This gives me an idea of how long I'm going to leave the mug in the wax. Now, to the easy answer you were hoping for. I'll leave the leather in for about 20 seconds. This is if the wax is around the boiling point of water (what you'd have using a double-boiler). Does soaking leather in hot wax make it stiff Yeah. Almost as hard as plastic. It will soften up if it gets hot (like sitting in a closed up car in the middle of summer). But at room temperatures, it's pretty hard. (Leather poker chips saturated in wax are really cool... Sound almost the same as casino chips clunking on the table) Will the handle be stiff enough As to the stiffness of the handle. I've had handles that still had some flex in them after waxing. This was due to either using too thin of leather or using the 'soft' leather at the edges of the side. What I've started to do to get around this issue is to double up the leather on the handle. Just take two layers of leather and glue them flesh sides together. Oh, and as I glue them together, I start forming the curve the handle will have at the end. This keeps the inside layer of leather smooth. Another benefit to having the two layers of leather is all you have to burnish is the edges. There is no flesh side that needs to be slicked down.
-
Vintager Based Dyes
Angster replied to albane's topic in Dyes, Antiques, Stains, Glues, Waxes, Finishes and Conditioners.
I have just started playing around with this technique, but in doing some research on ebonizing wood, it may be some truth here. You'll have to look around yourself (I've forgotten all of the sites I looked at), but for wood, they were saying that different types of vinegar (apple cider, red wine and such) can be used to produce different colors. I believe the apple cider they said would give you a green hue. Since both wood and leather have tanins that react to the mixtures, I would think that you might be able to create different colors. But I think there is more to the formula than just the type of vinegar. My two cents for ya! -
"Moisten me!!!" Definite creep factor worked into this one. Love it!
-
That looks awesome! Did you manage to wear it at Dragon*Con? I imagine you had tons of folk taking your picture... I really have to get out of the Exhibitor's hall more often!
-
My supplier of Brewer's pitch is Jas. Townsend and Son. They're based out of Indiana. You can look at their website http://jas-townsend.com/index.php and search for pitch. It runs $14 per pound, and if you're doing mugs, you should be able to get quite a few mugs out of the pound (I get well over 2 dozen mugs per pound, but I mix the pitch 50/50 with beeswax).
-
Steve did some great work on these mugs. I'm going to have to step up my game, I think! Keep it up!!!
-
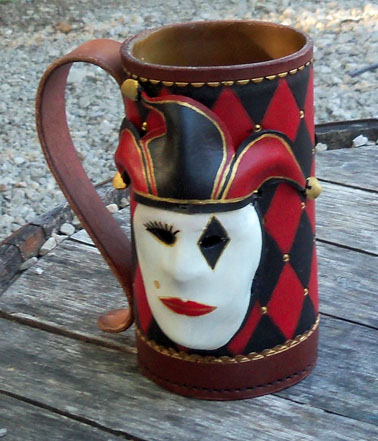
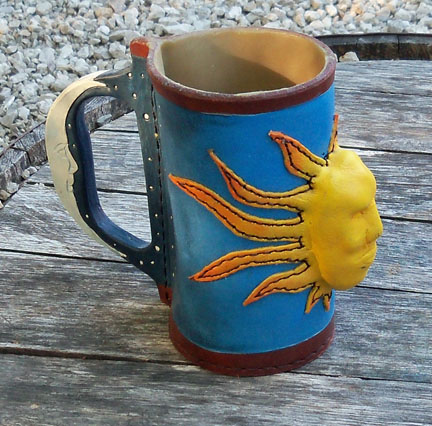
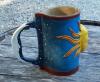
Well, we're past our annual Renaissance Faire, and have some new mug designs. The Sun-N-Moon mug was a proof of concept mug. If I make another one, the gap in the handle needs to be more narrow and the molded sun doesn't need to protrude quite as far. Other than that, I really like how the barrel came out blending from sky blue to midnight with the stars, and I really dig the moon on the handle. Maybe next time tool it a bit deeper. The Harlequin mug was pretty much for my fun. Again, critiquing my work, the face could have been molded better, but came out looking more like a mask, so uhn... Now I'm thinking about making some Mardi Gras mugs with masks, little leather feathers and beads (oooh, beads... Finally figured out something to do with all those leather pills from my hole punch). Hope you enjoy the pictures and maybe get some ideas for yourselves to play with!


-
Hmmm... Well, there was this wall-hanging I was working on, as a raffle item to an event we were going to the next morning. Just finished tooling it and wanted to get it dried out. Put it in a preheated oven at the lowest setting, I think it was 180. Went to look in on it after a couple of minutes and the grain side of leather was all wrinkled like my great grandfather's face. I reasoned that it was because I hadn't fully cased the leather, just wetting the surface to finish the tooling. So, out of the oven and to the bathtub it went. I was able to get the worst of the wrinkles out (along with some of the tooling), and was actually liking how it looked. Sort of old and antique-y. Then, just to compound my idiocy, back to the oven!!! Thinking I didn't want the leather to curl, I lined the rack with aluminum foil and placed the leather tooled side down. Turned the oven back on and was going to let it harden and dry. My wife, being concerned that I was an idiot asked if it was going to be ok, which I said 'Sure, no problem!' But I started getting worried. After a couple of minutes I went to check... It looked like a well cooked steak, grill marks and all. Although the oven said the temperature hadn't gone over 150, I'm sure below the leather and aluminum foil it was probably around 300... Well, needless to say, I was a bit upset. My wife, bless her, quietly disappeared to the far reaches of the house while I raged in the kitchen for a while. All in all, it did finally work out. I decided to recreate the wall hanging during the event, and as folk watched me work on it, they kept buying raffle tickets, so I think we raised more money than if everything had gone according to plan. The barbeque leather piece? It actually has a happy home with a friend of mine. He just had to have it, even though it was a complete mess.
-
Hi all. Just saw this thread. Since I do a goodly amount of leather mugs, shotglasses and such, I do have a large enough vat (crock pot) to submerge the leather items in the beeswax. This is simply a step to wax-saturate the leather to stiffen it, and help protect/waterproof the leather. The actual sealing of the leather mug/shotglass is done with a mixture of beeswax and brewer's pitch, where I'll pour the mixture into the mug, then pour it back out, while rotating the mug to get a smooth coating. With that said, there are alternatives. First, if you want to wax saturate your item, but don't want to have a 'vat' like I have, you can heat your leather in an oven set at its lowest setting (make sure it's under 200F, preferably around 170F or 75C). While your leather is warming up, melt your wax. Then you can either paint the wax onto the leather, or pour the wax in, then back out of the warm leather. The reason you warm the leather up, is it will soak up the melted wax. Then put the leather back into the oven for a minute or two. If you repeat this process several times, you'll finally see the wax 'weeping' through the other side of the leather. When this is fairly uniform, you have successfully wax-saturated the leather. Use paper towels to wipe off the excess wax and allow the leather to cool. Make sure you have plenty of precautions in place to keep the wax from coating the inside of your oven (or you'll get in trouble, and then I'll get in trouble, as my wife will know... She always knows). I put my leather on my own cookie tray (jelly roll pan, the cookie tray with the sides), lined several times with aluminum foil. I also have a large work area covered with either aluminum foil or wax paper, and a roll of paper towels handy. If you don't have or want to use the brewer's pitch, you can simply use the beeswax if you remember that the plain beeswax will be somewhat brittle, and prone to cracks. But, it's pretty simple to reseal/recoat if it's plain beeswax. To recoat, use your oven again, with the cookie tray/foil getup. Place the leather mug upside down and put into the warm oven (again, around 170F or 75C) and wait for the wax to melt out of the inside. Then wipe up the mug with paper towels as it will be sweating wax again, and then reseal after it has cooled down. Feel free to contact me if you have any questions, either through the site here, or by my email: ben@legendaryleatherworks.com.
-
Personally, I've used saddle skirting for armor before, but not the armor/sole bend leather. Saddle skirting will harden up just fine with heating the wet leather (either by using hot water when soaking it before forming it, or heating the leather as it is drying). I would imagine the armor/sole bend leather would be flexible enough when soaked... It's just a more, fibrous?, type of leather, so stiffer when dry?
-
My wife and I have a booth at our local Ren Faire. It's fairly small with 75 or so merchants. Average daily attendance is 2500+ for the spring Renaissance Faire, and 1800+ for the fall Pirate Festival. My booth is still in the process of getting built, but it's intended to be more of an actual working leather shop, with repairs and alterations offered, custom orders gladly accepted, with a small amount of ready stock. And actually, there are several folk from my leather guild that sell through me at the booth, so I don't have to come up with all the stock (yeah!). And this is not my profession, it is my hobby. So I'm not as concerned about what money I make, more about the fun I have while there. Actually, our best seller is a small strip of leather, 1.5 inches by 7 inches. We sell it for $2, and teach/help the kids stamp the leather themselves. They can use it to make a wristband or a bookmark (we'll punch either 2 holes or 1). While they are having fun doing that, the parents get to browse. The funniest thing for me is that we're about 50 feet away from the blacksmith, and they (the blacksmith folk) always gripe that we (the leather folk) are too noisy! The stock that we have to sell is along the one wall, on the shelves and piled in baskets. Other, more expensive items and display items are gathered about the rest of the booth. Hopefully when I get the second floor and a permanent roof in place next year, I can set about with better pictures of how the shelves will be finalized, counters built and so on.

-
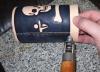
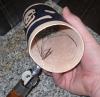
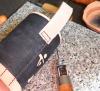
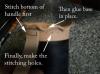
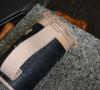
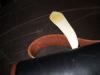
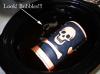
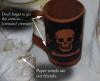
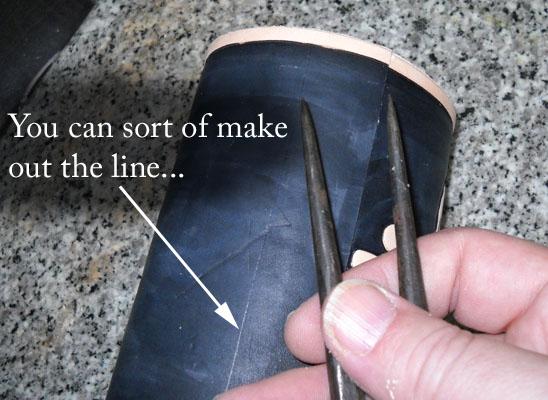
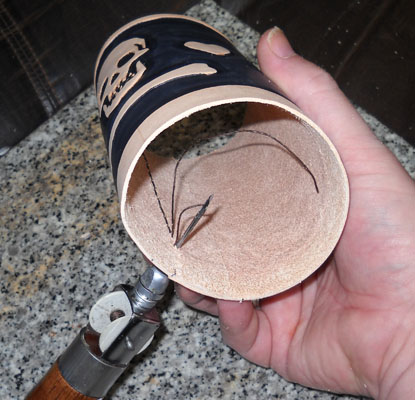
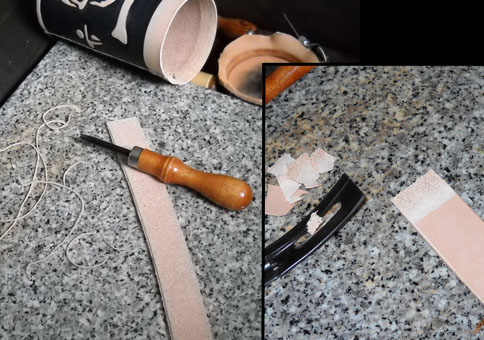
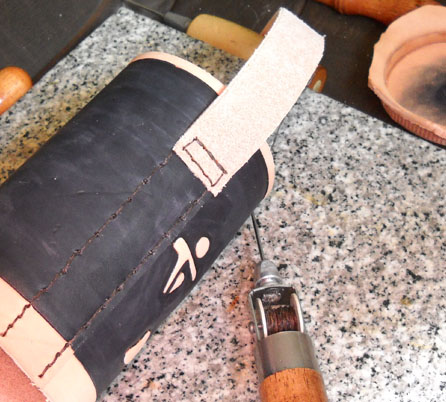
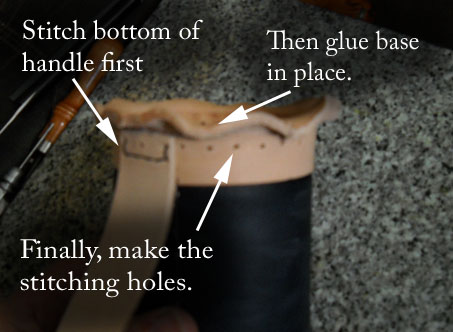
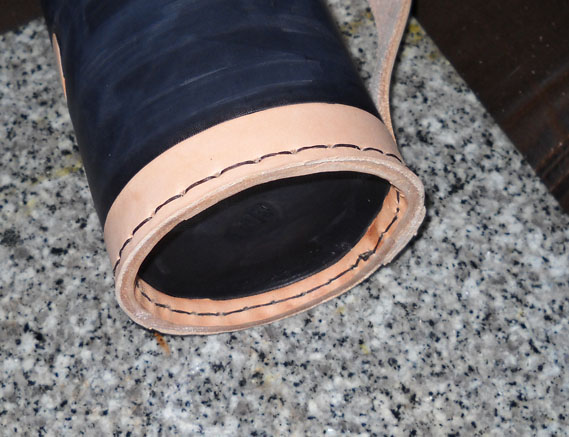
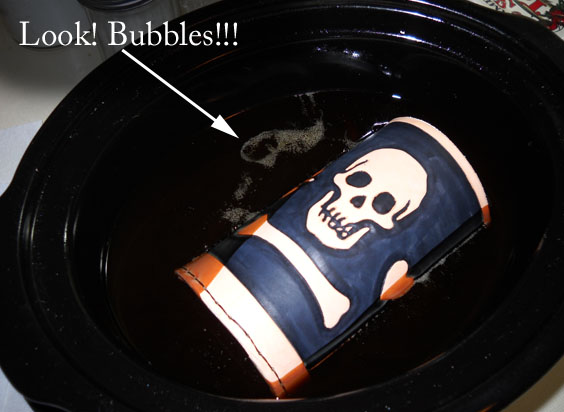
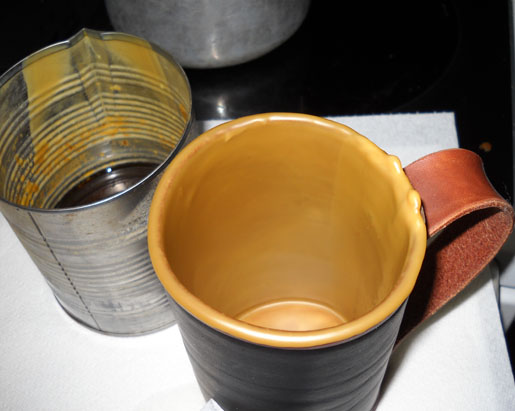
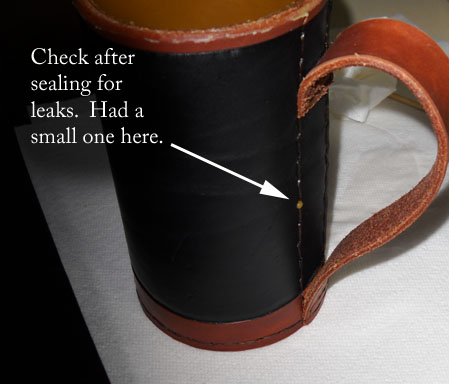
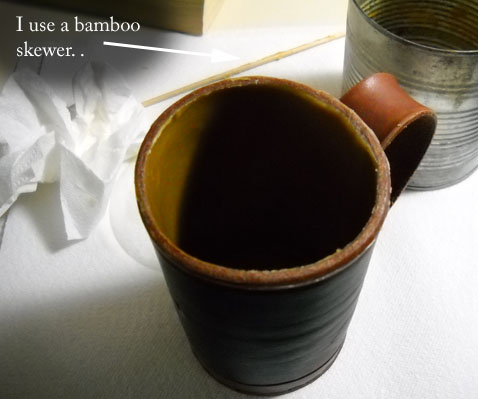
Ok, we've gotten our base formed, our barrel tooled/stamped/painted, then trimmed to size and ready for stitching. Let's forge on ahead! Stitching the Barrel We are going to stitch two lines down the overlap, on each side to hold the edges. I will lightly scribe a line parallel to the outside edge, that would be just inside the inside edge (if that makes any sense). So, for math geeks, if the overlap is 1 inch wide, I'll scribe the line 7/8 inch from the outer edge. That will place the stitch line 1/8 inch inside of the inside edge (ok, I seem to be making it even more confusing). I use an overstitch wheel and hand awl to punch my holes in the leather. I also use a stitching awl for the barrel. You don't have to, and if you have small hands, you can easily (well, easier than I could) use a saddle stitch for the side. But as the second picture is trying to show, using the stitching awl makes it a bit easier to stitch down the sides. Now is the time to put on the handle. I will strap a 1 inch wide piece of leather, and edge bevel both sides, front and back. Makes for a more comfortable handle. After bevelling the edges, I'll skive the edge (grain side) where the top of the handle is going to be. Finally, I'll glue the skived bit to the mug barrel, over the stitched lines. This picture shows the top of the handle after it is stitched on. I just eyeball where the stitches are going to go. I also stitch the box instead of just a line across, since the box seems to make the handle just a bit sturdier. Sorry about the fuzzy picture. The next step is to pull the handle down to the bottom of the barrel, forming out the handle to your preference. Trim off the handle and skive the handle leather at this end (flesh side). Then glue it down, punch some more holes and stitch. The picture shows that to stitch first. After that is done, you can glue the base into the barrel, set your stitch line, and poke yet another set of holes to stitch (don't fret, you're almost done with stitching!). Yet another fuzzy picture, but you should be able to see the finished stitching. Finally, now is the time when you can trim off the excess from the base. The reason I waited until now is that the bottom of the barrel is level, and it's pretty easy to trim the base to match the barrel, as opposed to trimming the base, trying to match it up with the bottom of the barrel, and keeping it lined up while stitching. How I trim off the excess is with a nice sharp box-cutter. The blade is thick enough that it doesn't flex, and by going around several times, I can carefully trim the base and end up with a nice clean bottom (of the mug!). We now are ready to wax and seal... Wax On, Wax Off, Grasshopper Now... I have my own crockpot (don't go grabbing one from your wife, you'll get in trouble) where I keep probably 7-10 pounds of beeswax ready. The reason is that I do a lot of mugs, and this is much, much easier. Let the crockpot melt the wax then place the mug into the melted wax. You'll see it bubles up a lot like when you dunk it in water. You can use that as kind of a meter on how long to leave the leather in the wax. If your level is like mine in the picture, you'll need to roll the mug over, so the other side can get waxed. Bamboo skewers are your friend at this point. Back to the bubbles. I don't leave the leather in until all the bubbles have stopped. WARNING: If you do the crock pot method, keep a close eye on it, because you can actually heat up the wax to its flash point. Some facts on beeswax. It's melting point is 144 to 147 degrees Farenheit (62 - 64 degrees Celsius). It's flash point is 400 degrees Farenheit (204 Celsius). There is no reported autoignition temperature, but I wouldn't want to get near enough to test. I've actually forgotten how long I had my crock pot on and melted/burned a piece of leather I was trying to harden. Stealing my wife's candy thermometer, I found out that my crock pot had heated the beeswax to around 375 degrees Farenheit. NOT GOOD!!! So, again, if you use a crock pot to melt beeswax, be very careful!!! Now, if you're not interested in having a crockpot full of beeswax sitting around your place, you can paint the wax on. Melt some beeswax in a double boiler (mine is an old pot and an empty bean can). Get a cookie sheet with edges (jelly roll pan?) and line it several times with aluminum foil. Set your oven on its lowest setting (make sure it's under 200 degrees), let it preheat, then stick your mug in there. You can do this as you start melting the wax. With the leather warm, you can brush the melted wax on the flesh side of the leather, and the leather will 'suck' up the wax (it's pretty cool to watch). You'll need to do this several times, so stick the leather back in the oven, and wait a couple of minutes. You'll do this until you see the wax 'weeping' out the grain side of the leather (if you've painted the outside, it may not weep, so brush the last coat of wax over the paint, and you should be good). This has great potential for messiness, so be careful, and put down paper everywhere that the wax may go. Get the mug out of the leather, and wipe off the excess wax with paper towels (it will take at least 2, maybe 3 or 4 towels to do this, so have a lot handy). Don't worry about the inside of the mug, we'll be doing more with that. Sealing the Mug Here shows the mug sealed. I probably needed to have more pictures of the process here, but I was in a hurry. If there are enough questions or requests, I'll post some more pictures of this portion. You'll see my double boiler here. The old pot is at the very top edge of the picture, and the old tin can is the other part. The mixture in the double boiler is roughly a 50/50 mix of beeswax and brewer's pitch. After it is all melted, I take the tin can out of the pot, dry it off, and pour the mixture into the mug. I then set down the tin can and take the mug. I slowly pour the mixture back into tin can, rotating the mug as I do, so that the mixture coats all sides of the mug. I usually start around the stitched seam and end up over the seam. I do this three times, going in opposite directions each time. This helps to create an even coat all the way around the inside of the mug. After you seal the inside of the mug, check for dribbles of the sealing mixture that may have leaked out somewhere. In the picture, I had one stitch hole that hadn't sealed completely when I waxed the leather. This is something that I just started doing. After the beeswax/brewer's pitch mixture has started to cool down, I scrape off the top of the mug. The rim of the mug, if you left the wax/pitch mixture is a magnet for lint and such. And since we wax-saturated the leather, you really don't need that stuff on the rim. To scrape off the wax, I use a bamboo skewer. After I get the majority scraped off, I can clean up the outer edge, then with a wet fingertip, I can smooth out the inner edge. Final touchups... Burnish the inside of the handle. The waxed leather makes for a fairly rough flesh side to the leather, but it smooths down easily. OK, you're done!!!