claybuster101
-
Posts
46 -
Joined
-
Last visited
Content Type
Profiles
Forums
Events
Blogs
Gallery
Store
Everything posted by claybuster101
-
Skoal/dip can holster pattern
claybuster101 replied to RMB Custom Leather's topic in Patterns and Templates
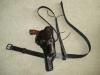
My laptop locked up and still uploaded...that has never happened before. So here is the edited reply. I call this the "Chew Boot@". There is a pattern with 3 holes and that could be for extreme tooling (inside front, front cover and strap) if so desired. The one shown is still not a completed work of art, but the concept is there. The stamping was me venting on the pounding board....I am sure I felt better afterward.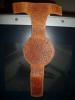


-
I have been using a bench mounted motor with a buffing wheel on one end and a 2" hard foam sleeve on the other end. A full sheet of sandpaper 8 1/2 " x 11" will wrap around the sleeve nicely, tape the ends and one wrap of tape in the middle and away I go. However, the large radius poised problems and the Dremel can be a P I T A at times. I (just today, it is still in the box) purchased an oscillating drum sander at Harbor Freight on sale for $99. I think this will provide a more even edge and allow the burnishing to look more professional. I also have noticed that when I glue up say both sides of a pancake style holster, I will apply a proper amount to the outer most edges of the leather, allowing the radius that will be formed to have a touch of glue on it as well. I know that this will get a final sanding and disappear during completion. I also use a small roller (wallpaper type) and roll over the glued edges to work out any air. Sounds like a trivial thing, but the devil is in the details. Next purchase is going to be a nice rosewood burnisher to fit an electric motor. Doing it by hand is fun (NOT!) but for this newbie one step at a time.... Dennis Michigan
-
IN GOD WE TRUST...ALL OTHERS PAY CASH ! Actually I want to be cremated and have my ashes and those of my family made into one of those "living reefs". They cast your ashes in a cement structure with a bunch of holes in it and put you down on the reef in Key Largo or Key West. My luck a giant sea turtle will come and poop on me...ha, ha.
-
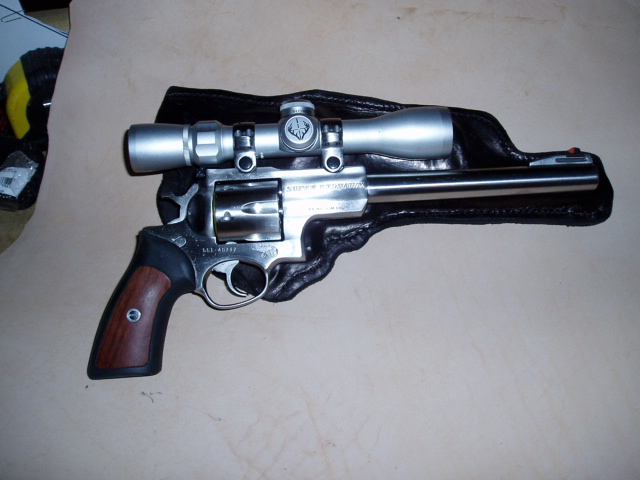
The Ruger has a dry weight of 4 lbs. 7 1/2 oz. This one posed a few additional challenges. It is going to be worn outside a hunting coat. The purchaser requested that it have a good range of adjustment and allow for ease of movement while stalking, sitting etc. I went with a pancake style 8/9 oz for the back and 5/6 oz for the front. Black Fiebings dye, Neatsfoot oil finish, hand rubbed to a dull gloss. Strapping is 8/9 oz x 1" for the shoulder with a 5 hole series of adjustment holes, laced top and bottom for ease of adjusting in the field. The belt is an honest 9 oz and 1 1/2 inches wide. It will fit someone from 5'7" - 6'4" and a waist (remember all the hunting gear is on) from 44" to 54". I am also doing a 9 shell ammo sling that the belt will go through. I did a prototype (great excuse to fall back on when the first one doesn't pan out) and am going to do a second one. Getting the ammo loops just right was a bugger! The biggest drawback to this style of holster is the fact that you are not anchored with a regular waist belt and balance is important so the whole rig doesn't creep due to the weight of the gun. Maybe I could make a 6 pack holder that attaches to the carry belt to offset the weight of the gun...hmmmmmm....bad idea. Comments, suggestions are always welcome....Thanks Dennis Michigan
-
Newbie looking for pattern
claybuster101 replied to yldbill's topic in Gun Holsters, Rifle Slings and Knife Sheathes
FNP-45 Holster I had to look it up on the net, but I may have something you can use. The pattern allows for OWB or IWB, trim to fit your application. Take a look and if you are interested we can figure something out. I am going to see if I can scan it full size and have an emailable file.
-
This is my 2 cents worth. The first question that comes to mind (actually there are several): Do any of your products increase your "personal risk" factor for litagation? Does your currently tax liability exceed 28-33%? Do you work from home? Do you have "bona fide" employess? Does your state (South Carolina) have a small business tax? Do you do any business with the US Govt? (DoD, Homeland Security etc) Are you maxing out all of your current personal investment options (max savings to your IRA's, etc) If something serious were to happen to you today, what plans or arrangments are made with your heirs? Is there a "will" or living trust in place to carry your business on? (Would you even care if there wasn't?) In Michigan the business climate pretty much sucks for anyone that is motivated to try and really create a decent modest sized business (1+ million gross, 10-15 employee's). As entreprenuers we get this warm fuzzy feeling knowing that we have spawned a "new company." But going from a dba to a full blown company had its price. Paperwork that had to be filed in a timely manner, costs associated with the accounting firm to do the paperwork, dealing with suppliers (they know it is harder to collect from a company than an individual, most of the time). But, I had to do it because of the exposure of customers coming into the retail facility, insurance reasons etc. If you are not currently doing a minimum of $75,000 gross, and you are a one horse operation, I would seek the advice of a tax lawyer, spend the $250 for a good consultation and I am willing to bet you do not need to incorporate at this time.
-
Guten Tag Wolle.... I clicked on your picture of the holster to take a close look and a pop-up window came up instead trying to sell me antivirus software? What is up with that? Das is nicht so gut, yea? Wiedersehn bis abent...
-
Shoulder Holster Pattern Scoped Super RedHawk
claybuster101 replied to claybuster101's topic in Patterns and Templates
I believe the Sept/Oct issue of 1997 may contain the article I am looking for. -
Looking for feed back and advice
claybuster101 replied to CedarCreek's topic in Gun Holsters, Rifle Slings and Knife Sheathes
There seems to be a turning point in every businesses natural life that you are faced with a nagging feeling, if you should or shouldn't take on a specific job. After all no one wants to turn down money. However, that time comes for every business. Ours came 30 years ago when we had a small construction company. A local well known businessman was developing a new strip mall located well within our comfort zone of ability and distance. His office called and asked to bid on a set of plans for "phase II" of the project. Right away I asked myself, what happened to the guys from "phase I"????? This project would have been huge for us (over $500K), however common sense took over, I did some digging, had a couple of meetings with the project manager and owner. When they would not come up with the required upfront monies or escrow the next draw I told them "NO THANKS!" Sure it hurt a little bit to say that. But as luck would have it, the bank ended up taking the development back and I am glad I said no. It was much easier after that to say no to various projects throughout my business life. As far as having customers "stiff" me. Yea that has happened also. I didn't like it. And there were a couple of times when we were not able to deliver our product in a timeframe that I had quoted. I either ate the work completely or offered a substantial discount for the customers inconvenience. Thankfully over 35 years I only need some of the fingers on one hand to count all those times. Only 1 bad check in all those years as well (it was a whopper $900) but we eventually got it all. What I would want to find out from a customer that says they are not happy, is WHY they are not happy. Does the fit seem improper? Did I not follow their wishes? Was there a change unaccounted for? This information is probably more valuable than the cost of the holster or leather piece you are selling. You could ask the customer Mr./Mrs. Customer, what do you think is fair? If it is a product quality issue, then you have to fix it, if they respond with an answer, you have to determine can you afford to take a screwing on this to A: Save the customer and any good word of mouth advertising that might be derived from the transaction or B: Tell them you understand, however your policy prohibits you from doing business under those conditions: C: Offer up a comprimise...Redo the job to their exact specs, allow them to "use" the holster you just made until the new one is done. But by all means you get the cash NOW. Swap the holsters when the new one is ready.....aside from our bruised artistic ego's...everyone wins. -
Best of luck..... Dennis
-
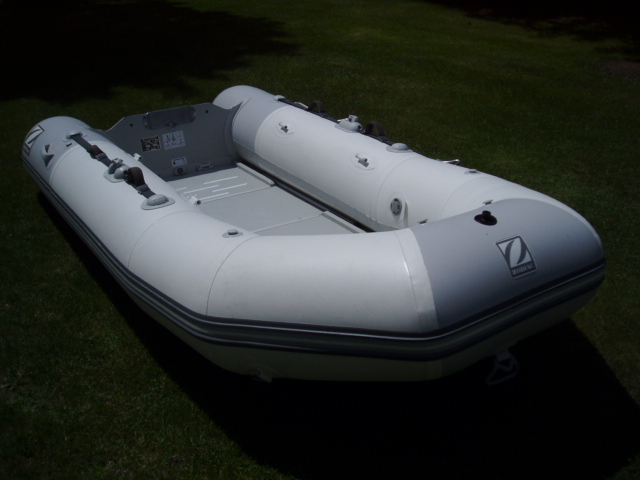
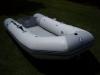
Our store motto was " If your Dinghy is limp, we can fix it ". Servicing Inflatable Boats, River Rafts and the like. For several years we have also repaired Inflatable Bounce Castles (Moonwalks) here in SE Michigan. I am also an NRA instructor. We produced a really unique "Rapid Response Assualt Vessel" that is currently being tested by Uncle Sam. Along with Inflatable Boats we still find time to do some salvage diving, mostly for lost items overboard at dockside, rings, Rolex watches, bracelets etc.
-
Shoulder Holster Pattern Scoped Super RedHawk
claybuster101 replied to claybuster101's topic in Patterns and Templates
Customer used a Bushnell scope. I do not have the firearm here so I do not remember the particulars. I beleive it to be a fixed power (maybe 2.5x). I know it shoots 300 gr. bullets through it...I would think you wouldn't soon forget shooting that. -
Shoulder Holster Pattern Scoped Super RedHawk
claybuster101 posted a topic in Patterns and Templates
I have been informed that a previous of issue of the Saddlemans Journal may contain a nice pattern for this particular firearm/scope combo. If anyone has a copy of that issue or would like to share the particulars of that pattern me with, it would be greatly appreciated. Dennis -
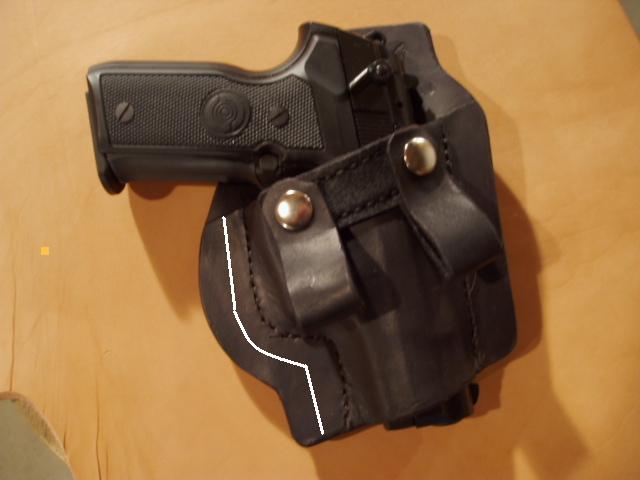
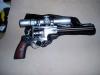
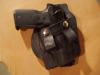
Hello Dan... Thanks for taking a good close look at the holster, I really appreciate it. The mag release button is actually on the opposite side, what appears to be a mag button is non functional. I beleive they may have made a model or had an option to have mag release's on both sides. I put some notes in the holster folder regarding providing relief for the mag button as a reminder. The left side is kinda fat I know. Originally I was going to do an OWB style and just left it chunky during construction. It certainly can get a shave to bring the profile inline with the rest of the holster. What margin tolerance is most appropriate? I am thinking 3/16", but if I were to ask 12 holster makers, I would get 6 different answers. Also, the margin tolerance probably varies depending on the holster type/style to some degree. Please share your thoughts on that. This pattern will fit the XDm by moving the rear (trigger guard) stitch line back 3/16" and feathering to the rear an additional (1/16") the starting hole for that stitchline. While the picture really doesn't show it, I like how the finish turned out. Fiebings USMC black pro dye (2 coats), then a liberal amount of Neatsfoot oil, while the oil was still a bit damp, I put the holster on the buffing wheel. Using a light touch it produced a pleasing finish. Kinda like "worn" leather. I didn't want it all shiny like patent leather. I would change the snaps to black on the next one. Dennis


-
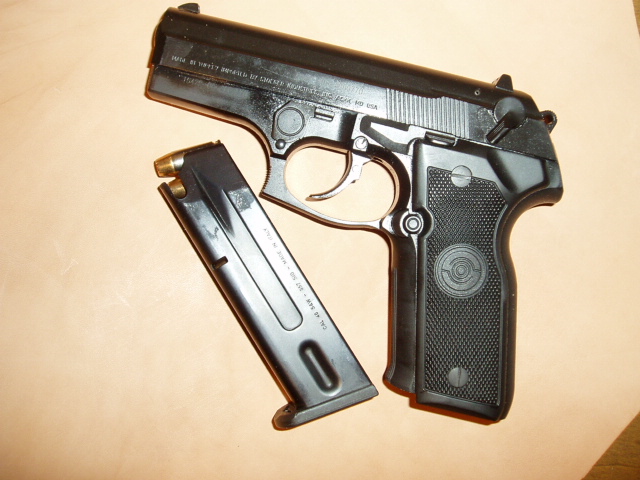
Well, I don't know which takes more courage. Diving into a new project or posting the results of your first born here on the LW.N I first want to thank Keith and Jay at Tandy in Detroit....lots of encouragement.....and Chris from Horse and Mule Gear, the leather pieces I aquired from you were outstanding! The IWB holster is made for a Stoeger (Beretta clone) Cougar in 40 cal. For the last 3 years I was using an off the shelf OWB holster that while it works, I wasn't 100% satisfied with it. Instead of going broke trying this leather and that leather, I chose to make my own. What I am discovering is that with minor modifications to the main outline pattern, the stiching pattern, etc. similar firearms can be made from the same basic outline. Sure, they may be some waste (using a larger semi-auto pattern to fit a smaller frame semi-auto firearm) but there is a lot of cross over. The intermediate steps of determining a glue line and subsequent stitching line play key roles in properly fitting the firearm to the holster. Customer likes and dislike I am sure will also play into a proper fit and finish. While I am not sure I am ready to make a holster for someone else, my neighbor saw this one from start to finish and now he is willing to pay me to make him a similar holster for his Springfield XDm...as he says there are just not a good selection of holsters designed specifially for that gun. Wow, I thought this is neat. I have spent quite a few hours going over old posts on this board in an effort to learn from everyone's wisdom. It has been a pleasant journey so far! My real life specialty is dealing with Inflatable Boats (Zodiacs and the like) from garden variety yacht tenders to more advanced military assualt vessels. If anyone ever needs that type of help or advice...please, please feel free to contact me and I will do whatever I can to help. Dennis
-
I emailed Artisan Monday of this week with a question on a used Artisan machine. No response, no reply, not even a "I'm busy right now, but will get back with you." This all adds up to being on a respirator and the machine is slowly turning itself off. The old saying is people quit their jobs 90 days before they are ever fired. Without customer service, or worse yet, ignoring new customers they are doomed to die a slow, painful, agonizing business death. I am very new to leather working. I am not so new to doing business. My money (as of right now anyway) is good anywhere I choose to spend it. Artisan people need to address some basic business practices (ethics and integrity) just to name a few. They may have the best machines on the face of the Earth. I'll tell you what, I have worked with and done very well using 2nd best most of my life.
-
Hello Everyone.... I saw a post regarding the use of Elmers glue for bonding 2 pieces of leather together. One of the comments dealt with squeaky leather. Being new I am not familiar with all the things that can and do happen to our finished goods after they get into the hands of the end user. Evidently when the glue that is supposed to be bonding the leather dries out or weakens, it can cause the 2 pieces to rub and create a squeak. This is a technique that I use to repair patches and some seams on Zodiacs and other inflatable boats. Using a equine syringe (I get mine from TSC) put a small amount of glue in the syringe and in the case of leather I would go from the backside of the holster and find the void where the glue bond failed. Insert the needle, moving it around 360* if possible, injecting the glue (slowly) and working the needle back out of the insertion hole. There will no doubt be a little left over, oozing from the hole. Let the glue stand for a few minutes (not long enough to set up hard) press or squeeze the repair, wiping off the excess as it continues to ooze out. Normal curing times will apply, I like to use a heat gun on the boat material, but I would think a 60-100w light bulb would help to "set' the repair. I want to thank everyone who has responded to all the pm's and took their time to answer my questions. Dennis