


Snakeoil
-
Posts
82 -
Joined
-
Last visited
Content Type
Profiles
Forums
Events
Blogs
Gallery
Everything posted by Snakeoil
-
Friend made a bunch of calls and turned over all the rocks. No luck. Sorry. Rob
-
I finally saw my friend and he is reaching out to contacts in Gloversville to see if anyone has parts and such for a machine like yours. Stay tuned... regards, Rob
-
Singer 16-188 help with timing, threading?
Snakeoil replied to Hodgie77's topic in Leather Sewing Machines
I did not see anyone mention this here. You should do a search for an "Adjusters Manual" for your machine and you might get lucky. regards, Rob -
I am not experienced in this subject. So, purely out of curiosity, I decided to see what I could find out about 16x97 needles. I found this Singer site in the UK that lists your particular needle in a list of industrial machine needles. You might want to reach out to the owners of this site to see if they can help you with info or a possible replacement or even source for the needles you need. https://www.singersewinginfo.co.uk/industrial/industrialneedles I also have a friend who is from Gloversville, NY and his mother was an industrial sewing machine mechanic. He might know of a local source for vintage machine items like needles. I would think that the machine you have was abundant at one time when Gloversville was booming. If I find more info, I'll post here. regards, Rob
-
I am not an experienced leathet worker. Most of the work I do is hobby level repair. I own a 29K70. I have found that sewing a straight line with a patcher is a challenge. I suspect that you would never be happy with the appearance of you seams.
-
NEW UPDATE: FIXED!!!... I think. Hate counting my chickens before they've hatched but... I walk away from it for a bit and finished up putting the boat away for the season. Went back to the machine and started going over it again. Tried reversing the needle position, which is 180 from what the instructions say. It would make a stitch, but would also have thread get wrapped around the shuttle. NOT RIGHT! Tried some other hair-brained things just to see cause and effect stuff. Then I noticed that the foot was loose. It was wobbling on the presser bar. Not sure why I never noticed that. But I learned that anything that can have an effect on the needle can cause the machine to skip stitches. Tightened it up, made sure it was not blocking the needle nor the hole and tried to sew. Worked perfectly... on top. Bottom was a bird's nest. But I know that is weak bobbin tension so put the top on 3 and started to run stitches and adjust the bobbin tension until I had a balanced stitch. I ran several long runs and not a single skipped stitch. I'm going to put the needles in the machine that I started out with to see how it sews with them. I know that the foot was tight when I started. But that was yesterday with half the set-up backwards because of the wrong manual. I suspect the foot loosened, or I loosen it during a senior moment of trying to loosen the needle and it's been loose since. What are the odds that you figure out what was wrong with the set-up and you add a new variable without knowing it. I also machined a new top spool pin just to take that variable out of the equation and it had zero effect on fixing the problem. Think I'll go back out to the shed and run a bunch of stitches thru various material and see how it does. UPDATE: Put the other needle that I started out with and the problem returned. I put the new needle back in and it sews great. I spent almost 2 days monkeying with this thing because the needles I was using were not good. I've never had a needle problem in the past so this is a true educational moment for me. I read a bunch of forums where 15-91 machines were skipping stitches and the members always pointed to the needle as the first fix before going deeper. Learned my lesson this time. Both of those old needles went in the trash. I wasted all this time because I failed to dig out a new needle from my other machine stores. Grrrrrrrrrrrrr... regards, Rob
-
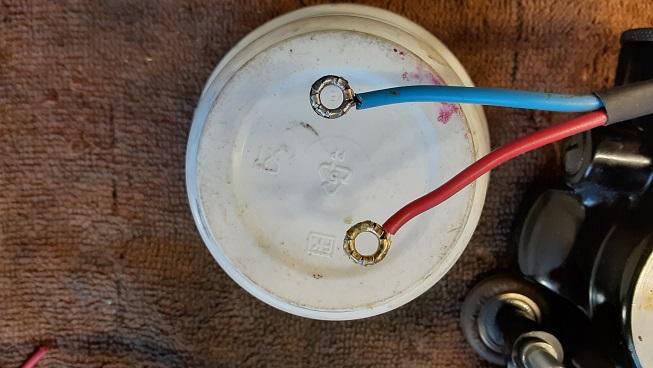
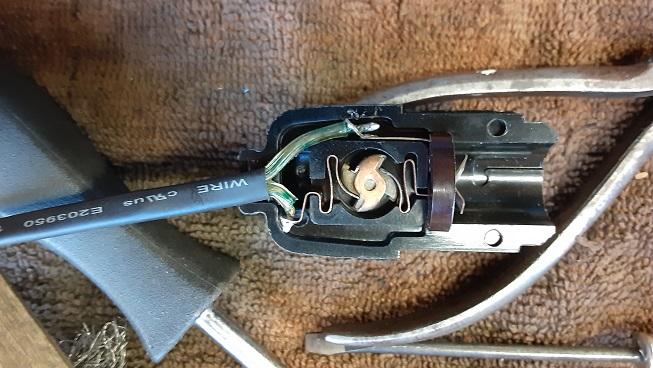
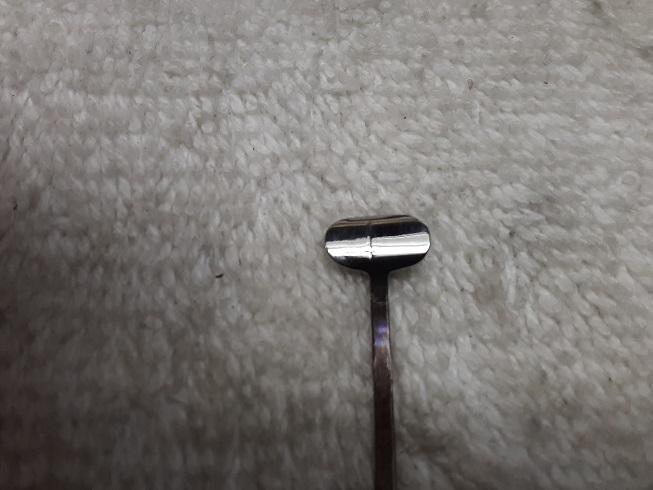
Meanwhile, back at the ranch... With the motor leads rewired, I moved on to the foot pedal and light. The connection cord/plug was actually in great shape with no hardened or cracking insulation so I left it be for now. Singer did something that I've never seen in all my years of playing with vintage cars, bikes and a career keeping power plants running. They used eyelets, aka small grommets normally used on shoes for laces as wiring terminals. It provides no stress relief, but it is better than making a loop and then tinning it. I had the eyelets so simply followed their lead in making the replacement leads. Here is a pic of what I'm talking about. The terminal on the bottom is only crimped on. The one on the top is complete as it has been soldered to the wire. The process is simple. Strip off about 5/8" of insulation and twist the wire. Now tin the wire with solder. Once cool, form the tinned wire into a loop that will fit tightly to the eyelet. You can do a little forming of the wire on the eyelet with small needlenose pliers as a final touch. Now crimp the eyelet as you would for any normal application. Flux the eyelet and put the soldering iron to it with some solder and you are done. The light on the machine was interesting. No threaded fasteners. It is held together by three spring rings which do a great job but are a bit of a challenge to remove. Here is what I found on the inside. As you can see, not much room to work. I first removed the bottom contact with the wire. I then unsoldered the wire from the top contact and left it in the socket. It was then easy to unsolder the bottom contact from the old wire. New wire installation was the reverse and began with soldering the new wire to the bottom contact. Installed the contact into the socket, threaded the wire into the hole in the top contact and soldered it. Connected the various wires back to the plug socket on the machine, plugged in the connection lead, and the motor ran great. Put the machine back together and it also ran great. Went thru the machine and lubed and cleaned. I was ready to sew. Only hinderance is the top spool pin is missing and I have to make one. I put the spool on the bobbin winding pin and threaded the machine normally from there. This is now day 2, trying to get it to sew. Most of the 1st day was wasted by bad instruction from an earlier Mod 15 instruction manual. Found the correct manual last night and started over. But I'm still struggling. And I'm not a mechanical newbie. I rarely let a machine beat me. But I'm starting to think I might need some guidance. Needle is good. Shuttle is clean and point is fine. Timing is good and really not adjustable on a 15-91. I'm using 50 thread and a 16/100 needle to start and then found a new Singer needle and switched to that. I've played with the tension on the bobbin holder and the thread tension. I've repositioning the tension spring and varied it's' setting in the spline teeth on the tension stud. I'm pretty sure everything mentioned here is right. The machine skip stitches. And it is not consistent. If I go slow, it stitches fine. As I bring up the speed, it will continue to do well, but skip every so often. Then it will skip and not pick up another stitch no matter how far I sew. I'll start again and it will skip right off the bat. I was using a bobbin that I found in the machine that was already wound. I finally ran it dry and rewound it with the thread on the spool. I tried again and it worked great. Then it started to skip again and then it would not sew at all. I watched several vids last night from what I believe to be knowledgeable mechanics and they all rave about the 15-91 and demonstrate how well it sews and feeds. I have the adjuster's manual and will check the adjustment of the needlebar height. That is the only variable left that could be causing this. Although, I'm no expert at setting bobbin tension. I set it at what I thought was equal to a slight pull and similar to the top tension pull. I would think it is close enough to sew. I'm taking a break from it today. Gonna pull the batteries out of my boat and open all the hatches to let things air out over the winter. Maybe I'll go back to check the needle height when I'm done with that. Or maybe I'll just go for a bike ride. I need a little mental therapy after two days bent over that machine. UPDATE: I could not walk away. I checked the needle bar height and it is perfect. regards, Rob
-
As a side note, I just did a Google search on the web for "Sewing Machine Technical Discussion" and all I found were OEM sites like Singer and Coats that offer troubleshooting Symptom/Fix type of articles. No technical discussion forums. Rather than a sub-forum for old domestic machines, why not a sub-forum for technical discussions on machines in general. Maybe the subject could be "Repairs, tune-ups, adjustments, and rebuilds". There are vintage motorcycle forums that have sub-forums dedicated to rebuilds/projects. It allows someone looking for info to find a single thread that has a step by step fix or a total blow by blow rebuild for them to follow as they attack their machine. It would be a great place to store links to manuals, parts lists, etc., as stickies that members can contribute to as documentation info is uncovered/shared. Just a thought. Had an extra synapse fire this morning when I had an extra cup of coffee. regards, Rob
-
Okay, thanks.
-
I'm sorry. I did not mean to take this way off topic with a non-leather machine. I have looked at other sites for non-leather machines and it is all about sewing and lace and taffeta, and... well... you know. I'll let this thread die if you prefer and with no hard feelings. I just figured that a sewing machine is a sewing machine and the mechanics are all pretty similar. So, any dive into the innards might be of interest and helpful to others. regards, Rob
-
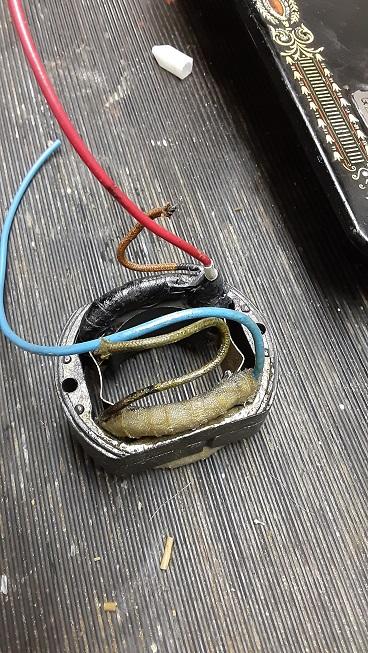
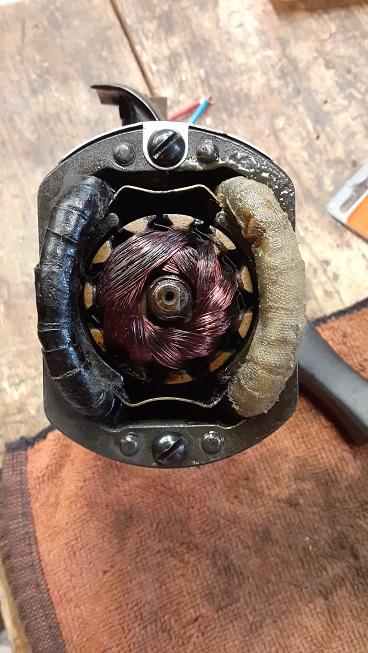
Here are the promised pics of the reinsulated and rewired motor stator. One of the places that rewinds motors was a good friend of my cousin's and a guy about my age. Turns out his wife is from Peru and I worked in Peru for a month or so in the 80's and we got to chat in Spanish and share some thoughts about Peru. Ken her husband gave me a the rundown on the materials required, which is cotton tape and insulating varnish. He did not have the tap, but had a gallon of the varnish and gave me a small container. Told me to get cotton take in a fabric store. Instead of buying tape, I dug thru my rag drawer and found an old pair of jeans. I cut out the pocket and then cut that into strips. Before wrapping, I installed a new lead wire to this unwrapped coil. Had to make a small connector from brass foil and then soldered the new wire to the coil wire. Was able to use the original paper tube that covered the old connection, get everything back where it was on the coil and then began the wrapping process. Strips of cotton were about 1/2" wide. Wrapped it tightly and held the last end tight with a dab of superglue. This was a bit of a challenge, since I had to hold the wrap tight with one hand while opening the superglue with the other. And of course the nozzle was plugged. This was the part that should have been in a video. I managed to pierce the plug in the glue nozzle with a hat pin I keep with the glue for that very purpose. Did not notice the clear glue had gotten way up the shank on the pin and next thing I knew, I'd glued my index finger to my thumb with the pin sandwiched in between. It was a Chevy Chase moment for sure. There was enough glue on the tip of the pin to fix the end of the wrap with my fingers still glued together. Took a bit of time with acetone to get my fingers back apart. I'm sure everyone here has glued their fingers together with superglue in the past and it was just a tiny drop and easy to get apart. Well, let me tell you, those suckers were glued for keeps. There was no pulling them apart. Acetone did the trick. With my fingers separated, I then gave the coil a good coating of varnish and let it soak in. It dries pretty quickly and was getting tacky quickly. I wanted to get it back into the stator while the wrap was still soft based upon the difficulty of getting the coils out with hardened varnish. Once the coils and the two retaining clips were installed back into the stator frame, I let the varnish dry. I gave it two more coats, letting it dry between coats before I considered it done. I decided that I'd made a mistake stripping off the insulation and should have rewired it without doing that. For the coil that was still wrapped, I did just that. I was able to get to snip the old wire up close to the coil, make another connector and then solder a new wire to that short pigtail. I then coated the exposed pigtail with varnish and then put shrink tubing over it. Last step was black high temp silicone sealing around the area where the bare pigtail exited the coil insulation. This is required to create a stress relief area on that bare wire. For those of you not familiar with this, the insulation on a wire not only insulates it electrically, it also spreads out any bending stresses over the insulation to prevent the wire from breaking. This is why a double barrel crimp on connector crimps to the bare wire and the second crimp is on the insulation. It provides stress relief for the wire. That said, here are some pics of the stator. I have not been able to run the motor yet. I did this work at home and the machine is at our summer place. I did bring it up there and that is where I installed the rotor into the motor. But I was there to pull docks and such and then had to head home for a closing on an estate we are handling so the Singer was no high in the priority list. I hope to finish the wiring and run it next week. Regards, Rob
-
When I saw the textolite gear I realize that was the weak point. I have pics of the repaired coil, but have to resize to post here. Also started on a Mod 66 treadle we inherited last year. Cabinet is the best one in oak with hand carved drawers. Late cousin refinshed wood, frame & treadle. I just flushed out the machine with min spirits. It was locked up tight from sitting on display in his house for many years. A little Kroil and some gentle persuasion with a brass hammer have it nicely freed up. Let it sit a couple days and today gave it spray with 3in1 just to coat all the metal parts while it waits for me to finish it. Machine was made in 1913. Photos to come.
-
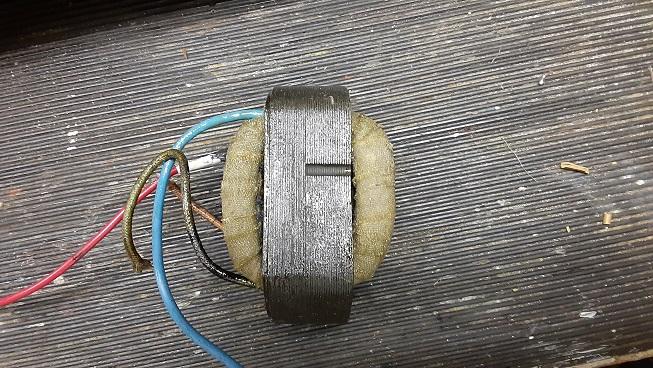
Okay. I'll keep the leather away from it. Two local motor rewind places have offered to sell me materials and help with reinsulating the coils in the motor. I did notice when I was taking it apart that the drive gear on the balance wheel is textolite. So that is probably the weak link in the drive train. Everything else looks pretty robust. Here's a photo of the coils, one stripped the other still in the factory wrap. Rob
-
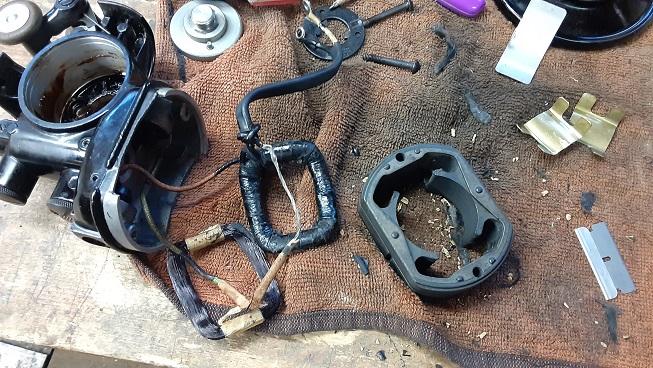
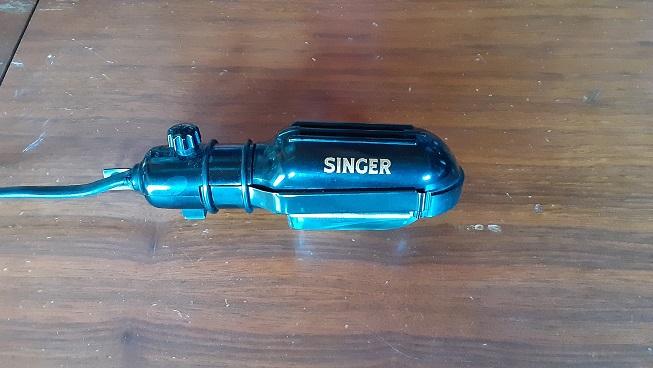
Well the quick spruce-up hit a snag. The machine has a potted, worm gear drive motor. All the wiring is 1953 vintage plastic and either rotted away where it was bent or hard as a rock and cracked. I pulled the motor apart thinking I could easily splice in new wires and they were rotted all the way into the potted wrap. So, I stripped the potting off one of the coils after getting both out of the frame (it was a mutha to remove them) and now I have to figure out how to reinsulate the coils and install them securely in the frame. I know two places that might be able to help with materials. One rewinds starters and the other motors. Here's a few pics. The little Singer light is adorable and in perfect shape.
-
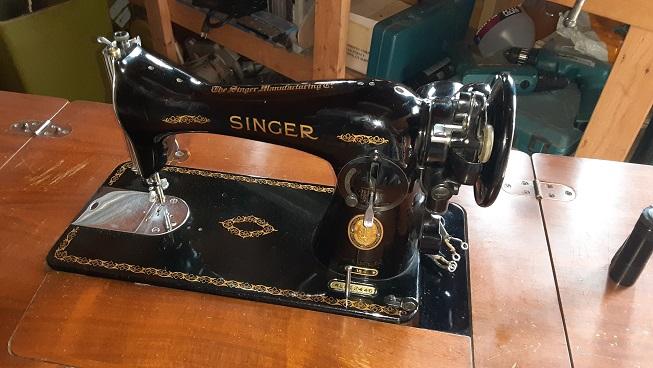
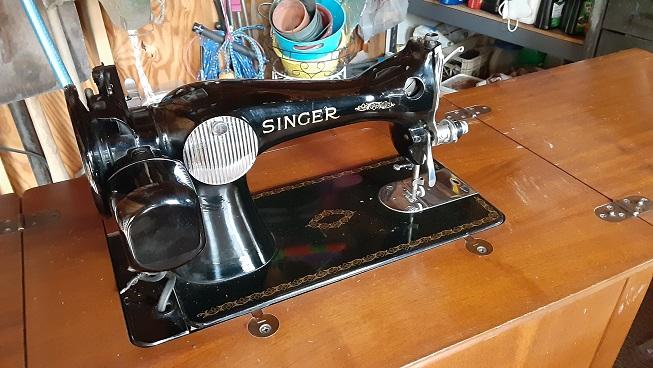
Well, I've not been here in a while. Got my patcher sorted out and have not had any projects for it in a while. My wife and I were taking back roads on our way to dinner tonight and there was a Singer in a cabinet by the side of the road. Tossed it in the back of the SUV and carried on to dinner. Got back unloaded it into the shed and plugged it in. Runs perfectly and is dead quiet. A quick look inside shows it was hardly used. It's a Mod 15 and was made in Nov 1953. Cabinet is in excellent shape except for some minor finish issues. Only thing I can see that is missing on my first look is the top thread spool pin. Imagine they are available. I can always machine one if I necessary. I imagine these are pretty heavy duty machines. Feed teeth look like new. Might make a nice light leather/canvas/nylon strap machine. Will certainly sew a straight seam better than that damn patcher. regards, Rob
-
When you get to the end of the seam, stop, turn the foot or the workpiece 180 degrees and sew back along the same seam 3 or 4 stitches.
-
Skipping stitches on 29K70 and Needles, Needles, Needles...
Snakeoil replied to Snakeoil's topic in Leather Sewing Machines
Great point. I had completely forgotten about the threading wire. Yes, I can see that chewing thru the epoxy. On my wire, shortly after getting the machine, I did not like how that wire felt as it passed down and out the end of the needle bar. The wire, which is a high carbon steel, was certainly "biting" into surfaces on its way down the needle bar. So, I stoned the end and then polished it. Made quite a difference to how the wire travels down and out the end of the needle bar. So, although your point is well taken, my particular wire might not be as damaging as say a new one. It's an experiment for sure. We'll see what happens. Appreciate the insight. A bit embarrassed that the effect of the wire never occurred to me. Homer Simpson moment for sure.
-
Neatsfoot oil??!!! That is the worst thing that ever happened to leather. I have owned and own vintage saddlebags that were turned into concrete by that stuff.
-
Skipping stitches on 29K70 and Needles, Needles, Needles...
Snakeoil replied to Snakeoil's topic in Leather Sewing Machines
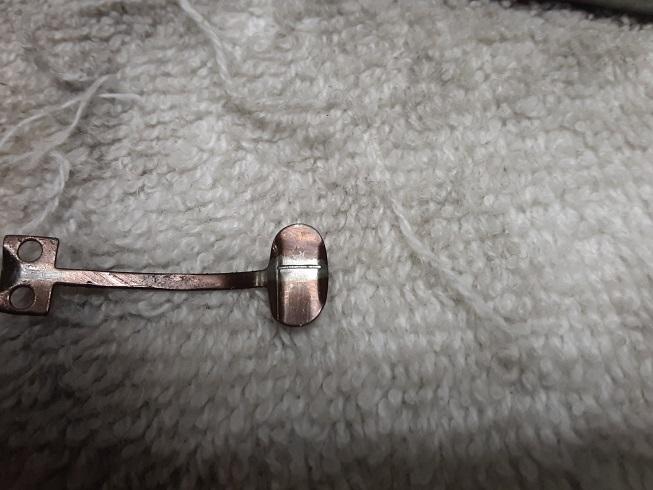
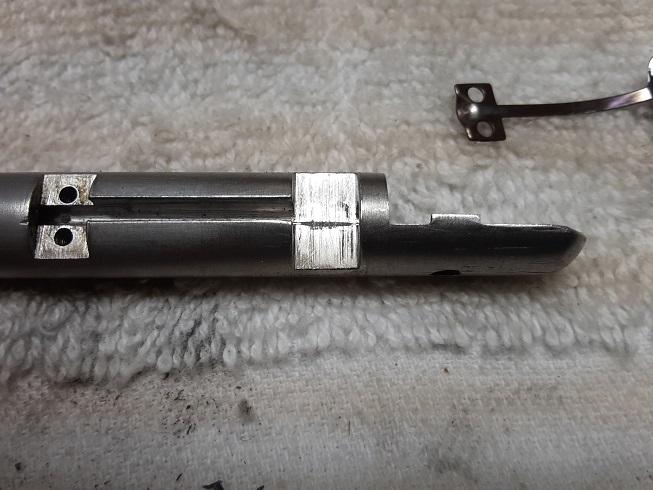
Okay, I was fresh out of important things to do and thought I'd play with the needle arm. Pulled the needle arm out and took a closer look at the thread erosion. Here is what I found. This is the needle arm surface under the little thread tension spring. What I had not noticed before or simply forgot about (damn gray hair) was the wear on the thread tension spring. So the combination of the wear on these two mating parts may have contributed to my skipped stitch issue. I decided to use JB Weld on the needle arm wear. Here is the repaired (filled) wear area on the needle arm. I did not fill the wear in the spring as being hardened and polished, I did not expect it to stick. So, I stoned the surface a bit and then polished on the buffing wheel with a little white jeweler's rouge. The wear is not gone, but greatly reduced. I think I need to put on of these on my list of parts I need to get. So we'll see how the epoxy holds up. When I get around to ordering a few parts and they arrive, hopefully, I've have used the machine a bit and can see if the thread gnawed thru the JB Weld. As a side note, I think my 9 year old laptop is dying. I need to get a new laptop and should it die before I do, please excuse any lack of response in the interim. I have my phone so it probably will not happen. But just in case... regards, Rob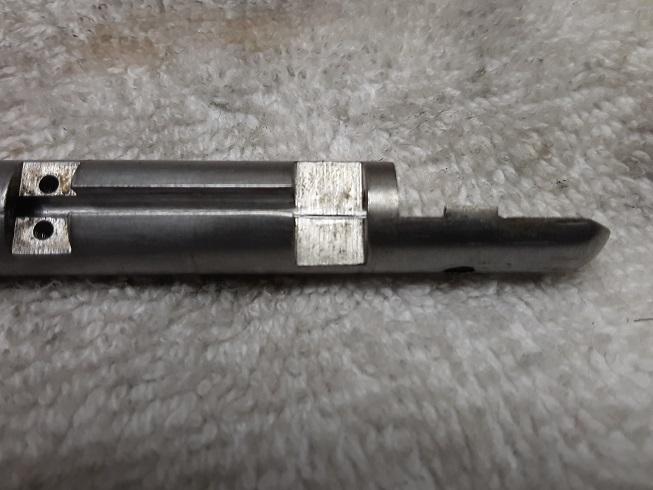
-
Skipping stitches on 29K70 and Needles, Needles, Needles...
Snakeoil replied to Snakeoil's topic in Leather Sewing Machines
Slightly of topic, but let me tell you about using epoxies for stuff like this. I have repaired pitted front fork tubes for vintage British bike when replacements were not available. The bikes are still leak free. My cousin has an ancient Caterpillar dozer. The two hydraulic rams for the front blade were severely pitted. New cylinders were going to cost more than that relic of a dozer was worth. We fixed them with epoxy and that was probably 25 years ago and they are still leak free. The front sights on Colt Govt model .45ACP pistols are staked in place. The slide recoiling tends to make them loosen over time. I install them with JB Weld and have never had one loosen after 1000's of rounds. If you prep the surface correctly, the epoxy will stay put. -
Skipping stitches on 29K70 and Needles, Needles, Needles...
Snakeoil replied to Snakeoil's topic in Leather Sewing Machines
I'd have to look more closely at the needle bar to see what you are talking about Jimi. I'll give JB Weld a try. I can always do it over with braze. Cleaning should be done with acetone or lacquer thinner. You need to cut the grease/oil and alcohol will not do that. Mineral spirits will work, but can leave a residue behind. If you use min spirits, and this would work with zero solvents used, wash the bar with Dawn dish detergent and very hot water. Make the JB Weld fix and then once cured, oil the bar inside and out. The small amount of flash rust you will get between washing/drying and oiling will be of little consequence. regards, Rob -
Great pics! Thanks for posting. I am always saddened when I see once great industrial buildings/businesses reduced to ghost buildings. The point made about free photo hosting sites is well made. Happened to me with photobucket.
-
Skipping stitches on 29K70 and Needles, Needles, Needles...
Snakeoil replied to Snakeoil's topic in Leather Sewing Machines
Thanks guys. I truly appreciate the follow-up info. There are epoxies with metal filler or I can add metal powder to JB weld to give it better abrasion resistance. Another option would be to braze it and then file it down to original specs. Keep in mind that this is purely a hobby machine for me. So, it will not see a lot of wear. They also make super glues with metal fillers in them now. My cousin has used them to repair damage to engine blocks and similar. They work great. But I realize that those repairs do not see any abrasion. And nylon thread is like running lapping compound thru the area. I have the needle as close to the shuttle hook as I can get it. I just have this thing about keeping original parts working. There was a bobbin in the drawer that looked like it had been thru both world wars. The hole in the hollow spindle was ripped, the flange on the non-slotted side looked more like a Chinese coolie hat. I made a jig and brought it back to shape, fixed the hole in the spindle and had to take a few thousandth off the OD because it had stretched a bit as I reformed it. But it's back in action now. I suppose I could just spring for a new needle bar. But that would just go against my grain. ;-) regards, Rob -
Skipping stitches on 29K70 and Needles, Needles, Needles...
Snakeoil replied to Snakeoil's topic in Leather Sewing Machines
I guess it is all part of the right of passage. When any type of machinery is new to me, there is always some suspicion that something is going on that I'm not aware of. I don't have a lot of feel for what is acceptable wear which put that in the back of my mind all the time. I now suspect that those needles that look like they had been re-sharpened, could be what Wiz called "diamond point. I need to learn a bit more about needles. I was on a site several weeks back for a company that manufactured needles. I think it was GB. The range of styles and sizes was truly mind boggling. I also read a post here where someone was having trouble and a member mentioned a different type of needle with a larger scarf. I had that paddle spring off the needle bar when I had the head apart. The spring is fine. But there was a track cut into the needle bar from the thread passing by. Someone else who was rebuilding a 29K machine mentioned this issue and was not sure if that track is supposed to be there or is simply wear. I suggested a fix using epoxy if indeed it was wear. I chose not to fix mine and if that track is wear, it could be contributing to the problem. Although, I would think that the creation of the loop is a job for the needle and the material being sewn. But that could be ignorance talking on my part. I need to watch the machine go thru the entire cycle to get a mental image of all the parts moving and which moves when and how they interrelate. I read in a post here when I first got the machine that sewing a straight line with them is difficult at best. I was skeptical of that comment. But since then I've learned that it is pretty damn accurate. I appreciate the input, guys. regards, Rob -
Yesterday, a friend dropped off some nylon straps for me to sew into custom length straps for a large structure he will be loading in and out of his Sprinter van. My 29K70 was giving me fits with skipped stitches and as bad as sewing several inches with not a single stitch. I adjusted the timing multiple times and with time and patience, managed to make the 4 straps for him. But my wife told me that she was sure that a fist fight was about to break out in the basement, even though she knew I was down there alone. Yes, I was doing a Basil Fawlty impression as I berated my machine. Although I did refrain from giving it a proper thrashing. Today, having cooled off, I did a little research. First, I read both of the original manuals I have and they both say exactly the same thing. Missed stitches are probably a needle problem. I went to Google for more and found a pretty good write-up that walks one thru the missed stitch issue and ended up at the same conclusion, bad or wrong needle. So, I went back down into the basement, where my machine cowered in the corner, donned my jewelers visor (magnifies up to 10x) and started looking at needles. I also looked at the needle and thread charts that I've found or was directed to here by members for proper needle to thread sizing. A slight tangent first. When I got my machine a few months ago, the little drawer in the base was packed with needles in cases and loose in the drawer. I figured that I had a lifetime supply of needles. I did my research and learned about needle sizes and then on a bitter cold day, hunkered down in the basement and went thru what could easily be called a pile of needles. I had original SIMANCO needles and other brands. I had plastic caddies with brand new GB needle in several sizes. I had needles that looks like something you could use to frame a house. I sorted them, put them into little vials with nicely printed labels with sizes and was quite pleased with myself. I had what I thought was a lifetime supply of needles, given the hobby application for this machine. Meanwhile, back at the ranch, something I noticed in the two singer manuals was the differentiation between cloth needles and leather needles. For this machine cloth requires 29x3 and leather 29x4. All the cases, caddies, envelopes in that little drawer said 29x3, regardless of the size. So, it would at first glance appear that I have zero leather needles. And I got this patcher from a shoe repair shop that was closing up. I put on my jeweler's visor and started looking more closely at my needles. The older ones with no packaging were interesting. It appears that they had been re-sharpened. The point was not symmetrical and was more of two flats that came to a point, and at a rotational angle relative to the eye. I looked at brand new GB needles and they looked nothing like that. So, my plethora of needles is really more of a pile of scrap metal. I put a new needle into the machine with a properly matching thread size and sewed a perfect seam down a piece of that same nylon strapping I was sewing yesterday. My guess is the thread I was using yesterday, a V92, was a tad too big for the 130 needle I was using. Although the chart have says a 130 will work, I suspect that a 140 would have worked better. What I was finding as I worked on the straps yesterday was if I went slow and ran the hand wheel by hand, all was well. But if I upped the speed with the treadle, I'd start to skip stitches. I suspect that the slipperiness of the nylon strapping did not help produce a decent loop for the shuttle to catch. I did measure all my thread today with a micrometer and compared it to the chart that Wiz directed me to (thanks again, Wiz). Turns out I have 1 spool of V46, several of V69 and 1 of V92. It was the V92 and a new 130 needle that was giving me agita yesterday. I never would have guessed that needle size would create this problem. Just proves that because you can sew, does not mean you fully understand how a machine sews. This reminds me of working on friend's cars as a kid. I was always a motorhead. I'd get calls for dead cars and the owner would have all kinds of theories on why it would not run. More than once I turned on the ignition and saw that the car was out of gas. Yesterday, my 29K70 was out of gas. regards, Rob