


Gosut
-
Posts
142 -
Joined
-
Last visited
Content Type
Profiles
Forums
Events
Blogs
Gallery
Store
Everything posted by Gosut
-
Thanks. I really am ready to dust off my old chemistry text book and start at the front. Have forgotten way too much of this stuff. This morning it looks like I may be getting significant dissolving of the steel wool. However, that could be shifting due to hydrogen forming on the steel wool and moving it around slightly in the liquid. Will wait and see.
-
I drive my wife up the wall with my insistence on using measurements when cooking. "I just add some salt," she might say ""But how much?" I ask. "How long do you let it cook?" "I don't know. I just as it until it looks right." That works well for her, but for a simpleton like myself, who only cooks on rare occasions, that's frustrating. I don't have the experience to know what "looks right." Same thing here. Like soap making, people were making iron liquor long before they understood exactly what was going on, and some of those old timers got mighty good results by eyeballing ingredients. But, like those soap makers of old, others got mixed results. Which is how homemade soap got the reputation of being harsh, because some ended up with excess lye. With vinegaroon, my question is the amount of free acetic acid, Ideally, an exact combination of iron with acetic acid should yield none, but I doubt that's possible with this kind of set-up. There will be some. If we neutralize it, we introduce sodium bicarbonate to the leather, but simply applying sodium bicarbonate might have bad effects on leather. Yes, I know free acetic and tannic acid would combine with the baking soda, but how much is left in the leather? So many unknowns. Basically, I want to understand what's going on chemically, and come up with a working recipe for personal use. Some of what I thought would work has already gone out the window, but that in itself teaches something. OTOH, so far there's no orange in the solution itself, so minimizing surface area exposed to air might help. OTOH, would have to do the same thing in a wide mouth container with the steel wool completely submerged in the vinegar to see if it's the smaller surface area or just keeping the steel wool away from oxygen.
-
Update: The vinegar has dropped slightly in the neck of the bottle, with no signs of leaks. That had me wondering how much drop would I see from the reaction. What follows is horribly slip-shod because I've forgotten the particulars about solutions. I'm going to have to break out an old chemistry text. My reasoning, slipshod as it is, is that the 46g iron that I used for calculations has a volume of 5.905 ml. Added to 2000ml of vinegar gives 2005.905 ml. The 100 g of acetic acid in the 2000 ml vinegar would be 95.829ml. So, 2000 - 95.829 = 1904.171ml water. If all the iron combined with acetic acid, that would give 144.865g ferrous acetate, which would have a volume of 83.544 ml. Added to 1904.171 = 1987.715 ml. 2005.905 - 1987.715 = 18.19ml drop in the vinegar. Again, note I've forgotten what little I knew about solutions, so these calculations may not be correct. It does look like my goal of keeping a minimal surface area exposed to air will mean topping it off more. I've already messed up this part of the experiment by adding vinegar to fill up the voids, so the result is going to contain more acetic acid than I hopped. OTOH, so far the liquid is clear.
-
The idea is that, in theory, if there's enough iron to combine with acetic acid, it should reduce the amount of acetic acid remaining in the solution to nothing. That's in theory. Actual practice is something different, though, and I don't know if this setup will result in all the acetic acid combining with iron. Likely not. I should have measured the vinegar as I poured it in, both to make sure I had the right amount and to make sure I had no air pockets in the steel wool. Since I had to add vinegar to make up the amount lost, as an experiment this is already a failure in that I won't know if it's possible to completely combine iron with acetic acid with such a set-up. Started wondering just how much hydrogen this should yield. By the formula, it takes 2 moles of acetic acid to yield 1 mole hydrogen. If there's 100g acetic acid in 2 liters of 5% acidity white vinegar, and the molar mass of acetic acid is 60.052g, then 100/(2X60.052) = 0.833 moles hydrogen. Hydrogen has an atomic weight of 1.00784, so H2 should have an atomic weight of 2.0157. 2.0157 x 0.833 = 1.679g hydrogen. Hydrogen has a density of 0.8988g/liter at normal temperature and pressure,, so 1.679 / 0.08988 = 18.687 liters hydrogen. If this calculation is correct (big if), that's a lot of hydrogen. Now I don't know if the displaced vinegar Friday was due to air trapped in the steel wool when it put it in the bottle or from the reaction. If correct, though, that yield of hydrogen shows why it's so important to allow the iron and vinegar mixture to vent.
-
Had thought about a higher concentration. White vinegar at 5% is easily available locally.
-
Update: Even with the cooler temperatures, there are now noticeable bubbles on the steel wool, with a bubble every now and then breaking free and floating to the top. So far, no orange in the bottle itself, so hopefully there's no oxygen getting involved in this. This is why I wanted to use the soft drink bottle, filling it up to the cap in order to reduce surface area exposed to air. Not quite ready to remove the cap and inspect the surface of the vinegar. There's problems with the bottle this full. A length of tubing attached to the top to lengthen the neck and allow for bubbles bursting at the top might be better, but don't know if it's possible to get such locally or if any exists in that diameter. Would have to cobble a connection. It would be very easy to spend a lot of money on this. I should have used a smaller bottle, since this is an experiment. Soft drink bottles seem to be stouter than plastic bottled water bottles, and would trust them more for this, even with the vent hole in the cap.
-
Update: There seem to be no more visible voids in the bottle, other than small bubbles on the steel wool. That said, the steel wool is way more intact than expected. Individual strands are visible. I would question whether the vinegar is reacting with the steel at all except that part that spilled out of the cap and onto the folded paper towel shows an irregular orange ring, with a similar spot on the remains of the label on the side of the bottle. My guess is the orange is rust where iron dissolved in the vinegar oxidized. But that it dissolved rather than formed ferrous acetate seems significant. We know that iron and acetic acid form ferrous acetate, and that iron liquor dye is made from iron and vinegar, but it seems to be taking far longer for the steel to combine with the acetic acid than anticipated. For what it's worth, temperatures have been in the 50°'s F / 10°s C since overnight, and that has to have slowed the reaction.
-
Update: Though there was only a small bit of vinegar on the cap, I didn't like the way the steel wool was bulged up, with gas pockets visible against the side of the bottle. I took a plastic drinking straw, which wouldn't displace that much vinegar, and pressed it down, releasing gas. Most of what came up has to have been trapped air. Although I have seen some bubbles form on the steel wool, there's been no noticeable amount dissolved. That means that even though I'd shredded the steel wool, it was compressed enough to hold air. Once again, I think passing it through the bottleneck lead to this. Using a bottle, I'd have to tear it apart even finer and not pack so much through at one time. Temperatures are forecast to drop, and that's going to slow the reaction.
-
Thanks. I'll look into it.
-
Bored a hole in the center of the bottle cap. It's in a plastic 2 liter soft drink bottle. Here seems to lie some of the difficulty. I was after limiting the surface area to the air. What seems to have happened is a wad of steel wool has collected enough hydrogen to float, in the process acting as a plunger pushing vinegar up out of the cap. Unfortunately that, and the accumulated hydrogen, has pushed out enough to leave some steel wool at the neck exposed. Have topped it off with more vinegar, which isn't ideal for this, experiment-wise. I don't know how much iron acetate I've possibly lost. True, it's likely to be slight, but it may also leave the solution with surplus vinegar. May have to scrounge up a plastic rod to push the steel wool back down. This is surprising in that I shredded the steel wool pretty well before putting it in the bottle. Putting it through the neck of the bottle may have compressed it enough that it can give the plunger effect. Have checked the bottle for leaks and found none. It looks like rain could be heading this way, and have put it under a roof, in a plastic flying disk with some folded paper towels.
-
Important update: This method has produced a miniature geyser. I don't know if it's a change in volume or just hydrogen bubbles coming to the surface, but I'm getting an almost steady flow out the top of the cap down the side of the bottle. In other words, a mess. Fortunately, I had it outside due to the vinegar odor, and have moved the bottle to something that the vinegar won't harm. It's not something anyone would want in their house or work shop. Why am I thinking change in volume? Grasping at straws, really. The temperature outside is warmer than inside, and wondering if the steel wool is expanding enough to force s little vinegar out of the hole in the cap.
-
AKA iron liquor. I've wanted to tinker with this since learning of it several week ago. Of particular interest is the chemistry of making ferrous acetate, the stuff that reacts with tannic acid to turn leather black. Unfortunately, I've forgotten most of what little chemistry learned in school, but I wasn't comfortable just winging it. The first question is how much acetic acid is in vinegar, in this case distilled white vinegar. The second is the chemical reaction involved. The third is the amount of iron needed to react with the acetic acid to make ferrous acetate. Important: Before we start, every bit of what follows could be wrong. It's been decades since I've been in a chemistry class, and all these calculations could be wrong. I'm hoping that any leatherworkers who know chemistry can comment on all this. In any event, please double check these calculations. First, the Vinegar The white vinegar I'm using says it's 5% acidity. But is that 5% by weight or by volume? So far, haven't found a definitive answer. An FDA regulation on vinegar implies that it's by weight; it gives grams of acetic acid to ml of water, and 1 ml of water is essentially 1 gram for the tolerance range of measuring instruments found in the home. So 5% acidity is 0.05 acidity, which should be 5g acetic acid/100ml water. For 1 liter that's 5/100 x 10/10 = 50/1000, so there should be 50g acetic acid to a liter of 5% acidity vinegar. Next the Chemistry Acetic acid has a formula of C2H4O2, and a molar mass of 60.052g. Iron is straight Fe, of course, and has an atomic weight of 55.845. The way chemistry is set up, I think that means iron has a molar mass of 55.845g. The reaction of iron to acetic acid is Fe+2(C2H4O2) yields Fe(C2H3O2)2 + H2. So it takes 2 moles of acetic acid to react to 1 mole of iron to yield 1 mole ferrous acetate. How Much Iron does this Take? Since it takes two moles of acetic acid to react to one mole iron, the ratio of iron to acetic acid by weight should be 55.845 / 2(60.052) = 55.845/120.104. For a liter of 5% by acidity vinegar, that should be 50 x 55.845/120.104 = 23.248g iron. Maybe. There's a strong chance all this is wrong. Please double check these calculations. Now the Experiment For this, I used a 2 liter soft drink bottle. First I measured the full capacity of the bottle. Since the iron will take up space, I hoped it would be large enough without having to tinker with the calculations. The density of iron is 7.874g/ml, and using 2 liters of vinegar hopefully means that I'll need s x 23.248g iron, which is 46.496g iron. 46.496/7.874 = 5.9ml. So the iron and the vinegar should come to 2005.9 ml. It looked like the bottle would hold it, so I then rinsed it out and bored a small hole in the center of the cap to let out the hydrogen produced by the reaction. Two liters should take 2 x 23.248g iron = 46.496g iron. I set the kitchen scale to grams (unfortunately, it only measures to whole grams), put a paper plate on it, zeroed it out, and weighted out 47g of 0000 steel wool, then bumped it up to 49g, which both used complete bats of the steel wool on hand and gave a little excess iron. Using a funnel, I poured a small bit of iron vinegar in the bottom. Right or wrong, thought this might prevent some air spaces. Then I pulled apart the steel wool as I packed it inside the bottle. Then, with the funnel, I slowly filled the bottle with vinegar to the very top. Hopefully, in filling the bottle to the top, that minimizes the surface area exposed to oxygen. Had thought about putting just a tad of neatsfoot or mineral oil on top to seal the surface from air, but the bottle was too full. The plan is to wait at least a week, then pour the liquid into another bottle, using a coffee filter in a funnel as a strainer. Now we wait. Now, About that Ferrous Acetate It has a molar mass of 173.993g, and 2 liters of vinegar may produce 173.993g x 46.496g/55.845g = 144.865g ferrous acetate. I think that means this yields a (144.865g / 2000g water) x 100% = 7.24% solution of ferrous acetate. That's if all this is correct.
-
This is from the strap belt I've made not that many weeks past. Dyed with Fiebing's Pro Dark Brown, conditioned with a thin application of neatsfoot oil, and sealed with three coats of Fiebing's Resoline (tm) cut to a 50/50 mixture. There was no rub-off after applying the neatsfoot oil or after the Resolene (tm), and until today had none. Tonight, when I took off the belt, there was some rub-off on my pants in the buckle area. Aha! I thought. There was originally more rub-off where I cut the holes, so it must be from the rivets and/or the belt holes. Started making plans of trying to remove the two rivets securing the buckle and reapplying the Resolene (tm). Then I thought, I need to rub over it to find exactly where it's coming from. Herein lies the mystery: I'm getting no rub-off at all. Not even running a cotton swab in the belt holes. Nothing. Checked the rest of the belt, including edges. Still nothing. This leads to three questions: Is there a way to track down the source of the rub-off? What will be the best way to reseal it? Is there a way to get the rub-off stain out of clothes? The answer to question three is likely "There isn't," and I've already told my wife. But it isn't visible with a belt.
-
Pruning shear sheath
Gosut replied to DwightT's topic in Gun Holsters, Rifle Slings and Knife Sheathes
Nice. Never thought about a sheath for pruning shears. What we have locally are sold sans sheath.. -
Dyeing, 2nd Attempt
Gosut replied to Gosut's topic in Dyes, Antiques, Stains, Glues, Waxes, Finishes and Conditioners.
It's imported leather. I'm a beginner and don't rate something like Herman Oak yet. I'm using a lighter weight of leather for the inside pockets, and it took dye differently that the cover itself. Ended up with some horizontal streaks on the cover despite using circular motion to apply the dye, so maybe it wasn't as circular as I thought. Wasn't terrible, but noticeable. Second application was to address this and bring the interior pockets to the same shade. Got rid of the streaks and brought the pocket material to a much closer shade to the cover. Have applied neatsfoot oil again. Even though I applied a light coat before the dye, the leather felt harder afterward. Only applied another light coat. Will buff and apply Resolene (tm) next. Got good results on the belt with diluting it to 50/50 and applying three coats over as many days. Will post photos in "Critique My Work" when it's done. -
This is for a checkbook cover for a gift. The dye is Fiebring's Pro Dye Dark Brown again. I had just a little left in the bottle, so I ordered a second one. Also ordered wool daubers, since I was certain the foam stain brush I used on the belt contributed to waste since it wasn't high density. I had already applied a light coat of neatsfoot oil to the cover, in hopes it would darken it and I wouldn't have to dye it, but to my surprise, it only slightly darkened the leather. I've applied it to work books over the years, and it always made them noticeably darker. This evening, I poured some of the dye from the first bottle in a small disposable plastic cup, and used a dauber, using a circular motion to apply the dye. This time I had little waste. Still have some dye in the first bottle, and didn't have to open the second. The cover is now drying in the back of my truck, but the project is small enough I can move it inside after a few hours. Can either lay it flat or suspend it by a hook I made from electric fence wire, slipped into a pocket. Used rubbing alcohol to rinse out the dauber. Will save it for use with this specific dye. Overall, I'm pleased with the lack of waste. Will see if I need to do a second application. Hopefully, not.
-
Following this topic with interest. My father's father tanned their own leather. Unfortunately, my father hated the process, and didn't discuss it much. The only thing he commented on was soaking the leather in the creek, taking it out and scraping it down, and putting it back, and that it was a long process. We once found one of these pieces of leather. It was hairless, thirty years or more old, and I recall it was hairless and dark colored. Unfortunately, I don't know if it was cow or hog. The latter is significant because a hog carcass was scalded to make it easier to remove hair and usually butchered with skin intact. My point is the one thing my father said about the process: soaking the hide in the creek. The streams here are loaded with tannins. Enough to tan hide? Don't know. Such was my father's dislike for tanning leather that he may have left out significant parts, such as soaking in a barrel with bark. Whatever the process, I strongly suspect it was something passed down, and utilized available resources. For what it's worth, some miles from here, someone tossed the remains of butchered deer carcasses beside the road. That was last fall. The skins still appear intact. The only "tanning" they have experienced was from the natural environment. Don't particularly want to investigate that further. Only know that the hides are still there, laying on top of the ground. Probably hard as a rock, too.
-
Still Buffing
Gosut replied to Gosut's topic in Dyes, Antiques, Stains, Glues, Waxes, Finishes and Conditioners.
My single experience with Resolene (tm ) used a 50/50 mixture. The leather readily absorbed the 1st coat. 24 hours later, it absorbed the 2nd coat. Another 24 hours later, the 3rd coat didn't soak in as well. Took that as meaning the first two coats were doing their job. But yes, I was amazed at how well the finish went into the leather. -
Well...That Wasn't Hard
Gosut replied to Gosut's topic in Dyes, Antiques, Stains, Glues, Waxes, Finishes and Conditioners.
Thanks. I secured the keeper by overlapping the full width of the keeper and skiving both ends to half thickness. If I'd thought about it more, I'd have tapered both halves for a better fit, but at least it's not visible. I punched the holes, but ran into problem after gluing and had to repunch. Ended up slipping the keeper over the corner of my punching board and the old magazine I put on top of it to protect the points. This was incredibly easy, so it may have only been slightly misaligned or had glue in the holes. Slipping it over the corner worked so well, I'll try to do that if I make another belt. Wished I'd creased the ends where the thread crossed from one side of the keeper to the other. Used a saddle stich, back stitching the last three holes. Applied the last coat tonight. This time noticed more of a tendency to streak, maybe due to the previous coats. Wasn't hard to clear up the streaks while still wet. -
Well...That Wasn't Hard
Gosut replied to Gosut's topic in Dyes, Antiques, Stains, Glues, Waxes, Finishes and Conditioners.
Here is a photo of the belt. I've adjusted the brightness a little based on the background, but yes, it's that dark of brown. OTOH, I did choose dark brown, and that's what I got. This is with one coat. Not much detail in the photo. Unfortunately, not even the belt and rivet holes show up well. It's just a strap belt, nothing more. It's to be a work belt Have put the second coat on it. One more to go.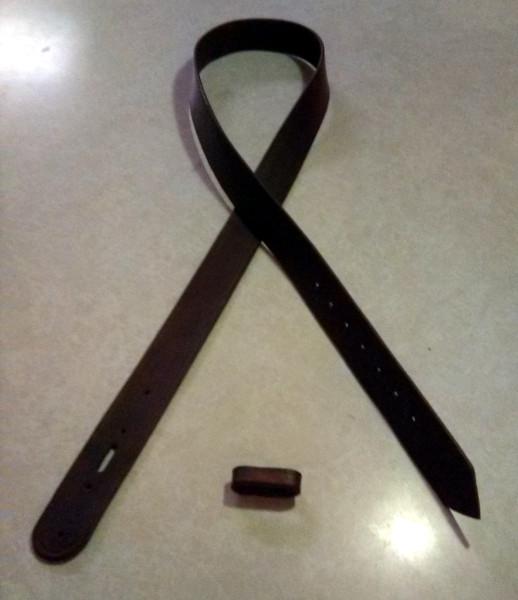
-
Well...That Wasn't Hard
Gosut replied to Gosut's topic in Dyes, Antiques, Stains, Glues, Waxes, Finishes and Conditioners.
It's all mundane. Just a strap belt dyed dark brown. A picture won't show how the crease I set at the end wandered a little. Am applying finish before I set the snaps. It was dry this morning and didn't see any streaking. Will try to remember to get a photo before the second coat, but really, it's all mundane. -
Eye/hand coordination is a skill and a part of artistic expression, but maybe isn't art in of itself. One could cut a curve or maybe under something freehand, but still not know how to make a visually pleasing carving. The visually pleasing aspect is the art.
-
As someone who likely could do neither, would think so. You have to know how to apply stamps in a visually pleasing way.
-
Have applied Resolene (tm) to the belt project. I used a 50 Resolene (tm) / 50 Water mixture, applied with half a cheap sponge. Rigged a way to hang the belt and keeper, and used a disposable plastic teaspoon to measure two each of Resolene (tm) and water in a small disposable plastic cup, then used the spoon to apply the mixture to the sponge. Applied 1 coat to the slick, flesh, and edges, and it's now drying. To my surprise it all went well. Had half the mixture left, and that suggests I can do something similar the next time I use dye (or at least try it). Current plan is to do two additional coats.
-
Still Buffing
Gosut replied to Gosut's topic in Dyes, Antiques, Stains, Glues, Waxes, Finishes and Conditioners.
Update: About half an hour ago, noticed all the oil had soaked in, took it down, and buffed it. Had no rub-off. All I have to do now is to seal it with Resolene (tm), put in the buckle and snaps, and it's done..