


Marietje
-
Content Count
44 -
Joined
-
Last visited
Posts posted by Marietje
-
-
Wow, true art. Stunning!
-
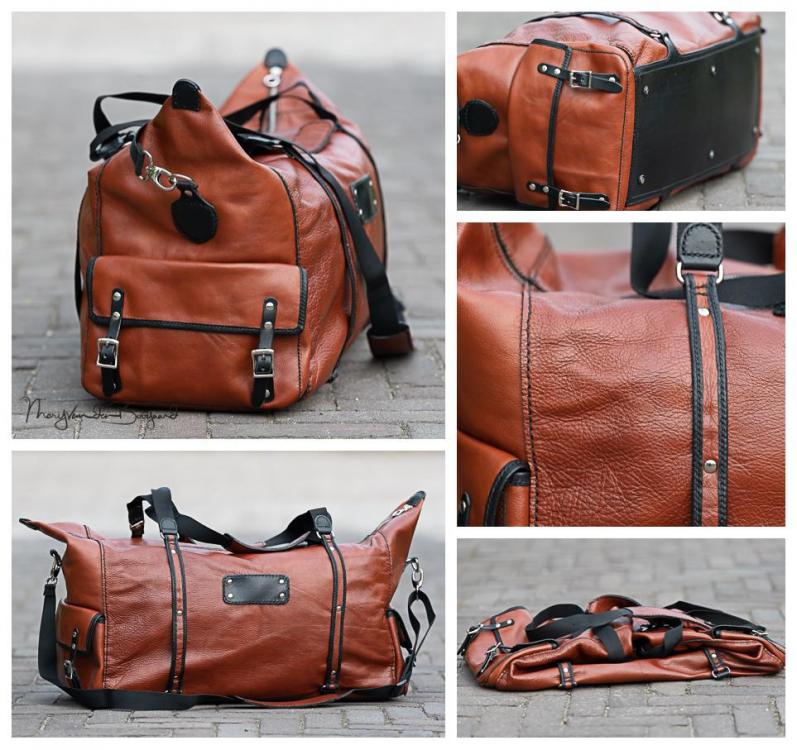
Been a while since I have posted anything but I certainly was busy and made two weekender bags, both fully hand-stitched as I don't have a machine. Lot of work, sore hands, but worth it
")
The first one was more of a tryout of some furnish leather I still had laying around. It was way too thin for any straps, so I lined them with black pigskin and folded the edges over to get a black accent.
Stitched over it to reduce stretching. Did not put tie down on this one yet, as I did not know how with the side pockets being in the way.
Someone liked the bag a lot, so it was sold before it was even finished (which made me quite proud).
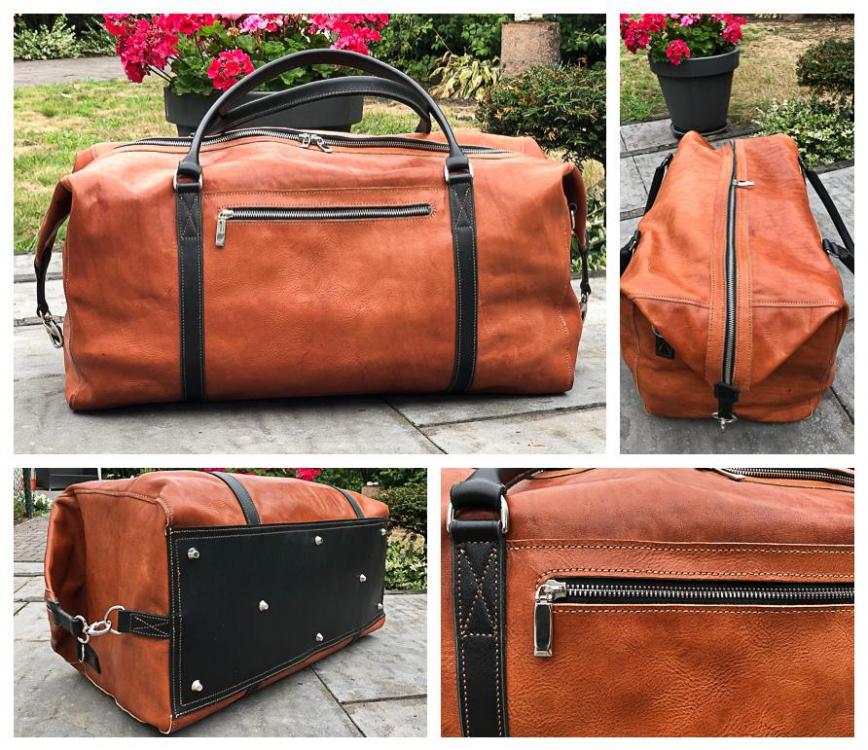
I did not ask much for it, but the money I got gave me the chance to buy some nice new leather and make a bag for myself, using the experience of the first bag.
Still made some mistakes and have some not so nice stitches (lost focus at some point), but happy with the overal result.
I've used 4oz tan color veg leather for the bag and 5oz black for the bottom and straps. Also made a shoulder-strap lined with black pigskin to prevent stretching.
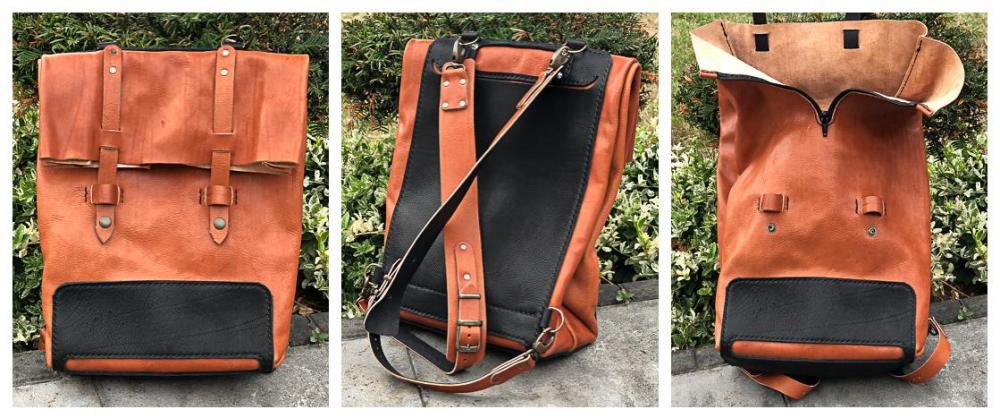
As I had some leather left I also made a backpack. The black at the back is an outside pocket.
Patterns are from DieselpunkRo and for the weekend bags I modified the patterns myself.Let me hear what you think and if you have any tips or modifications I should take into account next time.
-
On 2-10-2018 at 8:19 AM, Garyspruill said:Marietje:
I have made several bags from the patterns of DieselpunkRO and my wife loves all of them. :-)
I was making the Witch Doctor Bag (pattern) for myeslf and when the wife saw it, she took ownership of it and I finished it for her (hmmmm?)
I only "wish" I could figure out what he (Tony aka: DieselPunk) uses on the edges to darken them up and make them look patina (darker) like he does.
The bag you made: looks fantastic! Great Job!
When cutting out the leather, don't you just love all the stitching plugs EVERYWHERE? It took me days to get them all up from the floor:-)
Your edges look fine. This is how they are suppose to look from the tutorial.
That is great to hear! (sorry for my delayed answer, for some reason I just don't get notifications of responses, so look at this forum occasionally).
I love the patterns of Tony too! What's your name on his page? I'm Mary")
I just finished the Boston bag (maybe you have seen). Need to make better pictures and will post here too.
Now I'm working on the Messenger bag.
I've just watched a video from Armitage Leather on YouTube about edge burnishing. It's a skill I do not quite master yet. Armitage is using 2 kinds of burnishers though, 1 more rounded and one for the more flat edges.
It is key that the burnisher touches the leather well.
Haha.... the stitching plugs... it's a pain in the but! I have a piece of tape at hand to 'pick them up' and also a cup to put them in, as I have a simple punch that I can close off with my fingers and empty in the cup when needed.On this weekender bag I used edge burnishers in a Dremel tool, which made it a lot more convenient I must say, but still, they could be better.
-
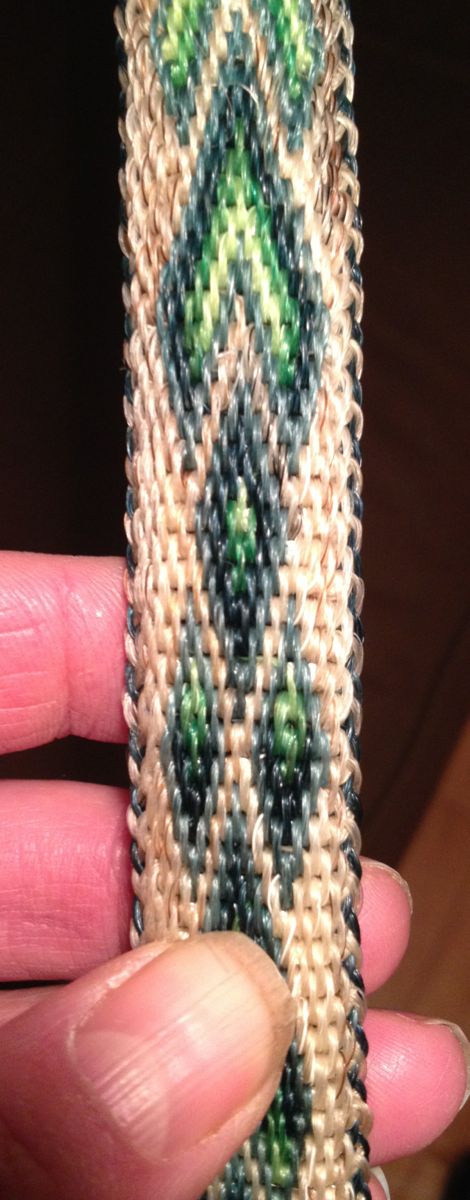
That is really nice! My basket weave skills are terrible when I see this.
-
Thank you all for the kind and positive comments.
@ Scoutmom103: It definitely can carry weight Lot's of unnecessary stuff I carry around.... LOL. I've got the pattern from DieselpunkRo @ Etsy. Lot's of nice DIY patterns. Dimensions are 12x6 inch, but you also get a larger pattern of 20x10 inch
@ Riem: dankjewel. Yes I hand stitched. I like hand stitching, don't want to use a machine (don't have one, can't buy one either). That said, I'm looking into buying a good diamond chisel cause I like that more than the punched holes. Might be difficult with these patterns though, cause they are all perfectly aligned with the amount of holes.
I used rubber cement for the lining. Yes, edges of the strap are more rough. It was a different piece of leather as I did not have a piece long enough and for some reason the flesh side was more rough too. Still figuring out how to get the edges real smooth. It's getting better with the next bag I think, just a lot of practice I need to do. I use a little gum trac now, then edge with my Dremel and an edger with different widths on it (via eBay) and then again with some bees wax. Next time I want to try some edge kote. It's still not as smooth as can be. I think I either use too much or not much enough gum trac?
@Flashmojo & Sheilajeanne: yes correct, Fiebings Pro Saddle Tan
@ScoobyNewbie: Color is mainly the dye, the pure neatsfoot did not do that much anymore, but I only applied 1 coat after dying. Luckily it's not that shiny because of the resolene. I was afraid too it would become to shiny.I've cut out all the pieces for the next bag, did the edges and applied two coats of pure neatsfoot now. It darkened a little, but still not much, so I think I'll do another coat tomorrow.
Then I need to decide if I put mink oil on or carnauba creme, or maybe both?
Any advice is appreciated! -
Long time I have done anything, years.... Now I've done a handbag from a pattern.
Dyed with Fiebing's pro tan dye, then oiled with neatsfoot (unfortunately compound, the pure was in the shed and I forgot), then finished with resolene.
6oz veg tan leather. Lined with black pig skin.
Turned out a little stiffer than I anticipated. Some say I should oil first (with pure neatsfoot obviously), then dye, not use resolene.
My next project I'm thinking of only using neatsfoot and finish with carnauba creme or mink oil. Any advice is appreciated.
Still happy with it though, it's in use
-
No luck at Ohio travel bag or hardwareelf, they don't know where i would be able to get these end caps.
I give up
 , have to think of something else...
 -
yes, no response
Will try some others too...
-
Still not the rights ones, sorry... Macculloch has round ones, what i'm looking for is not round
-
Thanks Tree Reaper.
I already looked through their whole catalogue, but cannot find these particular ones though....
Does anyone know if it has a particular name?
-
Thanks, but I'm really looking for these ones with a screw as it's for the exact same type of bracelet.
-
Can anyone help me where I can find these kind of end caps? I'm googling for two days by 'end cap', 'end cap for cuff', 'end cap for bracelet' as well as via 'how to.....' but just cannot find them.
Help is greatly appreciated.
-
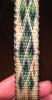
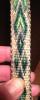
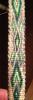
These are awesome!
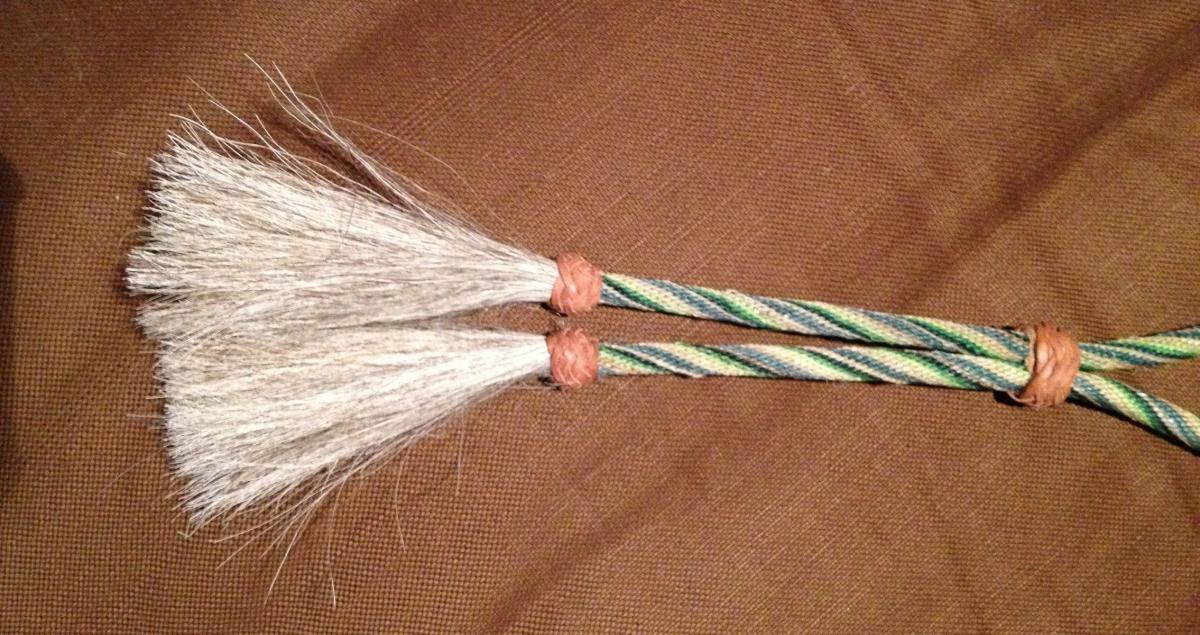
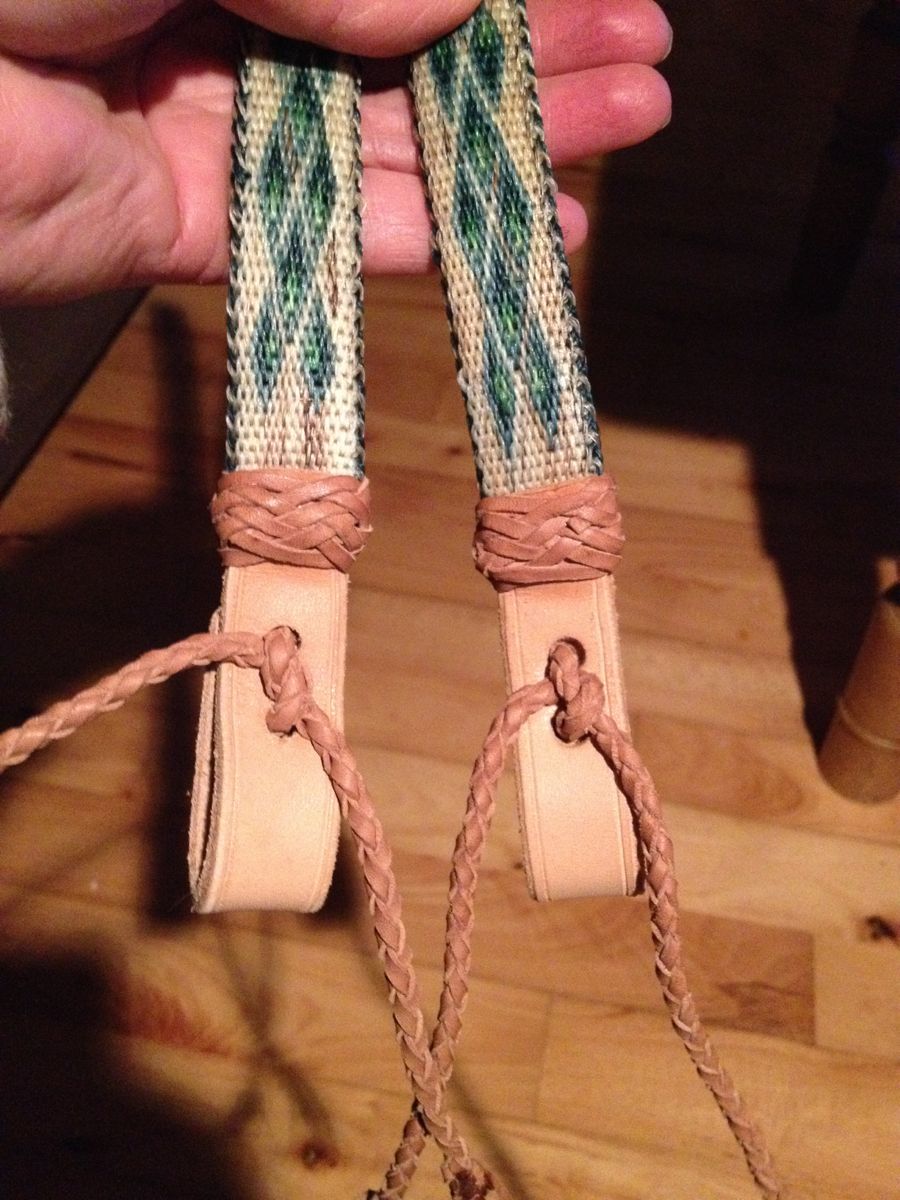
Can you explain to me how to make the knots on the connector? Not on the end of the reins, but the single one connecting to the reins itself?
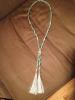
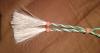
I'm hitching horse hair reins and need some rein connectors. Cannot buy nice ones in The Netherlands so I want to make them myself with a 4-strand round braid (or more strands if that is better?). As the whole bridle and reins are made by myself I would like to finish it off with own-made connectors too
When making the loop I get 8 strands in total and want to make a nice knot with that. I know how to make a crown knot and can do with the 8 strands in 4 pairs of 2, but it does not look that good and I'm afraid the knot is a little too small?
Do you use a core in the rein connectors?
I have a leather braiding book but cannot find how to make a knot with 8 strands. Any way you can help me?
-
Amazing!! The Leopard is 'alive'!
-
I've started hitching a bridle about 3 weeks ago. It's going pretty well thus far, but now it's time to attach the leather and put it all together.
It's the finishing I have some trouble with though. Eg, I'm using kangaroo lace for the Turks head knot, bot doubt if this is the proper lace to use, I think it does not look the best.
Well, here are some pics of the progress: first three pics of the pattern on the side pieces, pic 4 & 5 of the neck strap, pic 6 the leather part on the side pieces for the bit.
Thanks for watching.

-
Bob, but what about the temperature?
-
thanks Dwight, I will go for it! I have two strongs horses, so should be able to manage a pair of chaps... LOL
I'm sure my dad has a steel rod like that.
-
During my holiday in Mexico I've bought a couple of working batwing chaps, thick leather (4mm). The leather is quite stiff and nor comfortable to wear. I've oiled with neatsfoot oil twice, but it does not help much. I'm afraid to oil more as it might saturate/drench the leather too much?
I know it works best just to wear them, but they are just not comfortable enough to wear at all now, they are so stiff it even hurts.
Any advice?
-
Great video tutorial! Excellent help, especially the slow motion part!
-
Btw: belly 'thickness' is 1" more over the total (compared to side aluminum), so 1/2" on each side. Is it possible to mould the leather and keep the same circumference? (which is 19.2cm incl. 0.6mm seam). If not, I will make it bigger.
edit: just heard on the CityCas forum that he added 1" to the diameter of the canteen to get it molded....
-
@Camano Ridge: thanks for the link, it's exactly the same canteen and he moulded the leather around it beautifully. Wonder how he did that and I'm going to ask
The tutorial on this forum is fully read (see my first post) and sure gave me some insight, but it's not the same way of working with this canteen I think. I you can find out where to get the step by step sheets, that would be great. Of course I can start and experiment, but I really would like to avoid any stupid mistakes. As it's my 1st one, it will probably be hard enough to get it done already
Thanks you all!!
-
I have one additional question: I noticed the belly of the canteen is a little thicker than de aluminum side. Will all fit around the canteen? Will the circumference be big enough to get it attached to the side piece or should I add additional seam mm's in this case? So I mean, when looking to the canteen from the side, the belly sticks out a little, I think about 10mm on each side?
Can I put it together when dry or should I wet it? And I was thinking: Do I put it together partly and push the canteen in? Or can I first put the side piece (rectangle with drink hole/cutout for straps) around it and then lace the front/back piece to it?
-
Thanks a lot Beaverslayer! Laying out the sequence to work is helping me a lot and I will do as you have told. I thought of the tab straps and drinking spout indeed, that will be no issue.
Some work to go from now and will start working on the template.
Thanks!
@Tree Reaper: I don't think molding is going to look nice on this canteen, as it has sharp edges. Thanks for the idea though.
-
I have this desert canteen and want to cover it with leather, lacing the pieces together, but need some advice (I've read Timbo's tutorial, but this canteen is of totally different shape).
1. Size is 18cm diameter (appr. 7"), 6cm thick (appr. 2.4"), 58cm circumference (appr. 22.8").
How much do I add for the seam? Is 1cm (0.4") enough?
2. Need to punch holes for lacing. I have 0.3mm of kangaroo leather and 0.5mm of normal leather lace. Which one is best to use (I know kangaroo is stronger, but maybe too thin?)
3. Holes for the rectangle piece (for the side) and the round piece (front & back) need to be the same amount, but how do I get that aligned? Can I use a chisel for the impression and then punch holes on the locations? But a chisel is straight, so how do I do it then on the round pieces?
Tried making a drawing on the computer and print, but the front/back pieces are giving me issues....
Want to do double loup or Mexican round braid lacing
Would appreciate any advice and help.
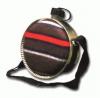


Tie down weekender bag a backpack
in Purses, Wallets, Belts and Miscellaneous Pocket Items
Posted · Report reply
No interior pockets in this one, only an outside pocket. Want to add interior pockets if I make another one and probably line it too
thank you all and especially thanks to the answers in Dutch")