


Yellowhousejake
-
Posts
35 -
Joined
-
Last visited
Content Type
Profiles
Forums
Events
Blogs
Gallery
Store
Everything posted by Yellowhousejake
-
Hermann Oak G19 Leather Holster
Yellowhousejake replied to LMullins's topic in Gun Holsters, Rifle Slings and Knife Sheathes
First rate, looks very neat and tidy. DAve -
I use neatsfoot oil as a wad and patch lube on my rifles, have for years. It gets on your hands and then the rest of the gun. Never saw a problem. I would not hesitate to use it near bluing. DAve
-
They still sell incandescent bulbs for rough service and utility service. Some hardware stores will have them, if not Jeff Bezos will take your money. https://www.amazon.com/s?k=incandescent+light+bulbs+100+watt I do not like using Amazon, raised in a self employed family, I try to keep my money local. But, if the stores will not carry what I want I go to who does. When we find them, we stock up. DAve
-
I forgot to add, when making a flat back holster and gluing up the inside and outside. I apply all my glue to both pieces and when I mate the pieces and use wax paper to keep them separated so I am only mating specific areas at a time. I think that would work well when adding a lining. Apply all the glue where needed, add wax paper to the body on each side, press the sight tunnel (bend), and when ready to move, start slipping the wax paper out as you press the leather together. Does that make sense? DAve
-
I completely agree about pre-bending the leather when lining, though I have never done it myself. I say that because I have now torn down two original holsters to duplicate them and I am preparing to do a third, and forth, and so on. I discovered that you cannot break down an original holster, flatten it, and trace a pattern. The pattern will be too small. It took me three tries to learn this lesson. On close examination I found that when flattening the original leather you will see wrinkles forming on the outside of the bend. What you end up with is a traced pattern that fits the "inside" of the holster, not the outside. I built three copies of my first remake of Federal Man before I caught on to what was happening. The thicker the leather the greater the difference. I now break down the holster, flatten it to get a tracing, and then add 2X the thickness of the leather to the outside dimension, as a starting point. Were I to line a holster, I would follow Dwight's advice. I also notice that many commercial lined holsters use a very soft suede leather for the lining which would add almost nothing to the strength as suede is a split, and without the hair side, is relatively weak. DAve
-
Outstanding. Thank you for the tutorial. I bought a dozen caiman tails cheap from Buckle Guy, I think, and have been looking for a use. DAve
-
Dye woes
Yellowhousejake replied to Yellowhousejake's topic in Gun Holsters, Rifle Slings and Knife Sheathes
Interesting idea. I have done that with NFO, but results vary depending on the leather. DAve -
Dye woes
Yellowhousejake replied to Yellowhousejake's topic in Gun Holsters, Rifle Slings and Knife Sheathes
Hmmm, all food for thought. I need to experiment on some scrap. DAve -
Dye woes
Yellowhousejake replied to Yellowhousejake's topic in Gun Holsters, Rifle Slings and Knife Sheathes
No, I do not wet the leather before dying. How much do you wet the leather? Casing wet or just a quick wipe down and a minute to soak in? I do use NFO before dying a customer holster, but I let it dry/cure for 48 hours before dying. I left this holster in the dye for about 15 minutes, no idea if that is long enough. Or, clearly it was not ;^) I only tried dip dying because every other attempt on scrap leather from the same hide was mottled when spraying or using a dauber/sponge. I have watched Mike Dorsett's videos so many times I have them memorized. My dye never looks like his 100% of the time. DAve -
I have had hit and miss luck with Dying Saddle Tan Fieblings. Sometimes it goes on even and looks great, other times it goes on blotchy and looks terrible. I have tried sponges, airbrush, dip dye, all with no luck. Oddly enough my best luck has been dying Springfield Leather craft squares. Every attempt on quality Herman Oak looks uneven. Here is a picture of my latest article holster. A copy of a late 1930s Berns Martin for a S&W N frame snub. This was dip dyed and still came out splotchy. I can't help but think I am doing something wrong here. Any thoughts? DAve
-
I will be there shooting my M1D and dragging along a new participant. I am thinking about making databook covers for the auction next year so I have been researching journal covers and the like. I also want to try my hand at tooling holsters as well. DAve
-
You know MBM? I bought a CO2 laser cutter just so I could make stamps. I burn them into acrylic and epoxy the stamp onto a piece of steel plate. So far, they are holding up very well with my arbor press. At $150 dollars for a custom brass stamp, I need make only one more acrylic stamp to break even. Thank you for the compliment. DAve
-
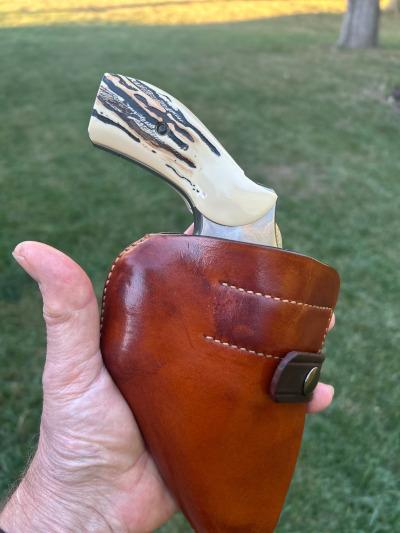
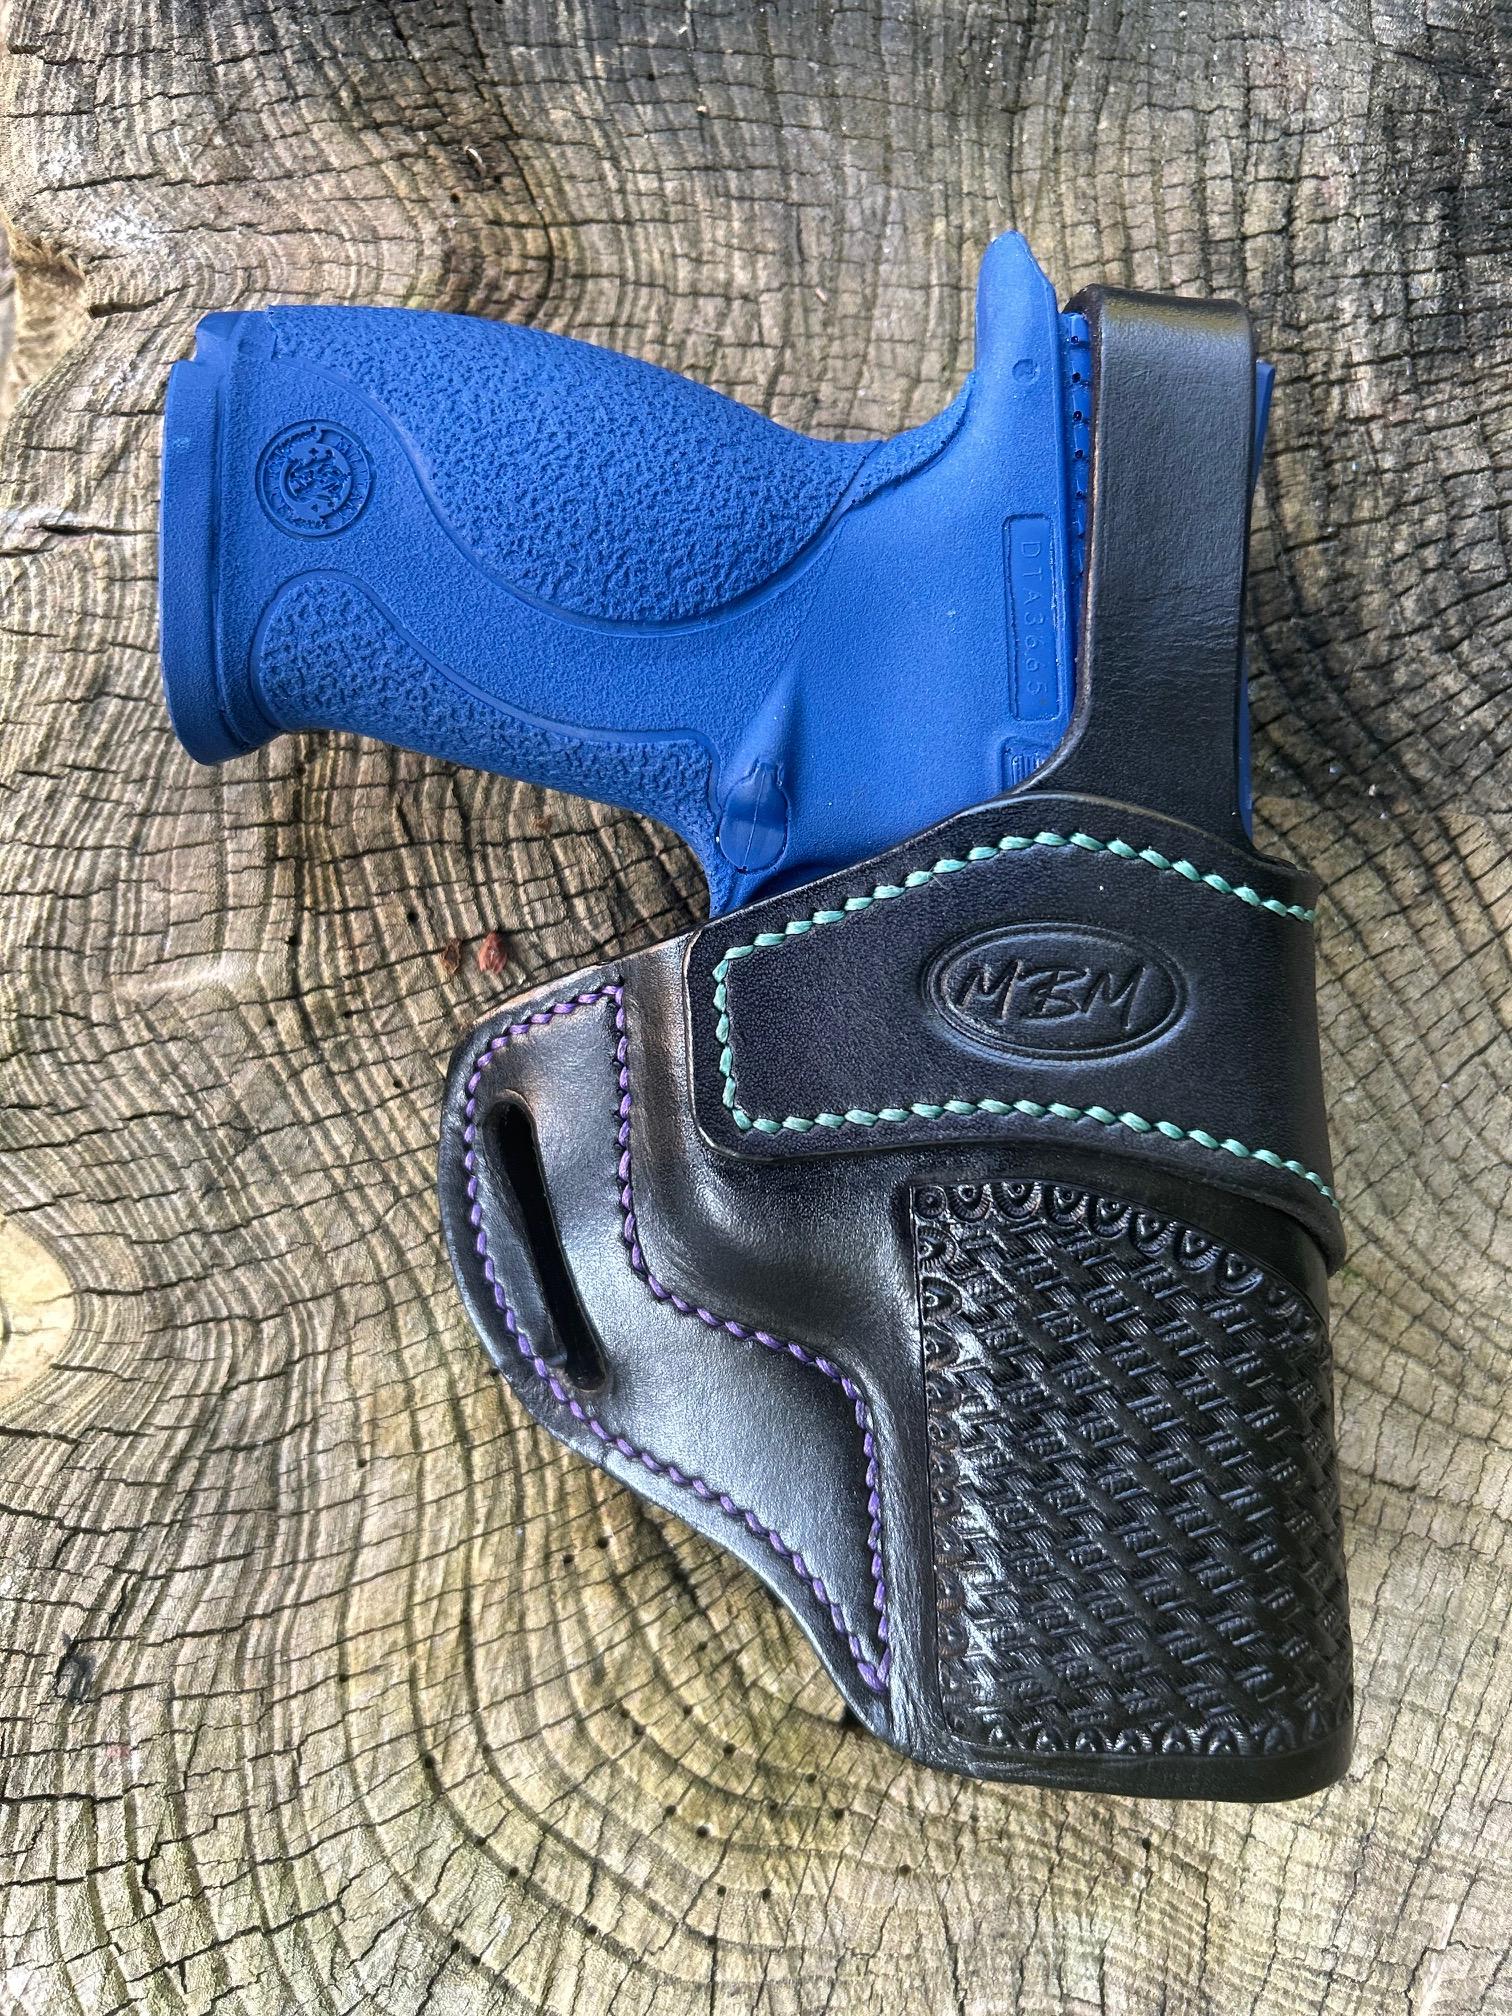
Avenger Style thumb break. S&W M&P 9/40. Black basketweave 8oz Herman Oak veg tan leather. 1mm Ritza raspberry and turquoise stitching. I'm getting better at this, I think. DAve
-
I think the thread is too large if you think it looks chunky. I use 4mm stitching irons, a bargin set of Aiskaer for diamond holes and a set of 4mm Sinabroks when I have room for a very obvious stitchline. I use 1 mm Ritza thread and it does not look that big. You could drop down to a .6 Maine thread and I think it would look less bulky and appear "tighter". DAve
-
Some exotic inlay for 1911
Yellowhousejake replied to Stetson912's topic in Gun Holsters, Rifle Slings and Knife Sheathes
Gotch ya. Thank you. DAve -
Some exotic inlay for 1911
Yellowhousejake replied to Stetson912's topic in Gun Holsters, Rifle Slings and Knife Sheathes
Nicely done! I have some caiman but the holster design I was looking to use it on has proven to be difficult without very thin borders on the window (an avenger style). Did you back the caiman in the window of the outer later Or, did you use three layers. Outside, lining with Caiman, backside? DAve -
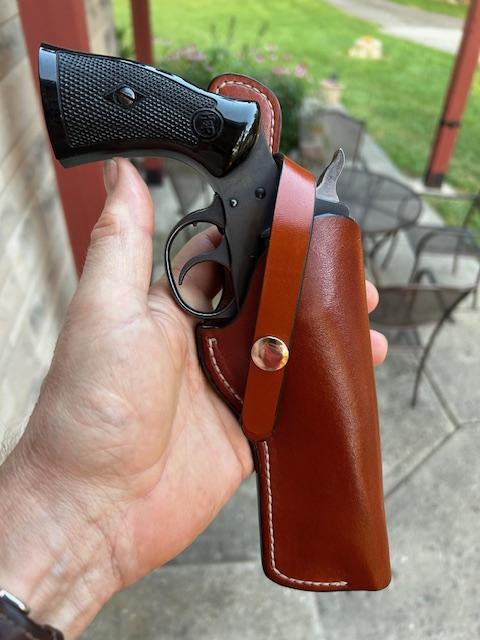
It was, the revolver I made it for was not the revolver the sample holster was made for. I bought a well worn out holster for a S&W M36 to tear apart. I had to lengthen the body 1 1/4" to fit the H&R. The biggest problem I faced, three tries to get it sized right, was leather compression. I disassembled the old holster and laid it flat for a tracing and it came out too small, twice! Looking closely I could see the outside of the leather was wrinkling up. The inside was not stretching out (originally it compressed) and the outside was compressing. Once I realized what was going on, I added the thickness of the leather to each outside edge and then the holster came together. The next one I am going to try is a Berns Martin front opening belt holster for a N frame S&W. If they like the article and want me to continue writing them. DAve
-
The Detective Gatzette, a print publication for https://snubnoir.com. I offered to do a series on old holsters. I will make a classic holster and use it for a few weeks reporting on what we learned over the years as applied to modern holsters, or what we left behind and shouldn't have. Not sure if they will print it, we will see. DAve
-
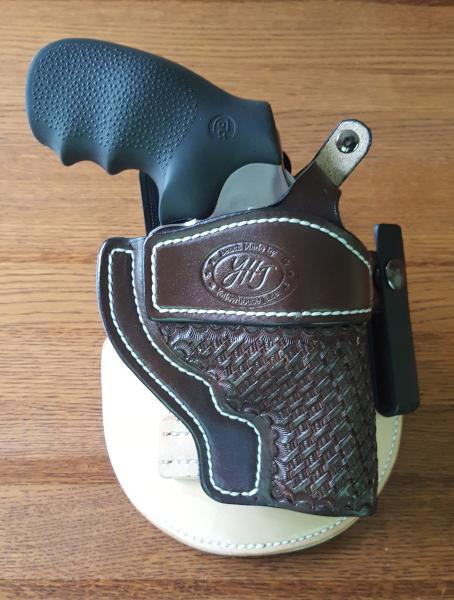
I just finished this for an article on holsters. It is a copy of a Federal Man holster I made for a H&R 732 I did not have a holster for. 8oz Herman Oak, Ritza 1mm thread, Saddle Tan dye. The suicide strap was an interesting feature on the early versions of this holster. It "looked" like a suicide strap but the snap was a rivet and the inside end was a thumb break. Allegedly, the bad guy would try to take your weapon by pulling on the strap but it would never let go. I didn't have such a rivet so I installed a pull the dot snap 180 degrees out. An interesting Tom Threepersons design holster. DAve
-
Holster Question
Yellowhousejake replied to Dwight's topic in Gun Holsters, Rifle Slings and Knife Sheathes
I agree, it is likely Jay-Pee. They often had shops like Buckhiemer make holsters for them to sell under their brand name. I have a Buckhiemer Semi Shoulder belt holster that is marked Jay-Pee. I believe a shop called Arsenal (maybe?) did the same, selling to government agencies like the FBI. The spring clam shell shoulder holsters were popular from the 1930s forward. I have a very old ElPaso Saddlery for a Detective Special and an early 60s Brauer Brothers for a Police Positive Special that are identically made. Do you a picture of the holster? DAve -
7.5 in Ruger Super Redhawk 480
Yellowhousejake replied to Hags's topic in Gun Holsters, Rifle Slings and Knife Sheathes
Beautiful work. From the finish, design, and craftsmanship it is first rate. DAve -
But, did the gun fit or was it too thick when worn after the gun was in it? DAve
-
K frame thumb break
Yellowhousejake replied to Stetson912's topic in Gun Holsters, Rifle Slings and Knife Sheathes
Great looking holster. I really like the color. DAve -
Two suggestions. To use vinegaroon (disolved iron in vinegar) you must first degrease the steel wool, 30 minutes in acetone and then completely rinsed with clear water. Once done it needs to seep in the vinegar for several weeks. When it stops reacting you need to filter it through a coffee filter. When it is done it will dye leather black almost immediately. You will not have to wait to see if it works. Degreasing is key, the oil they put on steel wool to stop it rusting will make a mess of things. Fabric dye. In the US it is sold as Rit Dye and is available in most grocery stores. Does a fine job if you first wet the leather and then dunk it in warmed dye solution. I hope that helps. DAve
-
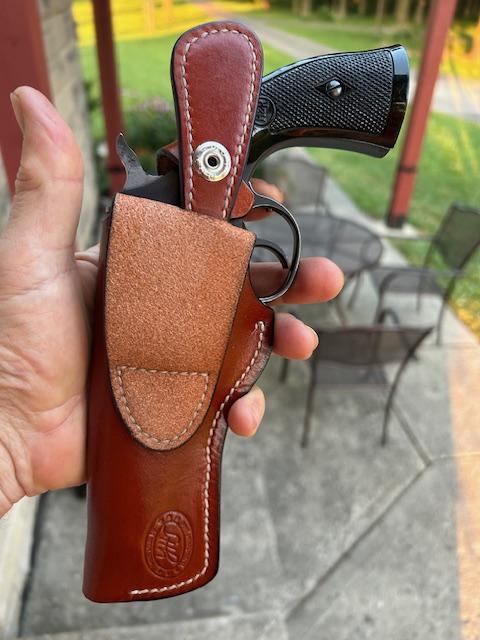
New 1911 Holster
Yellowhousejake replied to Yellowhousejake's topic in Gun Holsters, Rifle Slings and Knife Sheathes
I did the same thing for several holsters until I saw a ewwtube video that instructed you to line the stitchline up so that it goes away from you. Then when you hold the pricking iron to the marks it is running from six oclock to 12 oclock. You make your first set of holes and then move the iron farther away putting the tooth closest to you in the last previous hole and punch again. That way you can see that the iron is standing straight up. From your point of view, the stitchline is running vertically instead of horizontally and you are pricking away from you. Does that make sense? DAve