1985
-
Posts
33 -
Joined
-
Last visited
Content Type
Profiles
Forums
Events
Blogs
Gallery
Store
Everything posted by 1985
-
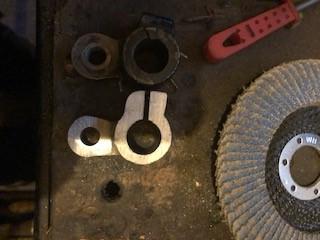
Thank you so much, to all of you for great advice and assistance and specially to some in particular who stuck with assisting me with several concerns I had with this singer twin needle 7 class. Machine is running smooth stitches well so all great now, But one of my question were ` why is there shiny marks on the rear and front cams this was one of my major concerns as it looked like metal on metal rubbing in certain areas causing or wear on these spots and because they looked new from the rest of the cam material, I had been told its normal wear, But in my case this info was not correct as I later found why this happened, When I got the machine the hand wheel was bolted quite away from the back of the cast body, this allowed to much play forwards and backwards on the horizontal shaft that had the cams were on, it was`t until removing the wheel and replacing it back I realized it would not go up to the end due to a nick in the horizontal shaft,after removing the nick on that part the wheel went up to its correct position,butting up to the rear end of the cast body. "knowing that now, this stopped the play back and forth to the shaft and stopped the hand wheel having to much intermittent stiffness and ease while rotating when not under tension and no load, So obviously not knowing that the hand wheel was not placed all the way up to its correct position and I not recognizing this being new to sewing machines, could of been seen as wear if all fixings were in place correctly and given its age very understandable from the answer given, but sorted now, And I think it was Bob who said when cleaning don`t bother stripping parts all they can break, well in my quest to clean and adjust , you were correct,I never realized that one of the parts were cast steel and it had a crack in it ,I assume I over tightened that part,hence pictures above me making another from steel, This material is not cast iron and possibly Will be prone to rust more than original piece . but if could not find a original replacement, but all good in the end.
-
Okay I resolved the issues , like I said very new to sewing machines and realized the 2 frustrating issues were as follows. The thread getting trapped where it showed on the bobbin case` was top tension issue, being to lose or tight cant` remember now as been a while, moved on to the 7-33 single needle ,The top tread was not sliding nicely across bobbin case but not really indicated on the stitch at first, something else had contributed to this issue and the other issue . I realized all my focus was on the top thread + needle +material+ and machine parts being clean and damaged free, but the bobbin thread combination with top thread was the major cause, The top thread was bonded poly nylon or something of that sort and must of had more give but after several stitches due to the bobbin thread , the bobbin thread being thinner but was old a (non) poly nylon thread due to it being left on the bobbin when bought machine not checking what was on there first` So the top tension thread had plenty of give where the old thread never and different wights so ` So the combination of the 2 wrong matching threads caused top thread to fray and snap strands hence the twisting, and constant issue with thread going around bobbin case, getting trapped and not coming up out the back in time, Once I corrected bobbin thread with same as top thread all issues were gone and machine stitched great.I had many people helping that kept telling me to check Top thread for its quality and how it comes of the spool/ correct needle and look for damage , correct tension top and bottom/ material I am using may have defects in the leather/ parts worn or damaged to machine/ check timing and feed dogs/from you tube and sites but no ever mention of matching the type of thread used as in there material make up had to match.only the thickness. But now I know I can get away with slight difference in the thickness from top and bottom but no so much the type if complete different.make up. By not replacing the bobbin thread this lead me down a rabbit hole over 2-3 weeks even stripping machine so far where I was on the verge to give up, I think lessons were learnt in my case , its natural `also taken for granted one would of replaced bobbin type thread to the same type used on top and commonsense for the average user of a sewing machinist to check what thread or even just replace bobbin thread straight away, but not to a newbie, Specially when stitching tension looked good on the material and the thread looked similar size to the naked eye and its make up , until checked later then it hit home.Its very easy to look over this specially when 99% your told to look more on the above areas, The one other lesson learnt by my self is don`t assume that the last owner has left the machine with the correct adjustment settings and the correct thread in bobbin that they gave me with the spools for on top, I never new the working of a basic function sewing machine much , but after all this I am pretty well adverse now how it works and how to set timing etc, on this basic machine, I kept telling my partner if I give up on this I would not know how to check issues with my other several vintage machines,that may be more complicated in there functions.we all start from the beginning and teaches us allot. So thank you to all helped it had been a big learning curve with machine and man.
-
 This is not meant to sound cocky in anyway but no, not much thought given written to what I write down just came naturally the way I think` although it may come across this way to some. I have a some autistic ways to the way I think written diarrhea is one of them. But then if you were going to announce the out come in your findings after carrying on with the tests in this forum ,won`t some people just be questioning your methods of practice to whether it was worth it,after all they only going by your word of mouth, Would this not be just like every one else giving there experience in the use of products used on leather` whether its true or not what the out come was ,this would surely bring us back to just another persons views as no scientific documentation to show us proof, even though I am not a great believer on scientific proof most of the time.were told what they want us to believe. I for one applaud any person trying out different methods does not need scientific evidence to get results as science has been proven to be wrong many times in the passed,and fudge the truth, specially when they don`t announce the correct findings as many companies have pay scientist researchers to only show the good stuff on paper with there product and not put down the bad stuff in a product on there findings ,just so companies make silly amount of money selling the product by the time they get found out , so they can`t even be trusted a lot of the time, This is why I stated people who have years of experience working with leather every day would know the out come with oil products,but if you choose to not believe in them and do your own research for fun then good on ya why not ,its the only real findings some times, I used to work in a museum helping the curator, documenting items , I seen stuff they would borrow and lend out many pieces to other museums, and listen to some of the ways and methods items had to be treated ,there were volunteers who worked with us very knowledgeable people and very experienced in there field.who I would trust there knowledge,after asking a thousand and one questions I was satisfied with there answers. off subject for a minute but has some meaning , One bloke who come to work with us worked in a nuclear plant for 20 years the knowledge he told me on nuclear waste and radiation was fascinating. word of mouth is not always bad to take on board, theirs some truths in it. The only trouble with products to day , the companies are changing there make up so quick to keep up with the competition by using cheaper man made substances in there products to keep costs down and profits up. so buy the time we get used to something they no longer produce it in the same way, that`s why using a product years ago possibly was really great but as the product changes the older generation may not notice anything much difference, So when some one uses the product for the first time many years down the line and does not recommend it that`s because its changed, this is why there is so much controversy on peoples opinions,some are right some don`t know any different. Anyway ill be interested in your findings if your decide to place them on this thread be interesting to find out what you discovered with the oils of today
 -
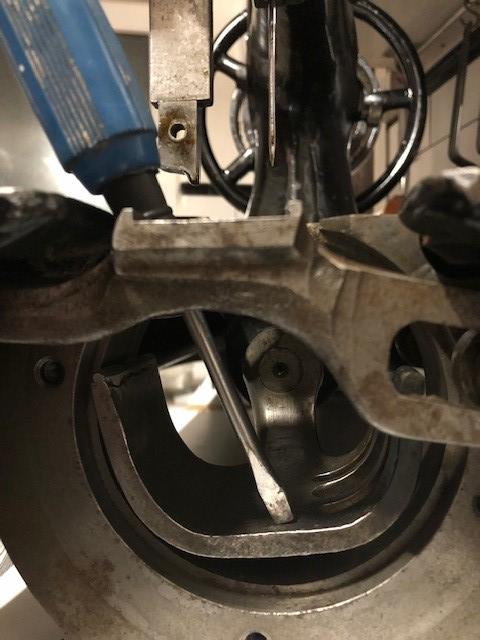
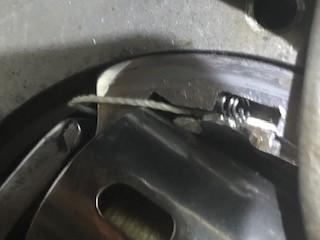
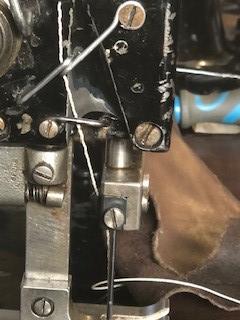
Hi all,I have a major issue with my singer class 7 double needle oscillating shuttle hooks,and thread , At the moment I am only using the left side needle trying to sort out one side first,on this twin needle singer class 7 machine. It does not matter what needle and thread combination I use the same issues occurs, seams to stitch for longer in thicker leather and worse in thinner leather, issues in thinner leather happens after 4-5 stitches issues with thicker leather can occur as soon as 10-30 stitches`s, I start stitching `then I will notice as its stitching the thread looks like it wants to twist more in the leather, and when the needle is travelling up and left the leather the thread looks like its twisting and some times fraying some time both together, but the twisting seams to happen a few stitches first before fraying. then it may fray it may not. if I carry on two or three more stitches the twist will get worse and go as far as the thread pick up leaver as shown in the picture, Some times the hand wheel will not move` stuck firm, where the thread had got trapped underneath when all stitches top look good and no sign of twisting above, but when looking underneath where the thread had tried to leave the back end of the hook ,its gotten trapped, other times there has been a double loop occurred or where the hook for some reason won`t go around to finish the cycle , because when I cannot pull the leather away with out cutting the thread,then I noticed the second loop not completed, The whole machine has been cleaned up all the shuttle hooks and the race and needle plate and all the run ways where thread passes all good and all the tension discs have been cleaned polished and checked , the needle thread guide by the needle no longer has thread cuts into it ,needle is set at correct height and distance from hook, and checked for sharp area on the shuttle hooks that may cut the thread has been checked.its all been well oiled , needles have been replaced with new, thread been changed to other types as well , but the issues still posits every time I sew, The last time it got snagged I cut the thread removed the leather removed items up above to inspect what had gone wrong on this particular moment. This time the thread had gotten (inside the hook) made its way to the spring as shown in the pics and the spring had come out of its hole laying as shown, I do not know how or whats happening causing the thread to get where it got to, Im thinking as the stitches look good surely it is not a tension issue , I have also threaded the machine several different paths just to see if it stopped the issue but it never , I Don`t know if the bobbin case may be moving slightly while in the hook assembly causing the thread to be snagging on the case as it slides over it, or to muck rocking back and forth with the hook in the race whether its moving faster or slower causing it to trap the thread, or is the bobbin thread tension to tight or to loose, or is there wear that the shuttle hook has to much movement from side to side as it goes around, but it feels good snug,or some how is the timing out, I am at the end of my options to why this keeps happening,and why they would make the shuttle with the gap partially so far and not have it as a complete hook going all the way around the bobbin case,like iv seen on the majority , I also made many types of tension springs for the front plate but this never changed the out come either ,so in the end I just tied it up to stop it moving so much, out of frustration,but on the pick before un threading you can see the twisting going up towards the thread take up


-
I get what your saying ,thinking this will be a very hard experiment to work out, given the type of leathers and treatments they have under gone , time factors. A lot of factors come into play, what animal the skin came from, how was the leather treated in the process with what chemicals, who had the leather after and what products did they use on it, I don`t know if you are using already used products or stuff straight from manufacturer . If I personally was to do this experiment, I would get all types of treated leather and some plain as less messed about with , you can get off cuts from the manufacturers using different types of animals skins as this may play as a factor , place them in a drying area until you are satisfied with the dried out effects your wanting , bend the leather to see the flexibility and pull on and twist them , use different oils in different areas on that leather, place back in the drying area or radiator and just keep repeating the process,bending twisting and pulling eventually you will start to see weaknesses in the leather, all your be doing is speeding up the processes to know the outcomes,of the oils but won`t tell you how long they take to naturally dry out, But if one oil still shows flexibility in the leather than another on the same piece then there is some thing to note down, As you know leather can last for decades If you are to use a product and not try to keep drying it out fast ,you may end up still studying the effects 10 years on,loll if you don`t force the effects As I mainly work on leather strops for my self vintage ones Iv bought and others iv made from new leather I can tell you iv had many vintage from around the same era going back decades , some have torn like cardboard others seemed a few years old, my only issue was, I never new what the previous owners had been using over the years, to cause them to have completely different effects. May be your best to get hold of the manufacturers who treat the skins as they would have the knowledge also museums they are very knowledgeable on treatments as they have to preserve many items involving leather, they will know what not to use on leather that may speed up the rotting process and how often they need to do it. And of cause the old boys and girls who have worked mending thousands of specialized leather items like vintage suit cases or brief cases, saddlers who are top of there game working with horse equipment ,, they would have so much knowledge, if none reply here then go visiting the old stores that may be around,find out with the manufactures why they produce certain oil for leather and whats in it ask for dater sheets, There must also be old books that have explanations on studies to do with effects with oils on leather but remember the oils back then in the early 18th and 19th centuries were produced different from to days, most likely used fats, But I gather your possibly looking at modern leathers with modern oils to see what will be destructive to leather, i just think to many factors will play its part in this as mentioned above , I also think to much of a treatment of oil can weaken as well , theirs a fine line to caring and destroying,hopefully gathering information from experts in there field may steer you right,. This is going to lead you down the rabbit hole with many tunnels , good luck` who knows you may come to some conclusions that you can share with evidence to show.
-
Owe, I do apologize . When I read this thread I overlooked the year ended, I just got a bit into the reading as Iv just been working on my class 7 machines all this month, So yes some what pointless adding my 2 bits worth considering the person locker isn't around anymore,Sorry!!
-
They are very heavy special with the bottom piece , me and my misses of 5ft4 helped me lift mine to its place of workings, we both were struggling to lift the dam thing, above our hips to drop on the table, unknown to her once iv refurbished the double needle class 7, that has to be carried back , lol then we have to carry the 7-33 into its the working area to be cleaned up and and taken back, shes a good old sort ` strong for her size, The only trouble with these machines if they ain`t on a table with a hole cut out to get underneath to adjust stuff they are a bugger to tip on there side,
-
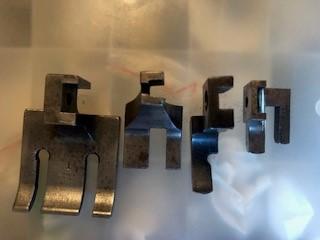
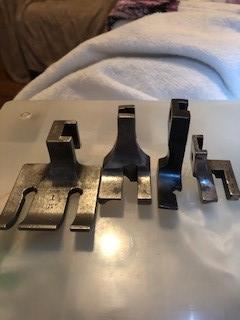
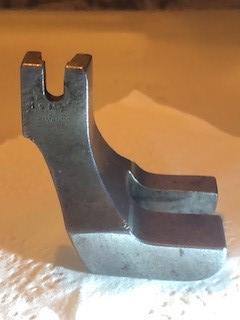
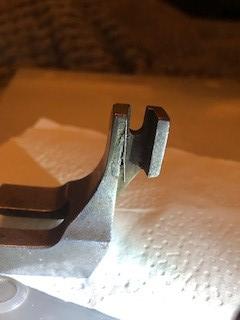
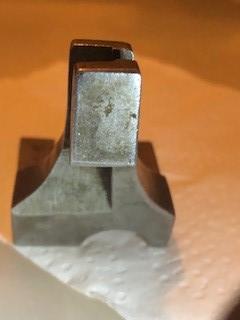
HI just purchased this foot with some 132 k6, feet, thought it may be to a 45k it has a light similar size slot as the 45k1 but some thing tells me its not to be ,as some thing just looks slightly different on the shank and size height of the whole thing, it has a number 19347 or 9347 made by SIMANCO and that 1 may be part of a letter like the others above the numbers in the photo, Iv done a comparison from left to right 1st 7 class 2nd the unknown 3rd 45 k1 4th 132 k6 and other separate pics of the unknown ,


-
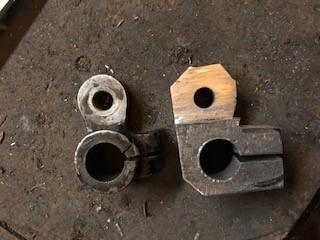
Well decided to make one from mild steel from my old multi gym plate , Using a press drill, an hacksaw , Disc cutter disc, sander disc ,files and wet and dry, I wish I had a metal lathe but never learnt to use one, it was the exact size as the original until I got carried away with the disc sander on the out side on the smaller section ,but worked great,after I gave it a final polish with compounds, A bit worried about it rusting so might have to quench in warm oil then wax and grease it,


-
I have several leather strops, some different leather than one another, they pick up dirt over the years, every few years I give them a good saddle soap with water, but only on the smooth face not the back.then I dab off access water, I place lint free cotton sheet or like pillow case on top then roller over pressing hard, to take up extra water, if some get to much of a shine from where the razor just slides I will give a light pommy stone but not on the decor,, before washing process explain above, Then I add Neatsfoot oil only to the backs of the strops and leave for a few days hanging up. Neatsfoot oil is not made the same way anymore like the old days. Once I am happy with the moisture content left on the strops , I mix my home made purified fat from (cod line) all the crap gets separated by boiling it a few times, leave to cool then pick up the solid block of fat left on top of water. I then mix it with a touch of organic coco butter and a touch of lanolin, Warm up until tepid and rub mixture into the face on the leather and push a glass jar up and down the strop, Then leave over night wrapped in cling film, then next day I rub off any thing that has not been absorbed in.leave again a few days hanging in the kitchen, then I rub the palm up and down until palm gets hot , Ill do the palm rub every day on each for a week, and that`s that ,and every time I use them I give them a rub with the palm, No fungi no bad smells and Iv had some strops few several years,some are vintage I suspect, My belief is Never leave leather to completely dry out for to many years it will rot, All my strops hang in the kitchen round the side where moisture and heat gets to them but the cooking stuff don`t reach them so easy , they are also in line with door way so plenty of air, not much oil cooking in my place , Better to add something to leather rather than leave it drying out, in my opinion .
-
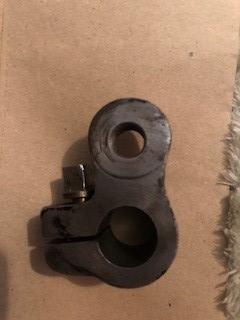
Have had to remove parts to get the drive hook out, On removing the Lower rock shaft crank part number 58335 belonging to the possibly singer 7-39, I noticed a crack, I suspect might be cast iron so may be tricky to weld,so looking for alternative , I seen some pics similar to my damaged one but not sure if they will fit, but they seem to be mostly in America sites ,when putting in for this part these come up on the web,does any one know if any of these can be a replacement,but I will show pics of my cracked part , and what comes up on web,
-
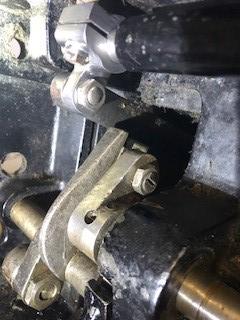
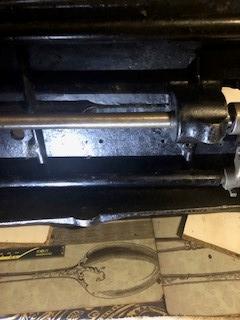
So after examining all part the left feed dog holder is slanted, does not really show on photo, the forked is slanted and the first rod just after hand wheel is slightly slanted, it is like every think needs moving over to the left ,I have a feeling who ever set this never had a good eye for alignment, or thought it works so its okay,or the casting is out slightly out and all been adjusted to the casting to work, So ignoring where I point my finger that is not what I thought on first looking ,my bad,the play in the shuttle holder that bar i think may of had a big collar with grub screws ,there is also a groove in the metal bar where I thought cir clip may of gone but to wide for that, , its puzzling that bit, any one now how to get rid of photos i don`t want in as I keep accidentally allowing duplicates

-


-
also just realized now why the forked thing is leaning on the two picks it showing the adjustment is looking to far over to the right
-
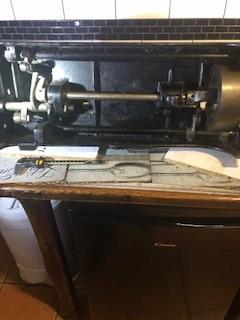
Okay , no car jet for me the car is down but do under stand what your getting at, with dismantlement , So iv put it on its side on table, and started giving a clean , I am checking out the forked bit on the rear that rocks back and forth it is pretty slanted not straight and looks like its to close to the stitch adjuster two pieces of metal, that move when adjusting for stitch length, the forked bit is just skimming them by a Rizzla paper thickness,which worries me , this might be the reason why the forked part has fresh rub marks where some of the metal is or has rubbed just like the front cam marks as shown in pics earlier on The forked part at top leans toward the back hand wheel and the bottom leans more toward the front of the machine,so I am cautiously studying the mechanism,to why?its not straight down, I also sending picks because there are no adjustment STOP collar`s that you usually find on this bar, well on a 7-33 there`s at least one, but not sure on this suspected double needle 7-39 , should there be any ,?and pic of the slated forked at back, I have removed pin and grub screw holding the race basket because I do want to remove it as some one had done some weld to the ends and not smoothed of well for my liking ,but also means removing the outer feed dog moving things ,
-
As I am no means an expert on the industrial machines but I do own a 7-33 , not actually used it yet, until I check and clean a few things first, As it was stated you did fix the issue changing a couple of things , so I thought ill still suggest what I check , But its usually obvious to blame the tension but as it stitches then at some point the thread gathers or misses a stitch surely there has to be other factors that all may contribute to 1 issue, as I say I am no expert but some times its not the obvious that is the usual culprit for the issue,I my self run through a list , not all but it helps to check not the obvious. Left or right twist thread top side- needle thread to thick or thin for the groove in the needle - pushing the work through when should only guide- needle plate hole become to big allowing the surrounding material to raise down and up around the needle snatching the thread- check to see if bonded nylon does not untwist in fingers and thumbs when testing, Thread on the spool,make sure its not sticking together as it comes of the spool and needs to come off smooth ,but not to loose` neither to tight -If using thread that needs wax make sure the thread is getting its lube- check thread is not fraying ie rubbing on all passage ways it runs, check correct needle for material and thread- needle not bending as it pushes through material- check for wear grooves in inside and out where thread passes, I suspect different softer materials it may not happen but hits a problem with certain tighter material or thickness , this it where the needle thickness and point is very important,and so thread, if theses were all checked correctly and tension correct then I suspect it was a number of things contributing to the issue. not just one,
-
Horween Leathers $6 per foot latigo, Roadmaster, CXL
1985 replied to nstarleather's topic in Old/Sold
Latigo leather of that, , Iv heard it makes good strops for the straight edge razor community , some while back there was a company that were making strops for pretty penny using Latigo leather -
Noooow, not a stone wheel ,I have a good collection of Japan / American and England / Greek and Belgium fine honing stones that I use for my straight edge razors , And strops with compounds, that`s what I meant to use on bringing back the blunt leather needles, Some time ago I bought a fair bit of different thread spools from a closing down industrial place that sold spools to companies,anyway they were kept sealed and placed in a cool dry dark area, I check them from time to time, and still great, I really should document the types I have on paper, and check what ones can be used on my machines, with needles to match, When I look at the chart I take it the metric is for over here UK England,
-
Thank you for moving the post into a better recommended place for me, and the information written above is very informative, cheers, It might seem obvious, but what are the signs of a needle blunting, also can I resharpen a leather needle with my honing stones,or are they coated and once blunt the coating gets removed,
-
HI to all, I would like assistance please, on combinations that could be used with needles threads and material,with a Singer 7-33 sewing machine, The Singer 7-33 not to sure whether for nylon ,canvas , leather and type, buffing wheels and 7x1 7x2 7x3 7x4 needles` there`s is so much mixed literature Iv read on this machine, its confusing to what is correct and to what you can get away with, I would like to know what are the correct needles and threads with the right material and how thick, please if any one could advice, Also, what other people know they have gotten away with using on the needles thread and material and thickness that worked well for them on this machine, please
-
Transferring tooling patterns onto the leather
1985 replied to TailGunner's topic in How Do I Do That?
Just something I used last year for a project, the plastic roll on deodorant bottle , squeeze the bottle and pop the ball out, wash out and fill with any think then push ball back in, -
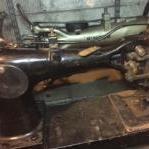
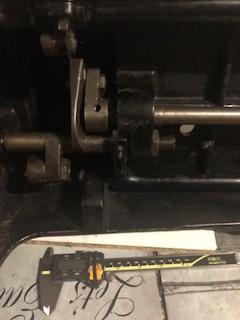
Brilliant Bob a Thank you , I know exactly what you are are on about, I really do appreciate you taking the time and having the patience to give your knowledge and experience to my questions, it really helped me out to understand the machine better . and it also may help others who may check this out. I suppose every one can remember how daunting messing with there first sewing machine not knowing whether they will adjust something out of sink, if they had not had any training first or some one not watching every move to advice them, I have studded and watched hundredths of hours on footage to do with sewing machine, but since having bad reactions to COVID jabs and getting brain fog with speech issues for months and then getting COVID a few times my memory suffers from brain fog allot, its almost like short term memory loss to things I try to remember, so I have to film or photo most stuff for reference now, Anyway`s I need to possibly at some point strip this Singer double needle class 7 down for a good clean as its starting to patina with fine rust in places I can`t get to easy with out taking bits apart and there`s loads of gunk in hidden places, But I am worried I might mess up the timing set buy the factory, but I think the factory have place a screw in the front cam joining the bar . So this is my thinking on how the parts control certain areas , From what I gather now if I split the machines workings into 3 sections in my mind it makes it easier to see whats doing what, if correct starting from the hand wheel crank bar that runs through the head of the casting, Section 1) The crank bar is where everything is timed by, moving from the back to the front CAM that has a connecting bit that moves in the cam groove` this connection bit also joined to the moving parts on the out side that controls the needle thread lifter ,and the foot bar that is having pressure from above by the spring foot pressure bar at the same time. And at the front of the cam there`s a joining piece that moves the needle bar clamp up and down, which moves the needle bar that hold the needle, few!! . Section 2) The back end of the crank bar rotates moving a forked piece back and forth,the forked piece also has a forked piece at the bottom that`s connected to a bar , that bar is rocked back and forth ,witch intern moves the shuttle hook holder I call the basket, Section 3) Then staying with the underneath at the rear end joined onto the forked bar there`s a connected bit that goes to another bar, that moves the feed dogs, Have I missed anything out,in principle I don`t want to mess up the original factory timing , I also not sure should the needle bar be at its highest or lowest point when starting to dismantle everything or does it not matter, And what should I (not) dismantle with out marking its original position first , I really need advice here from you guy`s on the does and don`ts that need to be done or not when stripping the machine down in the near future,please,
-
I know its an old topic, but hay" Singer 132 k6 they still hold a place in my garage covered in sheets like all my other machines, if I had my way they would all be in the house if I had the room,there`s just something about the old cast singers that grab me I also have a scares Singer 45 k1 here in UK England, iv not seen one for sale in years ,but there must be some, my misses trying to get me to sell some of my machines, but just can`t let them go, The 45 k1 has a bigger fly wheel than the 132 k6 I assume to punch through heavier material, But my 132 k6 is does have all the decor but its starting to loose some paint in places where the hands would frequently touch and don`t know if to repaint, I have seen these machines go for £200 - £700 over here, but the ones that demand high price , have been repainted re furbished on a clean tidy table fitted with servo motor, sold by a site well known for refurbishment machine and painted with different color from the original, I suppose the price depends on how bad you want to pay near the asking price and if you been waiting years to get hold of one, and the country ,its being sold in. Over seas from Britain they seem to go for more than they do here, I think they were made here so hence the price asked,but the rarer they get that will up , There was two for sale here , two different sellers on E bay looked pretty nice, I think one had original motor may of been a cast table, the other one the bidding only went up to £30+ pounds ,but he never sold it for that, shameful really bidders don`t see what it really should be worth, I would of paid his asking price and a little more than £130.00 if I had the room and a car to travel, but you can`t have them all,
-
Sorry ` my bad, not 100% sure some times , just getting use to forums,
-
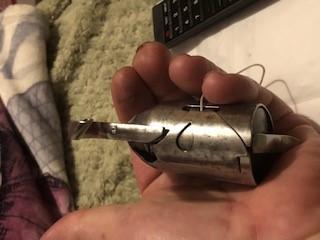
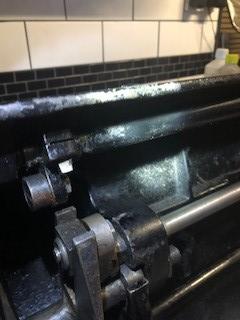
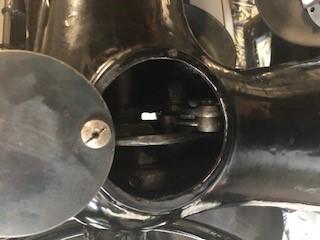
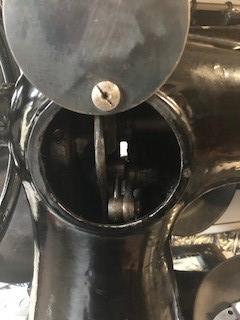
Okay `sorry Bob, let me try to explain it in a better way ` as I am possibly not using the correct names for the parts in question, I will show a pic front on with screwdriver touching to what I call the basket, it oscillates the two shuttles,may be you could give a correct name as I can`t seem to find its known name for that piece, So ill just keep calling it a basket until stand corrected, The basket is connected to a bar or rod from the rear end part of the basket, they are connect by the rod entering into the stem from the rear of the basket, They have been pinned together which means when the bar or rod moves the basket oscillates at the same time,as they are connected with a pin .so when the basket oscillates also do the two shuttles, . And my question was , When I grab the basket then push on it towards the hand wheel` and then pull back to the front there`s about 0.5 mm movement , I here it knock underneath at the far rear towards the hand wheel ,does this 0.5 mm movement need to be adjusted some where underneath at the back to where the other end of the rod is connected so there`s ends up with no 0.5 mm movement. I also here a knocking noise when it moves 0.5 mm the noise is coming from underneath at the rear of the machine ,I think it might be where the other end of the bar or rod may be connected to the connected rod, but don`t quote me on it being called connecting rod lol. So here is a pic of what I call the basket and another pic where I am pointing at the rear section of the basket and to where its pinned to the bar or rod. There was also no play where the pin is joined so its not a loose pin. Ps take no notice of the screw driver with the brown handle it was just left in the back ground, Hopefully I have