Ambassador leatheroo Posted April 15, 2008 Ambassador Report Posted April 15, 2008 I decided to make a new mask today so i thought i would grab the camera and take a few pickies. This mask is planned as a wall hanging although it could be worn. As Mrs Head had a twin, i decided to cut her in half and glued her to a board, i find this better for wall projects. Using 2mm leather, i cut a rough shape of leather, this depends on the shape of the mask...big..small....wide...tall.. With this mask i had a general idea of what i wanted, so i cut the basic shape and then cut some long skinny bits and the section for the nose and the split that i knew i wanted at the top of the head. Time to wet the leather..i give it about 30 secs in warm water until no more bubbles appear. Now comes the fun part..time to pinch and bend the leather into the shape you want. Sometimes the leather dictates where the folds and flaps and stickie out bits will be...i find this also depends on the begining shape you have cut. continued next post Quote "]http://leatheroo.blogspot
Ambassador leatheroo Posted April 15, 2008 Author Ambassador Report Posted April 15, 2008 The photo belows shows the half way mark of the shaping, note the little claps and pins, these help keep the folds where you want them until they dry a bit. Remember to use a strip of leather under the clamps so you dont get marks on the leather. Here is the mask with both sides done. It was quite hard to get both sides the same and have made a note to self when doing a mask like this to work each side as i go and not to complete one side and then have to work to get the other the same continued next post Quote "]http://leatheroo.blogspot
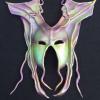
Ambassador leatheroo Posted April 15, 2008 Author Ambassador Report Posted April 15, 2008 Here is the finished mask ready for drying. Note that i have removed the clamps. The leather will stay in place now and if the clamps are left on you will get marks as the leather drys. Note that i have cut off two of the danglely things at the bottom, they werent working so off the went. I often cut and trim as the mask forms. Sometimes you have these great ideas but they dont always look right. As the mask drys i tend to fiddle a bit, fixing edges, improving curls. I find the half way point of drying is a good time to get the modeling tool out and smoothe the leather where needed. Below you can see the finished mask all dry, just waiting to be painted. And here she is, all finished. My 14 year old son is always telling me my masks are 'dum' and not very good. I showed him a photo of this mask that was made while he was at school. I told him that someone from this forum made it and he said.."That is soooo much better than the ones you make mum, why dont you make them as good as that!" What a golden moment when he walked into the other room and saw it lying on the table!!!!!!!!! Cheers Caroline Quote "]http://leatheroo.blogspot
Ambassador Beaverslayer Posted April 15, 2008 Ambassador Report Posted April 15, 2008 Roo....lying to your children Other than that tpough, great looking mask as always. Ken Quote Beaverslayer Custom Leather<br />Wearable Works of Art https://www.facebook...erCustomLeather
Froghunter Posted April 15, 2008 Report Posted April 15, 2008 Outstanding! Nice work Roo! Someday I am gonna try one of these too! How come there is so many cool things we can do with leather but only 24 hours in a day? I need moer time or more arms and hands...either would work! Quote ~~~~~~~~~~~~~~~~~~~~~~~~~~~~~~~~~~~~~~~~~~~~~~~~~ Pounding on dead animal flesh, who woulda Thunk it!
Members Nocturne Posted April 15, 2008 Members Report Posted April 15, 2008 Beautiful work! Absolutely! I really don't know what else to say, but ... yep, that rocks! Quote
Contributing Member ClayB Posted April 15, 2008 Contributing Member Report Posted April 15, 2008 Hi Caroline, I really like the way that one turned out, the shape and the color! Thanks for taking the time to show us all how you do that. I'm with Froghunter, one more thing I want to try sometime, if I ever get that far down the list. Clay Quote ClayB Badlands Leather Art blog Badlands Leather Art Website
Members Myriam Posted April 15, 2008 Members Report Posted April 15, 2008 Thanks for the instructions, roo. Another great looking mask! I kind of had an idea of how to make these, but now I really know. I totally agree with Ken and Clay, we all need more time so we can try all these neat things! Quote Myriam Myriam's Leather Work Dakota Braiding and Leatherwork
Members lindatt Posted April 15, 2008 Members Report Posted April 15, 2008 gratz!! really beautiful creation. Thanks for showing the steps. It was incredible to see how you make them. Linda Quote
Members TomBanwell Posted April 15, 2008 Members Report Posted April 15, 2008 Wow, Caroline! Great mask and great tutorial! Thanks so much for posting that. It is so educational to see how other artists work. Always gets the grey matter whirring! How did you do the coloring? It looks like airbrushed pearlescent paint. Is that what it is, or is it something different? Thanks, Quote


Recommended Posts
Join the conversation
You can post now and register later. If you have an account, sign in now to post with your account.
Note: Your post will require moderator approval before it will be visible.