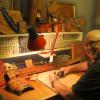
Members TapTapTap Posted June 3, 2012 Members Report Posted June 3, 2012 This is my latest Back Quiver. Image 1 shows the carving and tooling (basket weave X510). You can also see the arrow separation and the adjustable harness. Image 2 is a close-up of the harness assembly. The harness can be changed to left or right. Image 3 is another view of the acorn carving and the joining method. Image 4 is a close-up of the joining method. The edges are laced with the double cordovan braid then another length of lace is used to join the two together by stitching through the top loop of the edge braid. I will be putting together a Tutorial on my website as soon as I can. As usual, I would appreciate any comment. regards, TapTapTap Quote Do cattle stare at you when you pass them? BJB
Members jmkjmk2 Posted June 3, 2012 Members Report Posted June 3, 2012 Wow I like how you get the pop in your basketweave coloring! How did you get the lines to show up so well in the coloring? any tips would be appreciated. I still have a lot to learn. Quote bit.ly/LeatherTools4Sale Stamps, Swivel Knives, Mallets, Modeling Tools, Etc Message me if you want to buy/sell tools
LNLeather Posted June 3, 2012 Report Posted June 3, 2012 (edited) Yes, WOW – That Is a Gorgeous bit of tooling there…. Your Quiver is Very Nicely done! (is there a link to your website? ...you could put it in your footer - and yes I think cows do stare back or maybe they are just admiring the shiny color of your truck) Edited June 3, 2012 by LNLeather Quote ~Cheryl There are many things in life that will catch your eye, but only a few will catch your heart... pursue those...
Members Charliewz Posted June 3, 2012 Members Report Posted June 3, 2012 Simply amazing! Great workmanship. Charlie Quote
Members compound Posted June 3, 2012 Members Report Posted June 3, 2012 Yeah.. GREAT WORK!!! Love your arrow separation system and braiding. Good ideas and perfect look Martin Quote
Members TapTapTap Posted June 3, 2012 Author Members Report Posted June 3, 2012 Wow I like how you get the pop in your basketweave coloring! How did you get the lines to show up so well in the coloring? any tips would be appreciated. I still have a lot to learn. John, The colouring is a local Australian product made by Birdsall's in Sydney. The colour I use most often is called "Whisky". I have achieved the same effect with Fiebings Antique paste however the technique is slightly different. The Birdsall,s antique can be poured from the container into a small bowl whereas Fiebings is a paste. After cleaning up the article and making sure it is absolutely dry I apply the Antique with a paint brush ensuring that the dye is worked into all the impressions. I then use a dry lint free cloth to rub over the surface which removes the excess dye. I always have on hand a damp cloth so that if the dye dries too quickly in some areas I can wipe it off and redo it where required. As with anything in leatherwork, try the technique on a practice piece of leather before you commit yourself to the finished article. I have not yet tried the new Tandy Leather Factory Eco-Flo Gel Antiques. They seem to have the same consistency as Birdsall,s so I will have to give them a try. The other technique I use is to colour the background of a floral type carving to emphasise the antique process. This was done on the acorn leaf carving on the quiver. You need a steady hand for this. Hope this helps you John. I checked your website and realised that since 1964 I have been collecting antique tools lol. regards, TapTapTap myleatherwork.com Quote Do cattle stare at you when you pass them? BJB
Members Bigfoot Posted October 6, 2012 Members Report Posted October 6, 2012 That is lovely work and what a great joining method! It's twisting my mellon just looking at....I would love to see the tutorial. Great work and thanks for sharing Bigfoot Quote
Members TapTapTap Posted October 7, 2012 Author Members Report Posted October 7, 2012 Hi there Bigfoot, as we say in OZ -" I'm flat out like a lizard drinking" otherwise I would have the Tutorial finished. In the meantime here is the method without images. 1. Lace both edges with the double cordovan edge braid ( sometimes called the double loop braid) leaving about 6 inches of thong at the start and the finish. This is to join the top and bottom braid into the vertical seams.. It is optional to braid the top of the quiver at this time. 2. When you have completed the edge braid on both sides of the quiver use a hammer to "set" the lace. 3. Cut some small lengths of thong to tie the edges tightly together every 6 inches or so. I use very small plastic ties which can be cut with nippers as you reach them. 4. Line up the holes on the top and bottom of each side and join them with a tie. Do this about every 6 inches. As you braid the sides together you cut the temporary tie. 5. Make yourself a practice piece by edge braiding 2 X 6 inch scraps of belt leather. Then study the first image in my original post and practice makes perfect. You've got me thinking now - "Must finish that Tutorial" and place it on my website. regards, TapTapTap Quote Do cattle stare at you when you pass them? BJB
Members Yetiusmc Posted August 1, 2013 Members Report Posted August 1, 2013 Beautiful job! I am looking for a pattern for a back quiver....Any chance you have one? Quote


Recommended Posts
Join the conversation
You can post now and register later. If you have an account, sign in now to post with your account.
Note: Your post will require moderator approval before it will be visible.