Members Memorymode Posted September 9, 2015 Members Report Posted September 9, 2015 This is the third dog collar I've made and I'm super proud of it! I spread it over the course of a couple of weeks depending on available time and money for supplies. I'm open to critique and suggestions. I made the handle soft by rolling a thin piece of upholstery leather and sewing it in there. Thanks for looking Quote Maybe Bob Ross can show me how to make that extra mark a "happy mistake."
Members Memorymode Posted September 9, 2015 Author Members Report Posted September 9, 2015 (edited) These were the first two I made. Maki's collar was the second. Edited September 9, 2015 by Memorymode Quote Maybe Bob Ross can show me how to make that extra mark a "happy mistake."
Members DoubleC Posted September 9, 2015 Members Report Posted September 9, 2015 Hi Memory, an unusual concept for a collar. I like it a lot except for the spikes. I refuse to use them but it's a matter of preference. Cheryl Quote http://www.etsy.com/shop/DoubleCCowgirl
Members Memorymode Posted September 9, 2015 Author Members Report Posted September 9, 2015 Thanks! The person who's dog I made it for requested black, spikes, and with a handle. Quote Maybe Bob Ross can show me how to make that extra mark a "happy mistake."
Members DoubleC Posted September 9, 2015 Members Report Posted September 9, 2015 Yeah I just meant I would have passed on making it. I think it makes the collar look trashy but the customer is always right I guess Quote http://www.etsy.com/shop/DoubleCCowgirl
Thor Posted September 9, 2015 Report Posted September 9, 2015 Yeah interesting design, even though I don't see a real purpose for it. Anyhow, you need better tools and stop chewing on your liner. Looks like you ripped the leather which I feel makes the overall appearance not so great. Quote
Members Memorymode Posted September 9, 2015 Author Members Report Posted September 9, 2015 Thanks for the response! Which part of the design you disagree with? The spikes or the handle? Which tooks should I be investing in? I'd like to make better collars and leatherwork in general. As for the lining I made it over-sized so that I could cut it flush after I sewed it...but I had trouble with cutting it. Thanks again! Quote Maybe Bob Ross can show me how to make that extra mark a "happy mistake."
Thor Posted September 9, 2015 Report Posted September 9, 2015 Sorry I'm on the run, so I'll keep it brief. Review the circled spots please. None of your cuts are straight and non of them are "clean". You are either using a dull carpet knife or some other not so sharp tool. Did you use a strap-cutter at all? It may be personal preference in regards of the square corners. I don't like em and they will wear off in no time and don't look nice. A handle on a dog collar vs. a harness serves no purpose as you should always be able to get a hand between the collar and the dog. No matter how hard it may be to size the liner correctly it's definitely not the right way to have it to big and cut it afterwards. It just looks shitty. And one can tell on your result that you were unable to apply sufficient pressure to the leather to make a clean cut. If you're rounding off edges at one piece you should do that for all the others as well. 6 rivets in this little piece of leather is a bit overkill, plus what you wanted was to increase stability. Perforating leather doesn't make it stronger. I guess one last advice for your liner. Fold it over before you stitch it and it looks a lot cleaner and more professional. Probably missed a few things, but I'm in a hurry and this should and will hopefully help you. Sorry for the upfront comments. Quote
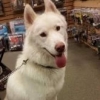
Members Memorymode Posted September 9, 2015 Author Members Report Posted September 9, 2015 (edited) I appreciate the upfront comments! If I didn't want to improve I'd just listen to my friends who think it's perfect. I did use a strap cutter. I'm not sure why the nametag got misaligned besides the rivet placement. Thankfully it's for my friend's dog so I'll get to see firsthand how the edges wear. She requested the handle because she's a kennel attendant at a dog (mostly police dog) training facility and she's found the handles to be very convenient. True I didn't round the edges on the nametag. The 6rivets was definitely an attempt to make a really strong product as the "dog" is a high content wolfdog. I didn't think it might mess with the integrity of the leather. Thank you for all of the advice! Attached is a picture of the pup that got the collar. She's 6months old. Edited September 9, 2015 by Memorymode Quote Maybe Bob Ross can show me how to make that extra mark a "happy mistake."
Members impulse Posted September 11, 2015 Members Report Posted September 11, 2015 The number of holes required for all those rivets weakens the leather considerably - it would actually be stronger all stitched instead. The slots for the buckle tongues are also too large, in fact using a 2 tongued buckle produces another weak point as there remains little leather holding the buckle. Regarding the lining: yes, cut it over-sized initially, but before sewing use a fast setting craft glue to stick to the main collar, but with the leathers curved around as if on the dog - this avoids wrinkles on the inside. After stitching, cut off the excess liner with a sharp knife or a scalpel (the ultimate in sharpness). I note that you have used a stitch groover, but this goes too deep for the thickness leather used and creates another weakness. Interesting design and a good effort. Bulky hardware is not what makes for strength though. I make, amongst a variety of things, leather buggy harness which needs to be strong enough to pull up to a tonne weight. It is all stitched, without a single rivet! Keep at it, we all learn as we go. Cheers, Lois Quote


Recommended Posts
Join the conversation
You can post now and register later. If you have an account, sign in now to post with your account.
Note: Your post will require moderator approval before it will be visible.