


friquant
-
Posts
540 -
Joined
-
Last visited
Content Type
Profiles
Forums
Events
Blogs
Gallery
Store
Everything posted by friquant
-
I suspect you need a bit of drag on the thread so it won't have enough slack to form the twisted loop. If there is another post, you can wrap around one post, then the other. If not you might try going through the first post, then around that same post 180 or 360 degrees, then through the other hole in the same post.
-
I think modern rotary hooks all rotate twice per stitch cycle. The ones I've seen accomplish this using gears. But imagine a machine with a rotary hook that uses only eccentrics to accomplish motion---those are the ones that I suspect only rotate once per stitch cycle. As a reference here is a reply to one of my posts on another forum in which the collector Unknown Artist states: "rotary hooks (Wheeler Wilson system) run smoothly. They are wear-resistant, fast, and reliable, but louder than double-rotary hooks. (Pfaff)". That was the first I had heard anybody mention single or double with the word rotary. I would like to obtain a single-rotary because I'm curious about the mechanism. Even if it's a domestic machine. I suspect that the White Rotary from a hundred years ago is single rotary, so I have my eye open for one of those.
-
 Cool push-button setup with the Durkopp-Adler 272. Is that always included with the Efka variostop system? Most of the time when people ask about variostop, they are asking how to get rid of it because they lack 3-phase power, or because it's broken. I think you said you are using VFD to supply the 3-phase. I'm intrigued by needle-feed systems. Haven't seen one come up for sale around here.
 -
This topic interests me as well. I've been cataloguing the traits of the hook and bobbin case systems that I have, noting the differences that I see. Questions to Consider Is hook to needle distance adjustable? Is hook to needle distance reliable? Is there a needle guard? What is required to change to a different needle size and maintain the same hook to needle distance? What is required to change to a different size thread and maintain quiet operation? Is a latch opener required? Is there a range of acceptable hook timing? Effects of changing stitch length and forward/reverse Hook to Needle Distance Reliable hook to needle distance is paramount for reliable stitches (for not skipping, that is.) The two machines I have with horizontal hook axis, oscillating hooks (Singer 31-15, Singer 237) have the downside that any axial play of the hook in the hook race constitutes variable hook-to-needle distance. In the case of the Singer 31-15, hook to needle distance is NOT adjustable. The one machine I have with a horizontal hook axis, (double) rotary hook (Singer 96-87) has considerable axial play of the bobbin case in the hook race, but this axial play has no bearing on hook to needle distance, as the hook point is attached solidly to the outer part of the hook assembly. On this machine the hook to needle distance is adjustable. The two machines I have with vertical hook axis, (double) rotary hook (Singer 144W103, Jianglong 341) include a needle guard which can be set to deflect the needle around the hook, and is also useful for stuffing the hook. In the case of the Jianglong 341 the needle guard has an adjustable screw in it for making precise adjustments. Hook to needle distance on these two machines is adjustable. Noise The angular freeplay of the hook for horizontal hook axis, oscillating hooks (Singer 31-15, Singer 237) means there is an additional ticking sound with every change of direction of the hook. Supposedly the amount of freeplay can be adjusted but I have not managed that yet. Also, this amount of freeplay needs to be large enough that the thread can slip by. One needs a large enough gap for the largest thread sizes that they intend to use. A Range of Acceptable Hook Timing With a (double) rotary hook, if the hook timing is advanced enough the hook may grab the thread again on its second time around. With any hook, if the hook timing is retarded enough the thread will make a snapping sound as the thread is force-dragged around the bobbin case. Ideally there is a range in between these two extremes where the thread gracefully rounds the bobbin case and the hook does not grab the thread on its second time around. Even better when the factory specification is somewhere in this ideal range. My machines that have oscillating hooks have fixed hook timing, so I have not experimented with those. Effects of changing stitch length and forward/reverse With a vertical hook axis, as the stitch length or direction is changed the hook to needle distance also changes. I wrote about this in Hook to Needle Distance: A Compromise. With either a vertical or a horizontal hook axis, hook to needle distance is unchanged but the effective needle bar height would still vary with changes in stitch length or direction.
-
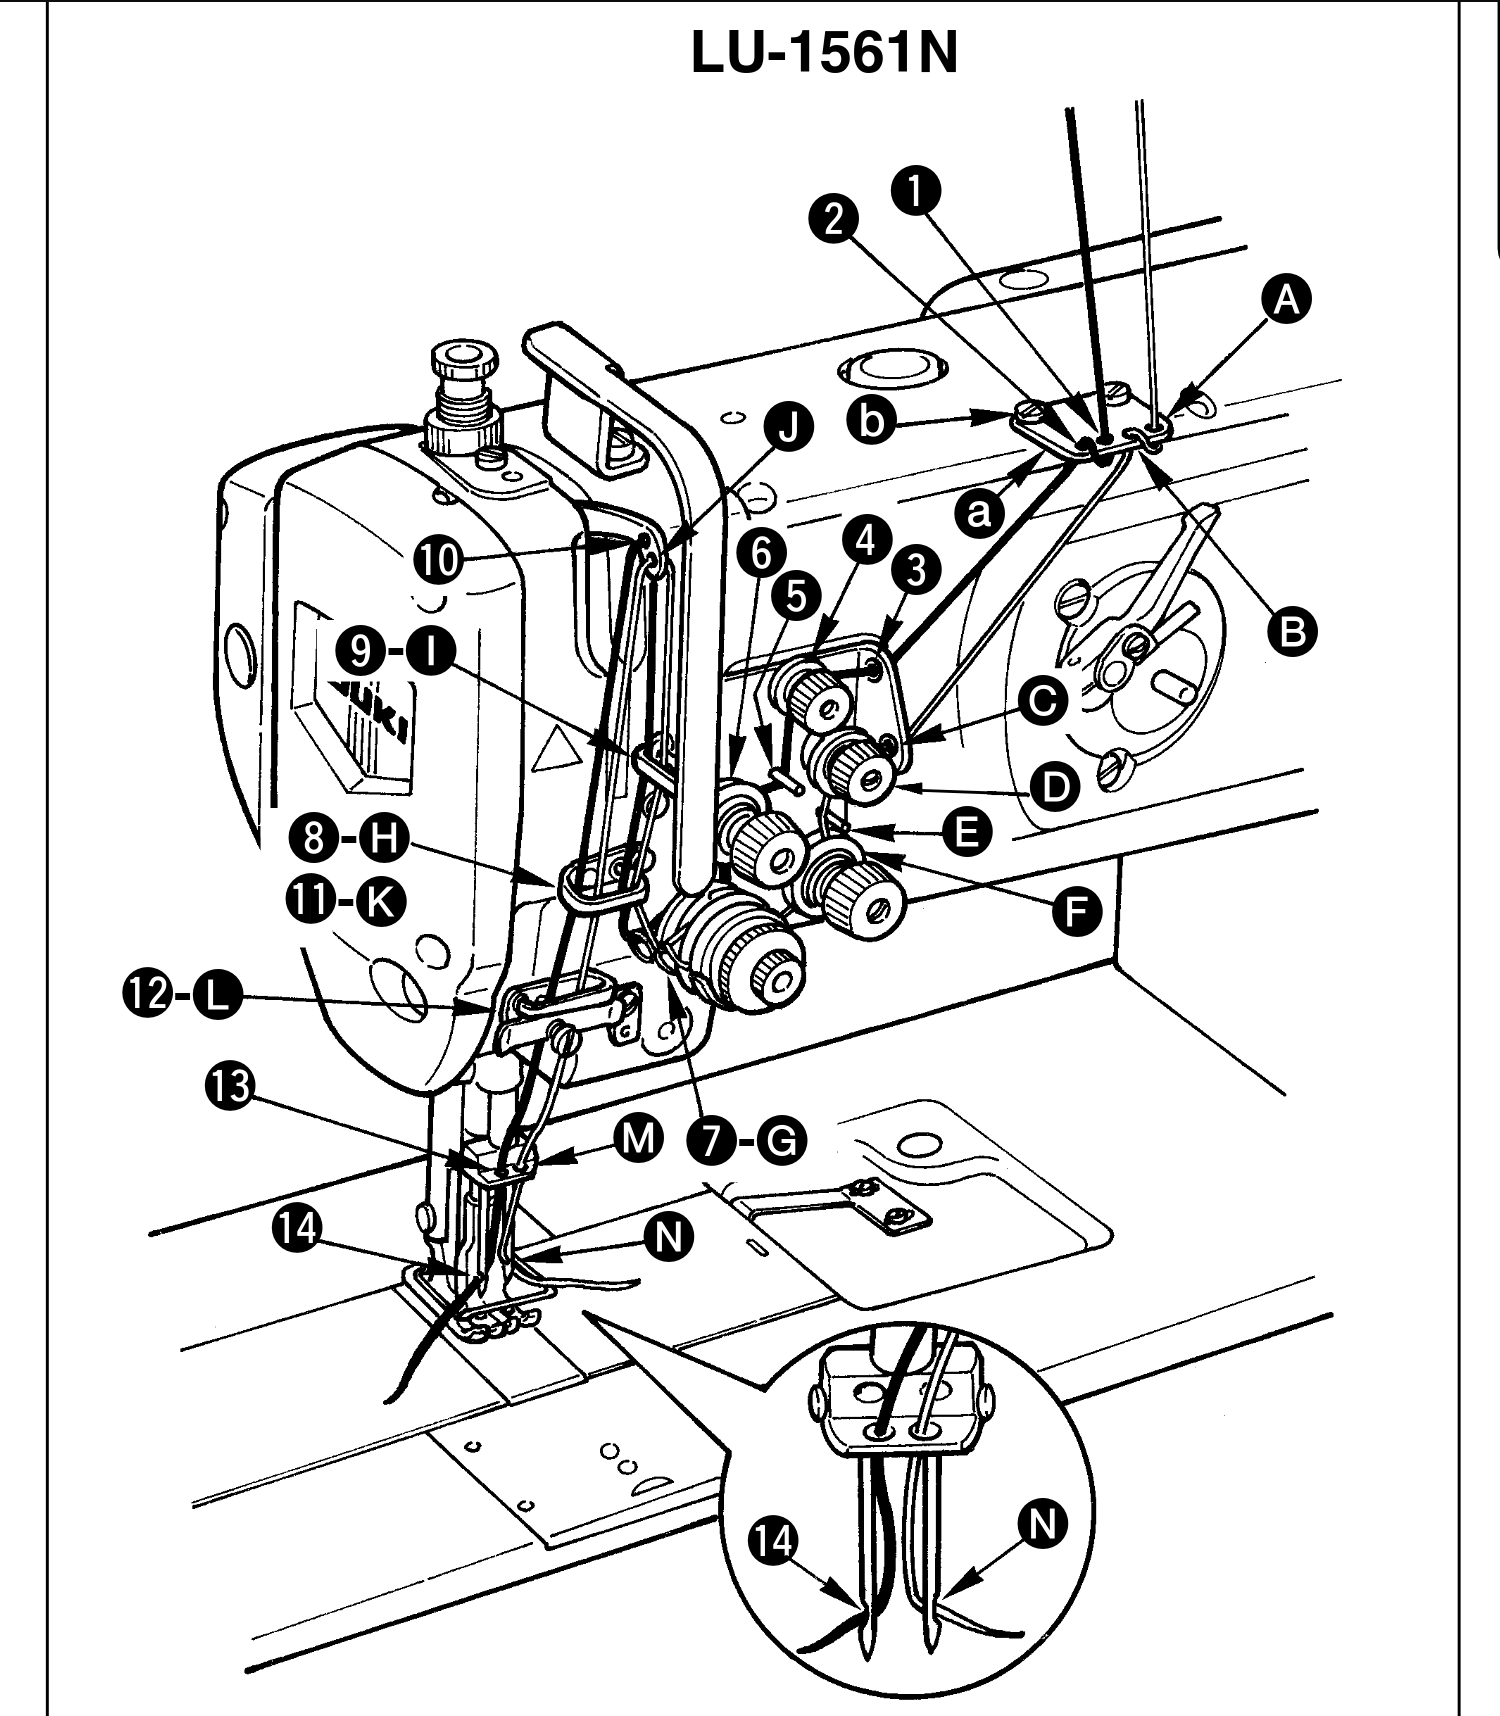
Here are a couple of excellent videos on timing in general: https://www.youtube.com/watch?v=1wNBPX8i524 - video by Uwe of Consew 225 https://www.youtube.com/watch?v=pL9WiZeKZAY The mitsubishi manual I see at https://www.manualslib.com/download/2159136/Mitsubishi-Lu2-410.html does show a threading diagram, but the image quality is poor. Here is a screenshot of the Juki LU-1560N threading diagram that may be more useful:
-
Here is an example of a hook gib in action on a horizontal-axis hook. On this Singer 96-87 the timing has been advanced 11 degrees from factory specs (measured in degrees of hook rotation, not arm shaft rotation) in order to clear the lumpy section on the bobbin case without the thread making snapping sounds. Needle bar height was adjusted accordingly. Shown here with TEX 70 thread. Typical of advanced hook timing is having a lot of thread in the way when the hook point comes around a second time. (If the hook grabs that thread, the machine will bind.) In this video it shows that the hook gib may be preventing the hook from stabbing the thread loop. Hard to tell for sure. I tried removing the entire hook gib (spring steel band that goes most of the way around the bobbin case) but the thread was binding up on something.
-
Can you post an up-close slow motion video of the hook area as this is happening? My usual approach to preventing the hook from catching on the thread when the hook comes around the second time is to retard the hook. It's quite predictable on the two machines I've tried this: Advance the timing and the hook grabs the loop of thread on the second time around. Retard the timing and the loop of thread is too far out in front of the hook point to be grabbed. Rather than follow factory timing on those two machines, I found my own timing specification that is advanced enough that the thread can be pulled around the bobbin case without too much tightness, but retarded enough that the hook does not grab the thread on its second time around. See this post for some background: https://leatherworker.net/forum/topic/131646-new-way-to-measure-and-visualize-hook-timing/
-
I don't have a double needle machine (yet!) but what an interesting challenge. 🤔 This excerpt (from the 112W139 manual, I presume) actually says to use left twist thread for both needles. @DMH This photo you posted shows both left and right threads having about the same twist when they land in the fabric. It's also skipping several of the first ten stitches in the seam (no time for thread unwind to happen). What I'm saying is the left side may be skipping due to other issues. @nylonRigging What machine are you using? I was hoping someone would show a photo like this...at the end of a seam so we could see the two sides.
-
In general, you may be able to sew with bigger thread than what a manufacturer states. But be prepared to accommodate the machine! 1. The needle + top thread needs to fit through the needle plate. (You can adapt the size of the hole as long as you polish it after.) 2. At some point, you will max out the tension adjuster for the needle thread. To get a balanced stitch with such limitation, you may need a bigger needle (makes a bigger hole, which is easier to pull the thread through when locking the stitch.) Also lessen the bobbin case thread tension to accommodate. (Thicker thread gives more bobbin tension for the same adjustment.) Let us know what you discover!
-
Looks like you have the left side more or less stitching I might thread one side of it and work to get that one side dialed in, then move to the other side. By "dialed in" I mean not skipping (check forward, reverse, short stitches, long stitches, thick material, thin material). And smooth action as the thread goes around the hook (no popping sounds, no broken thread.) By the way, you can slide one of the bobbin case covers open and watch the hook as you stitch slowly. This can help you to understand the cause of your occasional skips. Using a narrow piece of fabric (or just moved to one side) makes visibility easier. Someday I'll get to use a double needle 🤩
-
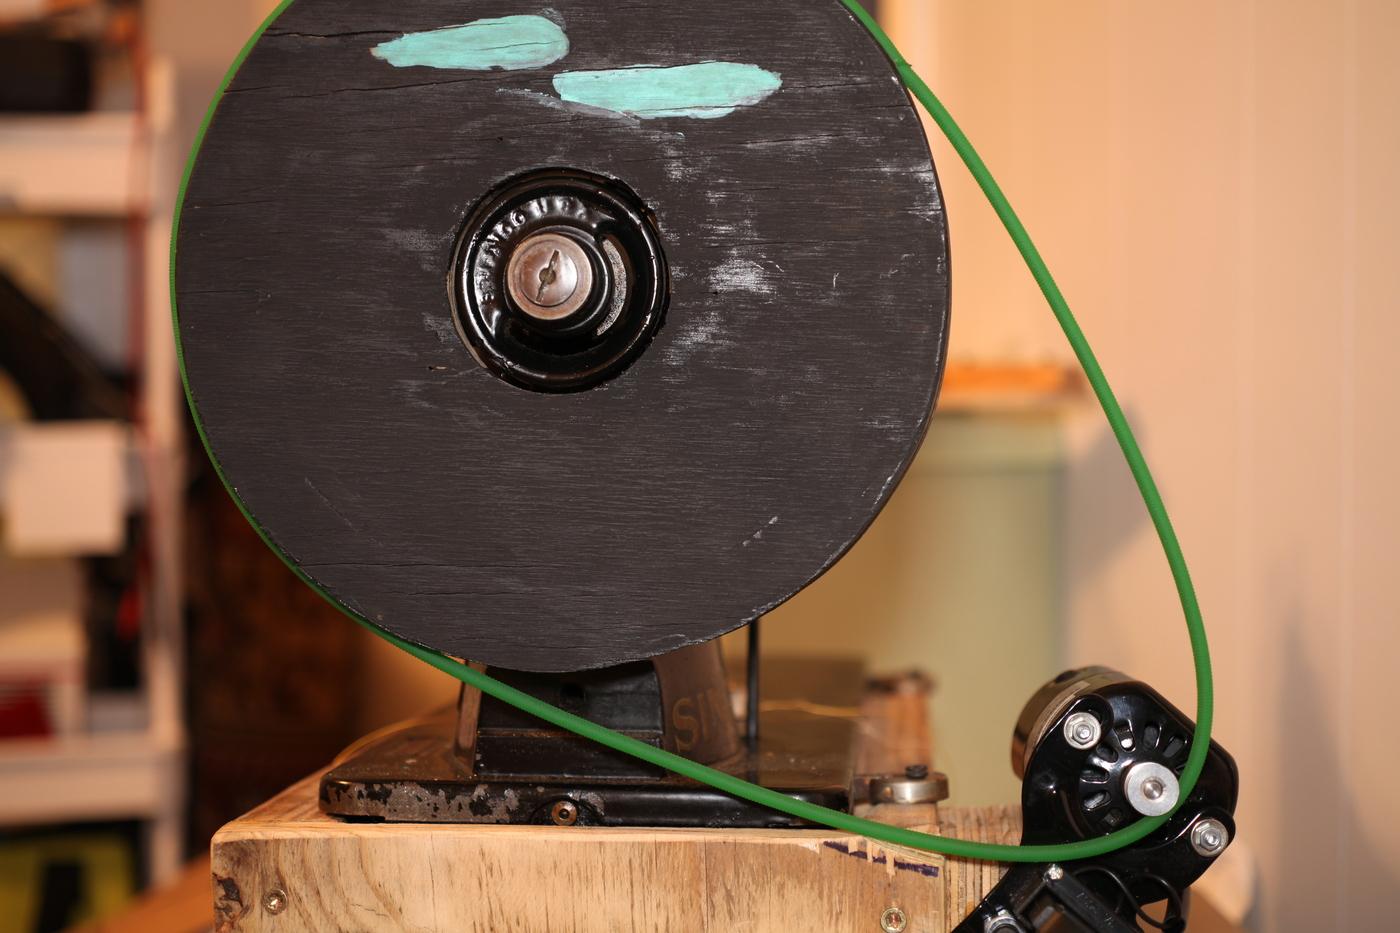
UPDATE: Since becoming more acquainted with domestic sewing machines and their low-power plain-bushing motors, I have started choosing belt tension that optimizes for best top speed. That is, looser belt tension than before. (This is 5mm PU belt for reference.) Top speed of the machine head is now 750rpm with no bobbin case, no thread, and presser foot up. Also fun to watch it spool up, as the belt shape becomes asymmetrical. This photo taken right after stepping on the pedal. Here's a demonstration of varying belt tension with a domestic motor and how it changes top speed. (Listen to the hum of the machine head to judge speed) Ah, well 😊

-
Replacement Pulley for Tapered Shaft
friquant replied to friquant's topic in Leather Sewing Machines
Yes. The cad files are here: https://leatherworker.net/forum/topic/125148-replacement-pulley-for-tapered-shaft/page/3/#findComment-790324 -
Wow, not much of a manual, is it? Maybe a sales brochure? This page says your machine takes a 135x7 needle: https://ismacs.net/singer_sewing_machine_company/model-list/classes-100-199.html This page shows 135x5 and 135x7 as being interchangeable: https://ismacs.net/needle_and_shank/pdfs/NeedleXRef9-30-23.pdf So I expect the needles from the first photo you showed (Organ 135x5) to work fine. (No need to purchase special order needles...135x5 is a fairly common system so needles are straightforward to find) But next up is you need to get the needle bar height (and possibly other timing issues) set correctly. This video by Uwe covers the basics of setting needle bar height: Possible reasons for the hook point to be striking the needle: Incorrect gauge set installed (this sets the spacing between the two needles) Needle is not oriented correctly. (Scarf of each needle must face its respective hook) Hook point is striking needle either above or below the scarf (hook point should enter scarf) Hook is too close to needle (hook to needle distance is adjustable) Needle guard not adjusted out far enough Needle is bent toward hook (Always set timing with a fresh new needle of correct system) Needle with 1.6mm shank being used in a machine that is built for 2mm needle shank (Again, always set timing with a fresh new needle of correct system) Axial play in the needle bar rock frame rock shaft, causing erratic left-to-right positioning of the needles. (Press the parts on both ends of the shaft towards each other while tightening the ends.)
-
Juki LS1341 - presser foot adjustment
friquant replied to MackProvisions's topic in Leather Sewing Machines
Looks like your outer toe is not touching down. I'm not sure how to adjust that on the 341. Is the foot lift hung up on something? Are those the correct presser feet for the machine? -
What makes you say the threads are damaged? If they will still tighten up, I would clean the threads and reassemble using medium strength threadlocker. (Coarse threads like this are likely to back out without threadlocker)
-
I've heard chain stitch is used as a decorative topstitch, but I haven't seen that in the clothes I wear. With the two-thread chain stitch I've used, the top side of the fabric looked just like a lockstitch seam. But the bottom looked fatter, because of the chain pattern. In the jeans I buy and wear, they put the chain pattern on the inside where it's not visible. There is an additional "gotcha" in making a chain stitch: Too-low tension (for a given material) will give skipped stitches. At least it did with the Baby Lock EA-605 that I repaired and used briefly.
-
Can you post or link your manual here?
-
Oh I get it...you were pouring oil in waiting for the oil to reach the sight glass.. The float pin on my industrial overlock (Union Lockstitch 39500) came with a red painted tip, so it's high visibiliity.
-
I bought this one and it was fine: https://www.amazon.com/dp/B0D3V2SB9N (Complete hook and bobbin case assembly)
-
Are you changing needle systems? The photo you have above shows needle system 135x5, in size 20 / 125. Then you have a photo showing two needles of different length (definitely two different needle systems in that photo). You don't need to change needle systems in order to use a thicker or thinner needle. A cursory glance at the internet did not tell me what needle system this model is supposed to take. Sometimes people do use a different needle system than called for, either because the called-for needle system is hard to find, or because they need/want more clearance under the needle. But unless you have one of these reasons to do so, I would either: Use the factory called-for needle system, or Use the needle system the machine is already set up to use. (Needle bar height is what you would change to swap between systems.)
-
Not sure how similar this will be to your machine, but here is a video with some close-up slow-motion of loopers in action.It took me a long time to figure out how this one was supposed to work, and there are SO many adjustments. I finally did get a service manual.
-
Can a worn case/hook prevent adjustment of case opener lever.
friquant replied to beefy's topic in Leather Sewing Machines
Excellent news! -
Is backstitching with a leather point needle a problem?
friquant replied to Gymnast's topic in Leather Sewing Machines
Are you saying diamond point is less susceptible to cutting threads in a backstitch than a slant needle? -
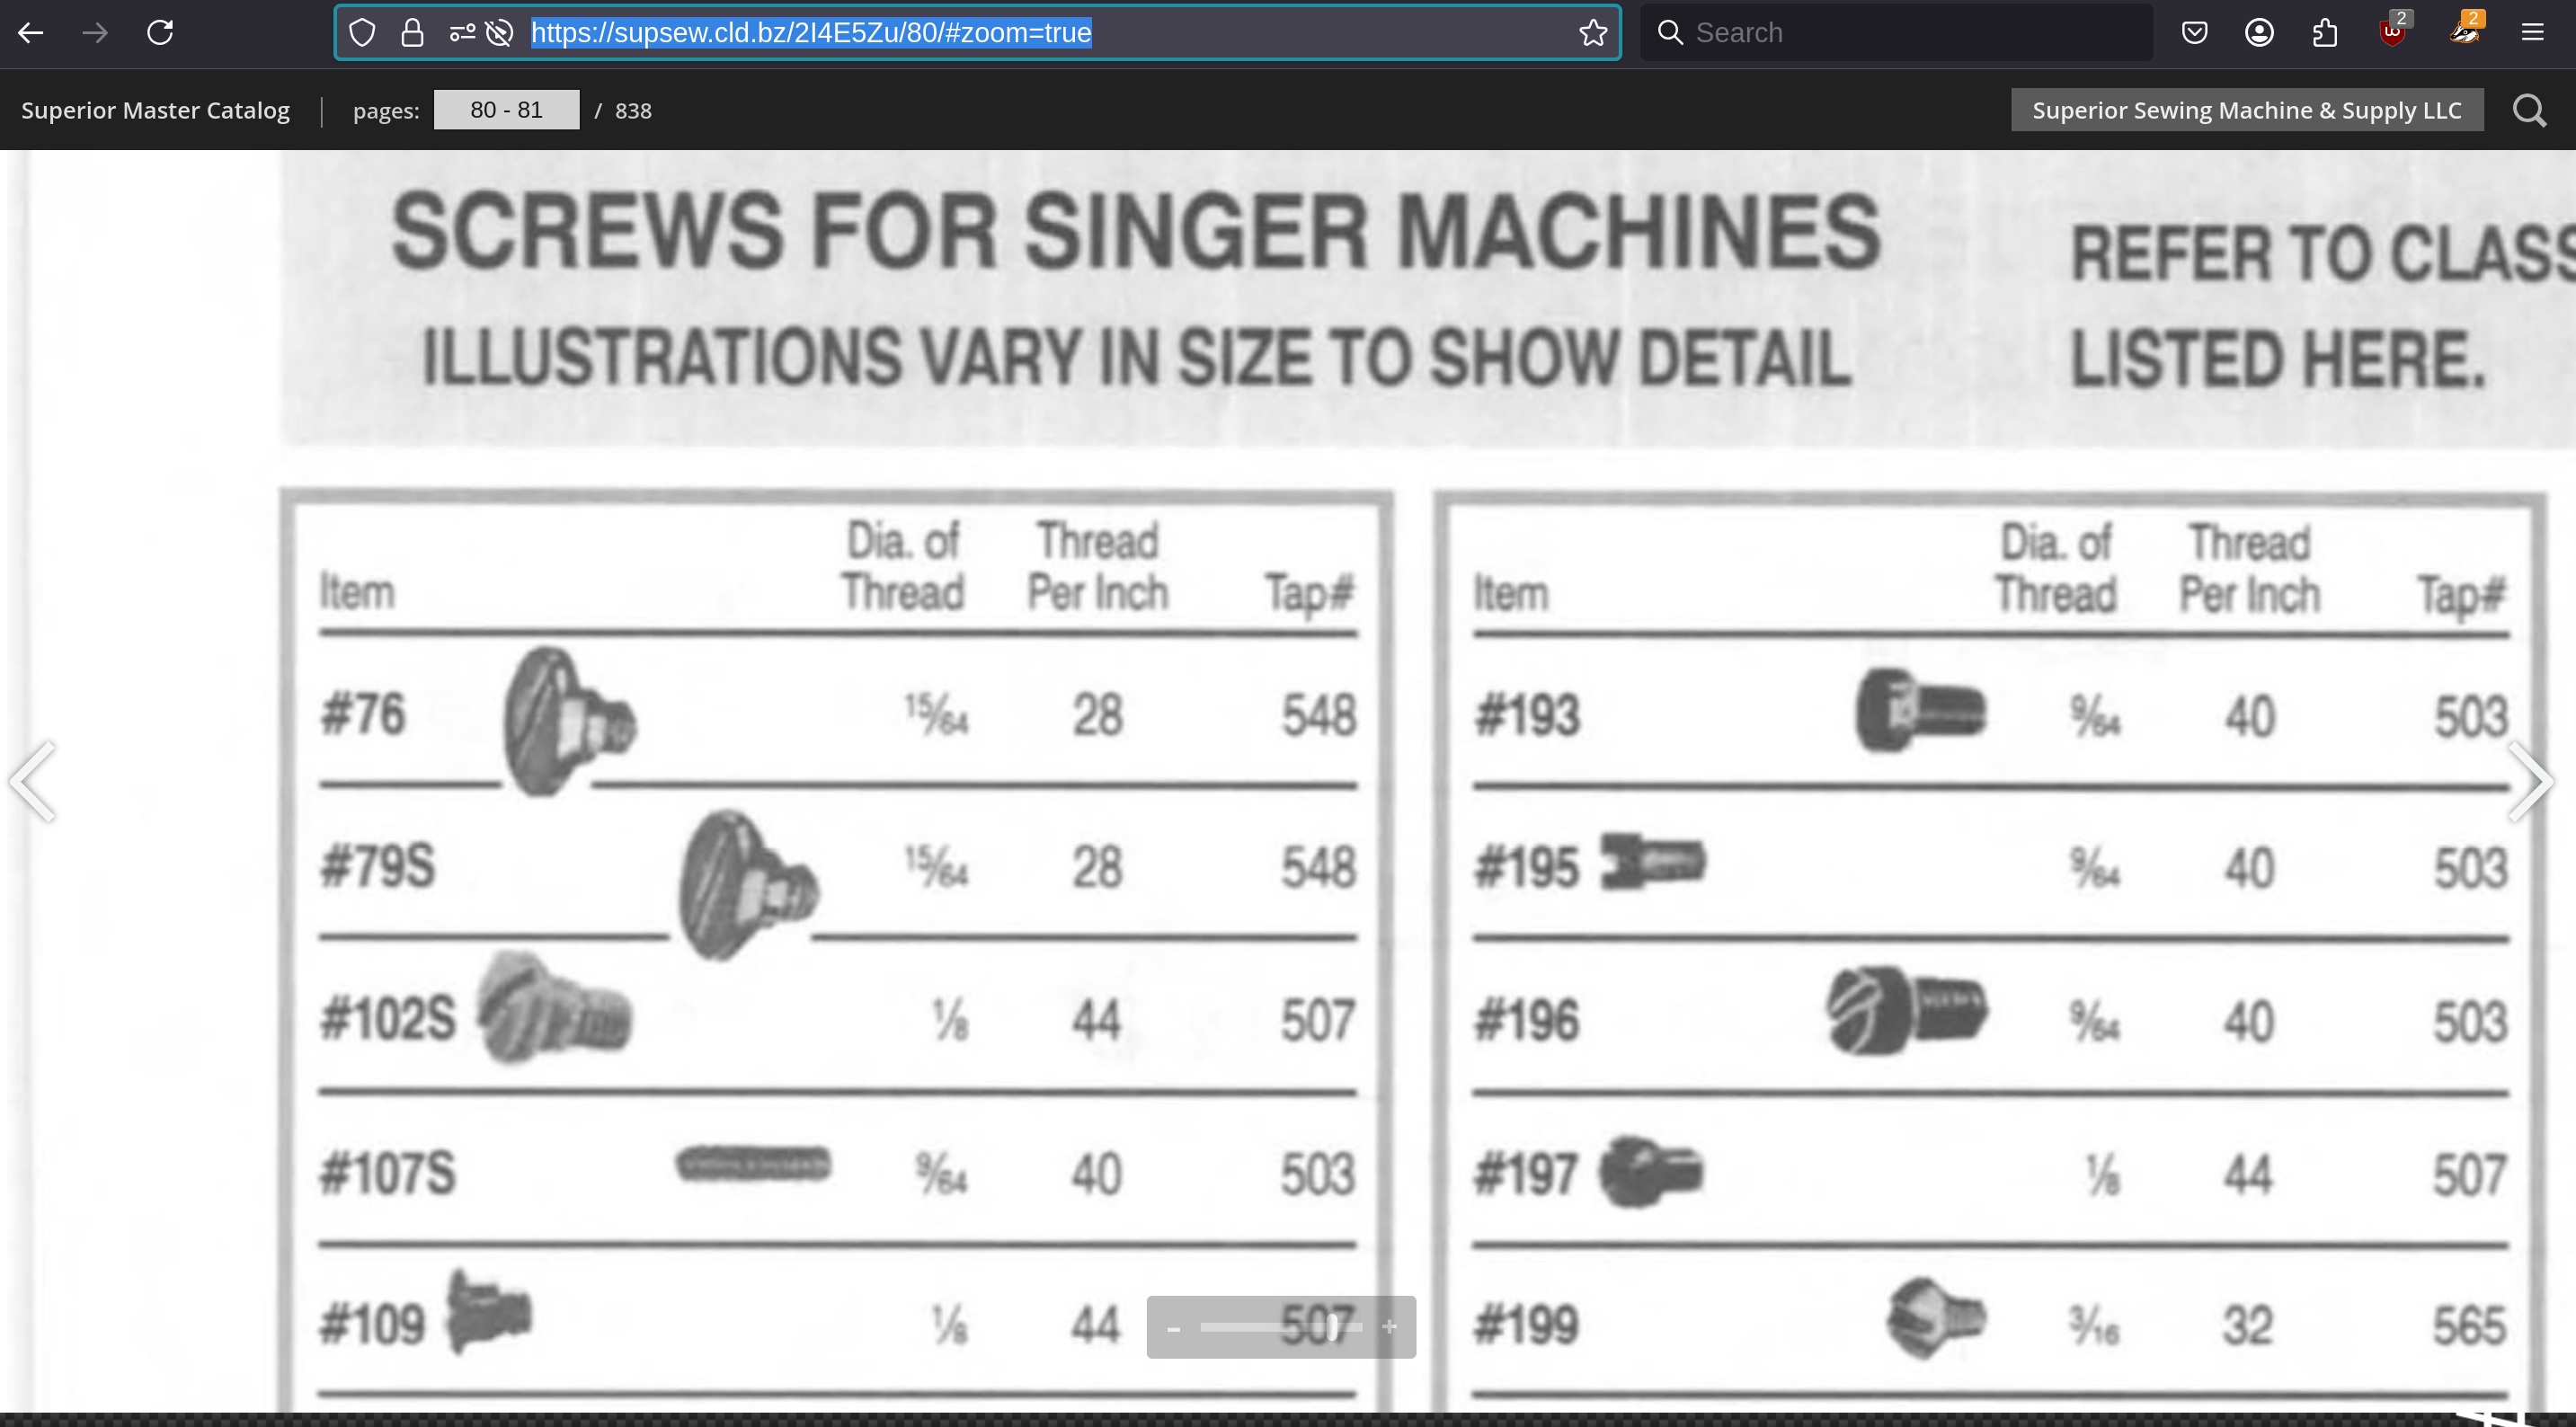
This looks promising! The section for screws starts on page 61. The sections for singer screws (page 80-) and union special screws (page 89-) are the most informative, as they tell you which tap is required.
-
Excellent reference, thank you. I suspected machinists would know things about this. Here is a link to a free copy of the book: https://www.tfgusa.com/wp-content/uploads/2023/11/Machinerys-Handbook.pdf Starting on page 1802 of the text, "Threads and Threading" introduces different thread systems. (There have been a few.) Page 1816 has a table of typical combinations in the american standard unified system. I think some slightly amended version of this system is still in common use today. It uses numbered sizes for anything smaller than 1/4". These numbered sizes mostly do NOT line up with 1/64" increments. Let's cross-referencing page 1816 with page 3 for details 1/16 is a little bigger than size 0 5/64 is in between sizes 1 and 2 3/32 is between size 2 and 3 7/65 is almost as big as size 4 1/8 matches size 5 exactly!! 9/64 is barely bigger than size 6 5/32 is in between sizes 6 and 8 11/64 is between sizes 8 and 10 3/16 is almost exactly size 10 13/64 is between sizes 10 and 12 7/32 is almost exactly size 12 15/64 is between size 12 and 1/4" Major Diameter of External Threads My main curiosity is how to interpret the measured major diameter and choose a nominal diameter from which to place an order. Let's look at an example from the book. Page 1818 The 1/4-28 UNF external (meaning screw thread, not nut thread) has a nominal diameter of 0.25" The least precision version (1A) has allowable major diameter 0.249" - 0.2392" This means the major diameter for the 1A series must be between 95.5% and 99.5% of the nominal diameter. From this I deduce that when I measure a major diameter to be X, I can look for a matching nominal diameter that is 1-4% bigger than X. I don't think I will always know which thread system the screws I'm searching for are from, either by my own ignorance or unavailability of data. But in general it makes sense that for a non-interference fit the screw major diameter has to be smaller than the accompanying nut major diameter. So I'll roll with the bolded deduction above until I find a more informed pathway.