
friquant
-
Posts
519 -
Joined
-
Last visited
Content Type
Profiles
Forums
Events
Blogs
Gallery
Store
Everything posted by friquant
-
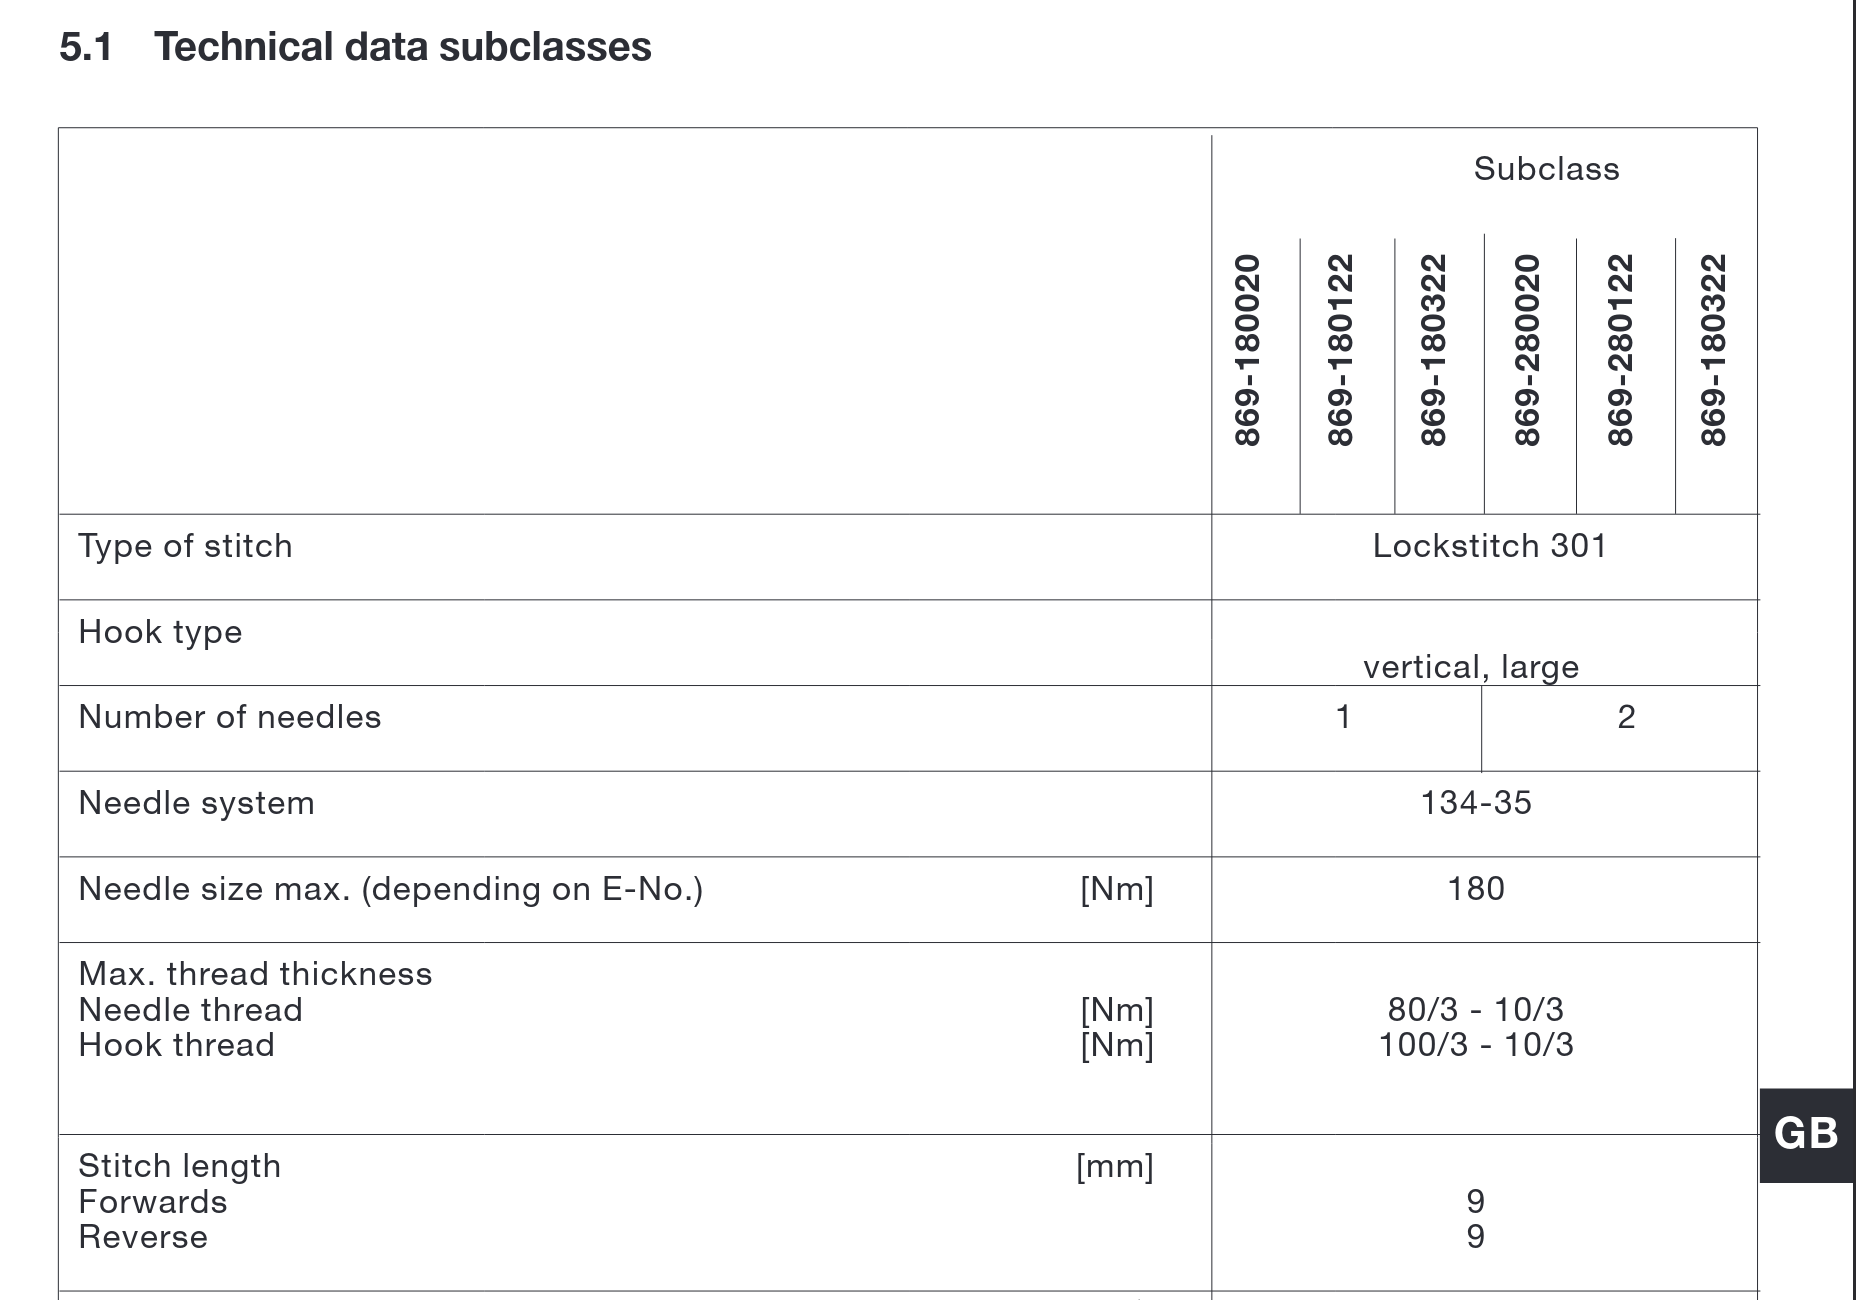
I'm not seeing reference to the "-M" part of the 869. Looking in this user manual: https://partner.duerkopp-adler.com/commons/download/public/869/B_869_DE_EN.pdf on page 89 (as viewed from the pdf reader), or page 9 (as viewed in print from the english section) it shows several subclasses and they are all specified with a max needle size of 180. Here is a screenshot: It also says "(depending on E-No.)" but I'm not seeing reference to "E-No" elsewhere in the manual. 🤷♀️
-
Looking forward to seeing pictures and videos of your solution! In the past I have 3d printed a motor pulley, but have not done the larger hand wheel pulleys. (My printer can print within a cube 180mm on a side) By the way, I took some of my inspiration from this slick item I found for sale on marketplace: https://www.facebook.com/marketplace/item/678066578496084/ That link will likely go stale soon so I'll post the pictures from the ad here for posterity.
-
Can you upload the user manual? That hopefully will show us how to set the start speed and the maximum speed. Also it may say what the absolute slowest the start speed can be set to. Once you know how slow the motor can go, you can do the math to figure out what pulleys will get you to your goal of 60 stitches per minute when the motor is at its slowest setting. As others have indicated, smaller motor pulley, larger handwheel pulley, and/or gear reducer in the middle are all options to get you to your goal speed. I also like what @nejcek74 said about a needle positioner giving you "as much time in between [stitches] as you want".
-
Hi jrdunn I suspect you are asking "Why power an industrial machine with a domestic motor?" I would say the benefits are: Portability. The motor attaches to the wooden skirt. Now you can pick up the whole machine, skirt, and motor and move it to another place in the house. I could even give the whole thing away as a gift (machine + skirt + motor) and someone could haul it home in the passenger seat of their car. Cost. I paid $20 for the motor and $20 for the pedal. I got the wood for free. I had some PU belt left over from a previous project. Driveability. My girlfriend doesn't stress when driving this machine. Unconventional. Or you might be asking, "Why gear down an industrial machine?" but the answer to that has been gone over LOTS of times so I'll bet you're not asking that. I think it is an obvious boon. 😉 Or you might be asking "Why use plywood and a PU belt as your means of gear reduction"? To that I would say both can be cut to the size you need. Meaning "choose your own gear reduction" and if you don't like it, choose again! (Compare this with the limited choices that you can find pre-built.) Also note that this gear reduction uses a single belt instead of two. Or maybe you're curious how it feels to tug on a plywhood hand wheel? It's actually quite nice. The stock handwheel is spoked and I used to have a reminder taped on the machine "Keep your fingers OUT of the handwheel" for safety. That is no longer an issue.
-
I do not know specifically. In general, the size of hole in the throat plate / feed dog / center toe seems to be a compromise. Larger means you can accommodate bigger needles and bigger thread without it binding there. I can't say exactly what the downside is. Maybe larger means when you stitch thin goods with a skinny needle, they get sucked down into the hole??
-
What other working sewing machines do you have in your shop?
-
@DarkHorseFarm As a starting point you could check what motor (how much horsepower) and what gear reduction (4:1, 5:1, 10:1) is being offered by the folks at Campbell.
-
My girlfriend says I can get a reduced sentence if I paint the pulley 😀
-
One curse of the 7x3 needle system is they are so long. This means they will flex more when using narrow sizes like the 140Nm you mentioned. The needles are also more expensive, and available from fewer sources.
-
Does the grinding sound happen when you turn the hand wheel by hand? What if you separate the bevel gears slightly? Uwe said in a video once that if you don't match up the teeth when you move a hook saddle the gears will be loud. To me yours sounds more like a grind than I would expect from gear teeth bedding in on new neighbors.
-
You may be able to gear down your Singer 66k. I did this by screwing a 245mm machine pulley to the existing handwheel of my Singer 31-15. Here is my post about it, with video showing slow-ish stitching. You would probably need to reposition your motor to make room for the oversize pulley.
-
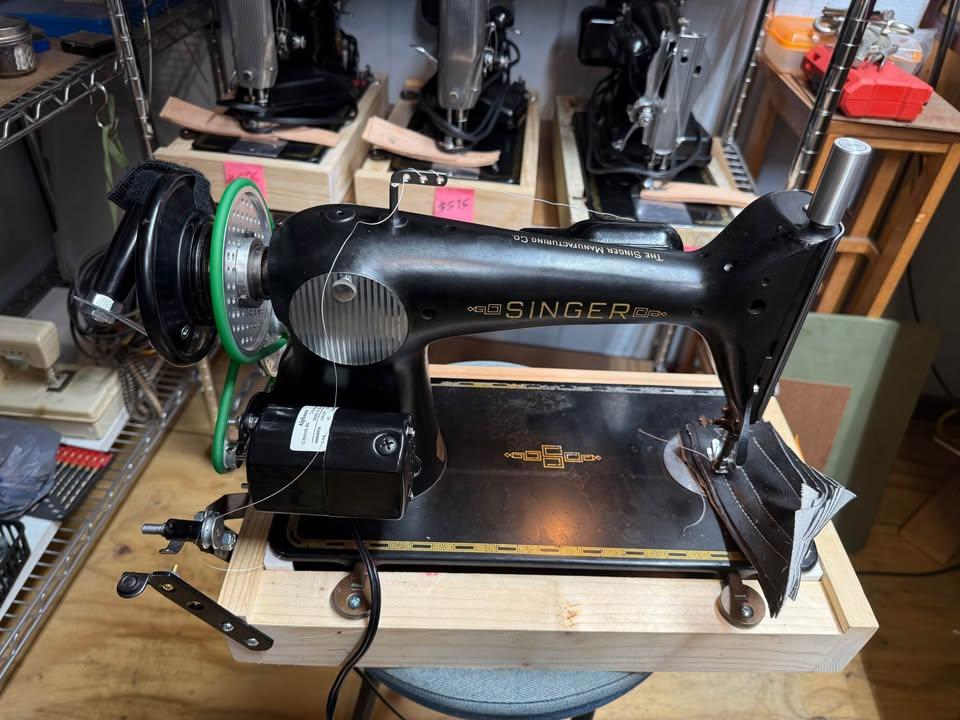
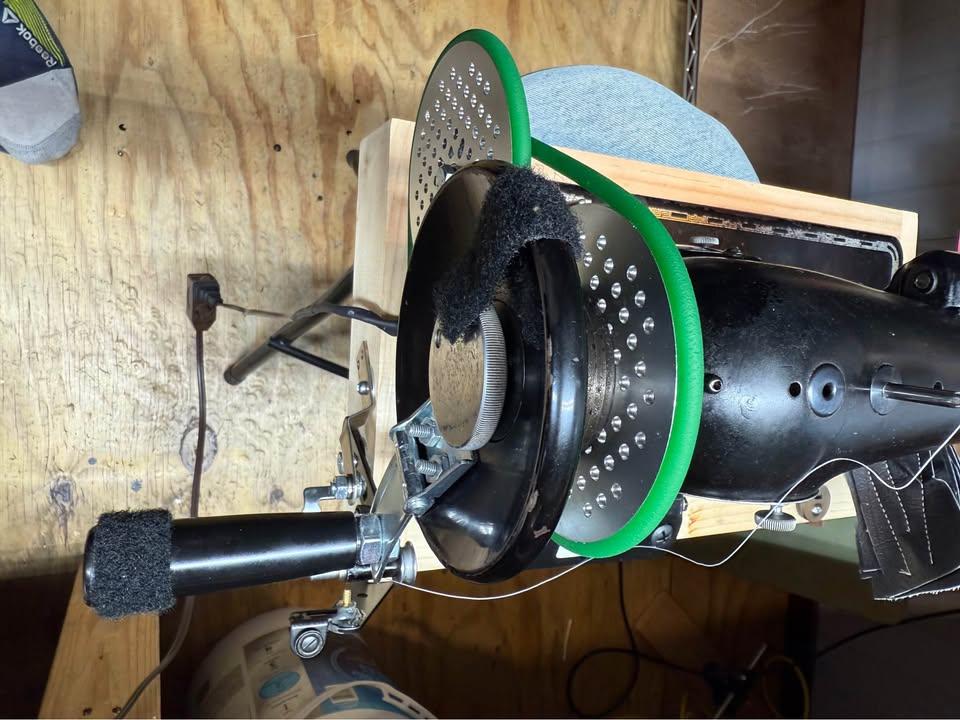
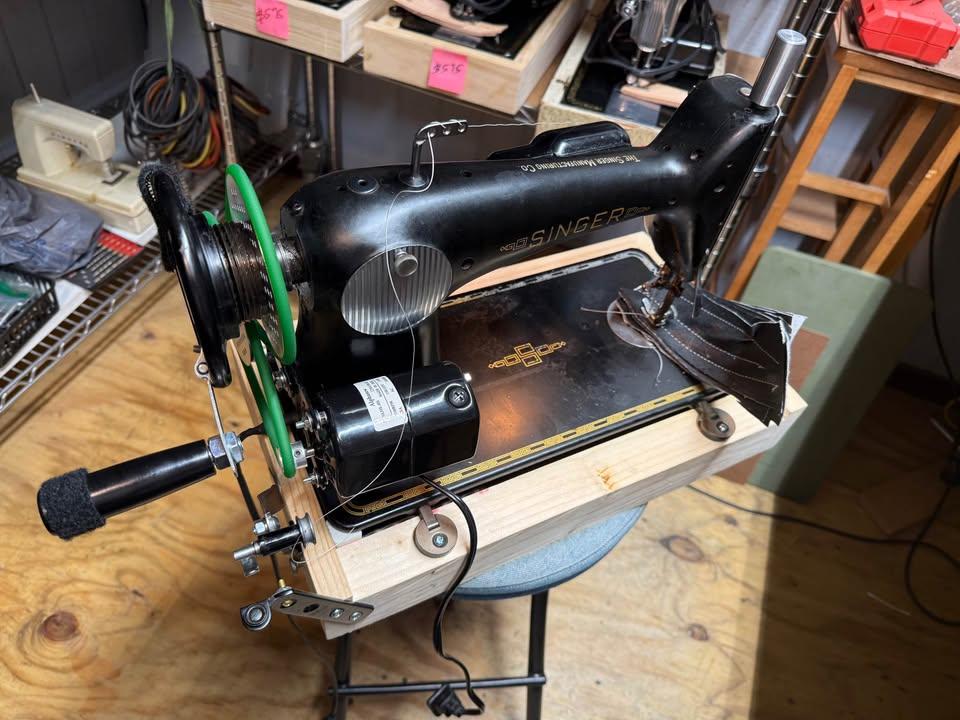
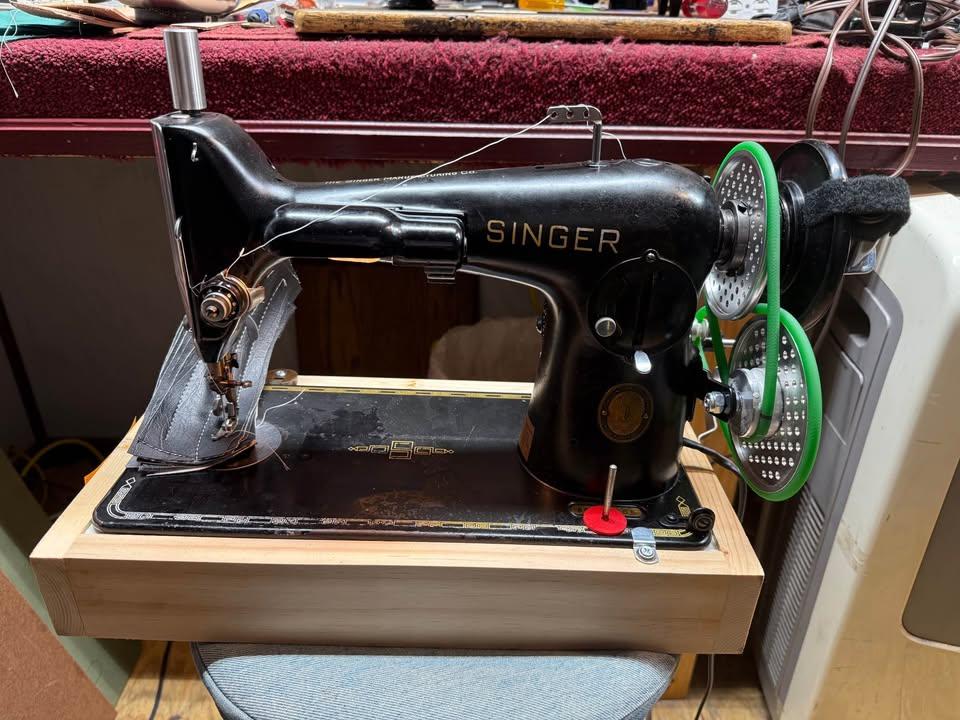
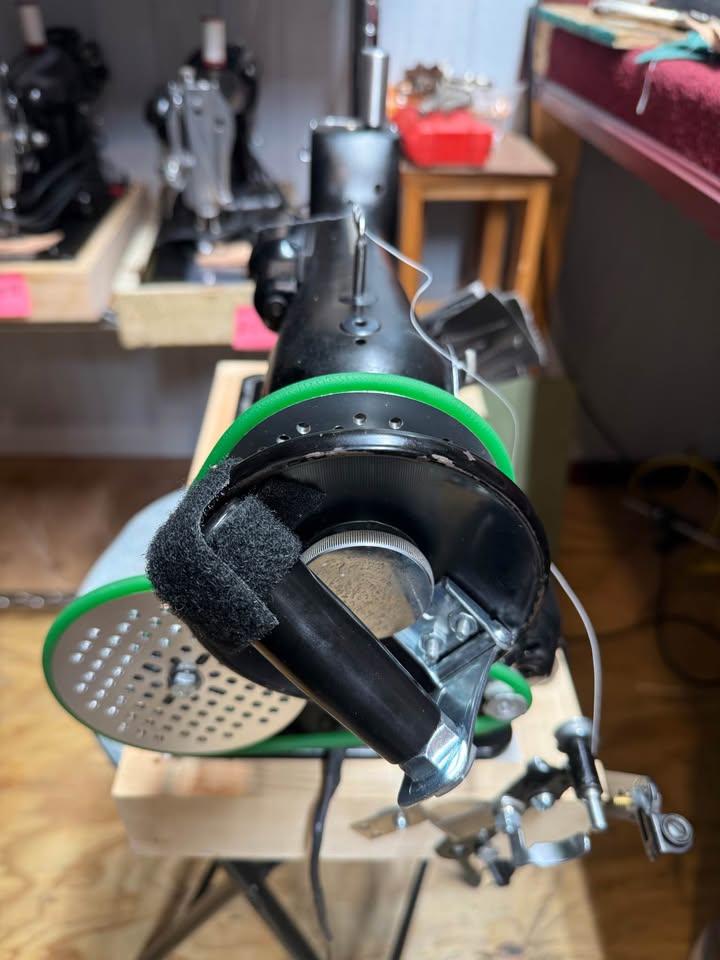
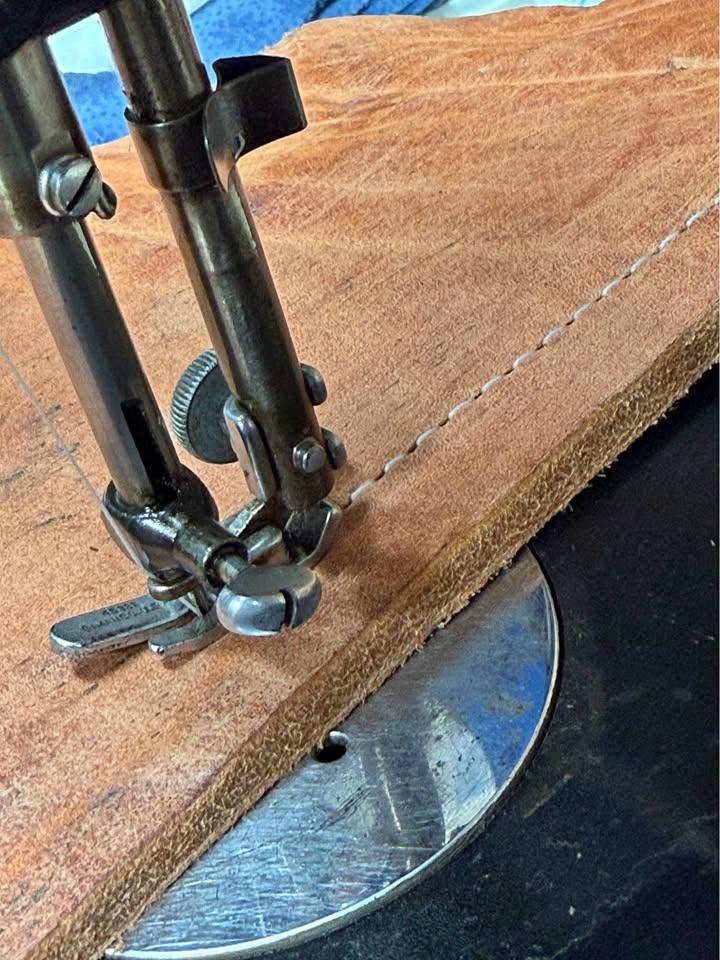
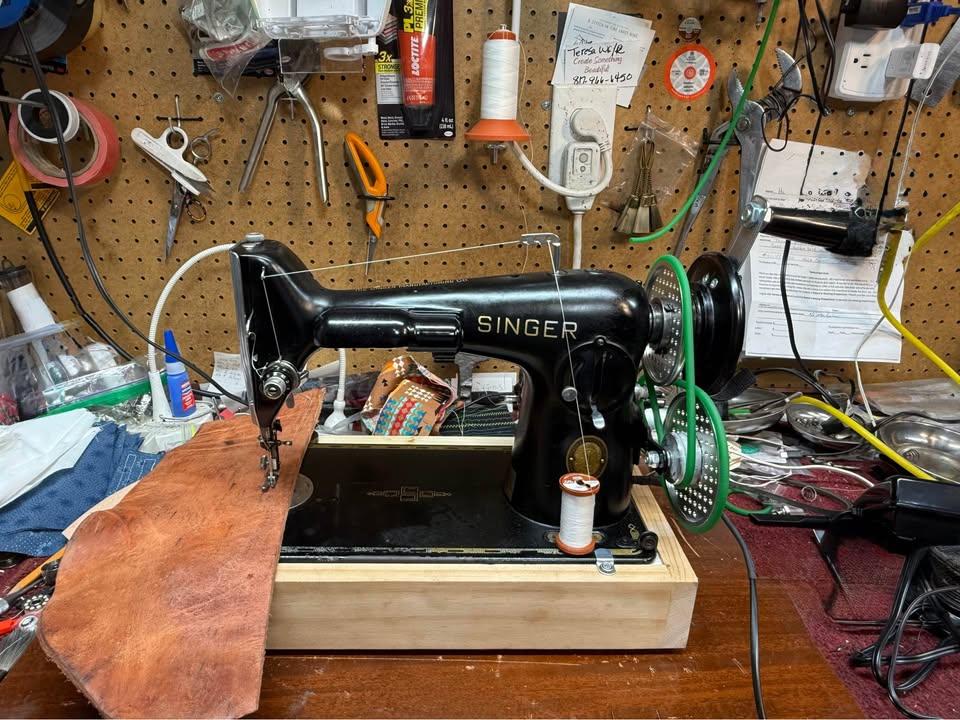
@Darren Brosowski once told me you could put a domestic sewing machine motor on an industrial sewing machine, as long as it was not a walking foot. Here is my riff on that. Singer 31-15 245mm plywood machine pulley 1-amp, 7000rpm universal motor PU belt Several wood screws were used to hold the plywood to the hand wheel. My inner diameter was cut a little too big, so the position and concentricity of the plywood is determined by which wood screws are screwed in more---the ones on this side vs the other. A round-tipped grinding tool was used to put a groove in the pulley for the belt to rest in. The groove is 0.5mm at its shallowest, 1.3mm at its deepest. (Crude tools, crude tolerances 🤷♀️) But it's enough to keep the belt in place. You'll notice a graphite circle etched onto the left side...that was made after the first assembly by spinning the machine with the motor and holding a pencil steady against the wood. From that I was able to determine which direction to shift the plywood to get it better centered. It's easier to drive at low speeds once it's well-centered. I'm using this 7000 rpm, 1-amp universal motor: https://www.amazon.com/dp/B0DYSNR32D The motor came with a pedal but I didn't like the pedal so I bought this one instead: https://www.amazon.com/dp/B08D8WPWTY The stock handwheel measures 66mm diameter, and top speed was measured at 980 stitches per minute in that configuration. After adding the 245mm plywood pulley, the top speed now clocks at 620 stitches per minute. I expected more speed reduction. My running hypothesis is that with the stock gearing it was too much load for the 1-amp motor to spin at its full speed. And here's a video.


-
 Awesome!
 -
I second Wiz' suggestion to turn the handwheel by hand for infestigation. If you can't isolate the cause, remove the timing belt. Then you can move the hand wheel (and arm shaft and needle bar) independently of the hook shaft. Also check if there is anything else contacting the face of those bevel/timing gears. On my Jianglong 341, the first time I moved the hook saddle to the left (to adjust hook to needle distance) left me with the bevel gears to rubbing on the feed dog eccentric. Once I also moved the feed dog eccentric to the left a bit, it was happy again.
-
What do you think of the Mitsubishi DU-105?
friquant replied to Zonker62's topic in Leather Sewing Machines
Show us your bobbin orientation. The thread will come out of the slit if you load the bobbin backwards. -
This gooseneck may be a good replacement: https://www.amazon.com/dp/B014LR1BEQ You can put whatever bulb you want in it. I've been using these, but are NOT bright enough: https://www.amazon.com/Machine-Magnetic-Flexible-Silicone-Workbench/dp/B0FJ7KW154
-
Will this work for a singer 111w154 ?
friquant replied to outaluck's topic in Leather Sewing Machines
Plug this one into the wall, and see how fast the pulley moves at its slowest setting. You can put a piece of tape on the pulley so you can count revolutions as you time it with a stopwatch. That will inform the slowness this one is capable of. By the way, how fast is your old motor? -
Cardboard is awesome. Here are some more exercises. Have fun! Draw an arbitrary shape on the cardboard and pretend it's your lawn. Drive within it in a "lawnmower" pattern, keeping your spacing even from the previous layer. Cut two rectangles of cardboard, and stitch them together about 1/2 inch from the edge Cut two rectangles of cardboard. Then change the edge on one piece so it's gently convex. Stitch the straight piece and the convex piece together about 1/2 inch from the edge. (This will make a 3-D shape) Same as #3 but with two convex pieces Same as #3 but with one convex, one concave Make a simple knife sheath from a single folded piece of cardboard. Make the curves as tidy as you can Do a straight run of stitches. Then go in reverse following the same line.
-
-
You may want to figure out where you are expected to oil that shaft 😉
-
I don't know why they are typically wider on the left. Somewhere I read that "the softer the material, the bigger you want your foot to be". Grinding down would make your footprint smaller. As long as you are not concerned about sinking too far I don't see a problem. I actually do a fair amount of my stitching with a zipper foot, even when I'm not sewing zippers. (A zipper foot would be like grinding one entire side off)
-
Are either of these machines any good?
friquant replied to timstips's topic in Leather Sewing Machines
Don't buy these. You will want a triple feed machine. (May take some internet browsing to learn to identify triple feed) The singer in the photo appears to be a bottom-feed lockstitch machine. (Bottom-feed won't feed sticky materials) The Lewis is not a lockstitch machine at all. Maybe a blind hemmer? -
Replacement Pulley for Tapered Shaft
friquant replied to friquant's topic in Leather Sewing Machines
Genius! -
Head unit only?
-
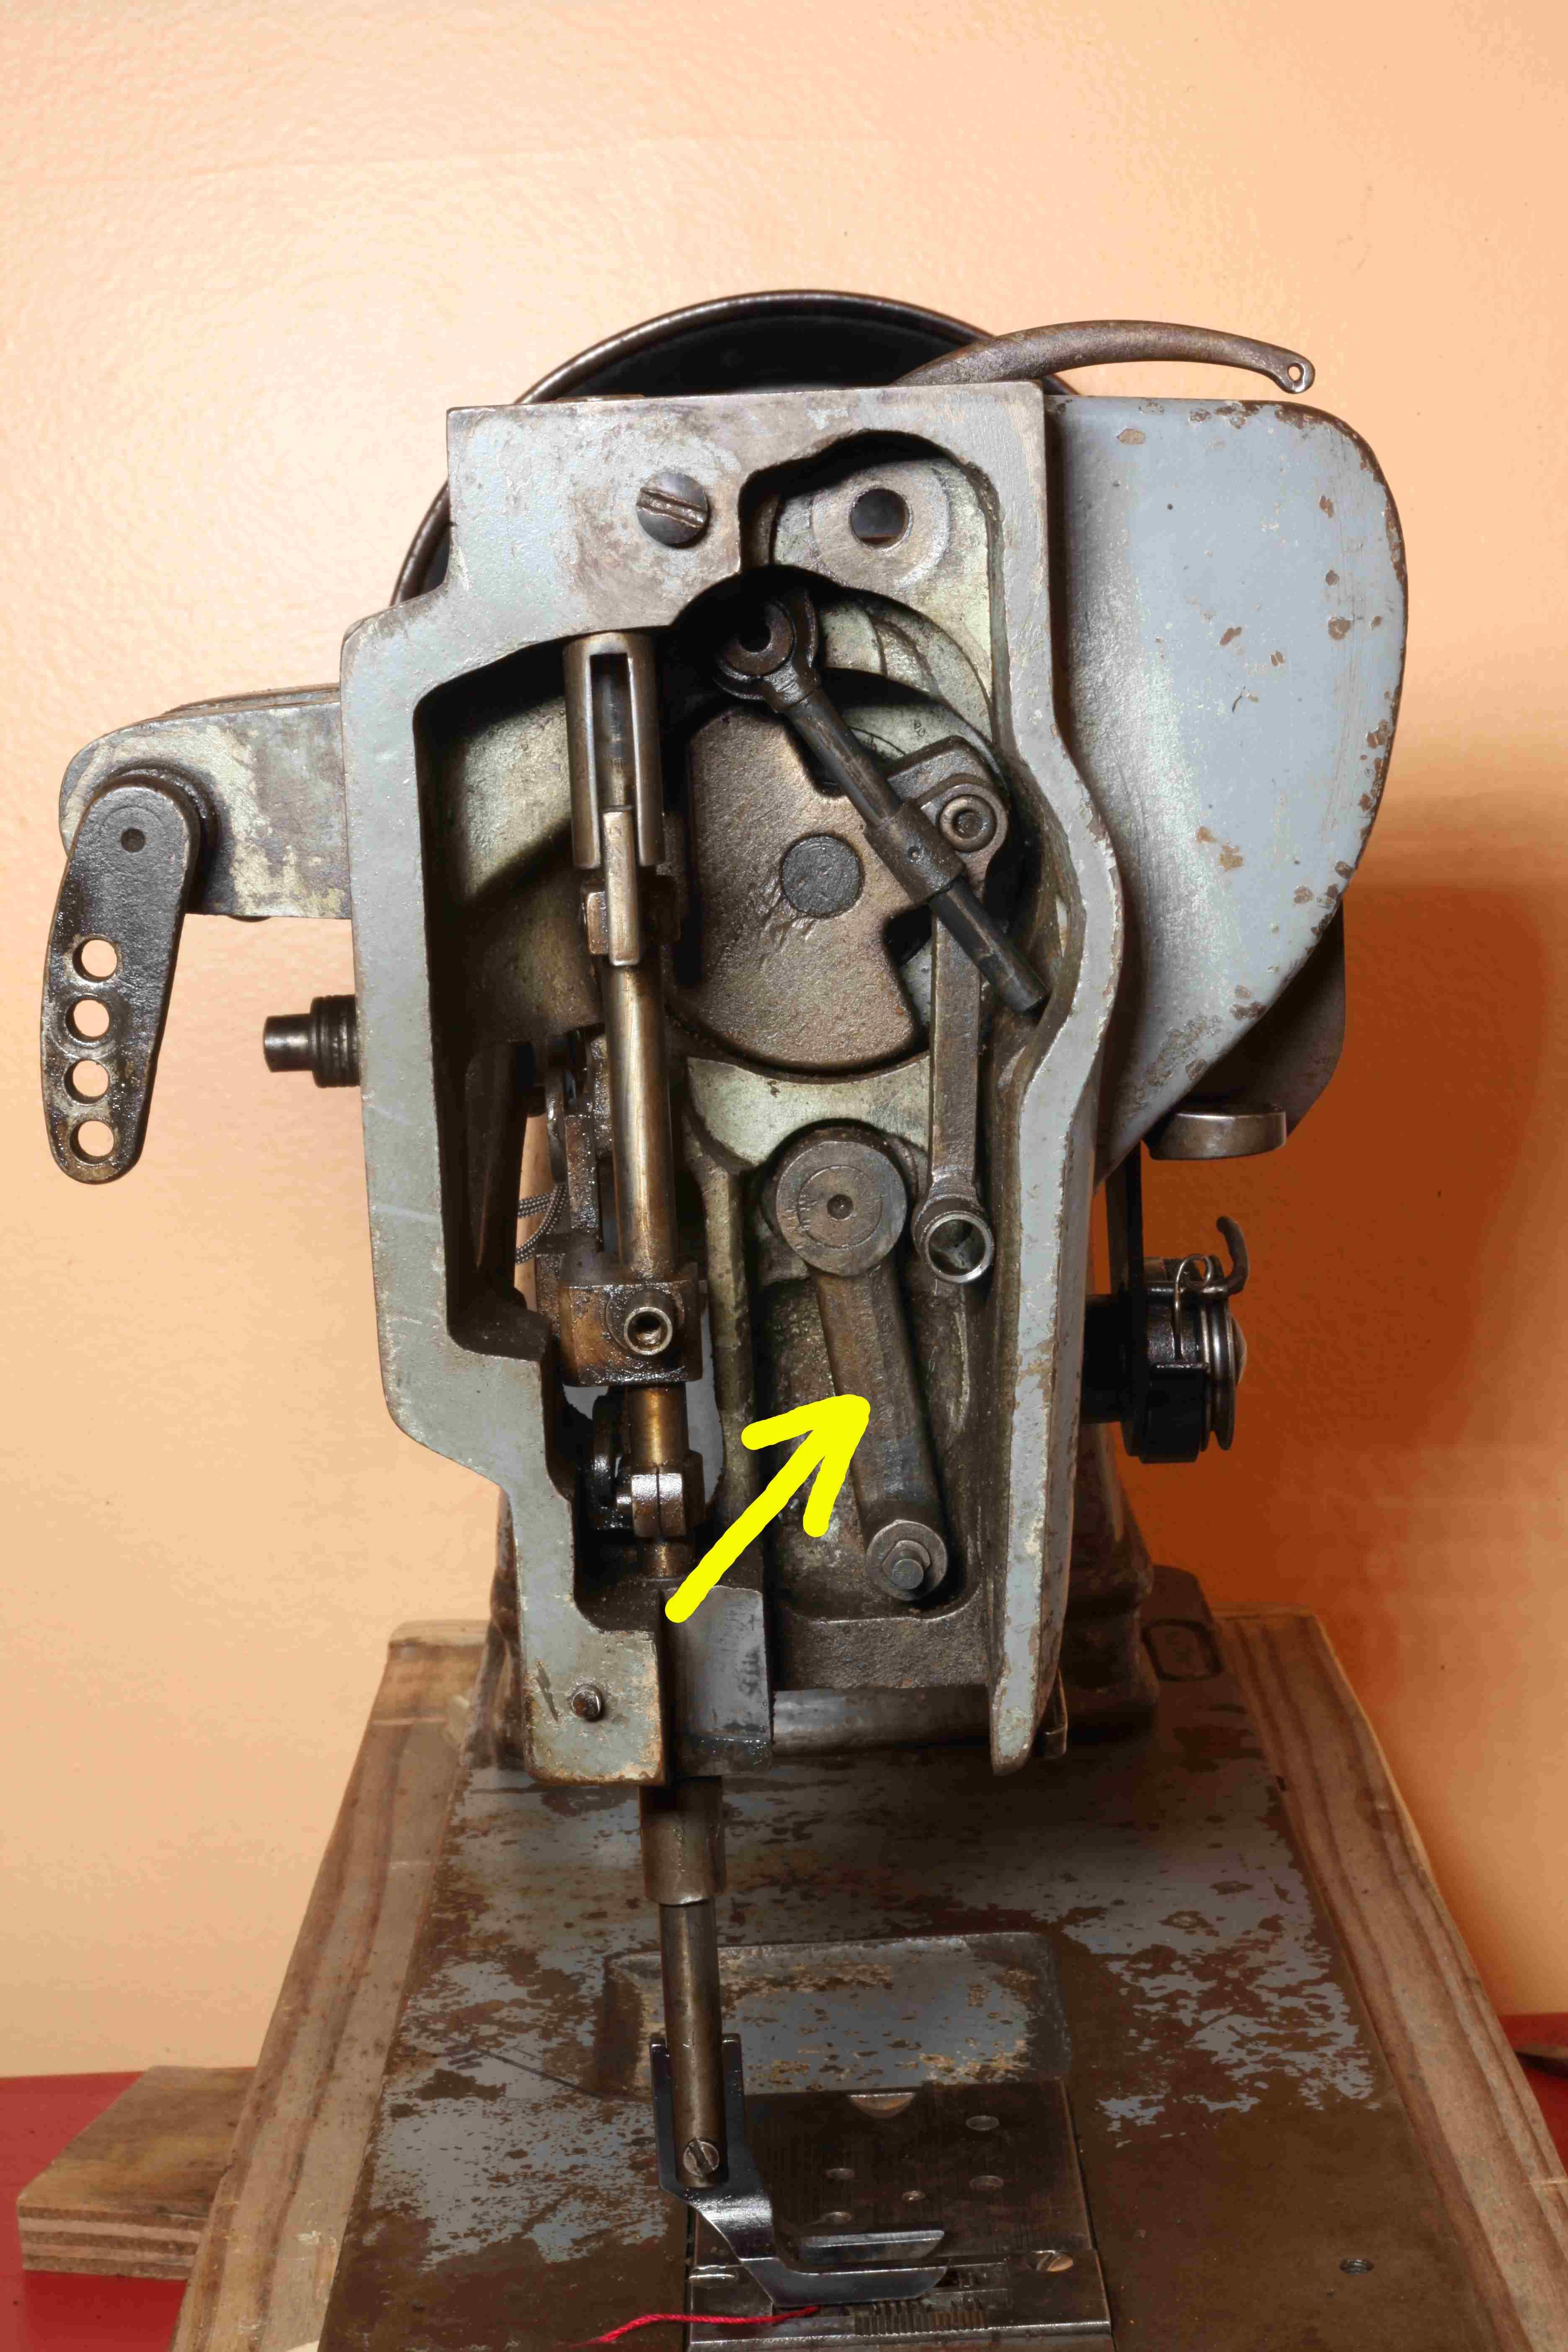
Is the handwheel easy to turn? Have you oiled the machine? (Do add some oil if not) Does the needle bar move front to back if you push it with your hands? You will need to find the clamp that Wyowally references and verify that it is indeed moving the "needle bar rock frame rock shaft" as singer calls it. We are looking for the clamp at the far right end of that shaft. If the clamp is loose, tighten it. Make sure the clamp and the rock shaft both move together when you turn the handwheel. If neither the shaft nor the clamp move when you turn the handwheel, flip the machine on its back and inspect the parts underneath that drive that clamp. If the shaft does move but still no movement at the needle bar, take the left end cover off the machine and find the crank arm at the left end of that shaft. Here's a photo of my singer 144W103 with the needle bar rock frame removed, and the yellow arrow points to the crank arm you want to check for movement.